
How to Remove Arrow Nocks
Arrow nocks are the small plastic or metal piece at the back of the arrow that you insert into the string. Over time, these nocks can become worn out and need to be replaced. Here’s how to remove arrow nocks:
1. Start by loosening the bowstring. This will make it easier to work with the arrows.
2. Use a pair of pliers to grip the base of the nock.
Gently twist and pull the nock off of the shaft. If it’s stubborn, you may need to use a bit more force. Just be careful not to damage the arrow shaft in the process.
3. Once the old nock is off, clean up any residue on the shaft with a cloth or alcohol swab. This will help prepare it for the new nock installation.
- To remove an arrow nock, start by unscrewing the bolts that hold it in place
- Once the bolts are removed, the nock should come right out
- If it’s stuck, gently tap it with a hammer until it comes loose
- To install a new nock, simply reverse the process
- Start by screwing in the new nock’s bolts, then gently tapping it into place until it’s flush with the rest of the arrow shaft
How To Remove and Replace Arrow Nock
How to Remove Glued Nocks from Carbon Arrows
If you’re a bow hunter, sooner or later you’re going to have to replace the nocks on your carbon arrows. And if you’re not careful, you can end up with a real mess on your hands. Here’s how to remove glued nocks from carbon arrows without damaging the shafts.
First, start by heating the area around the nock with a hair dryer. This will help loosen the glue. Next, use a pair of needle nose pliers to gently pull the nock off the shaft.
If it’s really stuck on there, you may need to use a razor blade to carefully cut through the glue.
Once the nock is off, clean up any remaining adhesive with acetone or alcohol. Then apply a generous amount of fresh glue to the shaft and slide on the new nock.
Hold it in place for a few seconds until the glue sets, and you’re good to go!
How to Remove Nocks from Crossbow Bolts
Removing nocks from crossbow bolts is a simple process that can be done with a few household tools. The first step is to remove the string from the crossbow. Next, using a pair of pliers, carefully twist and pull the nock off of the bolt.
If the nock is stubborn, you may need to use a sharp knife to gently pry it off. Once the nock is removed, you can re-string your crossbow and enjoy shooting again!
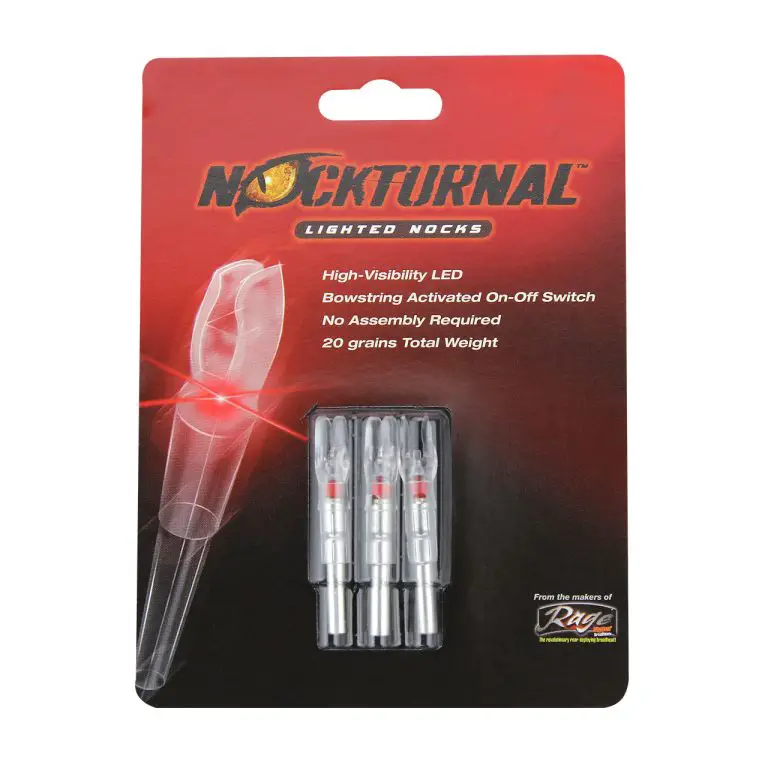
Arrow Nock Removal Tool
If you’ve ever had to remove an arrow nock from your bow, you know it can be a real pain. The Arrow Nock Removal Tool is a handy tool that makes removing arrow nocks quick and easy. Simply place the tool over the nock and turn it counter-clockwise to loosen and remove the nock.
The Arrow Nock Removal Tool is made of durable stainless steel and is small enough to fit in your pocket, so you can take it with you wherever you go.
How to Remove Easton Arrow Nocks
If you’re an archer, at some point you’ll need to remove the nock from your arrow. Whether you’re changing out a damaged nock or simply want to switch to a different style, removing the nock is a relatively simple process. Here’s how to do it:
First, remove the arrow from the bow. Then, using a pair of pliers, grip the nock and twist it counterclockwise until it comes loose. If the nock is particularly tight, you may need to use a little bit of force.
Once the nock is loose, pull it off the end of the arrow.
To install a new nock, simply reverse the process. Grip the new nock with your pliers and twist it clockwise until it’s snug against the end of the arrow shaft.
That’s all there is to it!
How to Remove Alpha Nock Insert
If you’re like most archers, you’ve probably had to deal with a stuck alpha nock insert at some point. Here’s a quick and easy guide on how to remove them:
1. Use a pair of needle-nose pliers or tweezers to grab the end of the insert that’s sticking out.
2. Gently pull on the insert until it pops out. If it’s really stubborn, you may need to use a little bit of force. Just be careful not to break the insert in half!
3. Once the insert is out, inspect it for any damage. If it looks okay, you can re-install it by following the same steps in reverse. If it’s damaged, however, you’ll need to replace it with a new one before shooting again.
How to Remove Gold Tip Nock Bushing
If you have a gold tip nock bushing that needs to be removed, there are a few things that you will need in order to do so. First, you will need a set of small needle nose pliers. Second, you will need a set of tweezers.
Lastly, you will need a small flat head screwdriver. With these tools in hand, follow the steps below to remove your gold tip nock bushing.
1) Begin by using the needle nose pliers to grip the base of the bushing.
2) Next, use the tweezers to grip the top of the bushing.
3) Gently pull on the tweezers while simultaneously pushing down on the base of the bushing with the needle nose pliers. This should cause the bushing to pop out of its housing.
4) If necessary, use the small flat head screwdriver to pry out any remaining pieces of the bushing from its housing.
How to Remove Glued in Nocks
Removing glued in nocks can be a difficult and frustrating process, especially if you don’t know the proper techniques. There are a few different ways that you can go about removing these pesky nocks, but we’ll focus on the two most common methods.
The first method is to use a utility knife or other sharp object to pry the nock out of the shaft.
Start by inserting the blade of the knife under the lip of the nock and gently prying up. You may need to wiggle the blade back and forth a bit to loosen the glue’s grip. Once you’ve got enough of an opening, you can slip a flathead screwdriver or similar tool in and finish popping the nock out.
The second method is similar, but instead of using a knife, you’ll need a pair of needle-nose pliers. Again, start by slipping the tips of the pliers under the lip of the nock and gently prying up. Once you’ve got enough of an opening, twist the pliers slightly and pull upwards on them until the nock pops free.
Whichever method you choose, be patient and take your time – rushing will only make things worse. With a little bit of elbow grease (and maybe some choice words), you should be able to get those glued in nocks out in no time!
Replacement Nocks for Arrows
If you’re an archer, then you know that having well-made and maintained equipment is essential for successful shooting. That’s why it’s important to know how to replace the nocks on your arrows. Nocks are the small plastic or metal pieces that fit onto the ends of your arrows and provide a place for the string to rest when you’re ready to shoot.
Over time, nocks can become damaged or worn out, so it’s important to be able to replace them as needed. Here’s a quick guide on how to do just that:
1) Start by removing the old nock from the arrow shaft.
You can do this by gently pushing it off with your finger, or using a small pair of pliers if it’s stubborn.
2) Once the old nock is removed, clean up the end of the arrow shaft with a rag or some sandpaper. This will help ensure that the new nock will fit snugly and securely in place.
3) Take your new nock and insert it onto the end of the arrow shaft. Again, you can use your fingers or pliers to help get it started if needed. Just be careful not to damage either piece in the process.
4) Once the new nock is in place, give it a few taps with a hammer (if necessary) until it feels snug and tight against the arrow shaft. You don’t want it too loose, as that could cause problems when shooting later on down the line.
5) And that’s all there is to replacing a broken or damaged nock!
With just a few simple steps, you’ll have your arrows back in action in no time at all.

Credit: www.amazon.de
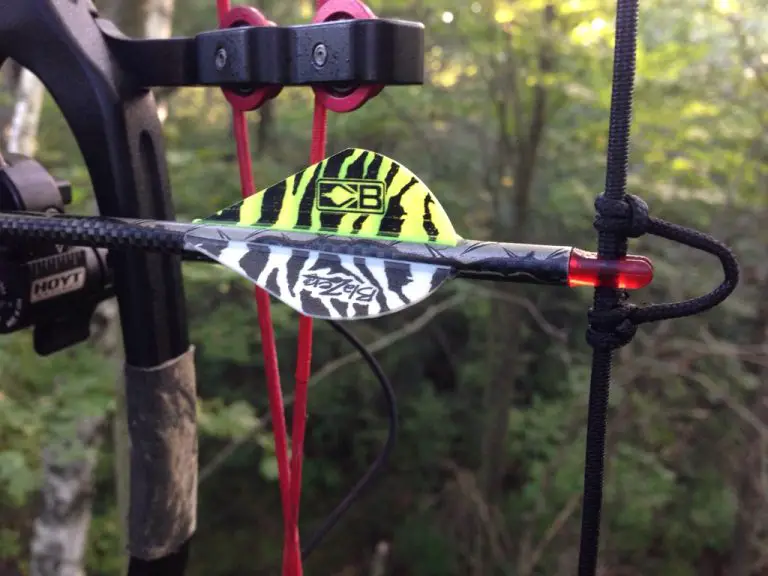
Are Arrow Nocks Glued In?
Most arrow nocks are glued in, although some may be held in place with set screws. The adhesive used to glue in the nocks is typically a cyanoacrylate adhesive, which forms a very strong bond. Once the nock is glued in place, it can be difficult to remove without damaging the shaft of the arrow.
How Do You Remove Easton Arrows from Nocks?
If you’re using Easton arrows with nocks, you’ll need to remove the nocks in order to change out the arrows. Here’s a step-by-step guide on how to do so:
1.Using a pair of needle nose pliers, grip the nock at the base and twist gently until it pops off.
2. If the nock is stuck, try heating it up with a lighter before attempting to remove it again.
3. Once the nock is removed, slide on a new one and repeat the process in reverse to reattach it.
How Do You Remove a Broken Nock from a Carbon Arrow?
If you find yourself in a situation where you need to remove a broken nock from a carbon arrow, there are a few things you can do. With the right tools and some patience, you should be able to get the job done without too much trouble.
First, start by removing the arrow from the bow.
If the nock is still attached to the string, cut it off as close to the nock as possible. Next, use a pair of pliers to grab onto the back of the nock and twist it until it comes free from the shaft. If the nock is stuck on tight, you may need to use a small drill bit or rotary tool to create a starter hole for the pliers.
Once the nock is removed, inspect the inside of the shaft for any damage. If there are any cracks or splinters, you’ll need to repair them before shooting again. Once everything looks good, go ahead and install a new nock and you’ll be ready to shoot once again!
How Do You Remove a Nock Insert?
Removing a nock insert can be done in a few different ways depending on the type of nock insert. If it is a press-fit nock insert, then you can use a punch or other similar tool to remove it by pressing on the center of the nock until it pops out. For an interference-fit nock insert, you will need to heat up the area around the base of the nock with a soldering iron or heat gun until it is hot enough to expand the plastic and release the fit.
You can then carefully pull out the nock insert.
Conclusion
In conclusion, if you need to remove an arrow nock from your bow, there are a few easy steps you can follow. First, use a pair of needle-nose pliers to grip the nock. Then, twist the nock counter-clockwise until it loosens and comes off.
Finally, inspect the inside of the nock for any damage or debris before reattaching a new one. With these simple tips in mind, you’ll be back to shooting arrows in no time!