Building your own archery range is a fantastic hobby, but it can be tricky for beginners to protect their surroundings. One of the biggest challenges is setting up an effective backstop to catch errant arrows. Finding quality equipment can quickly become expensive, so starting with a budget-friendly option like DIY Archery Backstop Netting: Affordable Option is a great idea. Don’t worry, this doesn’t have to be hard! We’ll explore a straightforward way to create your own backstop. Ready to get started?
Choosing Materials for Your Archery Backstop
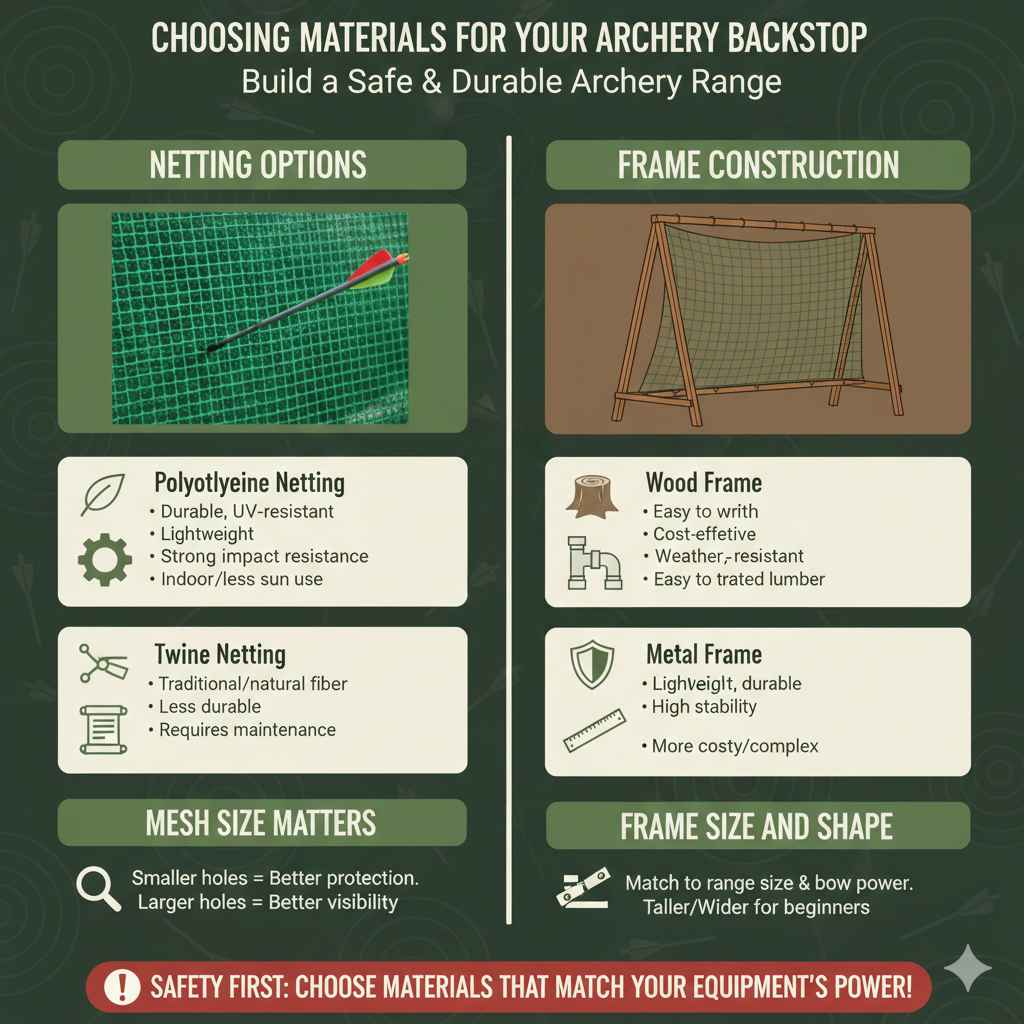
The first step in building your own archery backstop is picking out the right materials. This will determine the effectiveness and longevity of your setup. The choices you make directly impact how well your backstop stops arrows and how long it lasts. Making good choices upfront will save you time and money in the long run. Let’s explore the key components.
Netting Options and Considerations
The type of netting is the most important element of your backstop. You want something strong enough to stop arrows but not so rigid that it damages your arrows. Many materials are available, each with their pros and cons. Some are better for stopping arrows than others, and the lifespan of the netting can vary widely. Think about how often you will be shooting and the power of your bow when making your selection. This will assist you to select the appropriate type of netting.
Polyethylene Netting: This is a popular choice due to its durability and resistance to UV rays. It is also relatively lightweight and comes in various mesh sizes. This type of netting can withstand harsh weather and is a solid choice for outdoor ranges. It’s often used commercially because of its longevity.
Polyethylene netting is a synthetic material known for its strength and flexibility. It is made from long chains of polyethylene molecules. The specific weave and thickness of the netting determine its ability to absorb the impact of arrows. The mesh size is also a key factor; tighter meshes are better at stopping arrows, but they can also add to the cost and decrease visibility.
Nylon Netting: Nylon is another strong option, offering excellent impact resistance. However, it’s more susceptible to UV damage and can degrade faster outdoors. It’s often used indoors or in areas with less direct sunlight.
Nylon netting, similar to polyethylene, is a synthetic fiber. Unlike polyethylene, it tends to absorb more moisture and may stretch more over time. The elasticity of nylon can be beneficial in absorbing arrow impact, but it might require more frequent maintenance or
Twine Netting: This is a more traditional choice, often made from natural fibers like hemp or jute. It is generally less durable than synthetic options and can be affected by weather. It may also require more maintenance and is more prone to breaking over time.
Twine netting, created by twisting natural fibers, offers a classic appearance and can be a good option for a rustic archery range. Because natural fibers break down more easily, they may have a shorter lifespan. It’s important to inspect twine netting regularly for wear and tear, and replace it as needed. The cost can also vary greatly, depending on the material used.
Mesh Size Matters: The size of the holes in your net impacts its effectiveness. Smaller mesh sizes tend to stop arrows more efficiently, but also can make it more difficult to see through. For beginners, a smaller mesh size will offer better protection.
The mesh size directly affects the netting’s performance. Finer meshes, those with smaller holes, are more effective at catching arrows and preventing them from passing through. However, it can reduce visibility and might catch the arrow points more frequently, potentially causing damage. A balance must be struck when choosing the mesh size, considering factors like the bow’s power and the shooter’s skill level.
Frame Construction: Building a Sturdy Foundation
The frame provides the structure for your netting, holding it securely in place. A strong frame ensures the backstop can withstand repeated impacts without collapsing. The materials and design of the frame are very important. Safety is key; a stable frame prevents the backstop from toppling over, protecting both the shooter and anyone nearby. Let’s check out a few popular options for making the frame.
Wood Frame: A wood frame is a popular choice because it is easy to work with and cost-effective. You can build it from lumber available at most hardware stores. Make sure the wood is treated to resist the elements, especially if your range is outdoors.
Wooden frames are popular due to the ease of use and affordability of wood. The main challenge with wooden frames is ensuring they are weather-resistant. It is essential to use treated lumber to prevent rot and use outdoor-rated screws or nails. It’s a great choice if you are on a budget and have basic carpentry skills.
PVC Pipe Frame: PVC pipes are another great option because they are lightweight, durable, and weather-resistant. You can easily cut and assemble PVC pipes using fittings without special tools. PVC is also very cost-effective, and you can create various shapes and sizes.
PVC frames are lightweight and simple to assemble. This makes it a great choice for DIY projects. Since PVC is weather-resistant, it’s suitable for both indoor and outdoor ranges. PVC pipe frames are also a good option if you plan to move your archery backstop. The main downside is that the frame may be less robust than a wooden frame.
Metal Frame: Metal frames, often made from steel or aluminum, are extremely durable and provide excellent stability. They are more costly and may require welding or special tools to assemble. However, they are a great option if you expect heavy use or strong winds.
Metal frames offer the highest level of durability and are best for high-volume ranges or outdoor setups. Steel frames are very strong, but may rust. Aluminum frames are rust-resistant and lighter, but also more expensive. Metal frames may also be more challenging to construct without specific tools and experience.
Frame Size and Shape: Consider the size of your range and the type of shooting you’ll be doing when deciding on the size and shape of your frame. A rectangular frame is common and easy to build, but you can also design custom shapes to fit your space.
The size and form of the frame affect the backstop’s effectiveness and safety. Larger frames provide a larger area to catch arrows, reducing the chance of misses. The shape also impacts how well it performs; a taller and wider frame is best for beginners or if you are shooting from varying distances. Think about the specific needs of your range when deciding.
Step-by-Step Guide to Building Your Archery Backstop
Now that you have your materials, it’s time to build your archery backstop. This process is fairly straightforward. Each step is important for creating a backstop that is both safe and effective. It’s a good idea to lay out all your materials and tools before beginning. This helps ensure that everything is within easy reach.
Assembling the Frame
The frame is the foundation of your archery backstop. Building it correctly will give the structure stability and strength. Using the right tools and following the steps will create a solid base for your netting. Make sure the frame is level and square before moving on to the next steps. Safety first; always wear protective gear, such as safety glasses, when using tools.
Wood Frame Construction:
- Cut the wood pieces to your desired dimensions using a saw.
- Assemble the frame by joining the pieces at the corners using screws or nails.
- Reinforce the corners with corner braces for added stability.
When building a wooden frame, make sure that your cuts are accurate. Check the corners with a framing square to make sure they are perfectly square. Pre-drill holes to prevent the wood from splitting when you insert screws. The construction should be sturdy to withstand repeated impacts from arrows.
PVC Pipe Frame Construction:
- Cut the PVC pipes to your desired length using a PVC pipe cutter or a saw.
- Connect the pipes using PVC fittings (elbows, tees, etc.) to form the frame.
- Ensure all connections are secure to prevent the frame from collapsing.
When building a PVC frame, make sure to measure and cut the pipes carefully. Use PVC cement to secure the fittings. You can also use PVC primer before applying the cement. This helps to make sure a strong bond is made. Assemble the frame on a flat surface to make certain it is square.
Metal Frame Construction:
- Cut the metal pieces to the correct dimensions using a metal saw or angle grinder.
- Weld the pieces together or use appropriate connectors to form the frame.
- Ensure all joints are strong and secure for added safety.
Metal frame construction typically involves welding, so you should have experience and a welding machine. If you are not familiar with welding, consult a professional. Make sure to wear the correct safety gear, including a welding helmet and gloves. The frame needs to be rigid to absorb the force of the arrows.
Frame Finishing: Add any final touches. Sand the wood, or paint the frame to protect it from the weather. Make sure the frame’s finish does not interfere with the function of the backstop.
The finishing steps will give the frame a more professional appearance and add to its longevity. If you build with wood, apply a wood sealant or paint to protect it from moisture and UV damage. When painting any frame, choose a paint color that contrasts well with the netting to make the archery target more visible.
Attaching the Netting
Once the frame is complete, it’s time to attach the netting. Proper attachment is essential for the net’s effectiveness and longevity. The way you secure the netting impacts how well it captures arrows and how long it lasts. Take your time to carefully secure the netting to the frame. The tighter the net is, the better it will perform. Safety first; always wear safety glasses.
Stretching the Netting:
- Lay the netting flat on the ground.
- Position the frame over the netting.
- Pull the netting taut, ensuring it’s free of wrinkles or sags.
Stretching the netting can be a challenge. Work from one corner to another, making sure the netting is evenly distributed. Ensure that the netting is stretched tightly to absorb the impact of arrows. Take your time to prevent any slack or folds that can affect its performance.
Securing the Netting:
- Use staples, zip ties, or rope to attach the netting to the frame.
- Space the fasteners closely along the frame to prevent the net from coming loose.
- Make sure the attachments are strong enough to withstand the impact of arrows.
Choosing the correct fasteners and using them appropriately is very important. Staples can be used with a staple gun; this provides a fast and effective way to secure the netting. Zip ties give a strong hold and are easy to use. Rope can also be used, but this will take extra work. Check the attachments regularly for wear and make sure the net is secure.
Checking for Sag: After attaching the netting, check for any sagging or loose areas. Tighten the net and adjust the attachments as needed to eliminate any slack.
Sagging or loose areas can cause arrows to pass through the backstop or become damaged. Look carefully at the netting to identify any spots that need adjustment. Use additional fasteners or adjust the tension of the netting to remove any sag. This can also require some re-stretching of the net.
Adding a Target: You can add a target to the net. It can be made from a variety of materials, and you can add it to the center of the net. This gives a focal point for the archer and adds to the appearance of the backstop.
Adding a target is the final step in getting your backstop ready. Choose a target that is the appropriate size for your archery style. You can also make a custom target that reflects your style and needs. Position the target carefully and make sure it is securely attached so it doesn’t move when arrows hit it.
Improving Your Archery Range with DIY Backstop Netting
A well-built archery backstop is more than just a safety device. It enhances the overall shooting experience. Proper setup protects the archer and surroundings and creates a better range. Adding a backstop allows archers to practice their skills with confidence. Let’s look at some ways to optimize your archery range and improve the performance of your backstop.
Backstop Placement and Safety Considerations
The placement of your backstop is very important. The location affects its effectiveness and the safety of everyone. Considering the surrounding area will ensure that your archery range is a safe place to practice. Making sure your archery range is safe should be the top priority. Think about the location of your range before you start shooting.
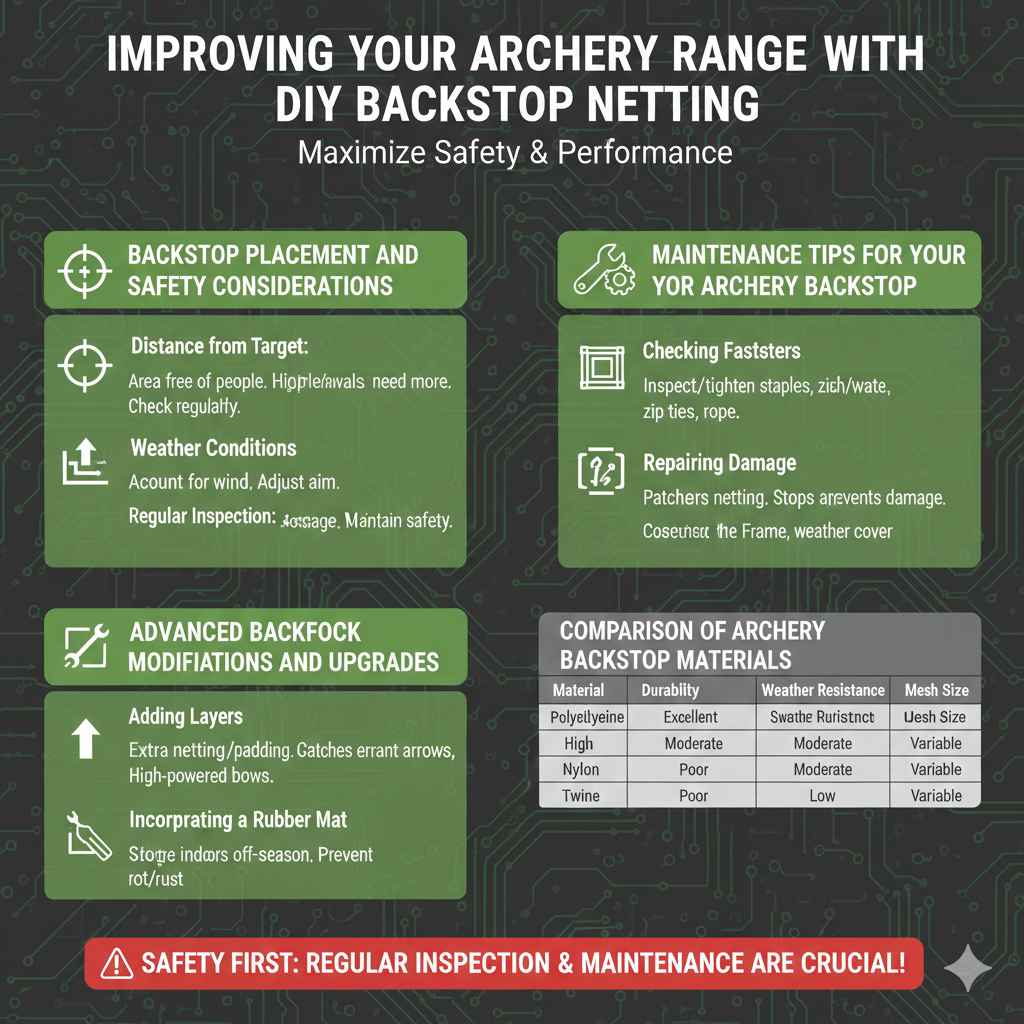
Distance from Target: Ensure the backstop is far enough behind the target to catch errant arrows. The distance you need will vary depending on your bow’s power and shooting style.
The space between the target and the backstop allows the backstop to protect anything behind it. Start with a distance that gives you a safe buffer zone. For most shooting situations, a distance of at least 10-15 feet is recommended, but for high-powered bows, you might need more distance.
Clear Zone: Make sure the area behind the backstop is free of people, animals, and anything you wouldn’t want to hit. Create a clear zone to keep people and property safe.
A clear zone is critical for safety. Walk the area behind your range to ensure nothing will be hit by a missed arrow. This area should be kept free from obstructions to protect the safety of anyone in the area. Checking the clear zone regularly is a good idea to ensure it is always safe.
Weather Conditions: Account for wind and other weather conditions. Wind can affect arrow trajectories and might push them outside of the backstop.
Weather conditions can affect shooting. Wind, rain, or bright sunlight can all make shooting difficult and affect the arrow’s flight. When it is windy, adjust your aim to compensate for the wind. Always assess the conditions before beginning. Your safety is most important.
Regular Inspection: Inspect the backstop and netting often. Look for any signs of damage or wear. This will allow you to maintain it and ensure it’s always working correctly.
Regular inspection is essential for extending the life of your backstop and keeping your shooting range safe. Examine the netting for tears, rips, or any weak points. Check the frame for any loose screws, rot, or any other signs of wear. Make any necessary repairs right away to avoid problems and keep your range safe.
Maintenance Tips for Your Archery Backstop
Regular maintenance will extend the life of your archery backstop and keep it in top shape. Performing regular tasks such as cleaning, inspection, and repairs can prevent problems. Maintaining your backstop will help to make sure that it’s safe and effective over time. These simple steps can make your backstop last longer and perform better.
Cleaning the Netting: Remove any debris, such as leaves or twigs, that may have collected on the netting. Use a soft brush or a gentle spray of water to clean it.
Cleaning your net will prevent buildup that can weaken the netting. Gently brush or rinse the netting to remove dirt, debris, and any other items that might affect the net’s performance. Clean the netting regularly to keep it strong and to make it last longer.
Checking Fasteners: Inspect the fasteners used to secure the netting to the frame. Tighten or replace any loose or damaged staples, zip ties, or rope.
The fasteners are very important for the performance of your backstop. Check them often to make sure they are secure. If any fasteners are loose or damaged, they could cause the net to fail. Take care of fasteners to maintain a safe and effective backstop. They need to be checked often and should be maintained regularly.
Repairing Damage: Repair any tears or holes in the netting immediately. Use patches or replace the damaged sections to prevent arrows from passing through.
Addressing damage as soon as possible is very important. Small tears or holes can grow quickly, reducing the net’s effectiveness. Repairing these defects will prevent further damage and keep your range safe. Use proper repair techniques, or
Storage: If possible, take down the backstop and store it indoors during the off-season or in extreme weather conditions. This will protect the materials and extend the life of the backstop.
Storing your backstop when it is not in use can protect it from the elements. This will keep the netting and frame from damage. Clean and dry the backstop before storing it. Store it in a dry place to prevent rot and rust. Proper storage extends the life of your archery equipment and will save you money.
Advanced Backstop Modifications and Upgrades
You can enhance the functionality and longevity of your backstop with some modifications. These improvements can also improve the overall shooting experience. From extra layers to customized features, these upgrades will increase the effectiveness of your archery backstop. Here are some modifications and upgrades that can improve your archery range.
Adding Layers: For added protection, consider adding extra layers of netting or padding behind the primary netting. This helps stop arrows, especially from high-powered bows.
Adding layers of material behind your backstop increases the backstop’s ability to absorb the energy of the arrow. This provides extra protection in case an arrow passes through the first layer. Additional layers can be installed with ease. It is a good upgrade to increase safety and the lifespan of the backstop.
Using a Second Frame: Some archers use a second frame, placed a few inches or feet behind the primary net, to catch any arrows that might pass through the first layer. This increases the backstop’s protection and lifespan.
A second frame can catch errant arrows, adding a critical layer of security to your range. The gap between the frames allows the primary net to absorb the force of the arrow, while the second net catches anything that goes through. When putting up a second frame, make sure there is enough space to allow for safe use.
Incorporating a Rubber Mat or Padding: You can add a rubber mat or padding behind the netting. This can catch arrows and stop them and also prevent them from passing through.
Adding a rubber mat or padding will improve the energy-absorbing capabilities of your backstop. This is a very good addition that can catch and stop arrows. The padding also helps to protect your arrows by reducing damage. Using high-density materials provides excellent protection for your shooting area.
Customizing the Frame: You can customize your frame with additional features, such as a built-in target holder or a weather-resistant cover to extend the backstop’s life. This will improve the usefulness and overall appearance of your backstop.
Customizing the frame will allow you to adapt your backstop to your specific needs. Adding a target holder ensures the target is in the correct place. A weather-resistant cover protects the backstop from the elements. These additions will improve your archery range. Customizations also enhance the functionality and appearance of your backstop.
| Material | Durability | Weather Resistance | Cost | Mesh Size |
|---|---|---|---|---|
| Polyethylene | High | Excellent | Moderate | Variable |
| Nylon | Moderate | Poor | Moderate | Variable |
| Twine | Low | Poor | Low to Moderate | Variable |
Frequently Asked Questions
Question: What is the best netting material for an archery backstop?
Answer: Polyethylene netting is generally considered the best choice because of its durability, weather resistance, and affordability. Nylon is also a strong choice, especially for indoor use.
Question: How far should my archery backstop be from the target?
Answer: The distance should be far enough to catch errant arrows. It typically depends on the power of your bow, but a distance of 10-15 feet is usually a good starting point.
Question: How often should I inspect my archery backstop?
Answer: It’s a good idea to inspect your backstop regularly, especially before each shooting session. Look for any signs of wear, damage, or loose fasteners.
Question: What should I do if an arrow goes through my backstop?
Answer: Immediately check the netting for tears or holes, and repair the damage. Also, make sure that the area behind the backstop is clear of anyone or anything that could be harmed.
Question: Can I build an archery backstop if I am on a budget?
Answer: Absolutely! Using materials like wood or PVC pipes for the frame and selecting affordable netting options like polyethylene can make it a budget-friendly project.
Final Thoughts
Building your own DIY Archery Backstop Netting: Affordable Option is a rewarding experience that combines cost savings with the satisfaction of creating something yourself. You’ve explored the essential components, from selecting the right netting and constructing a sturdy frame to setting up the backstop for maximum safety and performance. You also learned the importance of regular upkeep and how to add modifications. This process will create a reliable and functional archery range. Now, equip yourself with the materials and tools needed. Take your time, focus on each step, and before you know it, you will have a DIY archery backstop.