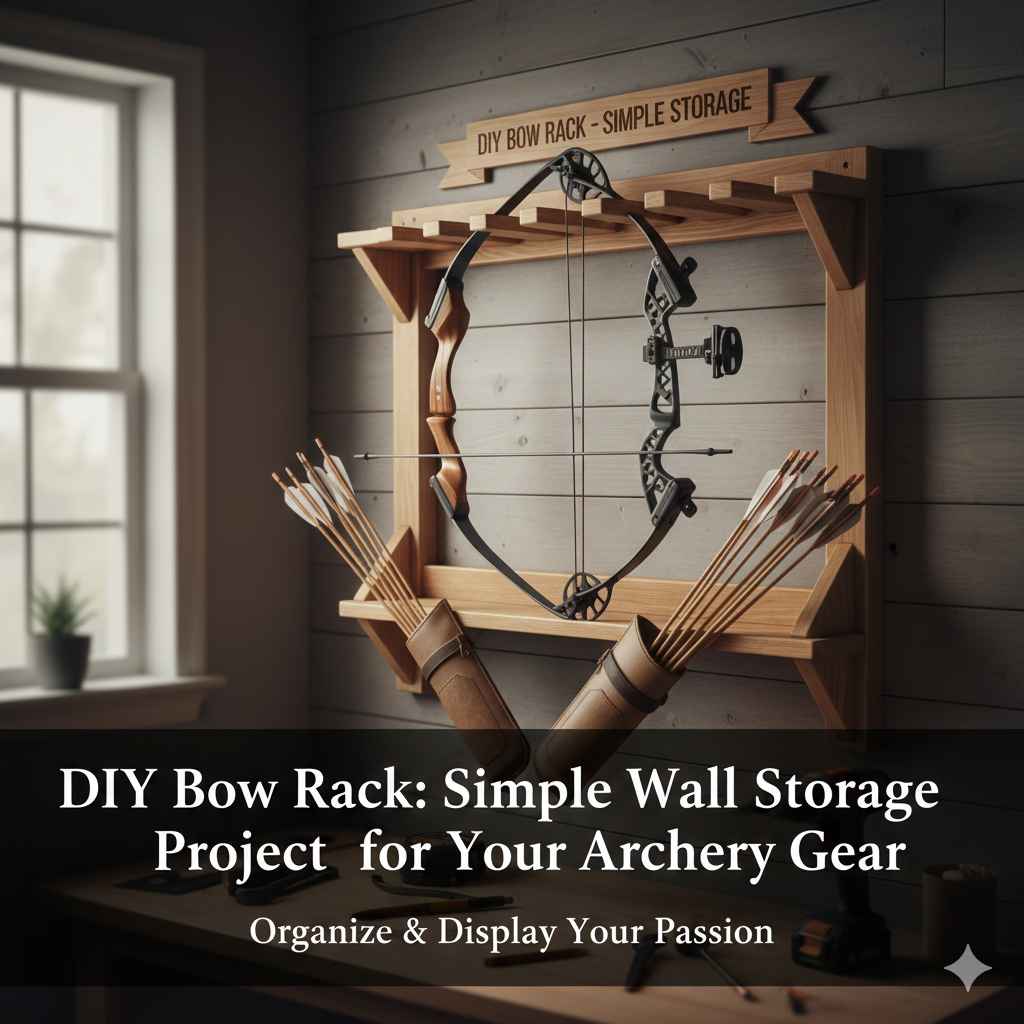
Building your own DIY Bow Rack: Easy Wall Storage Idea might seem tricky at first, but it’s really not! Many people think it’s a complicated carpentry project, but with the right instructions, you can easily create a great way to store your bows and arrows. Don’t worry, this project is perfect for beginners. We’ll break down each step so you can build your own bow rack. Let’s get started and learn how to make an awesome bow rack!
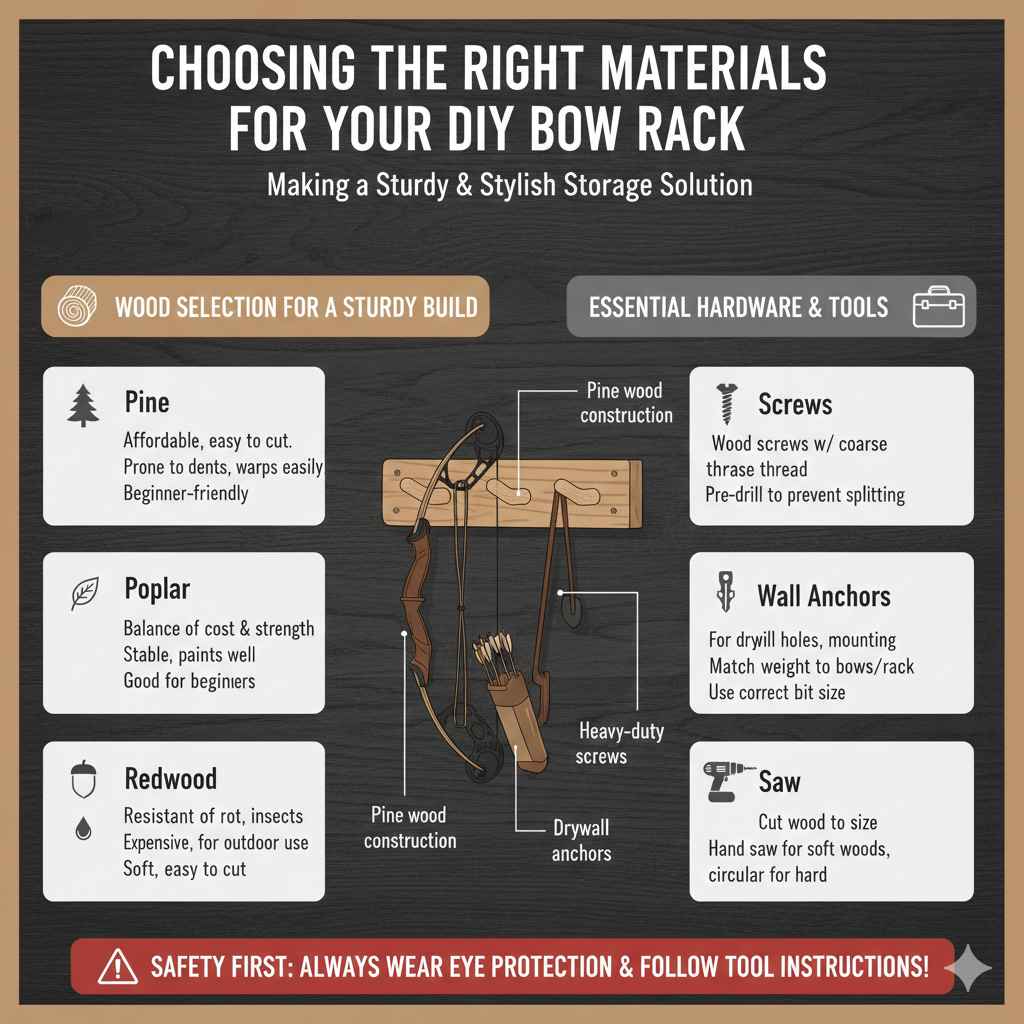
Choosing the Right Materials for Your DIY Bow Rack
The first step in your DIY Bow Rack: Easy Wall Storage Idea is picking out the right stuff. The materials you select will impact how your bow rack looks, how long it lasts, and how much weight it can handle. You’ll want to choose wood that’s strong and won’t warp or bend over time. There are several wood options to consider for your build, each with its own benefits and drawbacks. We’ll explore several choices and explain some of the other necessary items to complete your rack.
Wood Selection for a Sturdy Build
Choosing the proper wood is key to making a bow rack that’ll last. You don’t want something that’ll split or break after a short time. Different types of wood offer varied strengths and visual looks. The wood you choose also affects the total cost of your project. Think about how heavy your bows are and how many you plan to store. This will help you choose the best wood for the job. Here’s a look at some excellent choices to help you with your project.
Pine: Pine is a popular choice because it’s usually easy to find and it’s inexpensive. It’s a soft wood, so it’s simple to cut and drill. However, pine can be prone to dents and scratches, so it might not be the best pick for a long-term, high-use bow rack.
Pine is a softwood and is less resistant to wear and tear. It absorbs moisture easily and can warp in humid conditions. This can affect the bow rack’s stability over time. While it’s the most affordable choice, it requires careful handling and finishing to increase its durability.
Poplar: Poplar is another good option. It is a hardwood that’s softer than oak but much more robust than pine. Poplar is typically easier to work with than oak, making it a good choice for beginners.
Poplar provides a good balance between cost and strength. It’s stable, with minimal warping or splitting. Poplar also paints well. This will allow you to customize the look of your bow rack. You can stain or paint poplar to match your décor.
Oak: Oak is known for its strength and durability. It’s a hardwood that will last a long time. It can handle heavy bows and rough use. Oak is a more costly option and may be more difficult to cut. This makes it better suited for those with some woodworking experience.
Oak offers superior strength and resilience. It can handle significant weight and wear. Oak wood typically has a beautiful grain pattern, and it looks great with a clear finish. The drawback is that it’s more expensive and challenging to work with. It requires more power tools for cutting and shaping.
Redwood: Redwood is an excellent choice if your rack will be exposed to the elements. It’s naturally resistant to rot, decay, and insects. Redwood can be a bit pricier and might not be available everywhere.
Redwood is perfect for outdoor bow racks. Its natural oils protect it from moisture and pests. It has a rich color that looks good without stain or finish. Redwood is soft, making it easy to cut and assemble. However, it can be expensive and sometimes hard to find.
Essential Hardware and Tools
Besides wood, you’ll need some hardware to put everything together. The right tools will make your project easier and more enjoyable. Think about what you already have and what you might need to buy or borrow. Safety is also important. Always wear eye protection and follow all tool instructions. Here are some of the critical supplies you’ll want to have for your DIY Bow Rack: Easy Wall Storage Idea.
Screws: Choose screws that are long enough to securely fasten the wood pieces together. Make sure the screws are made for the type of wood you’re using. If you use the wrong screws, the rack might not be as strong, or the wood could split.
Screws hold the rack’s structure together. Use wood screws, which have a coarse thread for better grip. Consider the length of the screw based on the wood’s thickness. Pre-drilling pilot holes will prevent the wood from splitting. This will ensure your bow rack is solid and safe.
Wall Anchors: If you are mounting your bow rack on drywall, you’ll need wall anchors. These help to keep the rack secure on the wall. Select anchors that can handle the weight of your bows and arrows.
Wall anchors provide extra support for the bow rack, making sure it stays attached to the wall. Select anchors rated for the combined weight of your bows and the rack itself. Using the correct anchors will prevent the rack from pulling away from the wall. They also provide stability.
Drill: A drill is necessary for making holes for the screws. A drill with a drill bit set will come in handy for pilot holes.
A drill helps you to pre-drill holes for screws, reducing the chance of splitting the wood. It can also be used to drive in screws. Make sure you use the appropriate size drill bits for your screws to ensure a good fit. This helps to secure all the components of the rack.
Saw: You’ll need a saw to cut the wood to the right sizes. A handsaw or circular saw works well for most projects.
The saw is required to cut your wood. The type of saw you need depends on your wood. A handsaw is okay for softer woods, but for harder woods or larger pieces, you’ll need a circular saw or miter saw. This will allow you to cut the wood to the right size with precision.
Measuring Tape and Level: These tools are essential for accurate measurements and ensuring your rack is straight.
A measuring tape is used to mark accurate measurements for cutting and assembling the bow rack. A level is used to make sure the rack is straight and aligned on the wall. Correct measurements and alignment are essential for a functional and visually appealing rack.
Planning the Design for Your DIY Bow Rack: Easy Wall Storage Idea
Before you start building, it is important to plan the design of your DIY Bow Rack: Easy Wall Storage Idea. This step involves figuring out how many bows you want to store and how the rack will fit in your space. Careful planning avoids mistakes and wasted materials. You can draw a sketch or use online design tools to help. We’ll cover several key areas to focus on when you are planning your project. This will guarantee a bow rack that meets your needs.
Measuring Your Space and Your Bows
The first step is measuring. Measure the area where you plan to put your bow rack. Consider the length, width, and height. Measure your bows, too. You’ll need to know their size to make sure the rack is big enough. Knowing these dimensions helps you figure out how big the rack needs to be. Make sure there’s enough space to easily take your bows in and out. This will make your bow rack functional and easy to use.
Wall Space: Measure the wall area to see how much space you have. Avoid obstructions like windows, doors, or electrical outlets.
Measure the width and height to know your building area’s dimensions. Take note of any features on the wall that could impact your bow rack design. Ensure the location can support the weight of the rack and bows.
Bow Dimensions: Measure the length, width, and depth of your bows. Include any accessories or attachments that will stay on the bow when it is stored.
Take note of each bow’s size. Measure the longest bow and the thickest part. This helps to set the correct distance between supports and ensure the bow rack can accommodate all your bows.
Arrow Length: Measure the length of your arrows, since you may want to store arrows on your rack, too.
If you’re also planning to store arrows, measure their overall length. This helps you to include a space for arrow storage within your bow rack design. It ensures your arrow storage solution fits within the planned dimensions.
Desired Capacity: Decide how many bows you want your rack to hold. If you think you will buy more bows, make the rack a little bigger now.
Determine the total number of bows you plan to store. Plan for the future, so you have extra space. Make sure the rack can hold the weight of all the bows without issues.
Deciding on the Rack’s Style
You can choose from different types of bow racks. Some racks are designed to hold the bow by the limbs, while others support the entire bow. Think about which design would work best for your bows and the space. Consider what would best meet your needs. We’ll explore some popular styles and designs that are useful for your DIY Bow Rack: Easy Wall Storage Idea project.
Horizontal Rack: This design holds bows horizontally, usually resting on supports. It is simple to make and good for a small space.
Horizontal racks are easy to construct, with a simple design requiring fewer materials. They provide an organized way to display your bows. The horizontal style offers good visibility and easy access to the bows.
Vertical Rack: Vertical racks store bows upright. This saves floor space and can be ideal for long bows.
Vertical racks are great for saving space, especially in tight areas. This design can also be attractive, allowing for bows to be displayed. This rack style makes it easy to grab a bow and is suitable for various bow types.
Pegboard Rack: Pegboards let you customize the position of the hooks or supports for your bows. This is a very flexible option.
Pegboard racks are very customizable. They can be adjusted to match the size and number of your bows. This style is also easy to alter if your needs change. Pegboard racks offer great flexibility for storage.
Combination Rack: You can mix and match different styles. You could combine horizontal storage for bows with vertical arrow storage.
A combination rack integrates different storage methods, for a customized solution. The combination design will suit your needs and your space. This approach is helpful for those with different kinds of bows and gear.
Creating a Detailed Sketch or Plan
Before you start cutting any wood, sketch out your design. This is one of the most important steps in creating your DIY Bow Rack: Easy Wall Storage Idea. You can do this on paper or use design software. Include all measurements and dimensions, like the rack’s width, height, and depth. Label each component, like the supports, shelves, and any arrow storage sections. Your plan should show the materials you’ll need, like wood, screws, and any other hardware. This step will help you avoid problems later on. This will help you know the project’s costs and ensure that everything fits together as planned.
Building Your DIY Bow Rack: Step-by-Step Instructions
Now that you have your plan and materials, it’s time to build your DIY Bow Rack: Easy Wall Storage Idea! Follow these steps to put it together. We’ll cover each part of the process, from cutting the wood to mounting the rack on your wall. Remember to always use safety gear and take your time. This will help you construct a safe and functional bow rack that meets your needs.
Cutting the Wood to Size
Use your plan to cut your wood pieces to the correct dimensions. This is one of the most important steps for your DIY Bow Rack: Easy Wall Storage Idea project. Use your saw and measuring tape to ensure you have the proper dimensions for each piece. This will ensure your bow rack fits together correctly. Double-check your measurements before you cut. This can avoid wasted wood and ensure a proper fit.
Measure and Mark: Using your measuring tape and pencil, measure and mark the wood according to your plan. Mark the locations of your cuts.
Accurate marking is critical. Check all measurements carefully. Use a pencil to mark where you will make the cuts. This ensures the best alignment and fit during assembly.
Cutting the Wood: Use your saw to cut the wood along your marked lines. Make sure the saw blade is straight and the wood is steady.
Cutting the wood is where you’ll shape the pieces to the correct size. If you are using a circular saw, use a guide to ensure straight cuts. Be mindful of your safety when you use the saw.
Cutting the Support Pieces: Cut the support pieces at an angle if needed, to match your rack’s design. This could be necessary for a slanted or angled design.
Angled cuts can make the bow rack more stable. Use a miter saw or a saw with an angle guide for this. Make sure the angles are correct according to your plan.
Double-Check Your Cuts: After cutting each piece, double-check its dimensions against your plan. Make any necessary adjustments before proceeding.
It’s always a good idea to double-check that your wood is cut to the proper measurements. This ensures the bow rack pieces will fit together correctly and create a sturdy structure. Verify dimensions with your plan.
Assembling the Bow Rack Frame
Once you have all your wood pieces cut, it’s time to put together the main frame. You’ll join the sides, top, and bottom of your rack. Make sure everything is square and level as you assemble it. This is a crucial step in your DIY Bow Rack: Easy Wall Storage Idea. Your accuracy here will affect the rack’s stability. Follow these steps to build a sturdy frame.
Dry-Fitting: Before using any fasteners, assemble the frame pieces together without glue or screws. This is a dry fit. Make sure all the pieces fit together the way you planned.
Dry-fitting will show you where you need to make adjustments before you secure everything. This also helps you ensure that all pieces align properly. This is your chance to double-check everything.
Drilling Pilot Holes: Drill pilot holes at the joints to prevent the wood from splitting. This is especially important for hardwoods.
Pilot holes help screws go in easily and avoid splitting the wood. Pilot holes make it easier to attach all the pieces together. Use the right-sized drill bit to match the diameter of your screws.
Joining the Pieces: Apply wood glue to the joints for added strength, if desired. Then, fasten the pieces together using screws.
Wood glue adds extra reinforcement and strength. Use screws to secure the joints. Make sure the corners are square. This gives your bow rack its stability. Make sure the screws are tight.
Checking for Squareness: Use a square to check that the corners are perfectly square. This is important for a stable rack.
Use a framing square or a carpenter’s square to ensure that all corners are perfectly square. This will help make sure your bow rack is strong. If needed, make any adjustments.
Adding the Support and Storage Components
Now, add any shelves, pegs, or hooks you’ll need to hold your bows and arrows. This step transforms your frame into a fully functional DIY Bow Rack: Easy Wall Storage Idea. Install these parts with care. This stage will determine how your bows and arrows are stored. If you’re building a pegboard rack, attach the pegboard to the frame at this stage.
Attaching Shelves or Brackets: If your design includes shelves, attach them to the frame using screws. Use brackets for additional support if necessary.
Place shelves or brackets at the correct height to meet your needs. Ensure the shelves are level and securely fastened. These shelves will hold your bows.
Installing Hooks or Pegs: For hanging your bows, install hooks or pegs at the right positions. Make sure they are sturdy enough to support the weight.
Hooks or pegs should be spaced evenly to hold your bows. Make sure they are securely attached to the rack. Check the hooks to ensure your bows won’t fall or slip off.
Creating Arrow Storage: Add any arrow storage components. This might include holes or holders for arrows.
Determine where you will put the arrow storage. If you will use a hole or a specific holder, secure it with screws. Ensure the arrow storage aligns correctly and is securely fastened to the rack.
Final Checks: After installing all components, double-check that everything is secure and aligned. Make sure the rack is ready for mounting on the wall.
Examine all components to ensure they are securely fastened. Check that there are no loose screws. Your bow rack is now almost complete.
Mounting Your Bow Rack on the Wall
The final step is to mount your DIY Bow Rack: Easy Wall Storage Idea on the wall. This will require some careful measuring and fastening. Before you start, make sure you know where the wall studs are. If you don’t use wall studs, your rack won’t be as stable. These instructions will ensure your bow rack is securely mounted and functional.
Finding Wall Studs: Locate the wall studs using a stud finder. Mark their positions on the wall.
Find the wall studs. This will give your rack the necessary support to hold weight. Use a stud finder tool. Mark each stud’s location so you know where to attach the rack.
Positioning the Rack: Hold the rack against the wall in the desired position. Use a level to make sure it’s straight.
Position the bow rack. Use a level to ensure it’s straight, as this will affect how it looks. Mark the mounting points on the wall. Make sure the rack is centered in its location.
Pre-Drilling Holes in the Wall: Drill pilot holes through the rack and into the wall studs.
Drill pilot holes through the rack. These pilot holes will help you to insert the mounting screws with precision. Select the appropriate drill bit to match the size of your mounting screws.
Securing the Rack: Use screws to attach the rack to the wall studs. If you cannot hit the studs, use appropriate wall anchors.
Fasten the rack to the wall studs with screws. This secures the rack. If wall studs are not in place, use wall anchors for increased support. Make sure the screws are tight.

Frequently Asked Questions
Question: How much weight can a DIY bow rack hold?
Answer: The weight a DIY Bow Rack: Easy Wall Storage Idea can hold depends on the materials used, the construction quality, and how it is mounted. A well-built rack using hardwood and mounted securely to wall studs can handle several bows and arrows. Always consider the weight capacity when choosing your materials and design.
Question: Can I adjust the design of the bow rack to fit different bow types?
Answer: Yes, you can. A good DIY Bow Rack: Easy Wall Storage Idea is adaptable. You can modify the size and style to fit recurve bows, compound bows, or longbows. You can adjust the spacing between hooks or supports, change the shelf depths, or add more storage. Designing your own rack ensures it meets your needs.
Question: What’s the best wood for a bow rack?
Answer: Oak and Poplar are good choices for a bow rack. They provide a balance of durability, stability, and workability. Redwood is another excellent choice if it will be exposed to outdoor elements. Pine is the most economical, but it is less durable.
Question: How do I attach the bow rack to the wall safely?
Answer: For a DIY Bow Rack: Easy Wall Storage Idea, locating wall studs is key. Use a stud finder to find them. Then, pre-drill holes through the rack and into the studs. Use screws that are long enough to provide a secure grip. If you can’t reach studs, use wall anchors that match the weight of your rack and gear.
Question: How can I customize the bow rack to match my style?
Answer: You can customize your bow rack in many ways. You can stain or paint the wood to match your decor. You can add unique hooks, pegs, or shelves. The design is up to you, so add accessories that fit your style.
Final Thoughts
You did it! Building your own DIY Bow Rack: Easy Wall Storage Idea is a rewarding project that allows you to organize your archery gear efficiently and stylishly. By choosing the right materials, planning your design carefully, and following our easy steps, you’ve created a functional and personalized storage solution. Remember that patience is key. Don’t worry about perfection, just focus on each step and enjoy the building process. Your bow rack will not only keep your equipment safe but will also enhance your space. Enjoy your new bow rack!