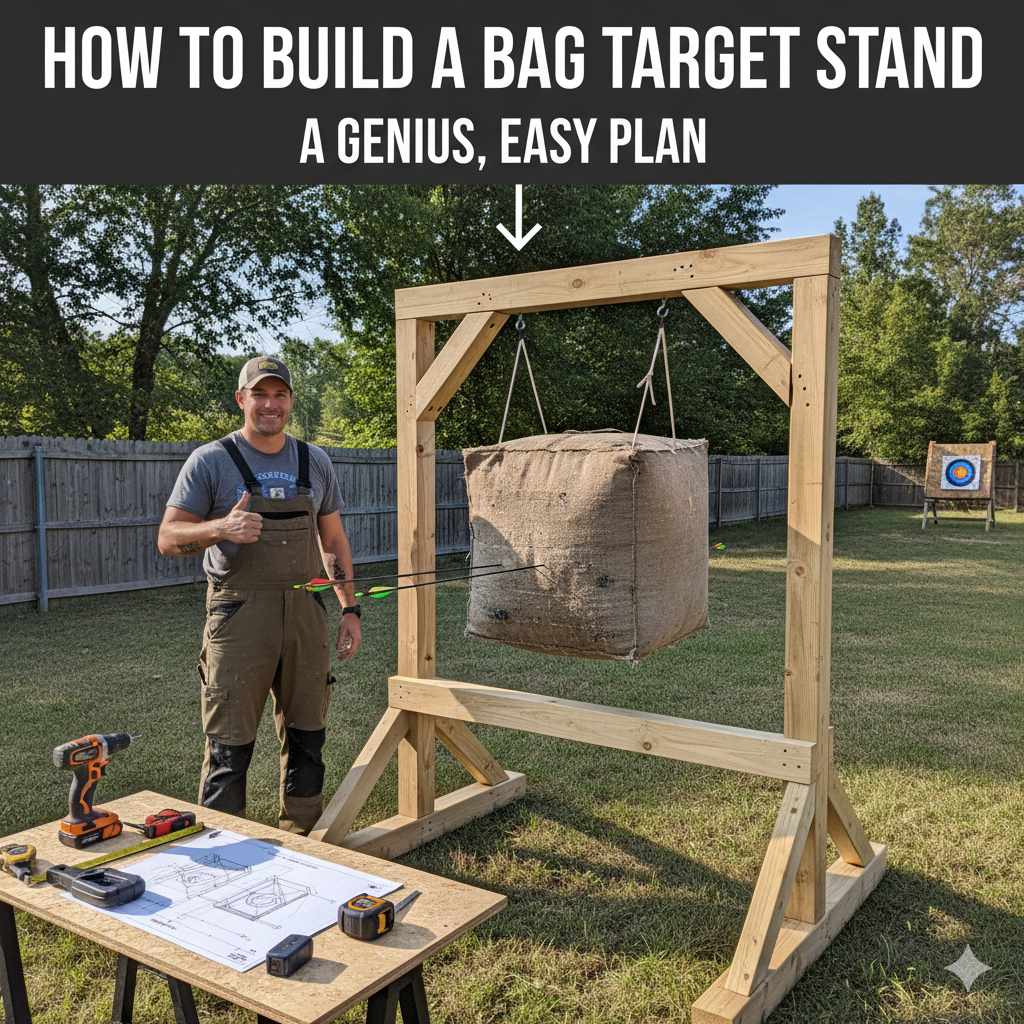
To build a bag target stand, you’ll construct a simple H-frame using 2×4 lumber. Cut your pieces for the base, uprights, and a top crossbeam. Assemble the frame with 3-inch deck screws, ensuring it’s square and stable. Finally, install heavy-duty hooks on the top beam to hang your bag target securely for safe practice.
Hello, fellow archers! Salman here. It’s great to see you on the range—or in this case, getting your home range set up. You have your bow, you have your arrows, and you have a great bag target. But there’s one problem. Where do you put the target?
Propping it against a hay bale or a tree just doesn’t feel safe or sturdy. A good shot can send it tumbling, and a bad setup can ruin your arrows. It’s a common frustration, but don’t worry. You don’t need to spend a fortune on a store-bought stand.
I’m going to show you a genius, easy plan to build your own bag target stand. It’s strong, stable, and simple enough for anyone to make in an afternoon. Let’s build your confidence and your equipment at the same time!
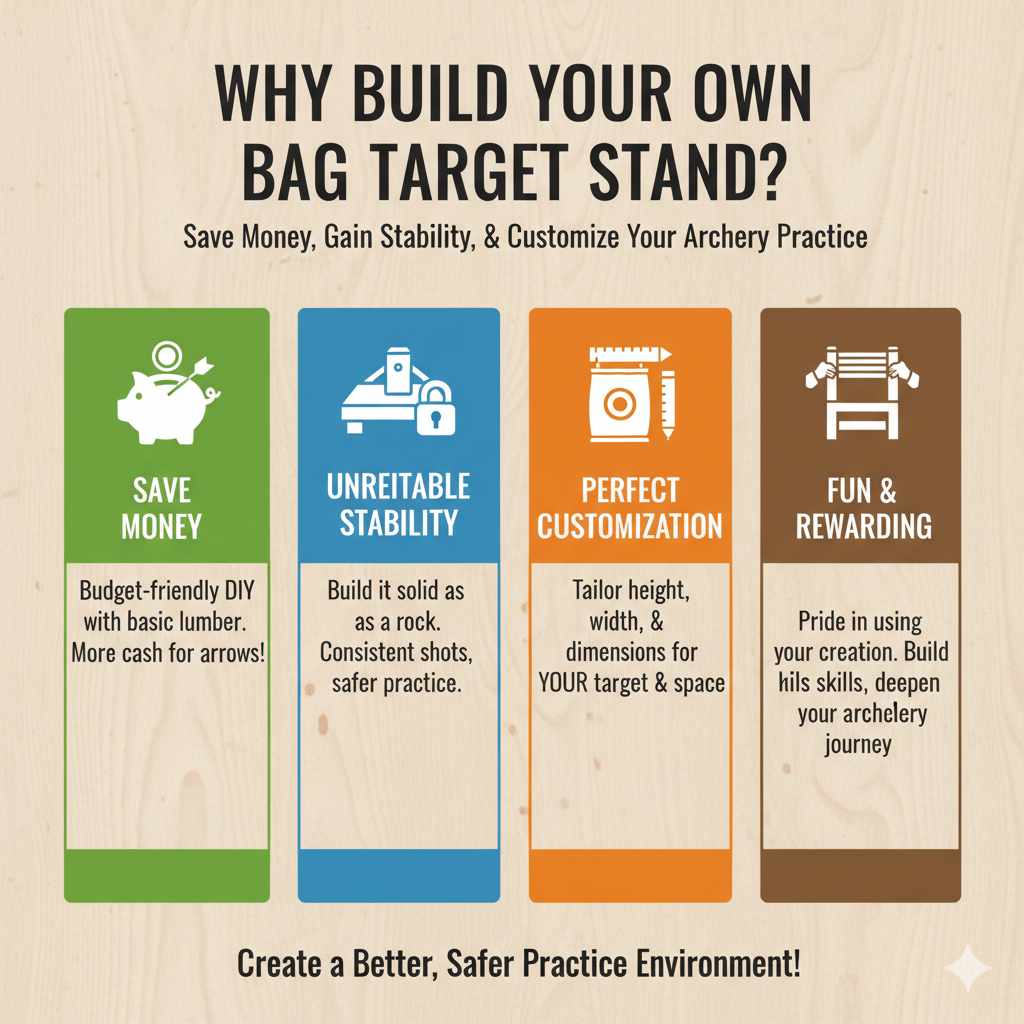
Why Build Your Own Bag Target Stand?
Before we grab our tools, let’s talk about why a DIY stand is such a fantastic idea. While you can buy one, building it yourself has some serious advantages, especially when you’re just starting out.
- Save Money: Let’s be honest, archery gear can add up. A pre-made stand can cost a pretty penny. Building your own with basic lumber is incredibly budget-friendly, leaving you more money for arrows!
- Unbeatable Stability: Many commercial stands are designed to be lightweight and portable, which sometimes means they’re wobbly. When you build your own, you can make it as solid as a rock. A stable target means more consistent shots and safer practice.
- Perfect Customization: Is your bag target extra large? Or maybe you need a stand that fits in a specific spot in your yard? When you’re the builder, you control the dimensions. You can make it the perfect height and width for your exact target and your body.
- It’s Fun and Rewarding: There’s a special kind of pride that comes from using something you built with your own two hands. This simple project is a great way to build practical skills and feel more connected to your archery journey.
Building this stand isn’t just about holding a target; it’s about creating a better, safer, and more enjoyable practice environment for yourself.
Gathering Your Tools and Materials
The best part about this plan is its simplicity. You don’t need a professional workshop. Most of these tools are probably already in your garage, and the materials are available at any home improvement store.
Essential Tools List
- Tape Measure: Accuracy is key. Remember the old saying: measure twice, cut once!
- Pencil: For marking your cuts.
- Power Drill with Phillips Head Bit: This will make assembling the stand quick and easy.
- Saw: A circular saw or miter saw will give you the cleanest cuts, but a simple hand saw will work just fine with a little patience.
- Safety Glasses: Always protect your eyes when cutting or drilling wood. Non-negotiable!
- Work Gloves: To protect your hands from splinters.
- Speed Square (Optional but Recommended): This handy tool helps you make perfectly straight cuts and ensure your joints are at a 90-degree angle.
Materials Shopping List
We’ll be using standard 2×4 lumber. It’s strong, inexpensive, and easy to find. For outdoor use, I highly recommend pressure-treated lumber as it resists rot and insects. If you use non-treated wood, be sure to paint or seal it later.
| Item | Quantity | Notes |
|---|---|---|
| 2″ x 4″ Lumber | Three (3) 8-foot long boards | This will be more than enough for the project, with a little extra just in case. |
| Deck Screws | One (1) box of 3-inch screws | Deck screws are coated to resist rust, making them perfect for outdoor projects. |
| Heavy-Duty Hooks | Two (2) | Look for screw-in eye hooks or lag bolts. Make sure they are strong enough to hold your target’s weight. |
| Sandpaper (Optional) | One (1) sheet of medium-grit | For smoothing any rough edges after cutting. |
The Step-by-Step Building Plan
Alright, let’s get building! Follow these steps carefully, and you’ll have a sturdy target stand in no time. This design is an “H-frame,” which is incredibly stable and easy to construct.
Step 1: Measure and Cut Your Lumber
First, we need to cut our 2×4 boards into the pieces we’ll need for the frame. Grab your tape measure, pencil, and saw. A clear, level space to work will make this much easier. Use your safety glasses!
Here is your cut list. This design will create a stand that is roughly 4 feet wide and 4 feet tall, perfect for most standard bag targets.
| Part Name | Length | Quantity | Purpose |
|---|---|---|---|
| Base Feet | 36 inches (3 feet) | 2 | These form the wide, stable bottom of the stand. |
| Upright Posts | 48 inches (4 feet) | 2 | These are the vertical supports that hold the target up. |
| Top Crossbeam | 48 inches (4 feet) | 1 | This connects the uprights and holds the hanging hooks. |
| Support Braces (Optional) | 18 inches | 2 | These add extra rigidity to the frame. We’ll cut these at a 45-degree angle. |
Before you cut, double-check all your measurements. If you’re new to using power tools, you can find great safety guides from organizations like the National Safety Council. Once everything is cut, you can lightly sand the cut ends to remove any splinters.
Step 2: Assemble the Base
Let’s build the foundation. The base consists of the two upright posts attached to the two base feet, forming two “T” shapes.
- Lay one of the 36-inch base feet flat on the ground.
- Find the center of the board by measuring to the 18-inch mark. Make a small pencil mark.
- Take one of the 48-inch upright posts. Stand it on its end, centered on the pencil mark you just made on the base foot. You should now have a “T” shape.
- Use your speed square to make sure the upright post is perfectly perpendicular (at a 90-degree angle) to the base foot. This is crucial for stability!
- While holding the pieces firmly, drive two 3-inch deck screws down through the bottom of the base foot and into the end of the upright post.
- Repeat this process for the second base foot and upright post. You will now have two identical “T” shaped sections.
Step 3: Connect the Two Sides
Now we will connect the two T-sections to form the main H-frame. This is where your stand really starts to take shape.
- Stand your two “T” sections upright. They should be able to stand on their own.
- Position them so they are parallel to each other, with the upright posts facing inward. The distance between them should be about 45 inches. This will leave a small overhang for the top crossbeam.
- Take your 48-inch top crossbeam and lay it across the tops of the two upright posts. Make sure the overhang is even on both sides (about 1.5 inches on each side).
- Ensure the crossbeam is flush with the front and back edges of the upright posts.
- Secure the crossbeam by driving two screws down through the top of the crossbeam into the top of each upright post. Use four screws in total for this step.
Your structure should now look like a wide letter “H” with long feet. Give it a gentle shake. It should already feel quite sturdy!
Step 4: Add the Optional Support Braces (Highly Recommended)
For maximum stability, especially if you have a heavy bag target or shoot powerful bows, adding corner braces is a genius move. This step prevents the stand from wobbling side-to-side.
- Take your two 18-inch support braces. If you have a miter saw, cut both ends of each piece at a 45-degree angle so they fit snugly into the corners. If you only have a regular saw, a straight cut will still work.
- Wedge one brace into the corner where an upright post meets the top crossbeam. It should form a small triangle.
- Attach the brace by driving one screw through the brace into the upright post and another screw through the brace into the top crossbeam.
- Repeat this process on the other side.
These two small pieces add an incredible amount of strength to the final structure. You’ll be amazed at the difference they make.
Step 5: Install the Hanging Hooks
This is the final step in the assembly. It’s time to add the hardware that will hold your target.
- Flip your stand so the top crossbeam is facing you.
- Measure the width of your bag target’s hanging straps. You want the hooks to be spaced slightly wider than the straps for a snug fit. For most targets, placing the hooks about 18 to 24 inches apart is a good starting point.
- Mark the spots on the underside of the top crossbeam where you want to place your hooks.
- Drill a small pilot hole for each hook. This makes it much easier to screw them in straight and prevents the wood from splitting. The pilot hole should be slightly smaller than the screw’s diameter.
- Twist your heavy-duty eye hooks or lag bolts into the pilot holes until they are tight and secure.
That’s it! Your stand is built. Now you can hang your bag target from the hooks and take a step back to admire your work.
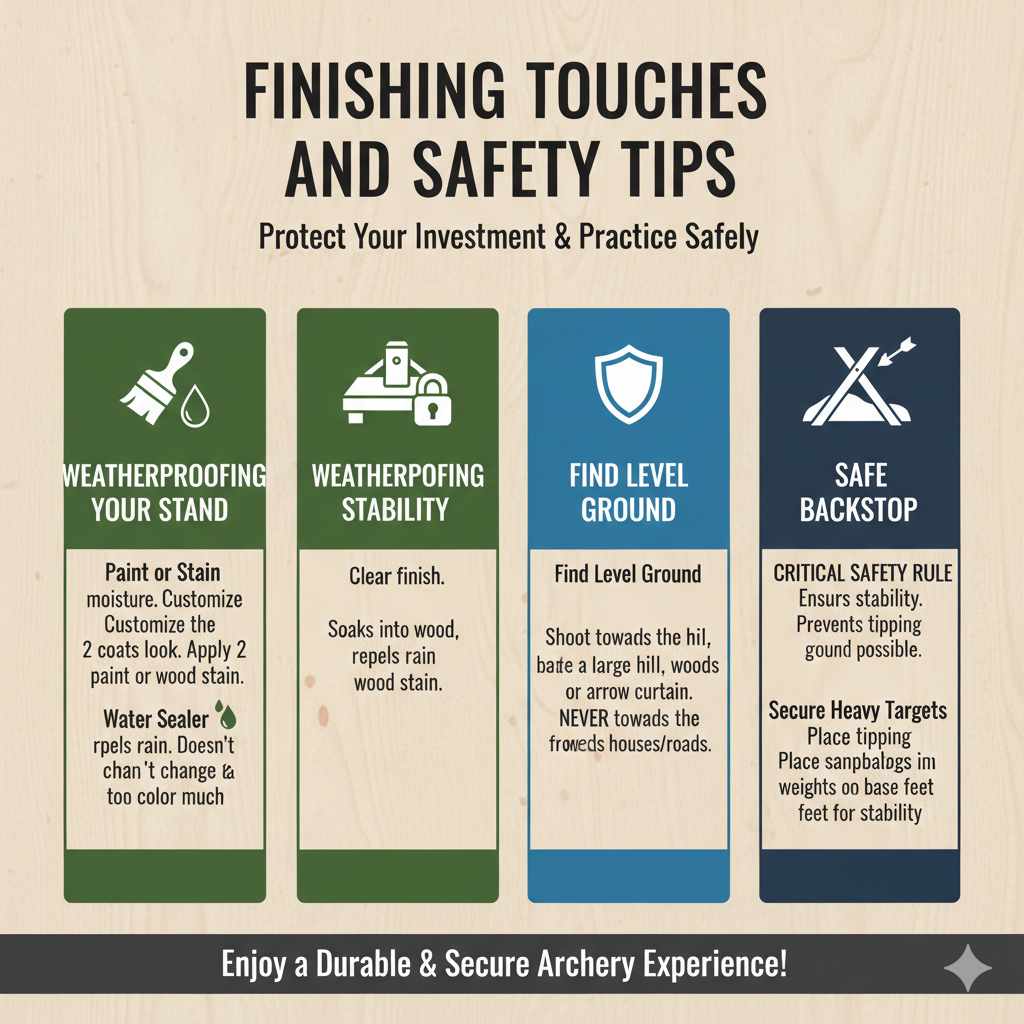
Finishing Touches and Safety Tips
Your stand is functional, but a few extra touches can make it last longer and keep you safer.
Weatherproofing Your Stand
If your stand is going to live outside, protecting it from the elements is essential. If you didn’t use pressure-treated wood, this step is mandatory.
- Paint or Stain: A couple of coats of outdoor paint or wood stain will seal the wood from moisture. This not only protects it but also allows you to customize the look.
- Water Sealer: A clear water sealer is another great option. It soaks into the wood and repels rain without changing the color of the wood very much. For more on wood finishes, the USDA Forest Service provides excellent information.
Safe Placement and Use
Building the stand is only half the battle; using it safely is what matters most.
- Find Level Ground: Always place your stand on the flattest, most level ground you can find. An unstable base is an accident waiting to happen.
- Know Your Backstop: The most important rule in archery is to always know what is behind your target. Ensure you have a safe backstop, like a large hill, a thick patch of woods, or a purpose-built arrow curtain. Never shoot in the direction of houses, roads, or areas where people might walk.
- Secure Heavy Targets: If your target is exceptionally heavy, consider placing sandbags or weights on the base feet to prevent it from tipping over, especially in windy conditions.
Frequently Asked Questions (FAQ)
1. What is the best wood to use for a target stand?
Pressure-treated 2×4 pine is the best choice for an outdoor stand. It’s affordable, strong, and specially treated to resist rot, moisture, and insects, ensuring your stand lasts for years.
2. How tall should I build my stand?
A good rule of thumb is to build the stand so the center of your bag target hangs at your shoulder height. The 4-foot tall design in this guide is a great starting point for most adults, but you can easily adjust the length of the upright posts to fit your needs.
3. Can I make the stand portable?
Absolutely! To make it more portable, you can attach caster wheels to the bottom of the base feet. Look for locking casters so you can secure it in place when you’re ready to shoot. Another option is to assemble it with bolts and wing nuts instead of screws, allowing for easy disassembly.
4. How much will this project cost?
The cost is one of the best parts! As of late 2023, you can typically buy all the lumber and hardware for this project for around $30-$50, depending on your local prices. This is significantly cheaper than most store-bought stands.
5. How do I make the stand more stable on uneven ground?
If your yard is sloped, you can use wooden shims or flat rocks under the base feet to level the stand. For a more permanent solution on a specific spot, you can dig out a small amount of turf to create a level patch of ground.
6. What size screws are best?
3-inch coated deck screws are perfect for this project. They are long enough to securely join the 2x4s and are coated to prevent rusting, which is essential for an outdoor project.
7. Can I use this stand for a foam block target?
Yes, but you may need to modify it. Instead of hanging the target, you can add a small plywood shelf or platform between the uprights for the foam block to sit on. This makes the design very versatile.
Your Archery Journey, Upgraded
Congratulations! You now have a plan to build a rock-solid, reliable, and affordable bag target stand. This simple weekend project does more than just hold up a target—it provides you with a safe and consistent platform to hone your skills. Every arrow you send into that bullseye will be a little more satisfying knowing you built the foundation it rests on.
Remember, archery is a journey of patience, practice, and continuous improvement. Building your own gear is a wonderful part of that journey. It connects you more deeply to the sport and empowers you with new skills. So grab your tools, put on your safety glasses, and get building.
Happy shooting, and may your arrows fly straight!