To aim when bow fishing, you must always aim low. Due to light refraction, the fish appears higher in the water than it actually is. The general rule is to aim about 6 inches below the fish for every 10 feet of distance and 3 feet of depth. Practice is key to mastering this technique.
Welcome, friend! I’m Salman Arfeen, and I’m here to help you get started on your archery journey. If you’ve ever tried bow fishing, you might have felt a little frustrated. You see a fish, you take the shot, and your arrow sails right over its back. It happens to everyone, I promise!
This is one of the most common challenges for newcomers. But don’t worry, it’s not about having a bad aim. It’s about understanding a simple trick of the light. Today, we’re going to break down exactly how to aim when bow fishing. We’ll turn that frustration into the thrill of hitting your target. Let’s get you ready to land your first fish!
Understanding the Biggest Hurdle: Why You Must Aim Low
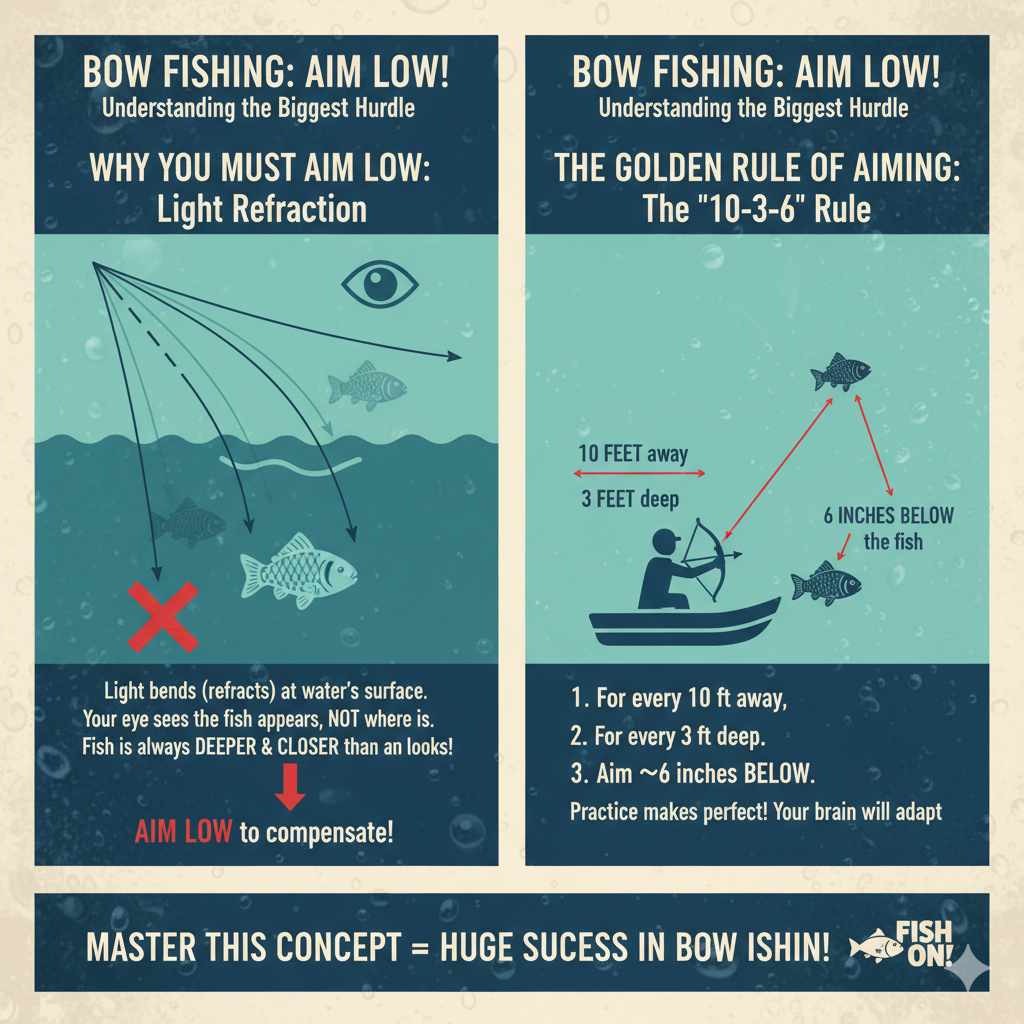
Before we get into the “how,” let’s talk about the “why.” The single most important rule in bow fishing is to aim low. This isn’t just a suggestion; it’s based on science. The culprit is something called light refraction.
Imagine sticking a straw into a glass of water. Notice how the straw looks bent or broken right at the water’s surface? That’s refraction. Light bends as it passes from water to air. Your eyes see the fish where the light appears to be coming from, not where the fish actually is. The fish is always deeper and closer than it looks.
Because of this, if you aim directly at the fish you see, your arrow will always go over its back. You have to compensate for this “light trick” by aiming underneath the visual target. Once you master this one concept, your success rate will skyrocket.
The Golden Rule of Aiming
So, how low do you aim? This is where a simple rule of thumb comes in handy. It’s a great starting point until you develop your own instincts.
The “10-3-6” Rule:
- For every 10 feet you are from the fish…
- And for every 3 feet deep the fish is…
- Aim about 6 inches below the fish.
This isn’t an exact science, but it gives you a solid foundation. The deeper the fish and the farther away it is, the lower you need to aim. Your brain will get better at making these calculations instantly with practice.
Here’s a simple table to help you visualize this:
| Fish Depth | Distance to Fish | Recommended Aiming Point Below Fish |
|---|---|---|
| 1 foot | 5 feet | Aim 2-3 inches low |
| 3 feet | 10 feet | Aim 5-6 inches low |
| 3 feet | 20 feet | Aim 10-12 inches low |
| 5 feet | 10 feet | Aim 8-10 inches low |
| 5 feet | 20 feet | Aim 16-18 inches low |
Remember, these are starting points. Every situation is a little different, but this chart will get you incredibly close right from the start.
A Step-by-Step Guide to Taking the Perfect Shot
Now let’s put it all together. Follow these steps on the water, and you’ll build the muscle memory needed for consistent accuracy. Take a deep breath, stay calm, and enjoy the process.
- Step 1: Spot Your TargetThis might sound obvious, but spotting the fish is the first skill. Look for movement, shadows, or shapes under the water. Good polarized sunglasses are your best friend here. They cut the glare on the water’s surface, allowing you to see much more clearly. Stay still and scan the water patiently.
- Step 2: Estimate the Depth and DistanceThis is the tricky part that gets easier with time. First, guess how deep the fish is. Is it just under the surface, or is it a few feet down? Next, estimate how far away it is from you. Is it 5 feet away? 15 feet? Use your bow or the boat as a reference to help you judge distances.
- Step 3: Apply the “Aim Low” RuleNow, do the quick mental math. Based on the depth and distance, decide where your aiming point needs to be. For example, if you think the fish is about 3 feet deep and 10 feet away, you know you need to aim about 6 inches below its belly. Don’t aim at the fish; aim at that imaginary spot in the water below it.
- Step 4: Draw Your Bow SmoothlyOnce you have your aiming point, it’s time to act. Don’t rush it. Bring your bow up and draw the string back in one smooth, controlled motion. Keep your eyes locked on your aiming point, not on the fish itself. A jerky draw can spook the fish or throw off your shot.
- Step 5: Find Your Anchor PointYour anchor point is where your drawing hand rests on your face or jaw every single time. Consistency is key in archery. Whether you touch your finger to the corner of your mouth or your thumb under your jaw, find a comfortable and repeatable spot. This ensures every shot starts from the same position, which is vital for accuracy.
- Step 6: Release and Follow ThroughRelax your fingers and let the string slip away cleanly. Don’t “pluck” the string like a guitar. After the arrow is gone, keep your bow arm pointed at the target for a second or two. This is called the “follow-through.” It prevents you from dropping your arm early and sending the arrow off course. Watch your arrow fly and see where it hits. Every shot, hit or miss, is a learning experience
Choosing Your Aiming Style: Finding What Works for You
Most bowfishing is done quickly and instinctively. You often don’t have time to use complex sights. However, there are a few different aiming styles you can adopt. Let’s explore the most common ones for bowfishing.
Instinctive Shooting
This is the most popular method for bowfishing. Instinctive shooting means you don’t use any sights at all. You simply look at your target (or, in this case, your aiming point below the target) and shoot. It’s like throwing a baseball. You don’t aim the ball; you just look where you want it to go and your body’s natural coordination takes over.
- Pros: Very fast, great for moving targets, and feels very natural once you get the hang of it.
- Cons: Takes a lot of practice to become consistent. It relies purely on muscle memory.
Gap Shooting
Gap shooting is a middle ground between instinctive shooting and using sights. With this method, you use the tip of your arrow as a reference point. You learn how high or low your arrow hits at different distances. When you see a fish, you place the tip of your arrow on your aiming point (the “gap” below the fish) and release.
- Pros: More precise than purely instinctive shooting and provides a concrete reference point.
- Cons: Can be a bit slower and requires you to know your distances well.
Using Bowfishing Sights
While not as common, some bowfishers use special sights. These are usually simple pin sights that can be adjusted. However, because shots in bowfishing are fast and at varying distances and depths, many find sights more of a hindrance than a help. They are best suited for situations where you have more time to line up a shot.
- Pros: Can be very accurate for stationary targets at known distances.
- Cons: Slow to use, can be confusing with refraction, and less effective for quick, reactive shots.
For beginners, I always recommend starting with instinctive shooting. It forces you to learn the feel of the shot and builds a strong foundation. You can always experiment with other methods later.
Common Beginner Mistakes and How to Avoid Them
Everyone makes mistakes when they’re learning. The goal is to recognize them and learn from them. Here are some of the most common aiming mistakes I see with new bowfishers.
| The Mistake | The Simple Fix |
|---|---|
| Aiming Directly at the Fish | This is the #1 error. Always remember refraction. Consciously force yourself to aim low. Say it out loud if you have to: “Aim low!” |
| Jerking the Release (“Punching the Trigger”) | This comes from shot anxiety. You’re so focused on hitting the target that you tense up and jerk the shot. Practice drawing, anchoring, and relaxing your fingers. A smooth release is a happy release. |
| Not Leading a Moving Fish | Fish don’t always sit still. If a fish is swimming, you need to aim low and slightly in front of it, just like you would lead a moving target in any other sport. |
| Forgetting to Follow Through | It’s exciting when the arrow leaves the bow! But many beginners drop their bow arm instantly to see where the arrow went. This can ruin the shot. Keep your form until the arrow hits the water. |
| Using Too Much Draw Weight | You don’t need a heavy-duty hunting bow for bowfishing. A bow with a 30-45 pound draw weight is plenty. Using a bow that’s too heavy for you will cause you to shake and struggle, ruining your aim. |
Practice Drills to Sharpen Your Skills
You don’t have to be on a boat chasing carp to practice your aiming. You can build these skills right in your backyard or at a local pond. Consistent practice is the fastest way to improve.
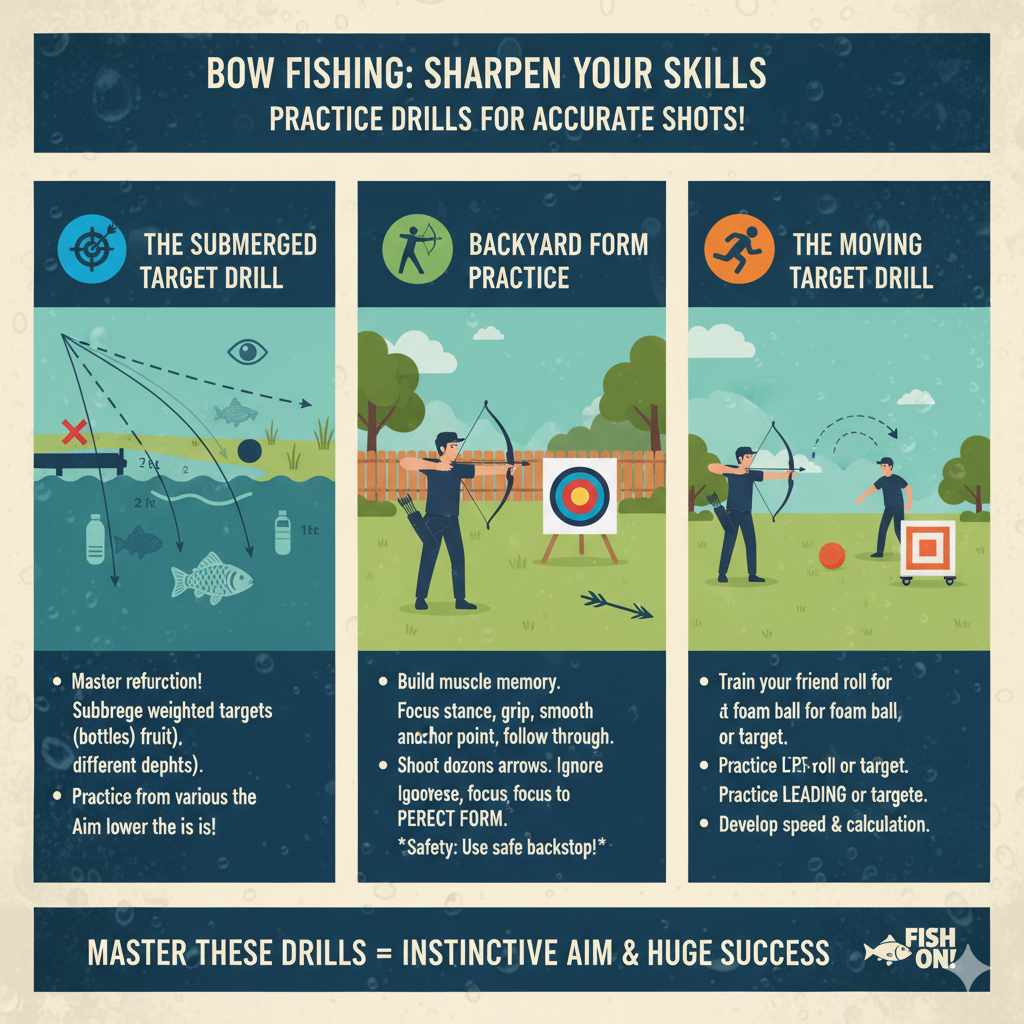
The Submerged Target Drill
This is the best drill for mastering refraction.
- Find a safe place to shoot, like a private pond or a designated area. Make sure you have a safe backstop.
- Tie a weight to an old milk jug, a 2-liter bottle, or even a piece of fruit like a melon.
- Submerge the target at different depths—first one foot deep, then two, then three.
- Practice shooting at it from different distances and angles. Pay close attention to how much lower you have to aim as the target gets deeper.
Backyard Form Practice
Your shooting form is the foundation of your aim. You can practice this without even going near the water.
- Set up a standard archery target in a safe location.
- Focus on your stance, your grip, your smooth draw, your solid anchor point, and your follow-through.
- Shoot dozens of arrows, focusing only on perfect form. Don’t worry about hitting the bullseye. This builds the muscle memory you need for when you’re on the water and the pressure is on. For more information on basic archery safety and form, resources like the USA Archery Safety Guidelines are incredibly helpful.
The Moving Target Drill
Once you’re comfortable with stationary targets, it’s time to practice on moving ones.
- Have a friend safely roll a foam ball or a durable target along the ground.
- Practice leading the target. This trains your brain to calculate speed and distance, which is exactly what you need to do for a swimming fish.
Frequently Asked Questions About Bowfishing Aim
How far below a fish should I aim when bowfishing?
A great starting point is the “10-3-6” rule: aim 6 inches low for every 10 feet of distance and 3 feet of depth. For a fish that’s 2 feet deep and 10 feet away, you might aim 4 inches low. For one that’s 4 feet deep and 20 feet away, you might need to aim over a foot low. It changes with every shot.
Does the angle I’m shooting from matter?
Yes, absolutely! A shot taken straight down from a boat or bank requires less compensation than a shot taken at a 45-degree angle from farther away. The shallower the angle of your shot, the more the light will refract, and the lower you will need to aim.
Can I use a regular bow sight for bowfishing?
You can, but most people don’t. Standard hunting sights are set for specific distances and don’t account for the variable depth of a fish. The quick, reactive nature of bowfishing is much better suited to instinctive shooting where you learn to “feel” the shot.
What’s the best time of day for bowfishing?
Often, the best time is at night with lights, as many species are more active and come into the shallows. For daytime shooting, a sunny day with calm water is ideal because it gives you the best visibility. Overcast days create a lot of glare and make it much harder to see into the water.
Do polarized sunglasses really make a difference?
Yes, 100%. They are arguably the most important piece of gear besides your bow. They work by cutting the horizontal glare reflecting off the water’s surface, acting like a window into the underwater world. You will see more fish and see them more clearly.
What is a good bow draw weight for a beginner?
You don’t need a powerful bow. A draw weight between 30 and 45 pounds is perfect for most bowfishing. It’s light enough to draw smoothly and hold steady, but powerful enough to penetrate even large fish like carp or gar.
How can I practice aiming for refraction without water?
While nothing beats practicing on the water, you can train your brain on land. Set up targets at different distances (5, 10, 15 yards) and practice estimating those distances without a rangefinder. This helps build your internal sense of distance, which is a key part of the aiming equation.
Your Journey to Becoming a Great Bowfisher
There you have it—the fundamentals of how to aim when bow fishing. It all boils down to one key principle: fighting the illusion of light refraction by aiming low. It will feel strange at first. Your brain will scream, “The fish is right there! Aim at it!” You have to trust the process and force yourself to aim at that empty spot in the water below your target.
Remember that every shot is a lesson. Don’t get discouraged by the misses. Celebrate them! A miss tells you what you need to adjust for the next shot. Was I too high? Too low? Did I rush it? This is how you learn and how your instincts develop.
So get out there, stay safe, and have fun. The thrill of watching your arrow connect after you’ve perfectly calculated the depth, distance, and lead is something you’ll never forget. Happy shooting!