Do you ever find yourself wrestling with endless rows and columns in Excel, trying to make your data stand out? You’re not alone.
Visual clarity is crucial when you’re presenting data, and a simple arrow can make all the difference. Adding an arrow to a data point in Excel is like highlighting a key moment in a story, drawing your audience’s attention exactly where you want it.
Imagine the impact when your data not only speaks but speaks clearly. In this guide, you’ll discover an easy, step-by-step approach to enhance your Excel skills and make your data pop. Keep reading to transform your spreadsheets from cluttered to captivating and ensure your data makes the impression it deserves.
Setting Up Your Excel Worksheet
Start by opening Excel. Enter your data in a table. Each column should have a title. This helps in organizing data. Make sure there are no empty cells. Excel uses complete data to create charts. Check for spelling mistakes. Errors can confuse Excel.
Highlight your data. Choose the “Insert” tab on the top. Look for chart options. Select a chart that fits your data. Common types are line or bar charts. Click on the chart type to insert it. The chart will appear on your worksheet. This visual helps see data patterns easily.
Credit: www.microsoft.com
Creating A Basic Chart
Select your data in Excel. Go to the “Insert” tab. Choose “Chart” from the menu. Pick a chart type. Click “OK” to insert.
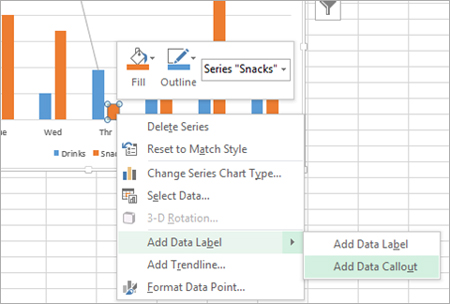
Click on the chart. A menu will appear. Select “Chart Elements.” Look for “Arrows.” Click to add arrows to data points.
Make arrows colorful. Change their size. This helps in understanding data better. It makes charts pretty. Kids love colorful charts.
Adding Arrows To Data Points
Open your Excel spreadsheet. Click on the “Insert” tab. Find the “Shapes” button. Click it to see various shapes. Choose the arrow shape. Click on the arrow to select it. Then drag the arrow onto your worksheet. Adjust the arrow size as needed.
Place the arrow near your data point. Ensure it points to the right spot. Use the “Rotate” option. This helps to align the arrow perfectly. Click and drag the arrow to move it. Make sure it highlights the data point. Adjust the arrow color if needed. Use a bright color for better visibility.
Credit: www.myexcelonline.com
Formatting Arrows
Changing Arrow Stylein Excel can make your data clearer. Different styles can show different meanings. For example, a bold arrow can show importance. A dashed arrow can mean uncertain. To change the style, select the arrow. Then, click on the format tab. Choose the style you like. Experiment with styles to find the best one for your data.
Adjusting Arrow Size and Colorhelps in highlighting key points. Bigger arrows catch attention. Smaller ones are subtle. To resize, click the arrow. Drag the corners to make it bigger or smaller. To change color, select the arrow. Then choose a color from the palette. Use bright colors for emphasis. Soft colors for less important points.
Enhancing Chart Readability
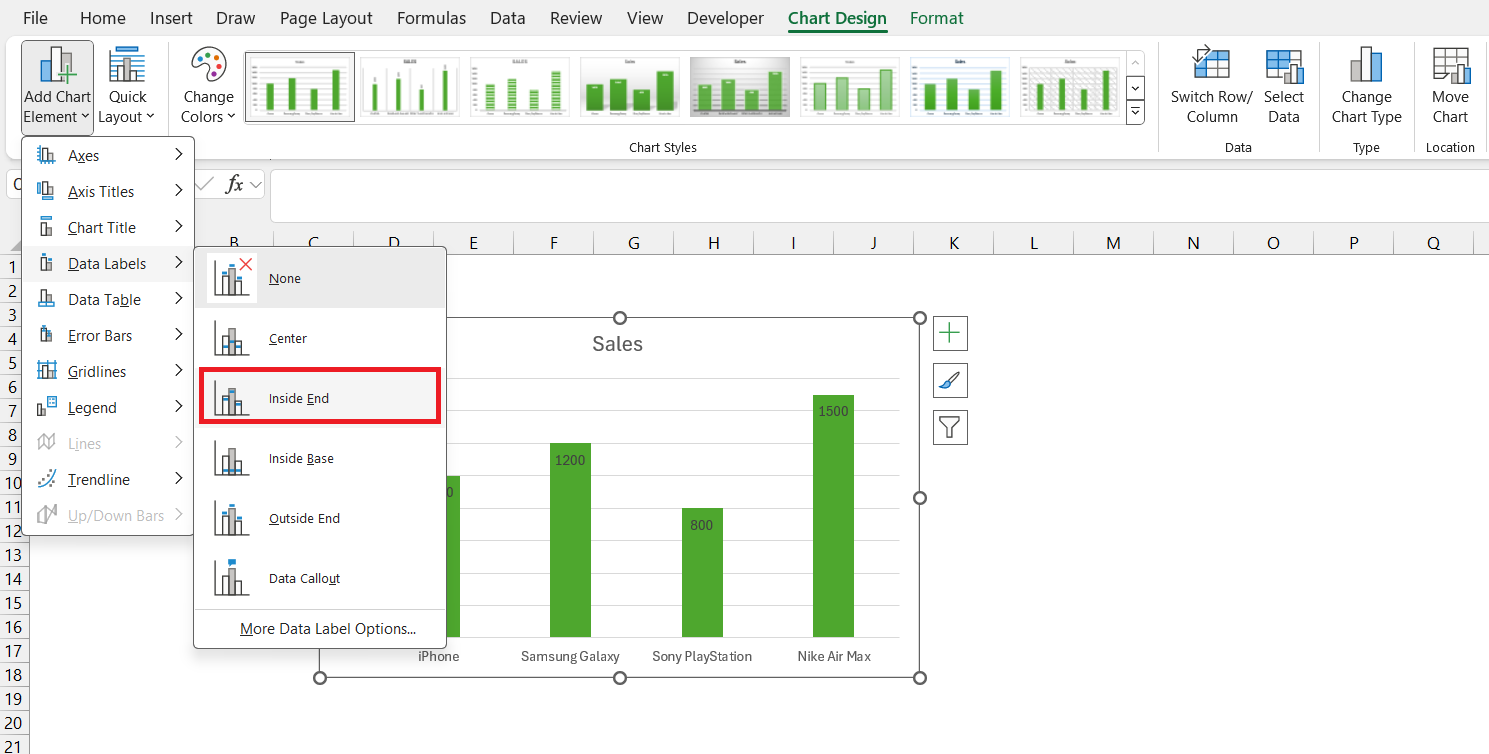
Data labels make charts easier to understand. They show exact numbers. Excel lets you add these labels quickly. Select your chart first. Then, go to the “Chart Elements” button. Click on “Data Labels.” Choose where you want the labels. Above, below, or beside the data points. This helps you see information better. You can also change label color. Make them bold or italic. Customize them as needed. This way, your data becomes more clear.
Gridlines are helpful for precision. They show lines across the chart. This helps to find exact values. To add gridlines, select your chart. Click “Chart Elements.” Then choose “Gridlines.” Decide how many lines you need. More lines mean more details. Fewer lines make charts simple. Adjust as needed. Gridlines guide the eyes. They make reading data easy. Use them for better understanding.
Saving And Sharing Your Chart
Enhance your Excel chart by adding arrows to data points for clarity and emphasis. Simply select the data point, then insert an arrow from the Shapes menu. Save and share your improved chart effortlessly.
Exporting Your Excel File
Exporting your Excel file is easy. First, save your work. Click on “File” at the top. Then select “Save As”. Choose where to save your file. You can pick your computer or a cloud service. This keeps your data safe.
To export, click “File” again. Choose “Export”. Decide the format you need. Options include PDF or CSV. Pick the one that suits your needs. This helps share your data easily.
Sharing With Others
Sharing your chart is simple. Start by emailing your file. Open your email and attach the Excel file. Write a quick note and send it. This way, others can see your work.
You can also use cloud services. Upload your file to Google Drive or OneDrive. Share the link with others. This lets them access your chart. Remember to set permissions right.
Troubleshooting Common Issues
Learn to easily add arrows to data points in Excel. Start by selecting your chart, then choose the data point. Next, insert a shape, select an arrow, and position it. This visual guide aids clarity in your data presentation.
Fixing Misaligned Arrows
Arrows on Excel charts may sometimes shift. This makes data unclear. Aligning them correctly is key. First, check the cell size. Adjust if needed. Use the format optionsfor precise placement. Zoom in to see better. This helps in positioning arrows perfectly. If arrows still misalign, try re-insertingthem. This often solves the issue.
Resolving Formatting Problems
Incorrect formatting can confuse readers. Always check arrow stylesand colors. They must match your chart theme. If formatting is off, use the Format Painter. This tool helps in quick fixes. Ensure arrows are not too small or too big. Adjust arrow size in the Format Arrowsection. Proper formatting makes the data clear.
Credit: databear.com
Frequently Asked Questions
How Do I Add Arrows To Data Points In Excel?
To add arrows, select your data points, click “Insert”, then “Shapes”. Choose an arrow shape and drag it to the desired data point. Customize the arrow using “Format” options. This enhances your data visualization in Excel.
Can I Customize The Arrow’s Color In Excel?
Yes, you can customize arrow colors. After inserting an arrow, click it, then select “Format”. Choose “Shape Fill” and pick your desired color. This allows your arrows to match your data visualization style.
Are Arrows Useful In Excel Charts?
Arrows are useful for highlighting trends and changes. They direct attention to specific data points, making your chart easier to interpret. This visual aid is especially helpful in presentations and reports.
Do Arrows Automatically Update With Data Changes?
No, arrows don’t automatically update with data changes. You need to manually adjust or move them if your data changes. Regularly check your chart to ensure the arrows accurately represent your data points.
Conclusion
Adding arrows to data points in Excel enhances clarity. It’s simple and effective. Follow the steps outlined to achieve this. Visual aids like arrows make data more understandable. They guide the eye to crucial information. Experiment with different styles for best results.
Practice makes perfect. Soon, you’ll use this skill effortlessly. Your Excel charts will communicate more effectively. Remember, clear data presentation is key. Keep exploring Excel’s features for more improvements. Happy charting!