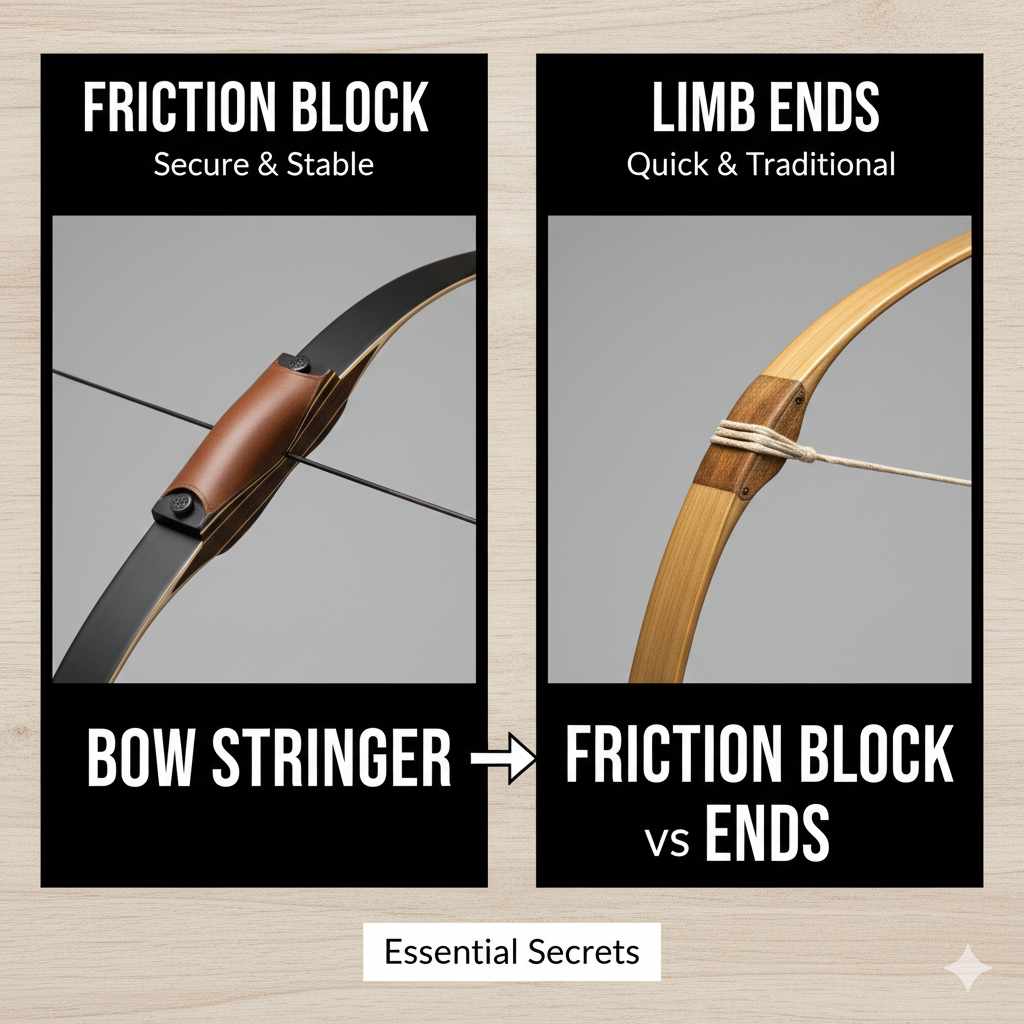
A bow stringer with “ends” (pockets) is safer and better for beginners because it securely cups the limb tips, preventing slippage. A “friction block” stringer is more versatile for different bow types, like flatbows, but requires careful placement to avoid slipping and potentially twisting the limb. For safety and ease, start with an “ends” style stringer.
Hello, fellow archers! Salman here. If you’ve just gotten your first recurve or longbow, you might be staring at a small rope-like tool called a bow stringer and wondering what to do with it. You’re not alone! Even more confusing, you might see two different kinds: one with two pockets and another with a pocket and a weird rubber block. This is a classic “friction block vs ends” dilemma, and choosing the right one is one of the most important first steps in your archery journey.
Don’t worry, this isn’t complicated at all. Getting this right is crucial for keeping both you and your beautiful bow safe. Stringing a bow the wrong way can twist the limbs or, worse, cause an injury. We want to avoid that! In this guide, I’ll break down everything you need to know about these two types of stringers, making it super simple to pick the perfect one for you. Let’s make sure you start off safe, confident, and ready for the fun part: shooting arrows!
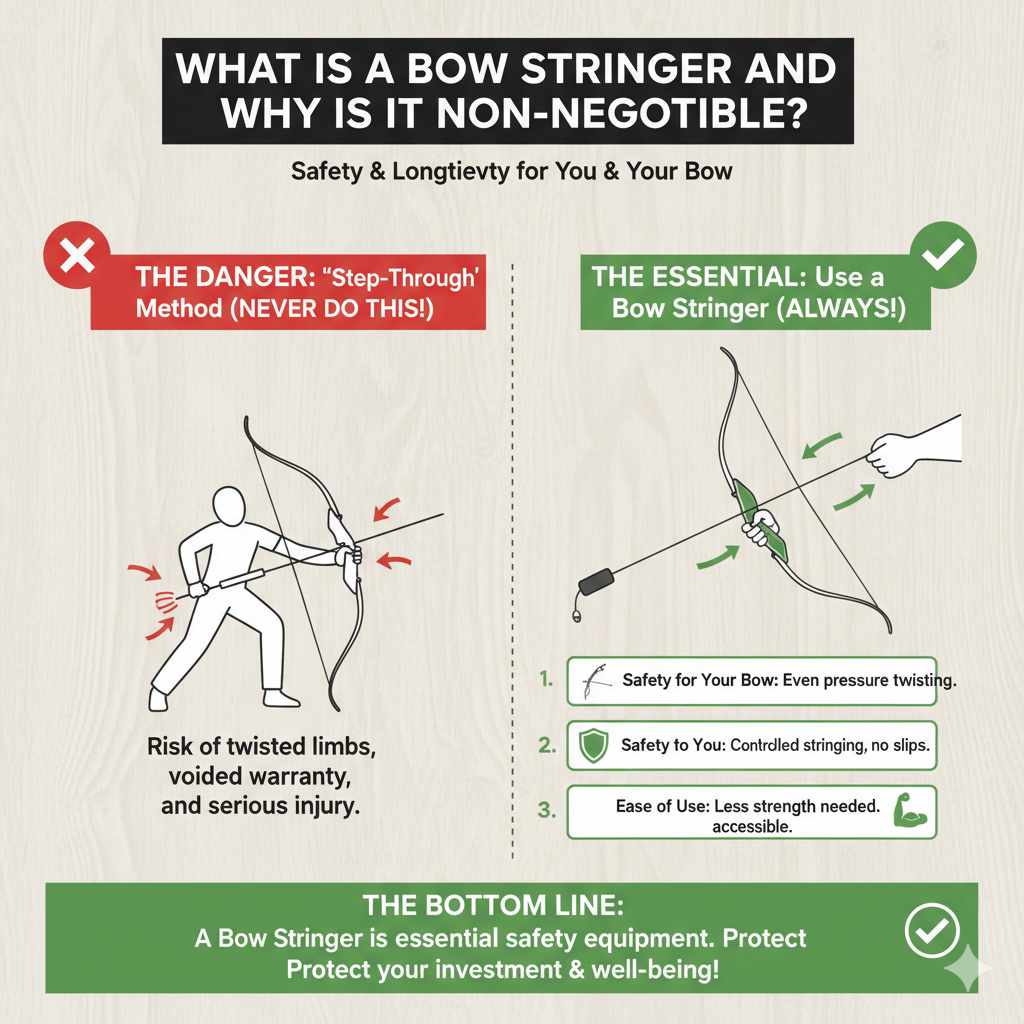
What is a Bow Stringer and Why is it Non-Negotiable?
Before we compare the two styles, let’s cover the basics. A bow stringer is a simple tool designed for one job: to help you safely bend (or “flex”) your bow’s limbs so you can slide the bowstring into place. Think of it as a leverage tool that does the hard work for you, evenly and safely.
You might see old movies or videos of people stringing a bow by bracing it against their leg and wrestling the string on. This is called the “step-through” or “push-pull” method. Please, never do this! It’s the fastest way to permanently twist your bow’s limbs, void your warranty, and risk the bow slipping and hitting you in the face.
Using a bow stringer ensures:
- Safety for Your Bow: It applies even pressure to both limbs, preventing them from twisting.
- Safety for You: It gives you complete control over the bow, so it can’t slip and cause injury.
- Ease of Use: It requires far less strength than muscle-power methods, making archery accessible to everyone.
In short, a bow stringer isn’t an optional accessory; it’s an essential piece of safety equipment. The small cost is a tiny price to pay for protecting your investment and your well-being.
The “Ends” Style Stringer: The Beginner’s Best Friend
The most common type of stringer, and the one I almost always recommend to new archers, is the “ends” style. It’s also known as a “double pocket,” “saddle,” or “cup” style stringer. Its design is simple and incredibly effective.
How it Works
This stringer has a cord with two distinct ends:
- A Large Pocket (or Saddle): This slides down over the upper limb of your bow. It’s wide enough to fit snugly without being too tight.
- A Small Pocket (or Cup): This is designed to fit securely over the very tip of the bottom limb.
When you step on the cord and pull up on the bow’s handle, the pockets hold the limbs securely at their strongest points—the tips. This allows the limbs to flex naturally and evenly, just as they would when you draw the bow to shoot.
Pros of the “Ends” Style Stringer
- Extremely Secure: The pockets physically cup the limbs, making it nearly impossible for the stringer to slip off during use. This is its biggest advantage.
- Very Beginner-Friendly: The design is intuitive. It’s obvious where each end goes, which builds confidence and reduces the chance of user error.
- Protects Limb Tips: It puts pressure exactly where the bow’s manufacturer intended—on the reinforced limb tips.
- Peace of Mind: For new archers, knowing the stringer is locked in place allows you to focus on the motion without worrying about slippage.
Cons of the “Ends” Style Stringer
- Limited Compatibility: While it fits most standard recurve and longbows, it may not work with bows that have very wide, square, or uniquely shaped limb tips.
- Can Show Wear: The material of the pockets can eventually fray or wear down, especially if your limb tips have sharp edges. Always inspect it before use!
Who Should Use an “Ends” Style Stringer?
I recommend this style to 9 out of 10 archers, especially:
- Absolute Beginners: Its safety and simplicity are unmatched.
- Recurve Archers: It’s the standard design for nearly all modern and traditional recurve bows.
- Younger or Cautious Archers: The secure fit provides maximum safety and confidence.
The Friction Block Stringer: The Versatile Specialist
The second type is the “friction block” stringer, sometimes called a “rubber block” or “pressure pad” stringer. It looks a bit different and works on a slightly different principle. While very effective, it requires a bit more care to use correctly.
How it Works
This stringer has one pocket and one rubber block:
- A Large Pocket: Just like the other style, this slides over the upper limb.
- A Rubber Block/Saddle: Instead of a pocket for the bottom tip, this features a grippy rubber block. You place this block on the back of the bottom limb (the side facing away from you), a few inches down from the limb tip.
When you pull up on the bow, the pressure you apply presses the rubber block firmly against the limb. The friction between the rubber and the limb surface holds it in place, allowing the bow to flex.
Pros of the Friction Block Style
- Highly Versatile: Because it doesn’t rely on fitting over a specific limb tip shape, this stringer works on almost any bow. This makes it great for archers with a collection of different bows, including flatbows or self-bows with non-standard tips.
- Universal Fit: If you have a bow with very wide or uniquely shaped limbs, a friction block stringer is often the only option that will work.
Cons of the Friction Block Style
- Risk of Slippage: This is the main drawback. If the rubber block isn’t placed correctly, or if the limb is dusty, wet, or slick, the block can slip. A slip during stringing can damage the bow or cause injury.
- Requires Careful Placement: You must ensure the block is perfectly centered on the limb. If it’s off to one side, it can introduce limb twist.
- Potential to Mar Finish: If dirt or grit gets trapped between the block and the limb, it can scratch or dent the bow’s finish over time.
- Less Intuitive for Beginners: It requires more attention to detail, which can be intimidating for someone just starting out.
Who Should Use a Friction Block Stringer?
This style is best suited for:
- Archers with Flatbows: Many flatbows have wide, thin tips that don’t fit in standard pockets.
- Owners of Multiple Bows: If you have a diverse collection, one friction block stringer can serve them all.
- Experienced Archers: Those who are already comfortable with the stringing process and can pay close attention to proper placement.
Friction Block vs Ends: Head-to-Head Comparison
Let’s put them side-by-side to make the choice crystal clear. Here’s a simple breakdown of how they stack up in the most important categories.
| Feature | “Ends” Style (Pocket) Stringer | “Friction Block” Style Stringer |
|---|---|---|
| Safety & Security | Excellent. The pockets physically lock onto the limb tips, minimizing slip risk. Ideal for beginners. | Good, but requires user care. Relies on friction, so there is a small but real risk of slippage if placed improperly or if limbs are slick. |
| Ease of Use | Very easy and intuitive. It’s clear where each end goes. Less room for error. | Slightly more complex. Requires precise, centered placement of the block, which can be tricky at first. |
| Bow Compatibility | Good. Fits the vast majority of standard recurve and longbows. | Excellent. Its universal design works with almost any bow, including those with non-standard limb tips like flatbows. |
| Risk of Limb Twist | Very Low. The cupped design encourages a straight, even pull on the limb tips. | Low to Moderate. If the block is placed off-center, it can introduce uneven pressure and potentially twist the limb. |
| Best For | Beginners, most recurve owners, and anyone prioritizing maximum safety. | Archers with flatbows or multiple bow types, and experienced users comfortable with careful placement. |
How to Use Each Bow Stringer: A Step-by-Step Guide
Reading about it is one thing, but seeing the steps makes it much easier. Follow these instructions carefully every time you string your bow.
Using an “Ends” Style (Pocket) Stringer
- Attach the Stringer: Slide the large pocket down over the top limb of your bow. Then, fit the small pocket securely over the bottom limb tip.
- Position the Bowstring: Place the bottom loop of the bowstring into the string groove on the bottom limb. Slide the top loop of the bowstring up the top limb, near the pocket.
- Get in Position: Place the bow horizontally in front of you with the back of the bow facing up. Step onto the middle of the stringer’s cord with both feet, about shoulder-width apart.
- Flex the Bow: Hold the bow’s grip firmly with one hand. Pull straight up, using your legs and back, not just your arms. You will see the limbs flex and the bowstring go slack.
- Slide the String On: With your other hand, carefully slide the top loop of the bowstring up and into the string groove at the top limb tip. Make sure it seats fully in the groove.
- Check Alignment: Before releasing tension, glance down both limbs to ensure the string is centered in both grooves.
- Release Tension Slowly: Gently lower the bow to release the tension. Do not let it snap back. Remove the stringer, and you’re ready to go!
Using a “Friction Block” Style Stringer
- Attach the Top Pocket: Slide the large pocket over the top limb, just like with the other style.
- Position the Block (The Crucial Step): Place the rubber block on the back of the bottom limb (the side facing away from the grip). Position it a few inches (e.g., 4-6 inches) down from the tip. Crucially, ensure it is perfectly centered on the limb.
- Position the Bowstring: Secure the bottom loop in its groove and slide the top loop up the limb.
- Get in Position: Step onto the stringer’s cord with both feet.
- Flex the Bow: As you pull up on the grip, keep an eye on the rubber block to make sure it doesn’t move. The pressure should hold it tight.
- Slide the String On: Guide the top string loop into its groove.
- Check and Release: Double-check that the string is centered on both limbs and then slowly release the tension. Remove the stringer.
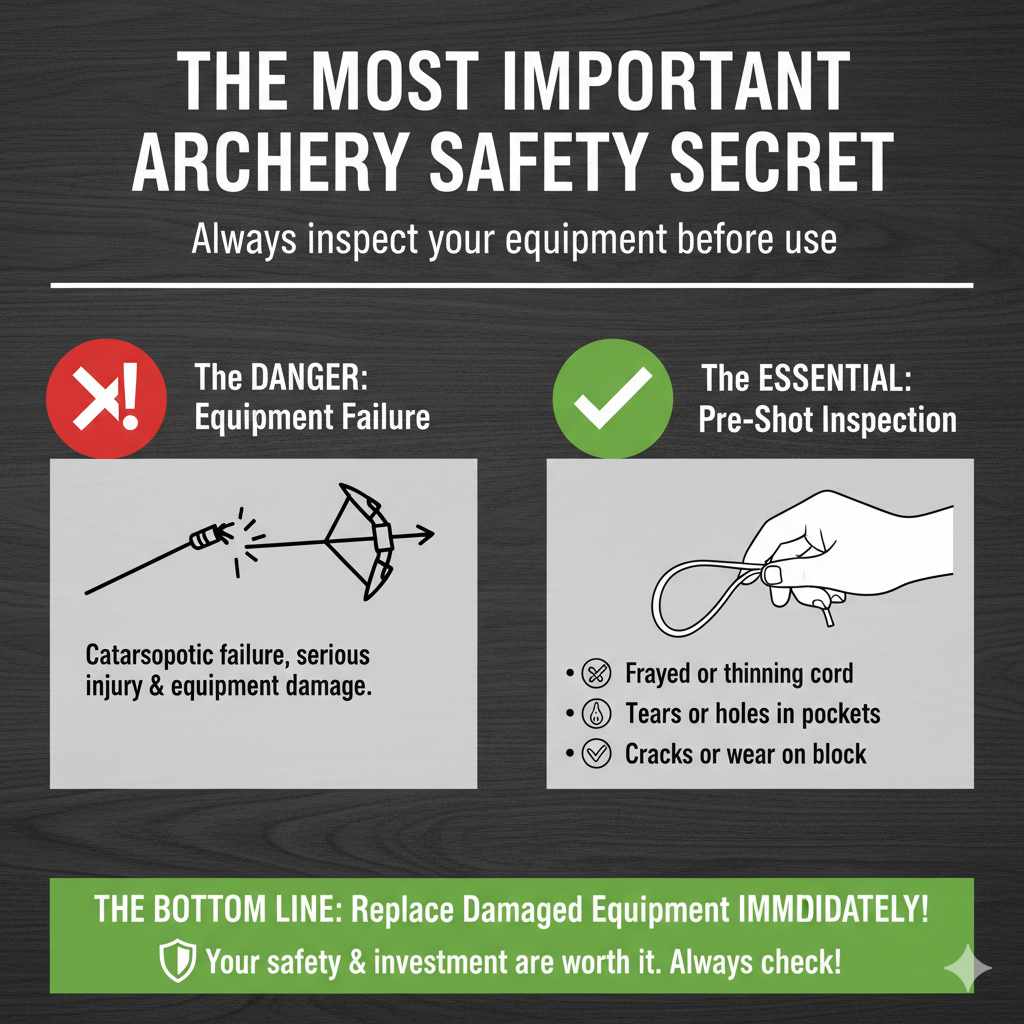
The Most Important Archery Safety Secret
The single most overlooked safety tip is this: always inspect your equipment before you use it. This applies to your bow, your arrows, and especially your bow stringer. Before you even think about stringing your bow, take 10 seconds to check your stringer for:
- Frayed or thinning cord
- Tears or holes in the leather or nylon pockets
- Cracks or excessive wear on the rubber block
A bow stringer is an inexpensive tool. If it shows any signs of damage, replace it immediately. The risk of one failing during use is not worth it. For more comprehensive safety guidelines, trusted organizations like World Archery provide official rules and best practices that are excellent resources for every archer.
Frequently Asked Questions (FAQ)
1. What is the safest bow stringer for a beginner?
The “ends” style stringer with two pockets is by far the safest choice for a beginner. The pockets physically cup the limb tips, which almost completely eliminates the risk of the stringer slipping off during use. Its design is simple, intuitive, and promotes good, safe habits from day one.
2. Do I really need a bow stringer for a low-poundage bow?
Yes, absolutely. Using a bow stringer is not about strength; it’s about safety and technique. Even a 20-pound bow can have its limbs twisted if strung improperly with the step-through method. The stringer ensures even pressure on the limbs, protecting your bow from damage regardless of its draw weight.
3. How do I know if my bow stringer is the right length?
A properly sized bow stringer should allow you to step on the cord and pull the bow’s handle up to about your waist height to slide the string on. If you have to pull the bow way up to your chest, the stringer is too long. If you can barely flex the limbs at all, it’s too short. Most commercial stringers are adjustable or come in standard lengths that fit most bows.
4. Can a friction block stringer damage my bow’s finish?
It can, but it’s preventable. The risk comes from dirt, sand, or grit getting trapped between the rubber block and the limb’s surface. When you apply pressure, that grit can scratch or press into the finish. To prevent this, always wipe your limb and the rubber block clean before each use.
5. Can I use a recurve stringer on a longbow?
Usually, yes. Most “ends” style stringers for recurves will also fit longbows, as the limb tip design is often similar. The friction block style is even more universal and will almost certainly work. The key is ensuring the pockets or block fit securely and are placed correctly.
6. How often should I unstring my bow?
You should unstring your recurve or longbow after every shooting session. Leaving a traditional bow strung for extended periods (days or weeks) can cause the limbs to lose some of their power and elasticity over time, a condition known as “limb memory” or “stacking.” Unstringing it lets the limbs rest and preserves their performance.
7. What happens if I string my bow backward?
Stringing a bow backward (with the limbs curving away from you instead of toward you) will almost certainly cause catastrophic failure. The limbs are designed to flex in only one direction. Forcing them the wrong way can cause them to crack, delaminate, or shatter, permanently destroying the bow and creating a serious safety hazard.
Conclusion: Your Best Choice for Safe Archery
Choosing between a friction block and an ends style bow stringer is one of the first technical decisions you’ll make as an archer, and hopefully, it feels much simpler now. To put it plainly: both tools get the job done, but they serve slightly different needs.
For the vast majority of new and intermediate archers using standard recurve or longbows, the “ends” style stringer is the clear winner. Its secure, slip-proof design provides the safety and peace of mind you need to build good habits and focus on the fun of archery.
The friction block stringer is a fantastic, versatile tool for those with non-standard bows or a diverse collection. It requires more mindfulness, but for the right archer and the right bow, it’s the perfect solution.
Ultimately, the most important “secret” is simply to use a bow stringer every single time. It shows respect for your equipment and a commitment to safety. By starting with the right gear and the right techniques, you’re setting yourself up for a lifetime of enjoyment in this amazing sport. Happy shooting!