Bear Ready-to-Hunt (RTH) bows come with sights installed, but they are only roughly set at the factory. They are NOT precisely sighted in for your specific shooting form, draw length, or anchor point. To ensure accuracy and safety, you MUST perform a custom sight-in process, usually starting at 10 or 20 yards. This guide gives you the easy steps.
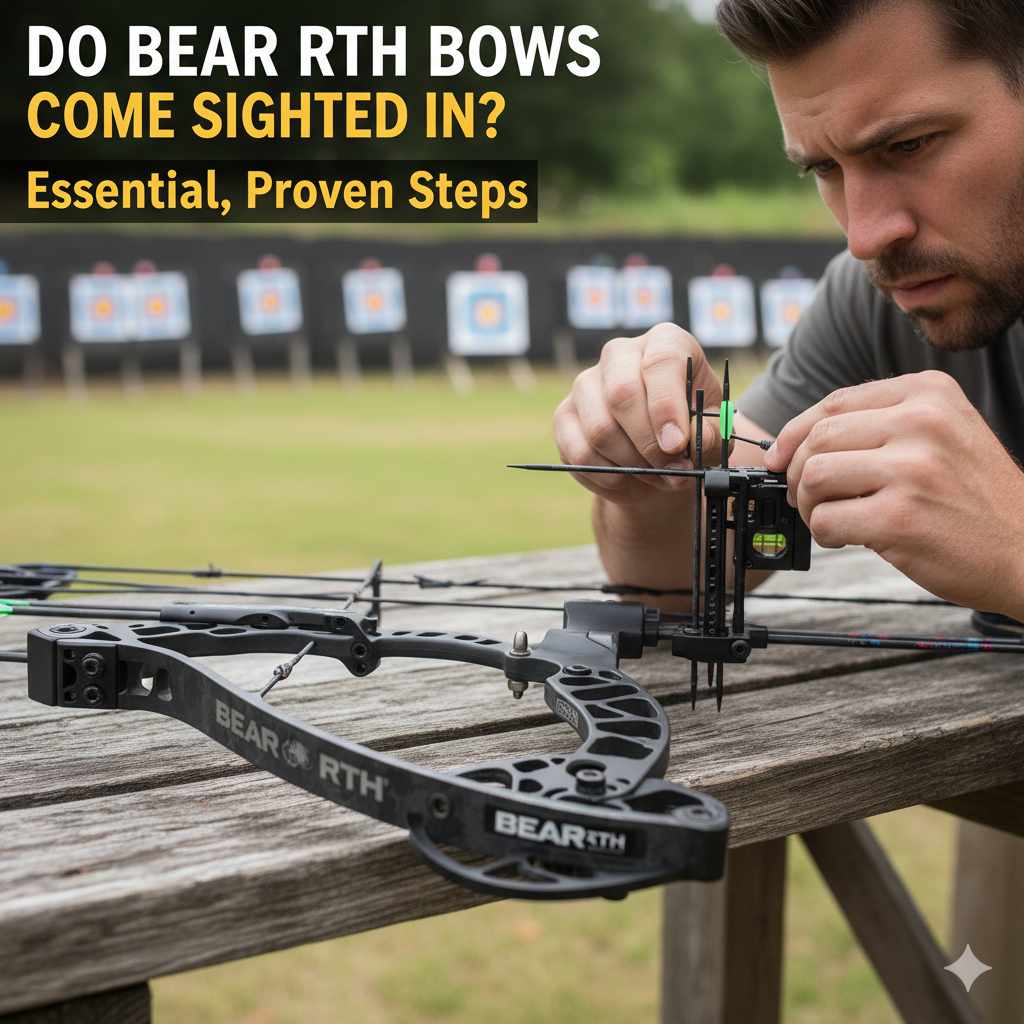
Welcome to the world of archery! Getting your first Bear RTH (Ready-to-Hunt) compound bow is exciting. But a common question pops up right away: Is this bow sighted in and ready to shoot accurately? It’s a frustrating mystery for many beginners.
The short answer is that while the sights are mounted, they are not calibrated to you. Think of it like buying a new car—the mirrors are there, but you still need to adjust them for your view. I’m Salman Arfeen, and I’m here to walk you through the essential steps. We will turn those random shots into consistent groups, boosting your confidence safely and quickly.
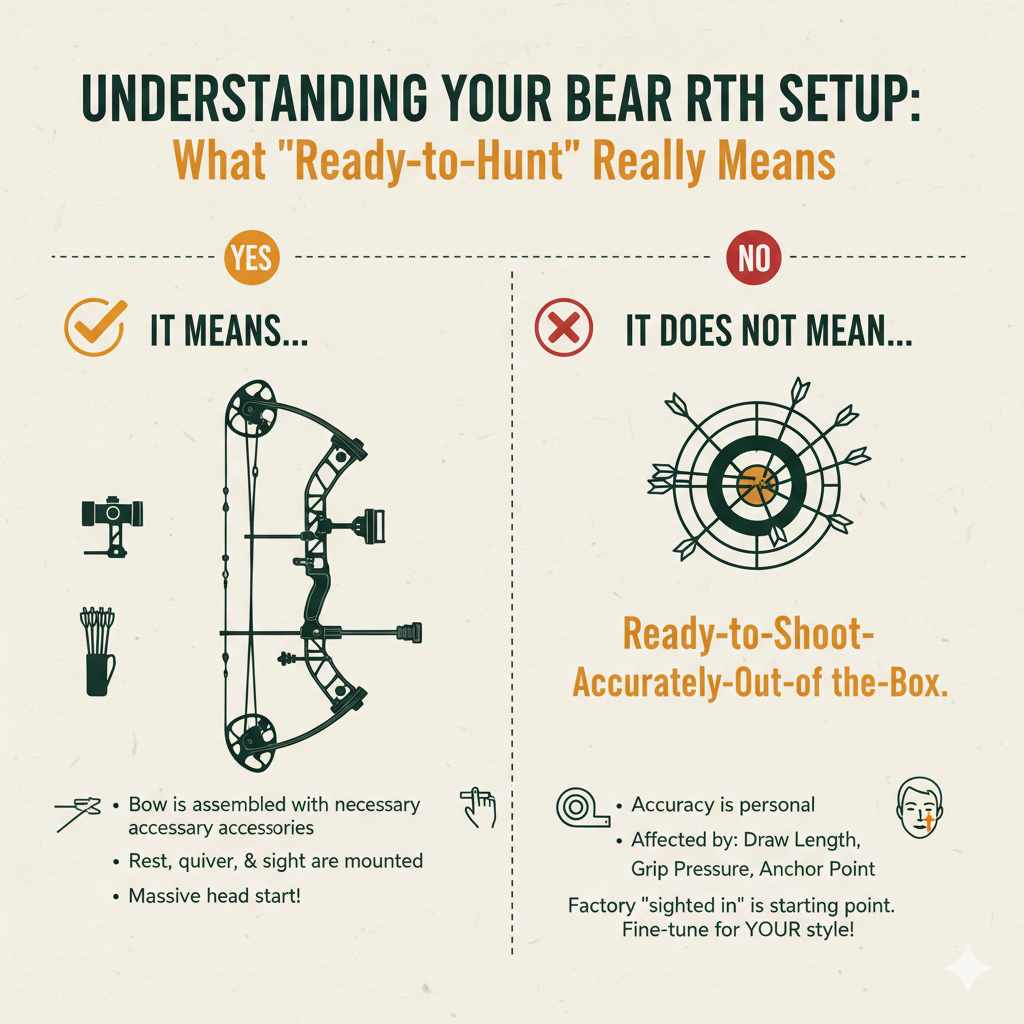
Understanding Your Bear RTH Setup: What “Ready-to-Hunt” Really Means
When you buy a Bear RTH bow, “Ready-to-Hunt” means the bow is assembled and has the necessary accessories to shoot safely. It means you don’t have to buy a rest, quiver, or sight separately. Everything is mounted on the riser for you. It’s a massive head start!
However, it does not mean “Ready-to-Shoot-Accurately-Out-of-the-Box.” Accuracy is personal. Your draw length, the pressure you apply to the grip, and your specific anchor point all change where the arrow lands. The factory can’t possibly account for that during mass production.
For the factory, “sighted in” usually means they have placed the sight housing so that the pins fall somewhere close to where they should be if a theoretical archer shot it. Your job is to fine-tune it based on your actual shooting style.
Components Included in a Bear RTH Package
Let’s look at what usually comes installed and what you need to confirm is set up correctly for you.
| RTH Component | Factory Setting Status | Required Beginner Action |
|---|---|---|
| Sight | Installed (Roughly centered/mounted) | MUST be precisely sighted in to match your shot. |
| Arrow Rest | Installed (Usually centered) | Check alignment; minor adjustments may be needed based on arrow spine. |
| Peep Sight | Installed (Often tied into the string) | Check height alignment with your anchor point and D-loop. |
| D-Loop and Nock Points | Installed | Confirm knot safety and ensure proper position (90 degrees to the rest is standard). |
| Quiver and Stabilizer | Installed | Usually good to go; no tuning required. |
Safety First: Pre-Sighting Checks You Must Perform
Before you ever draw back an arrow, safety must be your top priority. As your trusted guide, I insist you verify these things. Shooting a compound bow incorrectly can be very dangerous to the equipment and yourself.
Essential Safety Gear Checklist
- Eye Protection: Always wear safety glasses or shooting glasses. Though rare, a string failure or a component breaking can send shrapnel toward your face.
- Armguard: Especially for beginners, an armguard prevents the string from slapping your forearm, which is painful and ruins your shot.
- Finger/Release Protection: Ensure your mechanical release aid is functioning correctly, or use finger tabs/gloves if shooting finger release. Never dry-fire the bow (drawing and releasing without an arrow).
- Proper Arrows: Only use arrows that are correctly spined and weighted for your bow’s specific draw weight and length. Using the wrong arrow can cause serious damage or injury. Refer to your bow manual or consult an expert before shooting.
Also, make sure you are shooting in a safe environment. Never shoot at targets that do not have a large, secure backstop, and ensure there is nothing, or no one, beyond the target. For reliable safety resources, consider checking organizations like USA Archery for range safety guidelines.
The Core Process: Sighting In Your Bear RTH Bow
Sighting in means matching your eye, your peep sight, and your pin sight to your arrow’s point of impact. We always start close, usually at 10 or 20 yards, and work our way back. Consistency in your form is crucial here—if your groups are all over the place, it’s a form issue, not a sight issue.
Tools Needed for Sighting In
You will need a few simple tools and supplies:
- Target set up safely at 10 yards (9.1 meters).
- A comfortable chair or stool if you plan to take breaks.
- Small Allen wrench set (usually included with the sight package).
- Pen or marker to track adjustments.
- Consistent arrows (at least 6 matched arrows).
Step 1: Establishing the Starting Point (The 10-Yard Zero)
We start close to eliminate major vertical errors quickly. The biggest goal here is to get the arrow hitting the target with consistent form.
A. Initial Setup: The Shot Sequence
Stand 10 yards from the target. Use the very top pin (usually the 20-yard pin) for this close range. Shoot three arrows using the exact same anchor point, grip pressure, and release sequence every time.
B. Analyze the Group
Look at where your three arrows landed. Ignore any major flyers; focus on the center of the tightest group.
- If they hit dead center, fantastic! You might move directly to Step 4.
- If they hit consistently high, low, left, or right, you need to adjust the sight housing.
Remember this simple rule for adjusting your sight: Chase the arrow. If the arrow hits low, move your sight pin down. If the arrow hits left, move your sight pin left.
Step 2: Adjusting for Horizontal Error (Windage)
We usually fix left/right (windage) first because adjustments here can sometimes affect your vertical alignment slightly.
A. Making Windage Adjustments
If your arrow group is consistently to the left of the center bullseye, you need to move the entire sight housing to the left. If the group is to the right, move the sight housing to the right.
Bear sights often have small hash marks for reference. Use your Allen key to loosen the windage screw, move the housing a small amount (maybe two hash marks), tighten the screw, and shoot three more arrows. Repeat this process until your group is centered left-to-right on the bullseye.
B. Practical Example
You shoot, and your arrows hit 4 inches to the left. You move your sight housing 4 hash marks to the left. Shoot again. If the arrows are now 1 inch to the right, you moved too far. Move the sight back 1 hash mark to the right.
Step 3: Adjusting for Vertical Error (Elevation)
Once your windage is dialed in at 10 yards, it’s time to adjust the up and down (elevation).
A. Pin Movement
You are still using your top pin (the 20-yard pin). If your group is consistently high, move the pin up. If the group is low, move the pin down.
- Arrow hits HIGH: Move the top pin UP on the housing.
- Arrow hits LOW: Move the top pin DOWN on the housing.
Just like windage, make a small adjustment, tighten the screw, and shoot three more arrows. Keep adjusting until the 10-yard group is hitting exactly where the top pin is aimed.
Expert Tip from Salman: Why only 10 yards? Because at 10 yards, gravity has minimal effect. If you are hitting exactly where you aim at 10 yards, you know that the pin is truly aligned with your shooting form. This gives us a perfect baseline for longer distances.
Step 4: Confirming the 20-Yard Pin
Now that your form is warmed up and your sight is confirmed at 10 yards, it’s time to move to 20 yards (18.3 meters). This is the standard distance for setting your primary hunting or target pin.
A. Moving Back
Move your target back to 20 yards. Aim using the same top pin you just sighted in at 10 yards. Shoot three arrows.
Your arrows should now hit slightly below the bullseye. This is because the arrow starts its flight slightly below the sight line and then drops due to gravity. If they hit far too low, your vertical alignment from 10 yards might have been slightly off, or your form dipped.
B. Fine-Tuning the 20-Yard Elevation
Adjust the entire sight housing up or down until your 20-yard group centers perfectly on the bullseye. Because you already corrected the horizontal alignment at 10 yards, you should only need minor elevation tweaks.
- If your group is 3 inches low, loosen the elevation lock and move the entire sight housing down until the pin moves up 3 inches relative to the target.
Once you are grouping accurately at 20 yards, you can lock down the main screws for the 20-yard pin and the horizontal bar. This pin is now officially set!
Step 5: Setting Up Multi-Pin Sights (20, 30, 40 Yards)
Most Bear RTH bows come with a multi-pin sight (usually 3 to 5 pins). Once the 20-yard pin is set using the entire sight housing, you must adjust the individual lower pins.
A. The 30-Yard Pin
- Move the target back to 30 yards.
- Aim using the second pin (which will become your 30-yard pin).
- Shoot three arrows. They will likely hit low.
- Adjust only the individual 30-yard pin. If the group is 6 inches low, move that specific pin 6 inches down the sight rail relative to the 20-yard pin.
- Shoot and confirm until the group is centered.
B. The 40-Yard Pin and Beyond
Repeat this process for 40 yards, 50 yards, and so on, adjusting only the individual pin responsible for that distance. Since the arrow drops faster the farther it travels, the distance between the 30-yard pin and the 40-yard pin will be greater than the distance between the 20-yard and 30-yard pins.
Remember, once the 20-yard pin is set using the entire sight housing, the main housing should not move again. You are only shifting the smaller, individual pins.
Common Sighting Mistakes and Simple Fixes
Even with great instructions, beginners often run into the same hurdles. Don’t get frustrated; let’s solve them together.
Mistake 1: Target Panic and Snap Shooting
The Symptom: Arrows are wildly inconsistent, sometimes hitting left, sometimes right, or high/low, even at 10 yards.
The Fix: This is a form issue, not a sight issue. You are rushing the shot or anticipating the release. Focus on a strong, repeatable anchor point. Practice blank bale shooting (shooting at a target face without aiming spot) from 5 yards until you can execute a surprise release every time. Consistent form is the bedrock of accuracy.
Mistake 2: Confusing Windage and Form
The Symptom: Arrows consistently hit left or right, even after adjusting the sight.
The Fix: Check your bow grip. Are you “torquing” the bow (twisting it slightly with your hand)? Compound bows must be held with a light, relaxed grip, sometimes called the “heel of the thumb” or “open hand” grip. Excessive torque pushes the arrow off course every time.
Mistake 3: Over-Adjusting
The Symptom: You make large sight moves (halfway across the sight rail) after one bad shot.
The Fix: Never adjust based on a single shot. Always shoot a group of three arrows. Your adjustments should be small, incremental, and precise. If you are 5 inches off at 20 yards, a small adjustment of the sight is probably all you need—not a massive shift.
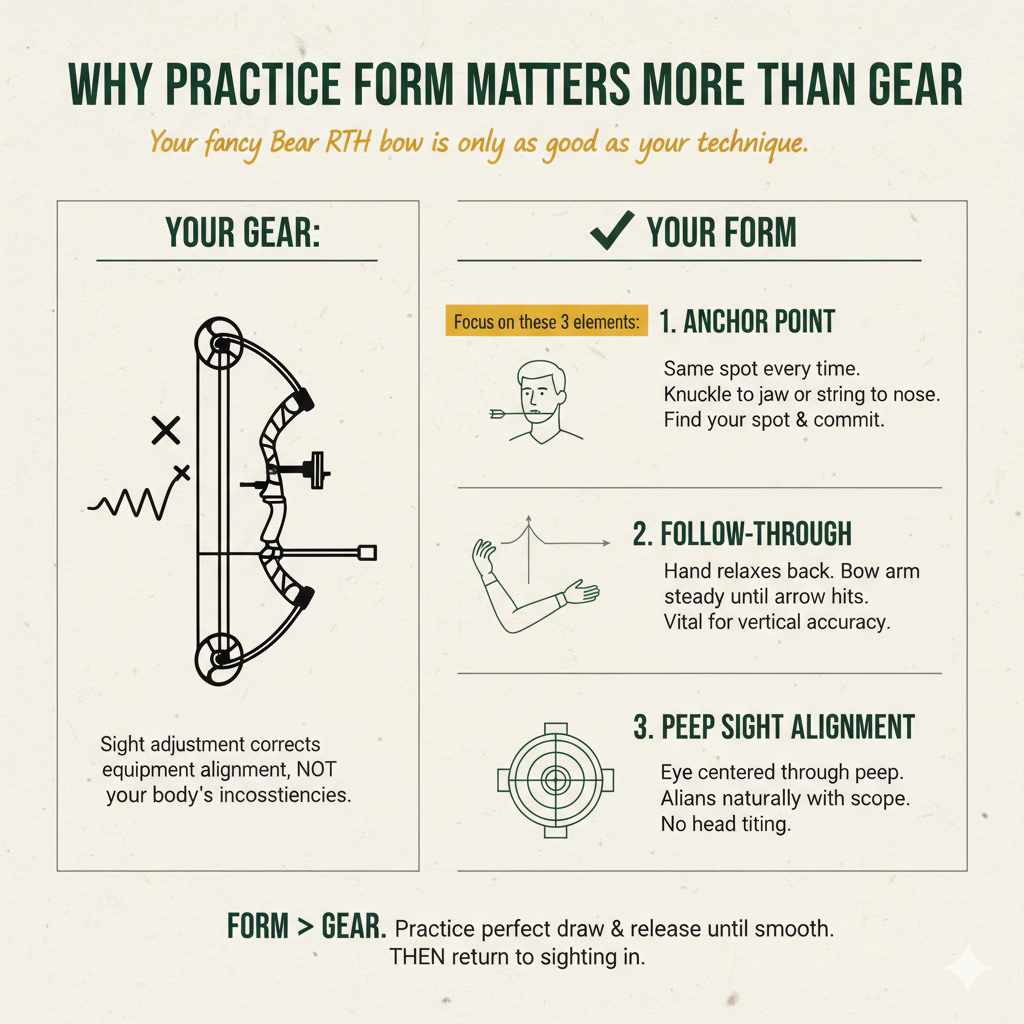
Why Practice Form Matters More Than Gear
I cannot stress this enough: your fancy Bear RTH bow is only as good as your technique. If you are inconsistent, no amount of sight adjustment will help you. Sight adjustment corrects the equipment’s alignment relative to your consistent shot—it does not correct your body’s inconsistencies.
Focus on these three form elements while sighting in:
- Anchor Point: This must be exactly the same every single time. Usually, the knuckle of your index finger touches the corner of your jawbone, or the string touches the tip of your nose. Find your spot and commit to it.
- Follow-Through: After the release, your hand should relax and float back naturally. Do not drop your bow arm to watch the arrow fly. Holding your bow arm steady until the arrow hits the target is vital for consistent vertical accuracy.
- Peep Sight Alignment: Ensure that your eye is centered perfectly through the peep sight window and that the peep aligns naturally with your scope housing/pin guard. If you have to tilt your head to see through the peep, you need to adjust its height on the string.
If you suspect a form issue is derailing your sighting, spend time practicing perfect draw cycles and releases without aiming until the shot execution feels natural and smooth. Only then return to sighting in.
Tool Kit Checklist for Sighting In
Having the right gear handy makes the sighting process less frustrating and more efficient. Keep these items in your archery tool box:
| Tool/Item | Purpose | Notes |
|---|---|---|
| Metric/Standard Allen Wrenches | Adjusting sight pins and housing screws. | Bear RTH packages often include a basic set, but higher quality ones prevent stripping. |
| Sharpie or Pencil | Marking existing sight pin positions or drawing reference lines. | Essential for tracking adjustments if you get lost. |
| Small Level | Ensuring the bow is held perfectly vertical during the shot. | Many sights have built-in levels; check it regularly. |
| Bow Stand or Holder | Keeps the bow off the ground between shots. | Prevents dirt or accidental damage to the cams and string. |
| Spare Peep Sight Tubing (Optional) | If your peep needs rotation to align (though most newer Bear RTH bows minimize this need). | Only adjust peep tubing if rotation is inconsistent. |
When working with any precision equipment like bow sights, remember to use gentle pressure. Overtightening aluminum components can easily strip the screws or damage the housing, leading to alignment problems that are impossible to fix easily.
Frequently Asked Questions (FAQ)
Beginners often have similar excellent questions when facing the sight-in process. Here are some of the most common issues I hear:
Q1: My peep sight doesn’t line up perfectly. Can I still sight in the bow?
A: No, you should fix the peep sight first. Your peep sight must be perfectly aligned with your eye at full draw without having to tilt or strain your neck. If it’s too high or too low, a pro shop needs to move it up or down the string. If it’s rotated sideways, sometimes a simple twist of the string or adding a small piece of tubing will fix it. Incorrect peep alignment ruins consistency, making sighting impossible.
Q2: How much should I move the sight pins per adjustment?
A: Start by moving the sight housing roughly half the distance of your error. If your arrow hit 4 inches low at 20 yards, move the pin down 2 inches on the sight rail. After the first shot, you’ll usually only need micro-adjustments (like 1/4 inch moves) to dial it in. Never adjust more than the distance of your error.
Q3: My draw length feels slightly off. Should I adjust the sight first?
A: Absolutely not. Draw length must be corrected before sighting. An incorrect draw length compromises your anchor point and form, leading to inconsistent arrow flight. If your draw length is too long or too short, you need to adjust the bow’s module (often easily done on Bear RTH bows) or seek help from a certified technician before proceeding with sighting.
Q4: Why do I hit high at close range (10 yards) but low at long range (50 yards)?
A: This is completely normal and expected! At 10 yards, the arrow hasn’t dropped much, but you might be anticipating the shot (peeking) and slightly raising your bow arm. At 50 yards, gravity has taken full effect, causing the arrow to drop significantly. This is why multi-pin sights are necessary, with each pin set lower than the last.
Q5: Does changing my arrow type require me to sight in the bow again?
A: Yes, almost always. Changing the arrow’s weight, spine, or fletching will affect its trajectory (the path it flies). Heavier, stiffer arrows usually hit differently than lighter, weaker arrows. You should always reconfirm your 20-yard pin when switching to a new batch or type of arrow.
Q6: What if my 20-yard grouping is great, but my 30-yard grouping is terrible?
A: If your close-range groups are tight but the farther groups spread out, it is often a form breakdown caused by distance anxiety. You might be dropping your bow arm sooner or applying too much tension on the release. Focus on extending your follow-through and ensuring a consistent anchor point, especially when shooting at extended ranges.
Q7: I can’t keep my 20-yard pin steady on the target. What should I do?
A: Some pin float is unavoidable—you won’t hold perfectly still. The key is to aim consistently within the float zone. If the pin is generally floating around the center of the bullseye, execute the shot when the pin is closest to the center. Heavy stabilizers can help reduce excessive pin movement by balancing the bow.
Conclusion
You now know the essential truth: Bear RTH bows are ready for accessories, but they are not sighted in for you. The sight-in process is a mandatory step that connects your unique physical form to the physics of the bow. By following these proven steps—starting close, chasing the arrow, and adjusting in small increments—you can quickly transform random shots into tight, consistent groups.
Remember, the goal is not just accuracy; it’s repeatability and confidence. Take your time, focus on flawless form before sight adjustments, and enjoy the process. Every click of the sight dial brings you closer to becoming a skilled, confident archer. Now grab your Allen wrenches, head to the range, and start sending those arrows exactly where you want them!