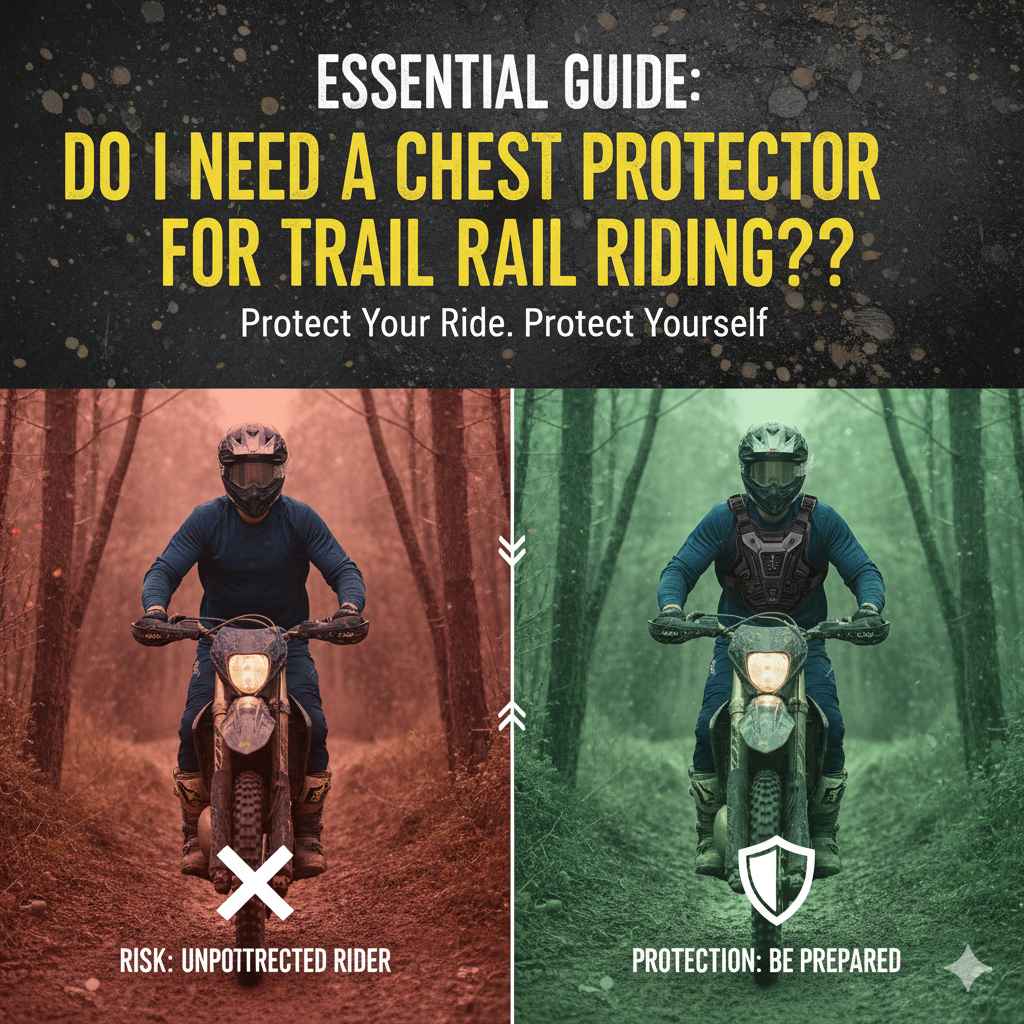
For mountain biking and ATV trail riding, a chest protector is highly recommended, especially for aggressive terrain or higher speeds. It shields your vital organs and sternum from impacts with branches, rocks, and falls, significantly boosting safety and confidence on the trail.
Welcome, trail riders! When you start hitting the dirt paths and woodland tracks, one piece of gear often pops up in discussions: the chest protector. Is this just extra bulk, or is it truly necessary for happy, safe riding? It’s common to wonder if you need one, especially when you see seasoned riders wearing them. Trying to decide what gear to invest in first can feel overwhelming. Don’t worry! We are going to break down exactly what a chest protector does, when you absolutely need one, and how to choose the right one for your style of trail riding. Let’s make sure your next ride is both thrilling and secure. We will cover the risks, the benefits, and the selection process step-by-step.
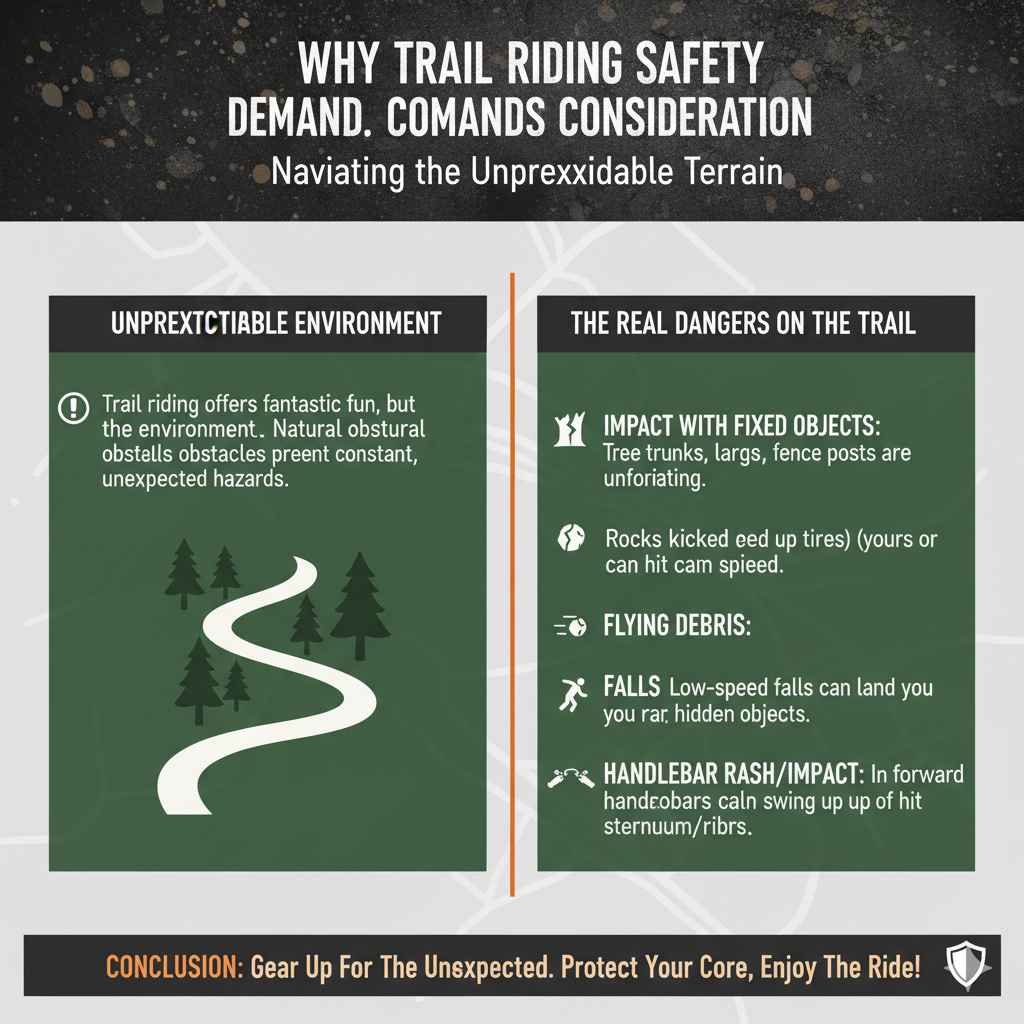
Why Trail Riding Safety Demands Consideration
Trail riding, whether on a mountain bike or an ATV/dirt bike, is fantastic fun. However, the trail environment is unpredictable. Unlike a smooth track, the woods and rough terrain present constant, unexpected hazards. Think about what you encounter when you are moving fast over uneven ground.
The biggest difference between pavement riding and trail riding is the presence of natural obstacles. These obstacles don’t always stay still or offer a soft landing.
The Real Dangers on the Trail
When you are out on the dirt, the risks shift from simple sliding scrapes to hard impacts. Here are the most common dangers that a chest protector helps guard against:
- Impact with Fixed Objects: Tree trunks, large rocks, or fence posts are unforgiving. A direct hit to the chest can be serious.
- Flying Debris: Especially on dirt bikes or ATVs, rocks kicked up by tires (yours or the rider ahead of you) can hit you at high speed.
- Falls and Tumbles: Even a low-speed fall can result in landing on a hard object hidden just under leaves or dirt.
- Handlebar Rash/Impact: In a forward crash, the handlebars can swing up and hit you squarely in the sternum or ribs.
These scenarios highlight why specialized protective gear moves from “optional” to “essential” when leaving the paved road.
Understanding the Chest Protector: What It Is and Does
A chest protector, sometimes called a roost guard (especially in motocross), is designed primarily to shield the rider’s torso from direct frontal impacts. For trail riding, it offers protection that your jersey alone cannot.
Anatomy of a Trail Riding Protector
Modern chest protectors are surprisingly lightweight, using a combination of hard plastics and impact-absorbing foams. They generally consist of two main parts:
- Front Plate: Covers the sternum, ribs, and upper abdomen. This is the main barrier against impacts.
- Back Plate: Covers the spine and upper back. While often thinner than dedicated spine protectors, it adds crucial coverage.
Many protectors also include shoulder caps and adjustable side straps to keep everything securely in place during a crash.
The Primary Function: Impact Dispersion
The key to any protective gear is not just stopping the impact, but spreading the force across a wider area so no single point takes the full brunt.
When a branch hits your chest plate, the hard plastic spreads that energy over the foam beneath it, which then compresses to absorb the shock before it reaches your ribs or internal organs. This difference between a direct hit and a dispersed impact is often the difference between a bruise and a serious injury. For more information on impact protection standards in sports equipment, you can often find guidelines from organizations focused on sports safety, though specific ATV/MTB standards vary.
Do I Need A Chest Protector For Trail Riding? The Verdict
The simple answer depends heavily on how you are riding, what you are riding, and where you are riding. We can categorize the need based on common trail scenarios.
Scenario 1: Beginner/Casual Mountain Biking (Low Speed, Smooth Trails)
If you are on flow trails, gravel paths, or very mild singletrack, the risk of high-speed, severe impact is lower.
- Need Level: Low to Medium.
- Alternative Gear: A high-quality upper body armor jacket (with integrated plastic armor) might offer enough rotational and low-speed impact protection without the bulk of a full race protector.
Scenario 2: Aggressive Mountain Biking (Enduro, Downhill, Technical Terrain)
When riding steep, rocky trails, or trails with high exposure, crashes are more likely and impacts are harder.
- Need Level: High.
- Why: In these environments, you are frequently exposed to sharp, jutting obstacles. A dedicated chest protector offers far superior coverage over the sternum than standard elbow or knee pads.
Scenario 3: ATV/Dirt Biking Trail Riding
This involves higher speeds, larger machines, and greater debris.
- Need Level: Essential.
- Why: Speeds are naturally higher, and the risk of being hit by a roost (rocks/dirt thrown by the tires) is constant. A full chest protector is almost universally worn by serious dirt bike riders for this reason.
If you answer yes to any of the following questions, then yes, you absolutely need a chest protector:
- Am I riding faster than I can comfortably stop?
- Am I riding through dense woods where branches are common?
- Am I riding a powered vehicle (ATV/Dirt Bike)?
- Do I plan on riding trails where a fall could result in hitting a large, solid object?
Comparing Chest Protectors and Upper Body Armor
When shopping for torso protection, you will see two main categories. It is important to know the difference so you choose the right tool for the job.
Table 1: Chest Protector vs. Upper Body Armor Jacket
| Feature | Dedicated Chest Protector (Roost Guard) | Upper Body Armor Jacket |
| :— | :— | :— |
| Primary Focus | Hard impact resistance (sternum, back) | General abrasion, moderate impacts, mobility |
| Coverage | Large, rigid plastic front and back plates | Foam padding, sometimes small plastic inserts |
| Ventilation | Generally excellent (less material covering skin) | Can be warmer due to mesh/fabric chassis |
| Best For | High-speed motorsports, very rocky MTB terrain | Low-speed MTB, casual trail riding, high mobility needs |
| Bulk | Moderate to High | Low to Moderate |
For pure protection against piercing or hard blunt force trauma on rough trails, the dedicated chest protector wins. However, if mobility and temperature management are your top concerns on mild days, a well-armored jacket might suffice.
Key Features to Look for in a Trail Riding Chest Protector
Choosing the right gear is crucial for comfort and effectiveness. A protector that fits poorly will either not cover the right areas or restrict your movement, leading to fatigue.
1. Fit and Adjustability
This is the most important factor. A chest protector must stay centered on your torso, even when you are standing, leaning, or shifting weight.
- Shoulder Straps: Look for fully adjustable straps. They should secure the unit high enough so that the bottom edge sits securely over your waistline without bunching up.
- Waist/Kidney Belts: Many high-end models include a wide, often elastic, belt that wraps around your midsection. This keeps the protector anchored horizontally.
- Compatibility with Neck Braces: If you use or plan to use a neck brace (common in high-speed dirt biking), ensure the protector is explicitly designed to fit over or work in conjunction with the brace design.
2. Material and Certifications
The plastic needs to be tough, but the foam needs to be shock-absorbing.
While specific certifications (like CE EN 1621-2 for back protectors) are more common in motorcycle gear, look for protectors that utilize high-density impact foams. Many reputable manufacturers use proprietary plastics and polymers that have been tested extensively against penetration and crushing forces.
3. Ventilation
Trail riding means physical exertion. If the protector traps heat, you will sweat excessively, leading to chafing, discomfort, and rapid fatigue.
Check for large vents, airflow channels molded into the plastic backplate, and mesh construction where the plastic meets your body. The less plastic touching your jersey, the cooler you will stay.
4. Coverage Area
Ensure the protector covers what you need it to cover.
- Rib Coverage: For aggressive riding, look for protectors that extend further down the sides of your ribs than basic roost guards do.
- Spine Guard: A good back piece should cover the entire spine, ideally extending down to the lower back area where the tailbone begins.
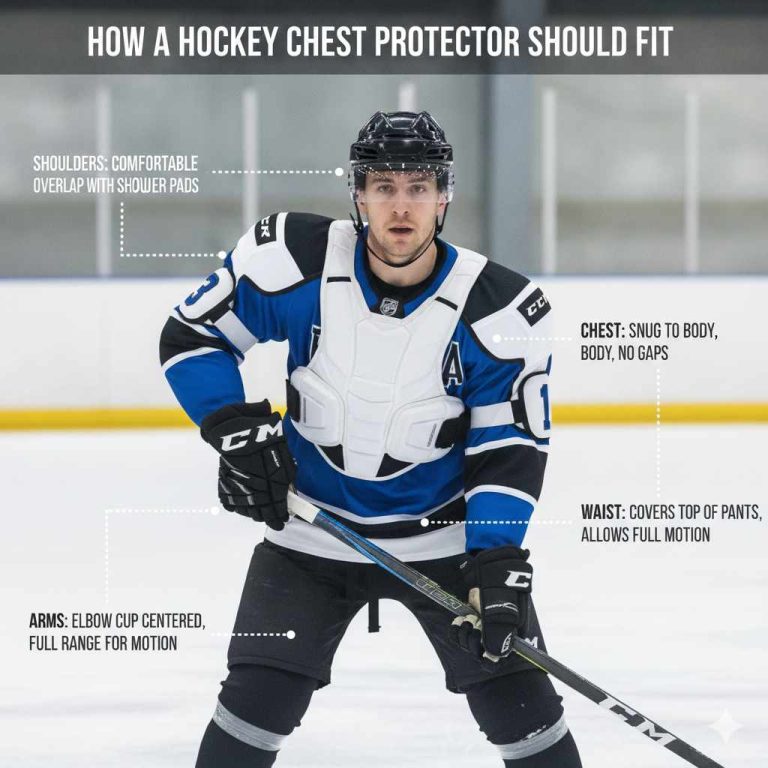
How to Properly Size and Wear Your Chest Protector
Improper fit renders the best protector useless. Follow these steps to ensure maximum safety and comfort.
Step 1: Determine Your Size
Chest protector sizing is usually based on your chest circumference, sometimes correlated with your general shirt size (S, M, L). Always check the specific manufacturer’s sizing chart.
Measure your chest circumference right under your armpits, around the fullest part of your chest. Compare this measurement to the chart provided by the brand you are buying.
Step 2: Initial Placement
Put the protector on over a base layer shirt (never directly on bare skin, as this causes chafing).
Fasten the waist belt (if present) snugly but comfortably. You should be able to breathe deeply without the belt digging in.
Step 3: Adjusting the Straps
Adjust the shoulder straps so that the front plate sits flat against your sternum. When you look down, you should be able to see the top edge of the protector sitting below your collarbones.
The rear plate should align perfectly with your spine. If the rear plate is too low, it might interfere with your riding pack or provide poor coverage during a backward fall.
Step 4: The Movement Test
Move around exactly as you would on the trail:
- Stand up and bend over as if reaching for your handlebars.
- Twist your upper body from side to side.
- Lift your arms high above your head.
If the protector shifts significantly, rubs uncomfortably, or exposes areas that should be covered, adjust the straps until movement is minimized but not restrictive. Remember, you need to be able to turn your head to check your blind spots!
Maintenance Tips for Longevity
Your safety gear takes a beating. Taking care of it ensures it performs when you need it most.
Cleaning After a Dirty Ride
Dirt, sweat, and mud degrade plastics and elastic over time. Always clean your gear after heavy use.
- Rinse: Use cool or lukewarm water to gently rinse off heavy mud and debris. Avoid high-pressure washers, which can force water into seams or damage foam padding.
- Wash (If necessary): Use a mild soap, like dish soap or a specialized gear wash. Scrub the plastic plates gently with a soft cloth or sponge.
- Rinse Thoroughly: Ensure all soap residue is gone, as leftover soap can irritate your skin.
- Drying: Always air dry. Hang the protector in a well-ventilated area away from direct sunlight or intense heat (like a heater). Direct heat can warp the plastics.
Inspection Schedule
Inspect the protector before every season, and after any significant crash.
- Check all plastic components for cracks, deep scratches, or stress fractures. A seemingly small crack can compromise the entire structure in the next impact.
- Examine the foam padding. Is it compressed permanently? Is it starting to flake or crumble? If the foam is damaged, the protector should be replaced.
- Check all buckles, snaps, and adjustment sliders for damage or wear.
If you notice structural damage, do not attempt to repair it with tape or glue; the protective integrity is compromised. Consider consulting manufacturer guidelines or replacing the unit, as protection for your vitals is not worth the risk of using damaged gear.
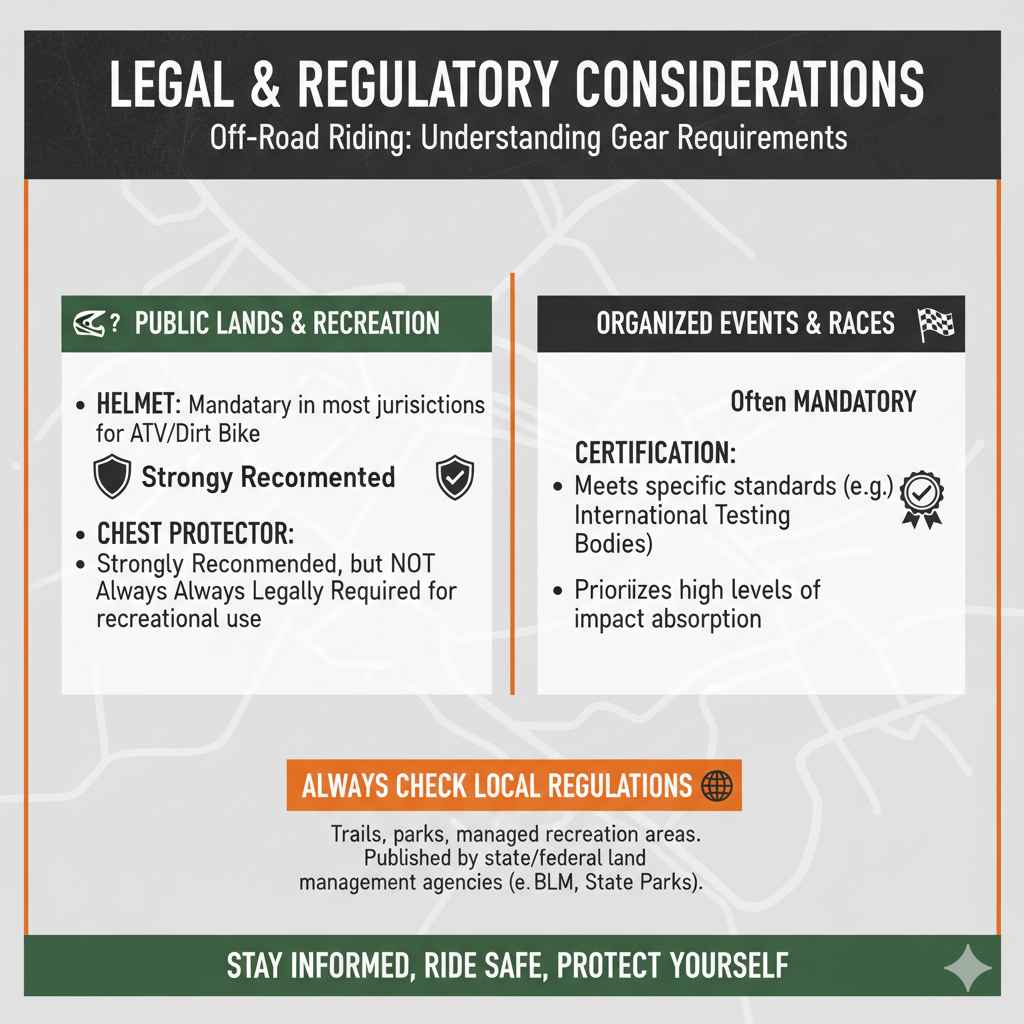
Legal and Regulatory Considerations (Where Applicable)
While trail riding gear isn’t usually regulated like road helmets, understanding general safety standards can help you buy quality equipment. In many jurisdictions where ATV or dirt bike riding is permitted on public lands, while helmets are mandatory, chest protectors are strongly recommended but not always legally required for recreational use.
However, if you are participating in organized events, races, or closed-course riding, certification might be mandatory. Event organizers often require gear that meets specific standards, such as those established by international testing bodies. For instance, you might see references to standards used in European motorsports which prioritize high levels of impact absorption.
It is always wise to check the local regulations for the specific trails or parks you plan to visit, especially if you are crossing borders or entering managed recreation areas. You can often find updated safety advisories published by state or federal land management agencies, such as those from the Bureau of Land Management (BLM) or state park services, regarding recommended gear for off-road vehicle use.
FAQ: Beginner Questions About Trail Riding Protection
Here are some quick answers to common questions new riders have about using chest protection on the trail.
Q1: Can I wear my hydration pack over a chest protector?
A: Yes, most modern chest protectors are designed to accommodate a hydration pack worn over the top. Ensure the pack straps do not interfere with the protector’s shoulder or waist adjustments. A pack worn over the protector offers an extra layer of minor impact resistance for the back, but check the manufacturer’s guidelines for the best fit.
Q2: Does wearing a chest protector make me too hot?
A: It adds warmth, yes, especially if you ride slowly or in summer. However, high-quality protectors prioritize ventilation with large cutouts and airflow channels. If heat is a major concern, opt for a lightweight roost guard style rather than a full jacket style.
Q3: Is a chest protector the same as back armor?
A: Not exactly. Many chest protectors include a spine plate for basic protection. True back armor (or spine protectors) are often more substantial and designed specifically for superior back/spine protection, sometimes extending much lower. When buying a combined unit, check the spine coverage rating.
Q4: Will a chest protector restrict my arm movement for steering?
A: If fitted correctly, it should not restrict steering or turning your head. If you feel restricted, the protector is likely too big, or the shoulder straps are adjusted too tightly, causing the front plate to sit too high up on your neck area.
Q5: Should I wear it over or under my jersey?
A: For maximum protection and to prevent abrasion against the plastic, wear the chest protector over a thin base layer shirt, and then pull your riding jersey over the protector. This keeps the hard plastic against your body armor, not exposed to snags.
Q6: How often do I need to replace my chest protector?
A: If you have a major crash where the protector took a significant impact, it should be replaced immediately, even if it looks fine, as the internal foam structure may have fractured. Otherwise, generally inspect yearly; if the plastic is brittle or the foam is degraded, replace it every 3–5 years based on usage.
The Confidence Factor: Riding with Proper Gear
Beyond the physical protection, one of the most underestimated benefits of wearing a chest protector on the trail is the psychological boost it provides. When you know you have a solid barrier protecting your sternum and vital organs from those nasty branches or unexpected tumbles, your focus shifts.
Instead of riding tentatively, worrying about every root or low-hanging limb, you can relax your grip slightly and focus purely on line choice and skill execution. This confidence often leads to smoother, faster, and ultimately safer riding because you are not fighting tension.
Think of it as an investment in your ability to learn and push your boundaries safely. When you remove the fear of catastrophic injury from minor accidents, you are free to progress as a rider much quicker. This is why coaches often emphasize getting the right protective gear early in your journey.
Conclusion: Prioritizing Protection for the Adventure Ahead
Deciding whether or not you need a chest protector for trail riding boils down to assessing your risk tolerance and the severity of the terrain you tackle. For any riding involving powered vehicles (ATVs, dirt bikes) or mountain biking on technical, obstacle-laden trails, the answer is a resounding yes—it is essential gear. It bridges the gap between simple abrasion protection and true impact defense for your core.
Remember, safety equipment is not just about surviving a crash; it’s about ensuring that a bad moment doesn’t end your season or lead to long-term injury. Take the time to find a protector that fits your body comfortably, check the fit regularly, and maintain it well. Gear up properly, ride smart, and most importantly, enjoy the unparalleled freedom and thrill that the trails offer. Happy riding, and ride protected!