Building your own archery backstop can seem a bit tricky at first, especially when you’re not sure about the best materials. A common question that pops up is about DIY Archery Backstop: How Thick Should Wood Be?. Many beginners find this specific detail confusing.
Don’t worry, this guide makes it simple. We’ll walk through everything you need to know, step-by-step, so you can build a safe and effective backstop for your practice sessions. Get ready to learn what makes a good backstop without any fuss.
Choosing the Right Wood Thickness for Your Backstop
Selecting the correct wood thickness is a key part of creating a safe and reliable DIY archery backstop. It’s not just about stopping arrows; it’s about stopping them effectively and without damage to your backstop or the surrounding area. For beginners, this aspect can feel like a puzzle, but understanding the basics makes the choice much clearer.
This section breaks down the most important factors to consider when determining how thick your wood needs to be.
Understanding Arrow Energy and Penetration
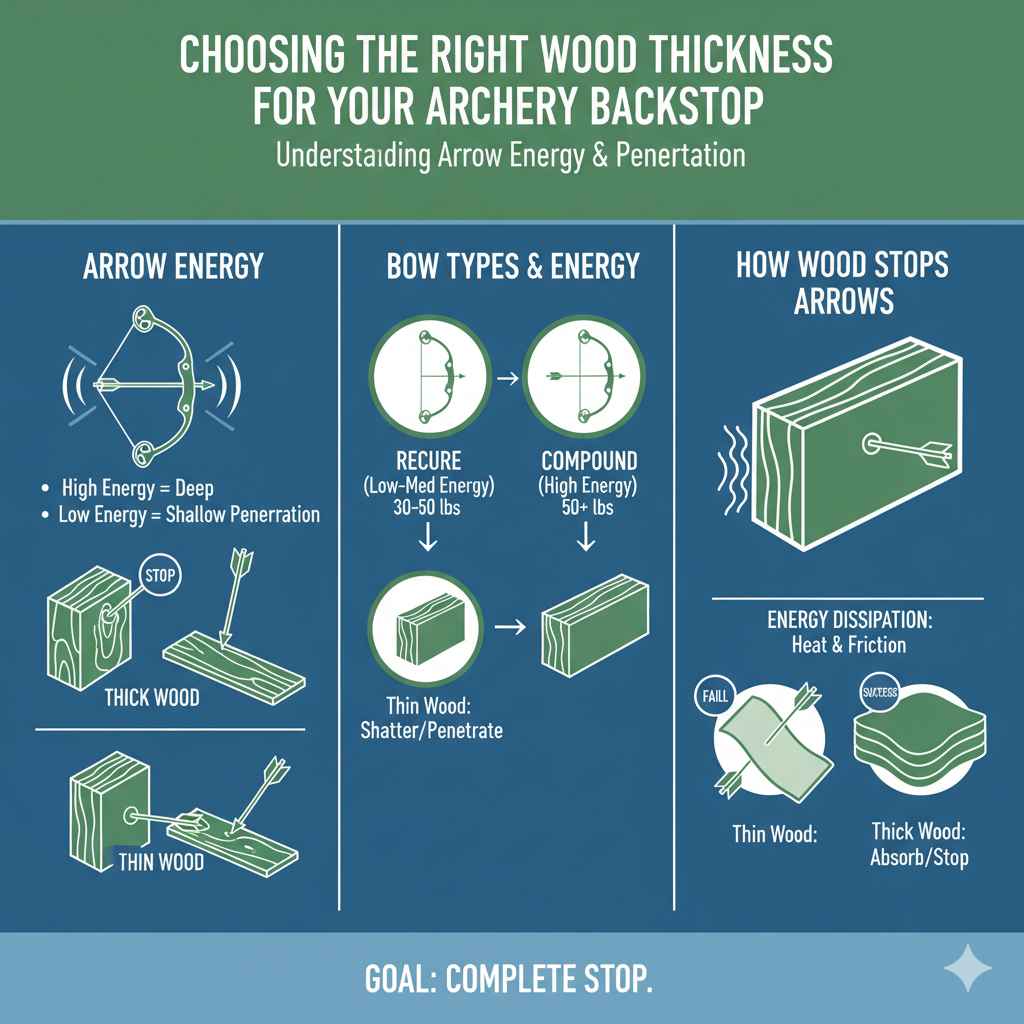
Arrows carry a surprising amount of energy, especially from powerful bows. This energy is what allows them to penetrate targets. The thickness of the wood you use directly relates to its ability to absorb this energy and stop the arrow safely.
Thicker wood provides more material for the arrow to pass through, dissipating its force over a greater distance. This reduces the risk of arrows passing completely through your backstop and potentially causing damage or injury.
Different bows and arrow types will have varying energy levels. A lower-poundage recurve bow shooting lighter arrows will require less backstop thickness than a high-poundage compound bow launching heavy arrows at high speeds. It is vital to consider the most powerful setup you intend to use for practice.
When an arrow impacts wood, it causes deformation. This deformation, along with friction, converts the arrow’s kinetic energy into heat and sound. A thicker piece of wood can withstand more deformation before the arrow stops.
Imagine trying to stop a rolling ball with a thin piece of cardboard versus a thick foam block; the foam block offers much more resistance and stops the ball more gradually.
This concept of energy dissipation is critical. It’s not enough for the wood to simply be hard; it must also have enough mass and depth to absorb the impact. A thin, hard piece of wood might shatter or allow penetration, while a thicker, softer material might deform and absorb the energy more effectively.
The goal is a complete stop, not just a partial slowdown.
Wood Types and Their Stopping Power
Not all wood is created equal when it comes to archery backstops. Some types are naturally denser and stronger, offering better resistance to arrow penetration. Understanding these differences can help you make informed decisions about your materials.
Commonly recommended woods for backstops include pine, fir, and spruce. These are relatively inexpensive and widely available. Pine, for example, is a softwood that offers a good balance of affordability and stopping power when used in sufficient thickness.
It’s forgiving and will absorb arrow energy well.
Hardwoods like oak or maple are denser and stronger but can also be more expensive and harder to work with. While they offer excellent durability, their density might not always be necessary for a home backstop, especially if you are shooting lower-poundage bows. For typical backyard archery setups, softer woods are often sufficient and more cost-effective.
Plywood is another option, often used in layers. The cross-laminated layers of plywood can offer good structural integrity and stopping power. When building a backstop with plywood, using multiple layers laminated together is generally more effective than a single thick sheet.
This layering helps distribute the impact force.
The grain direction of the wood also plays a role. It’s generally best to have the arrow hit the wood perpendicular to the grain. If the arrow hits parallel to the grain, it can split the wood more easily, leading to faster wear and potential penetration.
The way you orient your wood pieces can impact the longevity and safety of your backstop.
Recommended Wood Thickness Ranges
Determining the exact thickness involves considering your bow’s draw weight and the type of arrows you use. However, there are general recommendations that serve as excellent starting points for most DIY archery backstops.
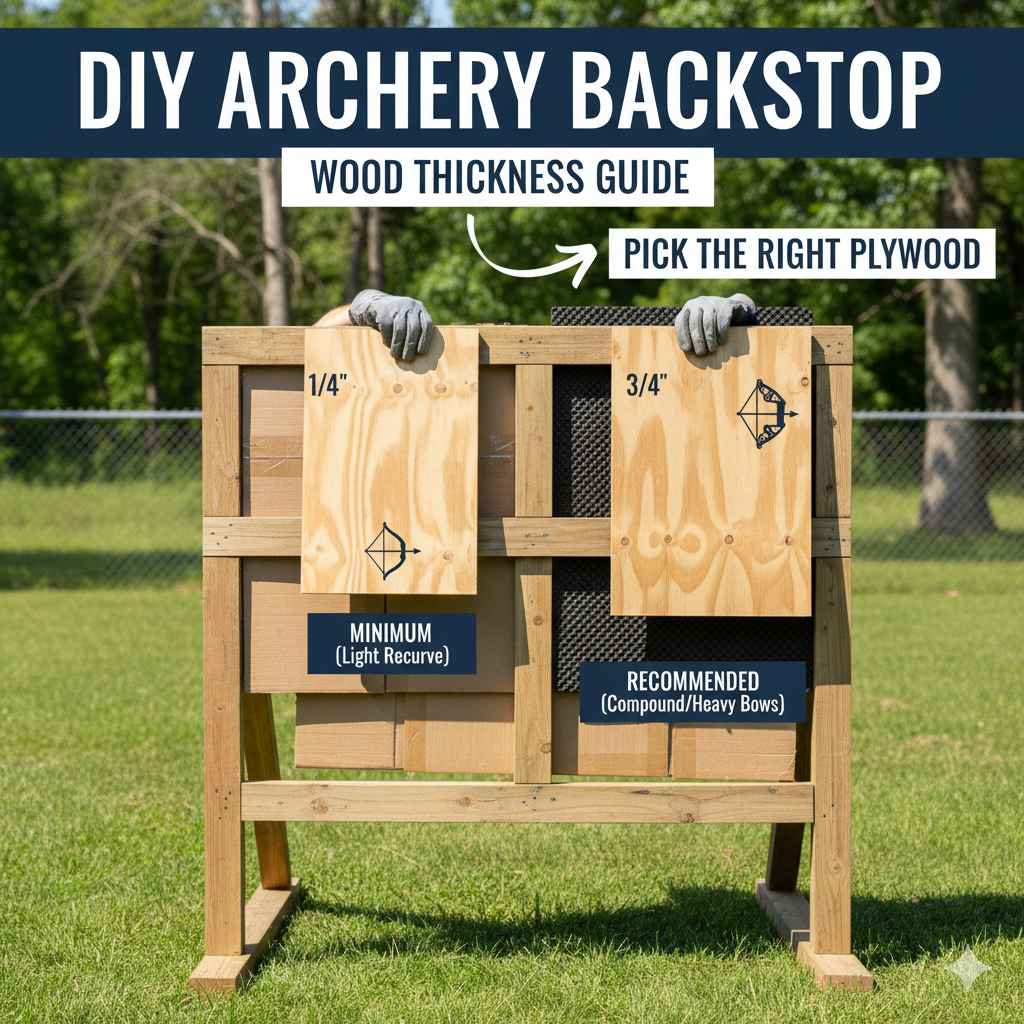
For lighter draw weights, such as those used by youth archers or for casual backyard shooting with recurve bows (under 30 pounds), a minimum thickness of 4 inches is often sufficient when using softwoods like pine or fir. This can be achieved with multiple layers of 1-inch or 2-inch thick boards stacked together.
For moderate draw weights, common for many adult archers with recurve or traditional longbows (30-50 pounds), aim for a minimum thickness of 6 to 8 inches. This provides a more robust barrier and better longevity. Again, this thickness is best achieved by layering boards together.
For higher draw weights, typical of compound bows (50+ pounds), a minimum of 8 to 12 inches of wood thickness is strongly recommended. Some enthusiasts even opt for thicker backstops, up to 18 inches or more, for maximum safety and durability, especially if they shoot heavier arrows or have a very powerful bow.
It’s crucial to remember that these are minimum recommendations. If you are unsure or have a particularly powerful bow, always err on the side of thicker and more robust construction. Combining different materials can also enhance stopping power.
Building Your DIY Archery Backstop Step-by-Step
Now that you have a better idea of how wood thickness matters, let’s get into the practical steps of building your own archery backstop. This process is designed to be straightforward, even for those with limited woodworking experience. Following these steps will help you create a safe and effective backstop for your archery practice.
Planning and Design Considerations
Before you start cutting or buying wood, taking a little time to plan is essential. This phase prevents costly mistakes and ensures your backstop meets your needs. Think about the space you have available and how you will use the backstop.
First, decide on the dimensions of your backstop. A good starting point for width is at least 4 feet, providing ample margin for error. The height should be sufficient to cover your target area, typically at least 6 feet.
The depth is where the wood thickness comes into play, as discussed earlier.
Consider the frame or housing for your wood. You’ll need a sturdy structure to hold the wood panels or blocks together and keep them from bowing out under impact. Using framing lumber for the exterior can create a secure box.
You can also mount the wood directly onto a sturdy wall or existing structure if that’s an option.
Sketching out your design is highly recommended. This visual aid helps you visualize the materials needed and the assembly process. It can also help you calculate the exact amount of wood you will require, saving you trips to the lumber yard.
Think about portability if you need to move your backstop. Building a lighter frame or incorporating handles can make a big difference. For a permanent fixture, you can build a much more substantial structure.
Materials and Tools You Will Need
Gathering the right materials and tools upfront will make the building process much smoother. Having everything ready before you begin saves time and avoids interruptions. Here’s a list to get you started.
- Wood for Backstop Core: This will be your primary stopping material. Common choices include 2x4s, 2x6s, or 2x8s in lengths that suit your design. You’ll need enough to achieve your desired total thickness and width. For example, to get 8 inches of depth with 2×6 boards, you would need four layers stacked together.
- Wood for Frame (Optional but Recommended): Larger lumber like 4x4s or 2x4s can be used to build a supportive frame around the core wood, especially if you’re not attaching it to a wall.
- Fasteners: Wood screws are essential for assembling the frame and securing the core wood panels. Ensure you use screws long enough to securely join the pieces.
- Saw: A circular saw or miter saw is necessary for cutting wood to size.
- Drill and Drill Bits: For pre-drilling holes and driving screws.
- Measuring Tape and Pencil: For accurate measurements and marking cuts.
- Safety Gear: Safety glasses, gloves, and hearing protection are crucial when working with power tools.
When purchasing wood, look for straight pieces with minimal knots, as these can weaken the structure. Pressure-treated lumber is an option for outdoor backstops, but ensure it is fully dried before use, as moisture can affect its density and weight.
Consider the weight of your backstop. A very thick, all-wood backstop can be extremely heavy. If portability is a factor, you might want to explore designs that use lighter materials for the frame or consider if a partially open design with a dense wood core is sufficient.
Assembly Instructions
With your materials ready and your design planned, it’s time to build. Follow these general steps, adapting them to your specific design.
- Build the Frame (If Applicable): Construct a sturdy outer box or frame using your chosen framing lumber. Ensure corners are square and the structure is robust enough to hold the weight of the wood core and withstand arrow impacts.
- Cut Core Wood to Size: Measure and cut your core wood pieces to fit snugly within the frame or to your desired dimensions if you are stacking them directly.
- Stack and Secure Core Wood: Begin stacking your core wood layers inside the frame or on top of each other. If you are stacking them, stagger the joints between layers if possible, similar to how bricks are laid, for added strength. Secure each layer to the one below it using wood screws. For maximum strength, pre-drill pilot holes to prevent splitting.
- Attach Core Wood to Frame: If using a frame, secure the stacked core wood to the interior of the frame. You can screw directly through the core wood into the frame members, or through the frame members into the outer edges of the core wood.
- Reinforce as Needed: Inspect your backstop for any gaps or weak points. Add extra bracing or screws where necessary to ensure everything is solid and stable.
- Add a Cover (Optional): Some builders add a sacrificial layer of plywood or thin boards to the front surface. This layer takes the initial impact, protecting the main wood core and can be replaced more easily when worn.
When screwing layers together, use plenty of screws to ensure they are firmly bound. This prevents layers from separating upon impact, which can compromise the backstop’s effectiveness and safety.
Always check your backstop for wear and tear after each shooting session. Any loose boards, significant splintering, or signs of deep penetration should be addressed immediately. A well-maintained backstop is a safe backstop.
Advanced Backstop Designs and Materials
While wood is a popular and effective material, exploring alternative or supplementary materials can enhance your DIY archery backstop. These options can offer increased durability, better stopping power, or easier arrow retrieval.
Using Plywood for Enhanced Strength
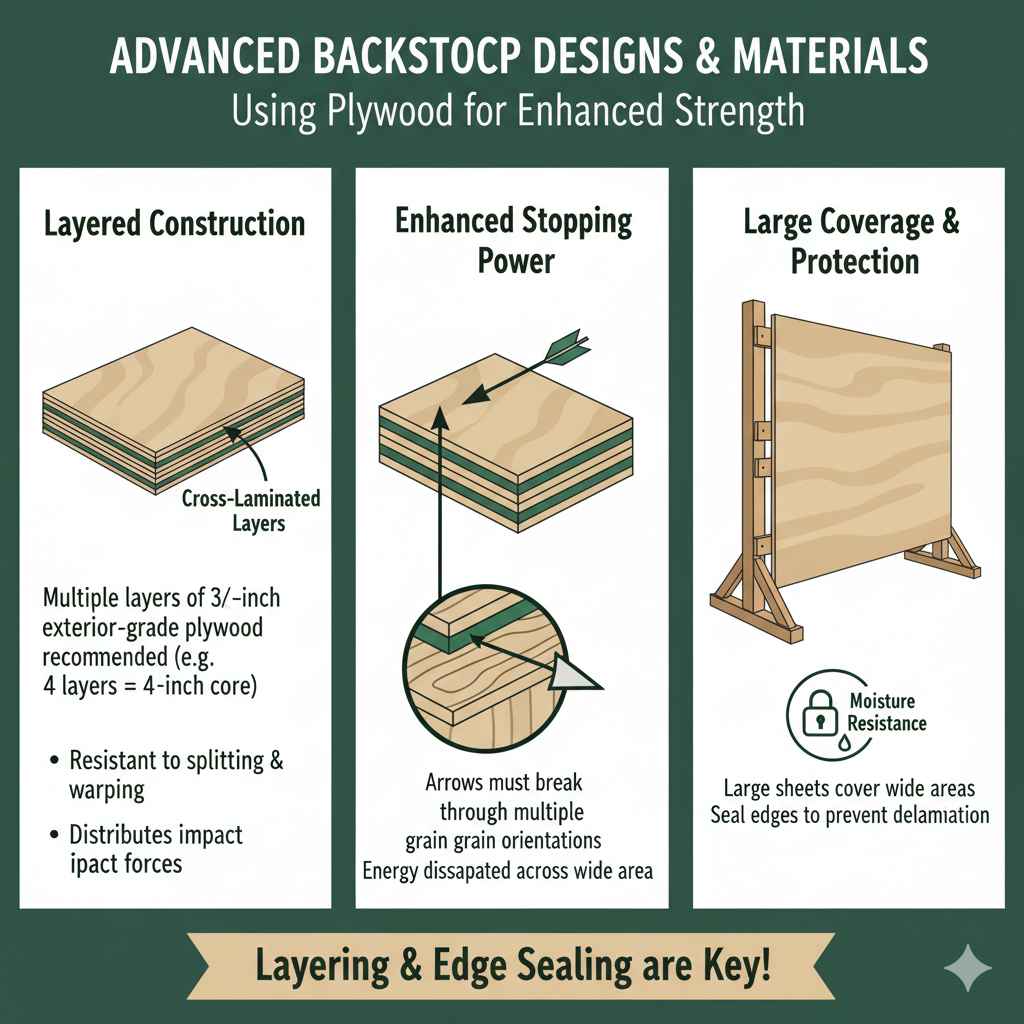
Plywood offers a different kind of strength compared to solid lumber. Its layered construction makes it resistant to splitting and warping. When used correctly, it can be an excellent component of a DIY backstop.
For backstop construction, exterior-grade plywood is recommended due to its moisture resistance. Stacking multiple layers of 3/4-inch plywood is a common and effective method. For example, four layers of 3/4-inch plywood would give you a 3-inch thick core.
If you need more thickness, you can stack more layers or combine plywood with solid lumber.
The cross-laminated nature of plywood means that the grain of each layer runs perpendicular to the layer below it. This interlocking structure distributes the impact forces across a wider area. It makes it harder for arrows to penetrate because they have to break through multiple layers of wood with different grain orientations.
When building with plywood, ensure that the edges are well-sealed, especially if the backstop will be exposed to the elements. This prevents moisture from getting into the layers and causing delamination.
One advantage of plywood is that it often comes in large sheets, which can cover a wide area quickly. If you are building a very wide backstop, using plywood sheets can be more efficient than piecing together many smaller boards.
Combining Materials for Superior Performance
The ultimate archery backstop often involves combining different materials. This approach leverages the strengths of each component to create a highly effective and durable safety feature. Layering is key here.
A popular combination is a solid wood core backed by a layer of plywood. The solid wood provides the initial shock absorption, while the plywood offers structural support and helps catch any arrows that might slightly penetrate the wood. Alternatively, you can place a layer of plywood at the front to act as a sacrificial face, protecting the main wood core.
Another effective combination uses rubber matting or old tire material. These materials are excellent at absorbing impact and can help retain arrows, making retrieval easier. You could create a wooden frame and fill it with layers of compressed rubber mats or pieces of old tires, perhaps interspersed with wood.
The key is to ensure that any material used is dense enough to stop the arrow and that the layers are securely fastened together. Arrows carry a lot of energy, and a poorly constructed layered backstop could allow arrows to pass through or cause the layers to separate, leading to a safety hazard.
Consider the weight of these combined materials. Rubber and dense wood can be very heavy. If you need a portable backstop, this might influence your material choices.
Protecting Your Backstop and Arrow Retrieval
A well-designed backstop not only stops arrows but also helps preserve itself and makes retrieving your arrows easier. Simple additions can make a big difference.
Consider adding a sacrificial front face. This can be a sheet of thin plywood, a layer of dense cardboard, or even a specially designed fabric that arrows can penetrate slightly but still be stopped by the main backstop behind it. When this front layer gets damaged, it’s much easier and cheaper to replace than the entire backstop core.
For arrow retrieval, you can build your backstop with a slight tilt backward. This allows arrows that are stopped cleanly to naturally fall forward a bit, making them easier to pull out. Alternatively, some builders create a small gap at the bottom of the backstop, allowing arrows to fall through into a collection bin.
Another method is to use arrow puller lubricant on your arrows or the front surface of your backstop. This reduces friction and makes it easier to extract arrows. However, ensure that any lubricants used won’t degrade your backstop materials over time.
A very effective method is to fill the backstop with loose material, like wood shavings or sawdust, contained within a sturdy frame. Arrows penetrate the shavings, and their energy is dissipated gradually. This method can also make arrow retrieval quite simple, as they often become lodged loosely within the material.
Frequently Asked Questions
Question: What is the minimum wood thickness for a DIY archery backstop?
Answer: The minimum wood thickness depends on your bow’s draw weight. For lighter bows, 4 inches might suffice. For moderate to heavy bows, aim for 6-12 inches or more, achieved by stacking multiple boards.
Question: Can I use a single thick piece of wood for my backstop?
Answer: While possible, it is often more effective and economical to stack multiple thinner boards. This allows for better energy absorption and can be easier to manage in terms of weight and size.
Question: Does the type of wood matter for an archery backstop?
Answer: Yes, wood type matters. Softer woods like pine or fir are generally good choices for affordability and stopping power. Hardwoods are stronger but can be more expensive and less forgiving.
Plywood is also a great option when layered.
Question: How can I make arrow retrieval easier from my backstop?
Answer: You can tilt the backstop slightly backward, use arrow puller lubricant, or build a system where arrows fall into a collection area. Some materials like wood shavings can also make retrieval simpler.
Question: Is it safe to shoot arrows at a DIY backstop made only of plywood?
Answer: Yes, plywood can be safe if used correctly. Stacking multiple layers of exterior-grade plywood to a sufficient total thickness will provide good stopping power for most bows. Ensure the layers are well-secured.
Conclusion
Building a safe and effective DIY archery backstop is achievable by understanding wood thickness. Aim for at least 4 inches for light bows and 8-12 inches or more for stronger bows, stacking boards for best results. Prioritize safety by using sturdy construction and checking your backstop regularly.
Enjoy your practice sessions with confidence.