Figuring out How Tall Should an Archery Backstop Be? Full Guide can feel like a puzzle for new archers. You want to be safe and have a good place to practice.
This might seem tricky at first, but we’ve got a simple plan to help you. We’ll walk through everything step by step. After this, you’ll know exactly what you need for your archery setup.
Archery Backstop Height Explained
Setting up a safe archery range starts with the backstop. This is super important for stopping arrows that miss your target. People often wonder about the right height because safety is key.
Too short, and an arrow might fly over. Too tall, and it might be overkill or harder to set up. We want just the right amount of protection.
This section will break down why height matters so much and what factors influence the best choice for you.
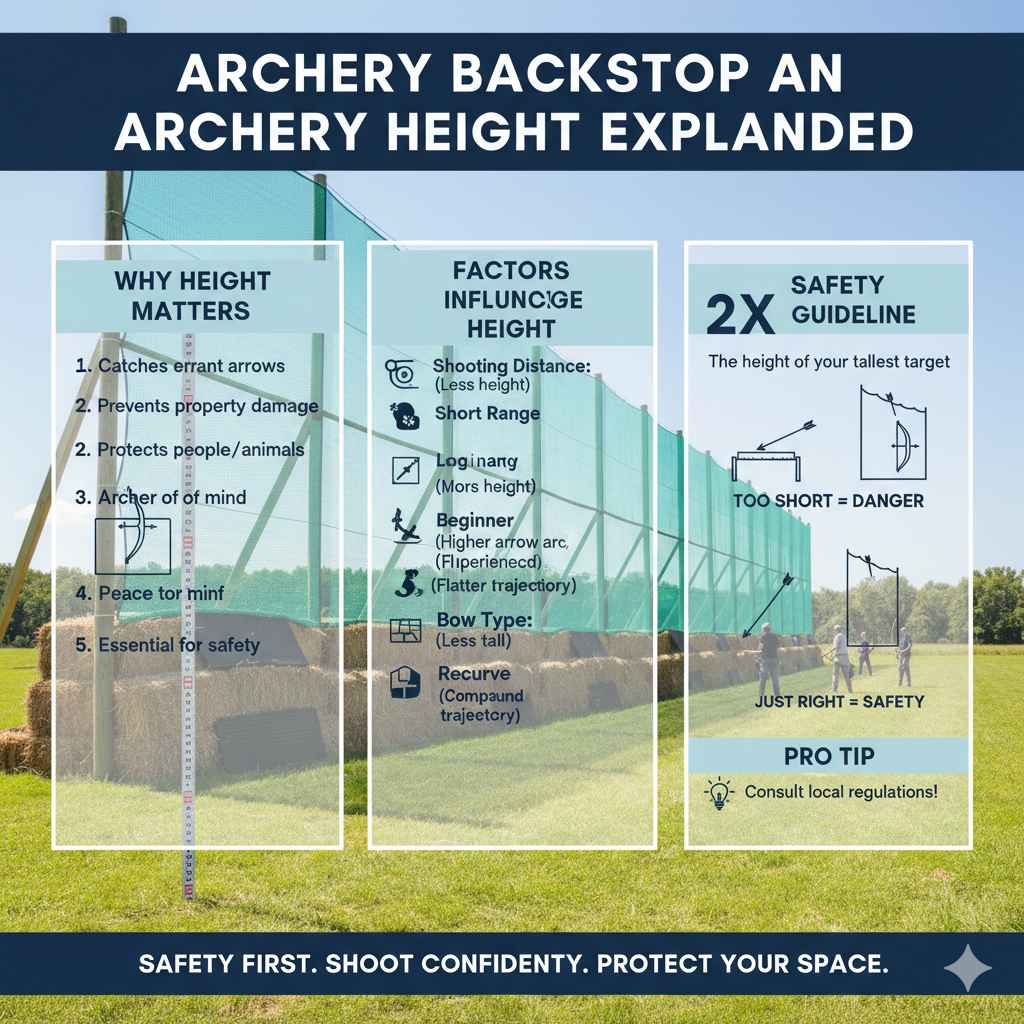
The main goal of an archery backstop is to catch errant arrows. This prevents them from hitting things they shouldn’t, like your house, a neighbor’s property, or worse, people or animals. A properly sized backstop gives you peace of mind while you focus on your shooting technique.
It’s an investment in safety and continued practice.
Why Backstop Height is Crucial for Safety
The height of your backstop directly impacts safety. Think about how an arrow flies. It travels in a straight line for a good distance, but then gravity pulls it down.
If your backstop isn’t tall enough, an arrow shot with a slight upward angle could go right over the top. This is especially true if you’re shooting from a higher position or if your target is set lower than you are.
Consider different shooting scenarios. Are you shooting from a standing position, or a kneeling one? Are you practicing long-distance shots where arrows might maintain a flatter trajectory for longer?
All these things matter. A taller backstop offers a wider safety margin for various shooting styles and potential arrow trajectories.
Arrow Trajectory and Backstop Height
Arrows don’t always fly perfectly straight. They follow a parabolic path, meaning they go up and then come down. The speed and weight of the arrow, as well as the draw weight of the bow, all affect how far and how high it will travel before gravity takes over.
A faster arrow with less weight might fly flatter for longer than a slower, heavier arrow.
When you’re shooting at a target, the arrow’s path to the target is generally downward or flat. However, if you miss the target completely, especially if you’re not aiming perfectly straight down, the arrow can travel at an upward angle. The backstop needs to be tall enough to catch these arrows before they leave the safe zone of your practice area.
Imagine a scenario where you shoot a bit high; the backstop needs to rise above that potential miss.
Ensuring Complete Arrow Containment
Complete arrow containment is the primary goal. This means no arrows should escape the confines of your designated shooting area. A backstop that’s too short is the most common reason for escape.
It’s like having a fence that’s too low; things can easily go over it.
The ideal height ensures that even if you have a wild shot, the arrow will strike the backstop material. This material is designed to absorb the arrow’s energy safely. If the backstop is too short, it fails its main purpose, turning a practice session into a potentially dangerous situation.
It’s better to be a little too tall than not tall enough.
Factors Influencing Backstop Height Decisions
Deciding on the perfect height for your archery backstop involves looking at several key factors. It’s not a one-size-fits-all answer because every archery setup and shooting situation is a bit different. Thinking about these elements will guide you to the safest and most effective height for your needs.
We’ll explore how your shooting distance, the type of arrows you use, and the landscape around your practice spot all play a role. Understanding these influences helps create a personal safety plan for your archery activities.
Shooting Distance
The distance you shoot from is a major factor in determining backstop height. When you shoot at closer distances, arrows tend to fly on a more level or slightly downward trajectory. The chances of an arrow going high and over the backstop are lower.
However, as you increase your shooting distance, the angle of your shot might change, and even slight deviations can send an arrow on a higher arc. For longer distances, a taller backstop becomes more critical. It needs to cover a wider potential area where a missed arrow might travel.
For example, shooting at 20 yards requires a different backstop height than shooting at 50 yards. The longer the range, the more vertical coverage you need.
Bow Type and Arrow Characteristics
The type of bow you shoot and the characteristics of your arrows significantly influence the necessary backstop height. High-poundage bows, like powerful compound bows, shoot arrows at very high speeds. These arrows tend to fly flatter and travel further before dropping noticeably.
This means a miss might go further horizontally before dropping.
Conversely, lower-poundage bows, such as recurve or longbows, typically shoot arrows slower. These arrows will drop more noticeably over shorter distances. However, even with slower arrows, if shot with an upward trajectory, they can still go over a short backstop.
The weight and stiffness of the arrow also matter. Heavier arrows might drop more, while lighter arrows can be more affected by wind and less predictable in their trajectory if they miss.
Terrain and Surrounding Environment
The landscape around your shooting area is another important consideration. If you’re shooting in a wide-open field with nothing behind your target, you might have more flexibility. However, if your practice area is near hills, buildings, or other structures, a taller backstop becomes essential to prevent arrows from going beyond your safe zone.
Consider the general slope of the land. If your target is set up on slightly lower ground than where you’re standing, the angle of your shots will naturally be more downward. But if the ground slopes upward away from you, or if there’s an elevated area behind your target, you’ll need to account for this.
The goal is to create a completely enclosed safety zone, regardless of the terrain.
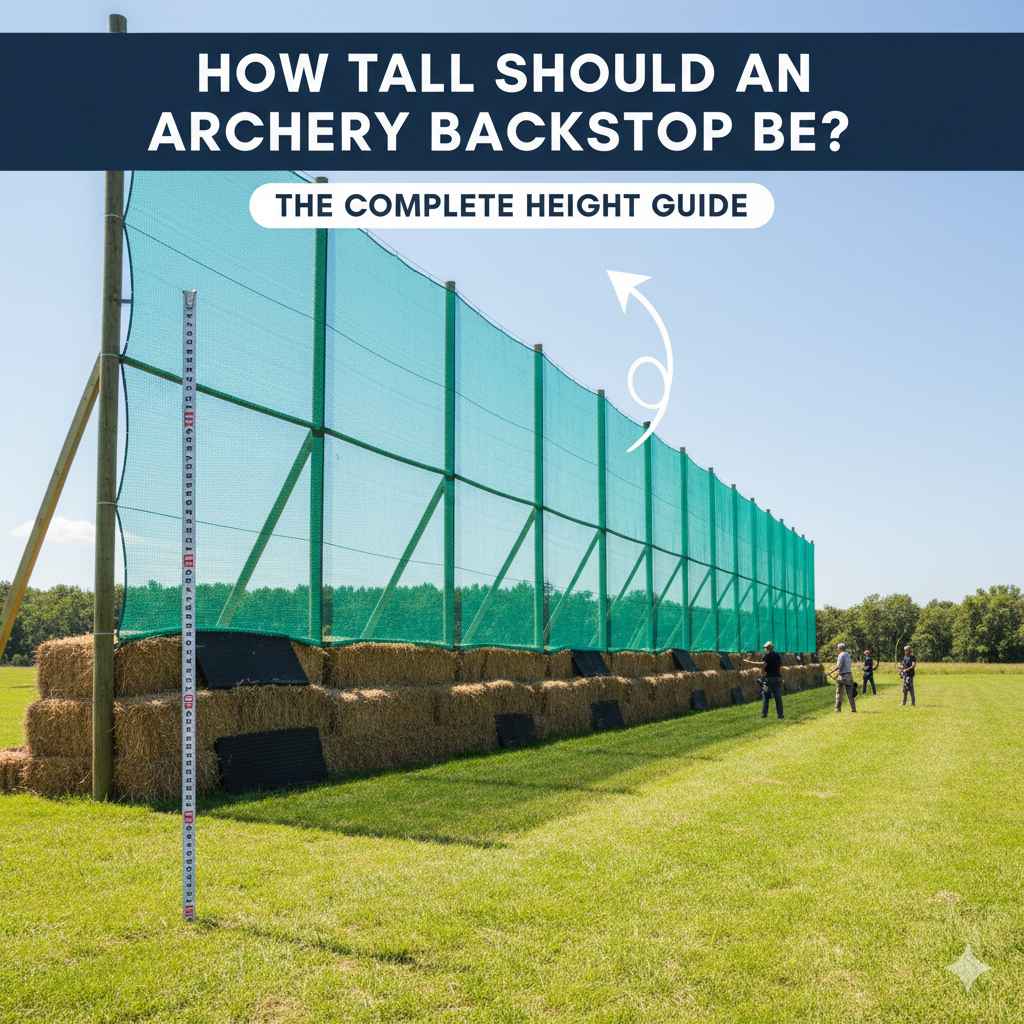
Recommended Backstop Heights for Archery
Based on general archery safety guidelines and common practice, there are recommended heights for archery backstops. These are not rigid rules but strong suggestions to ensure a safe shooting environment. The ideal height will always be influenced by the specific factors we’ve discussed, but these recommendations provide a solid starting point.
We’ll look at common scenarios and what height works best. This will help you visualize what a safe and effective backstop looks like in practice.
General Recommendations for Backyard Archery
For backyard archery, where space might be limited and safety is paramount, a common recommendation is for the backstop to be at least as tall as the highest point an arrow could possibly reach if missed. A good rule of thumb is to aim for a backstop that extends at least 10-15 feet higher than your target’s height, especially if you are shooting from ground level.
If you are shooting from an elevated position, like a deck or tree stand, you need to add that height to your calculation. So, if your target is 5 feet tall and you are shooting from 10 feet up, you might consider a backstop that is 15 feet or more in vertical height from the ground. Always consider the total potential arc of your arrow.
Backstop Height for Competitive Archery Ranges
Competitive archery ranges often have very specific requirements to ensure maximum safety for both participants and spectators. These ranges typically feature professional-grade backstops that are designed to handle high volumes of shooting and a wide variety of bow types. For outdoor ranges, backstop walls or berms are often quite substantial, easily reaching 20-30 feet or more in height.
Indoor ranges, while having less concern about arrows flying “over,” still need substantial backstops behind the targets. These are usually made of dense, energy-absorbing materials that are several feet thick. The height here is less about an arrow going over and more about containing any stray shots that might deviate significantly sideways or downwards.
The focus is on complete containment and absorption of arrow energy.
DIY Backstop Height Considerations
When building your own backstop, you have a lot of control, but also a lot of responsibility. For a do-it-yourself backstop, a safe height is typically at least 10 feet from the ground. If you are shooting at a target that is 5 feet tall, and your backstop is 10 feet tall, that gives you a 5-foot buffer above the target.
This is generally considered a good minimum for casual backyard shooting.
However, if you are using a more powerful bow or shooting from a significant distance, you may need to increase this height. Consider building your backstop to be 15-20 feet tall. You can achieve this by stacking multiple layers of your chosen material, ensuring it’s sturdy and well-supported.
Always err on the side of caution and make it taller than you think you might need.
Building or Choosing the Right Backstop
Selecting or constructing the right archery backstop involves more than just height. The materials used and how they are assembled are just as important for effectiveness and safety. A backstop needs to stop arrows reliably without causing them to shatter or ricochet.
This part will guide you through material choices and construction tips. We’ll ensure you know how to make a backstop that works well and lasts.
Materials for Archery Backstops
Several materials are effective for archery backstops. One of the most common is compressed archery target material, often made of foam or rubber composites. These materials are designed to absorb arrow energy gradually, stopping the arrow without significant damage to the arrow itself.
Another popular option is a dense wood, like thick plywood or lumber, often used in layered construction.
Some archers opt for large bales of hay or straw. While traditional and effective for slowing arrows, they can be susceptible to weather and may require more frequent replacement. For more robust solutions, earth berms or specially designed netting systems can be used, especially for outdoor ranges.
A common DIY approach involves using layers of landscape timbers, heavy-duty carpet remnants, or even old tires packed tightly together. The key is to have dense, energy-absorbing layers.
Construction and Installation Tips
When building a DIY backstop, stability is paramount. The structure must be strong enough to withstand the impact of numerous arrows without collapsing. Use sturdy framing materials like 4×4 posts for support.
Ensure the backstop is securely anchored to the ground, especially in windy conditions.
For layered backstops, make sure the layers are packed as tightly as possible. Gaps between materials can allow arrows to pass through or become lodged in ways that are hard to retrieve. If using netting, ensure it’s rated for archery use and is installed with ample slack to absorb energy effectively.
Regular inspection for wear and tear is vital.
Safety Precautions During Setup and Use
Always set up your backstop in a clear area, free from obstacles that could deflect an arrow. Ensure there is adequate space behind the backstop to catch any arrows that might pass through due to malfunction or extreme impact. Never shoot towards or around the sides of a backstop; always aim directly into it.
When assembling or making repairs, wear appropriate safety gear, including eye protection. Be aware of your surroundings and ensure no one is in a position where they could be hit by a stray arrow, even with a backstop in place. Regularly check the backstop for damage, wear, or signs of weakness.
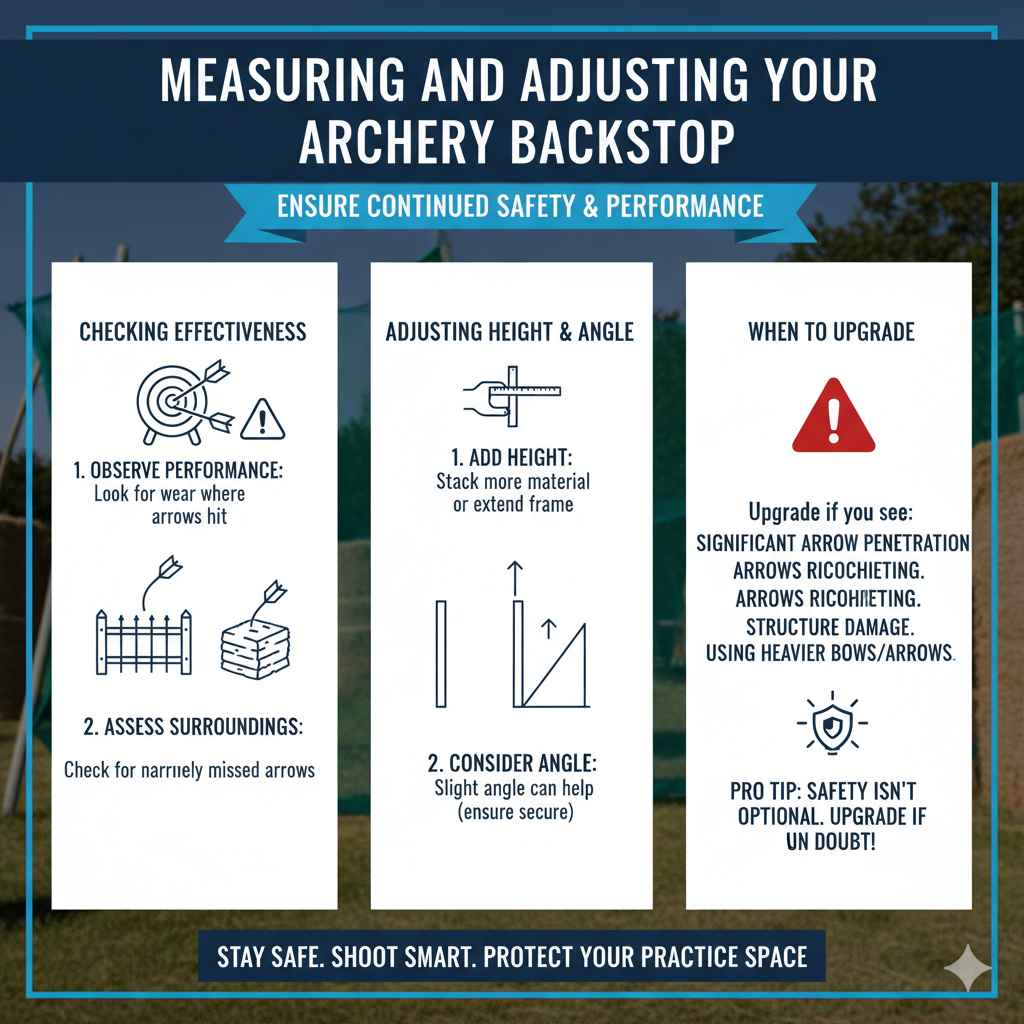
Measuring and Adjusting Your Backstop
Once you have a backstop in place, it’s wise to double-check its effectiveness and make adjustments if needed. This ensures it continues to provide the necessary safety for your archery practice. It’s a good idea to periodically review your setup.
We’ll go over how to check if your backstop is doing its job and what to do if it’s not quite right. Simple checks can make a big difference.
Checking Backstop Effectiveness
The best way to check your backstop’s effectiveness is to observe its performance during shooting. After a practice session, look for signs of wear, especially in areas where arrows frequently hit. If arrows are consistently penetrating deeper than expected, or if you notice the material becoming significantly compressed or damaged, it might be time for reinforcement or replacement.
Also, critically assess the area around and behind the backstop. Are there any signs of arrows that may have narrowly missed it or gone over? If you are unsure, it might be beneficial to temporarily place a secondary, less expensive barrier behind your main backstop for a session to see if any arrows penetrate it.
This can provide visual confirmation of any escape routes.
Adjusting Height and Angle
If your backstop is consistently too short, you’ll need to add height. This can involve stacking more material on top, extending the frame, or using taller support structures. Ensure any additions are securely fastened to the existing structure.
The angle of the backstop can also matter. While most backstops are vertical, a slight angle can sometimes help capture arrows more effectively, especially if they are traveling at high speed. However, changing the angle can affect how arrows penetrate and might require reinforcing the structure.
For most standard setups, a vertical backstop is sufficient and easiest to implement. Always focus on ensuring the entire potential flight path of a missed arrow is covered vertically.
When to Upgrade Your Backstop
You should consider upgrading your backstop if you notice any of the following: significant arrow penetration, arrows bouncing off the backstop and ricocheting, or if the structure itself shows signs of weakness or damage. If you are increasing the draw weight of your bow, using heavier arrows, or practicing at longer distances, your current backstop might not be sufficient.
Safety is not something to compromise on. If your current setup feels inadequate, or if you have any doubts about its ability to contain errant arrows, it’s time for an upgrade. Investing in a more robust or taller backstop is a wise decision for continued safe archery practice.
Frequently Asked Questions
Question: How high should a backstop be for a child using a beginner bow?
Answer: For a child using a beginner bow, a backstop that is at least 8-10 feet high is generally sufficient. The key is to ensure it is taller than the target and provides a safe buffer for any missed shots. Always supervise children during practice.
Question: Can I use a regular wooden fence as an archery backstop?
Answer: A standard wooden fence is usually not recommended as a primary archery backstop. Arrows can easily pass through or damage the fence. You would need to add a dense layer of archery-specific material in front of the fence to safely stop arrows.
Question: What is the best material for a permanent archery backstop?
Answer: For a permanent backstop, dense compressed foam or rubber composites are excellent. Earth berms or specially designed target netting systems are also very durable and effective. For DIY, layered heavy timbers or compacted gravel can work well.
Question: Does the thickness of the backstop matter as much as the height?
Answer: Yes, both height and thickness are critical. Height ensures arrows don’t go over, while thickness and the material’s density ensure arrows are stopped effectively and safely without penetration or ricochet. A good backstop needs both.
Question: How do I know if my backstop is too short?
Answer: You know your backstop is too short if arrows occasionally fly over it. You might also see arrows that have clearly hit the ground after clearing the top of the backstop. If you have any doubts, err on the side of caution and make it taller.
Summary
Determining how tall an archery backstop should be is a vital safety step. Ensure your backstop extends well above your target and accounts for arrow trajectory based on your bow and shooting distance. Prioritize complete arrow containment for a secure practice environment.