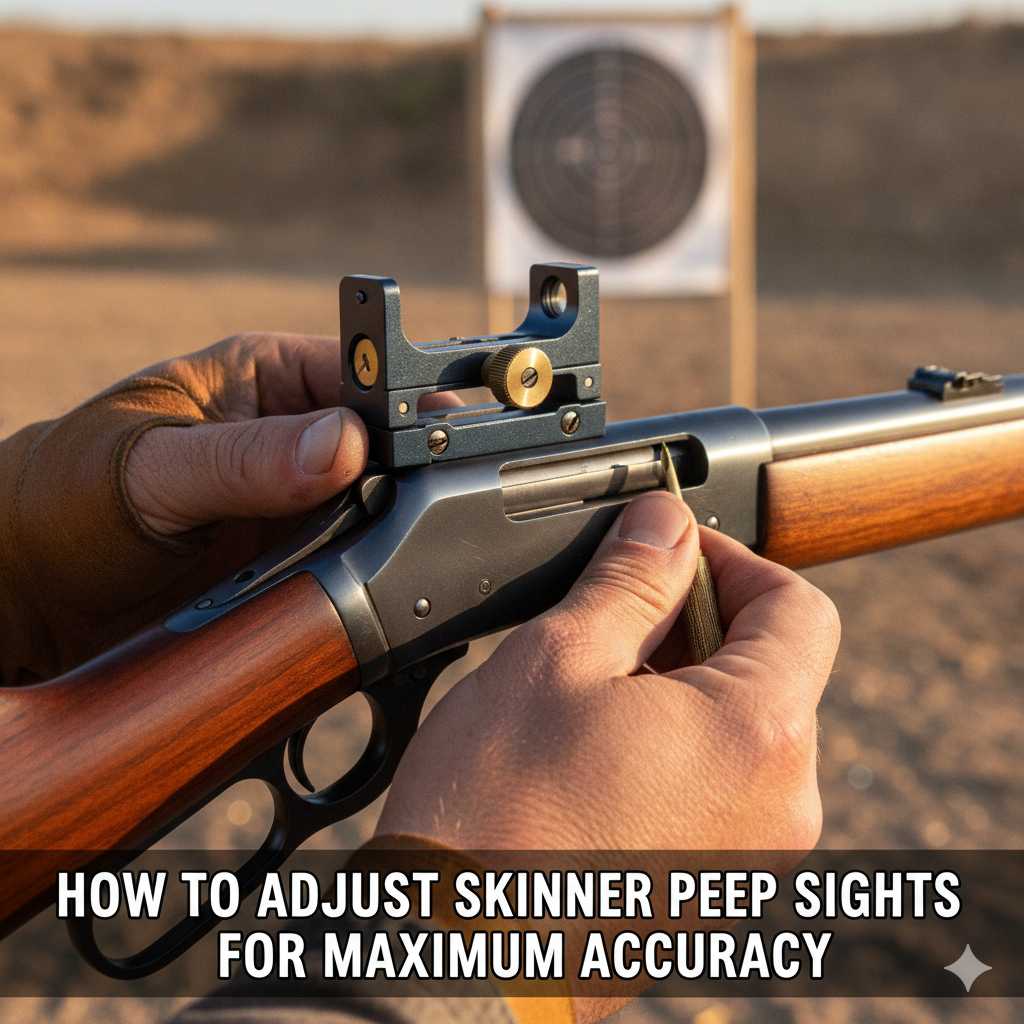
Adjusting your Skinner peep sights can feel a bit tricky at first. You want them just right for those perfect shots. It’s frustrating when your aim isn’t quite hitting the mark.
Many people struggle with finding that sweet spot. This guide will walk you through it step-by-step. We’ll cover what makes a big difference.
You’ll feel more confident with your rifle.
Adjusting Skinner peep sights involves small, precise movements. You need to align the front and rear sight to your target’s point of impact. Tiny turns of the adjustment screws move the point of aim left, right, up, or down. It takes patience, but the payoff is much better shooting.
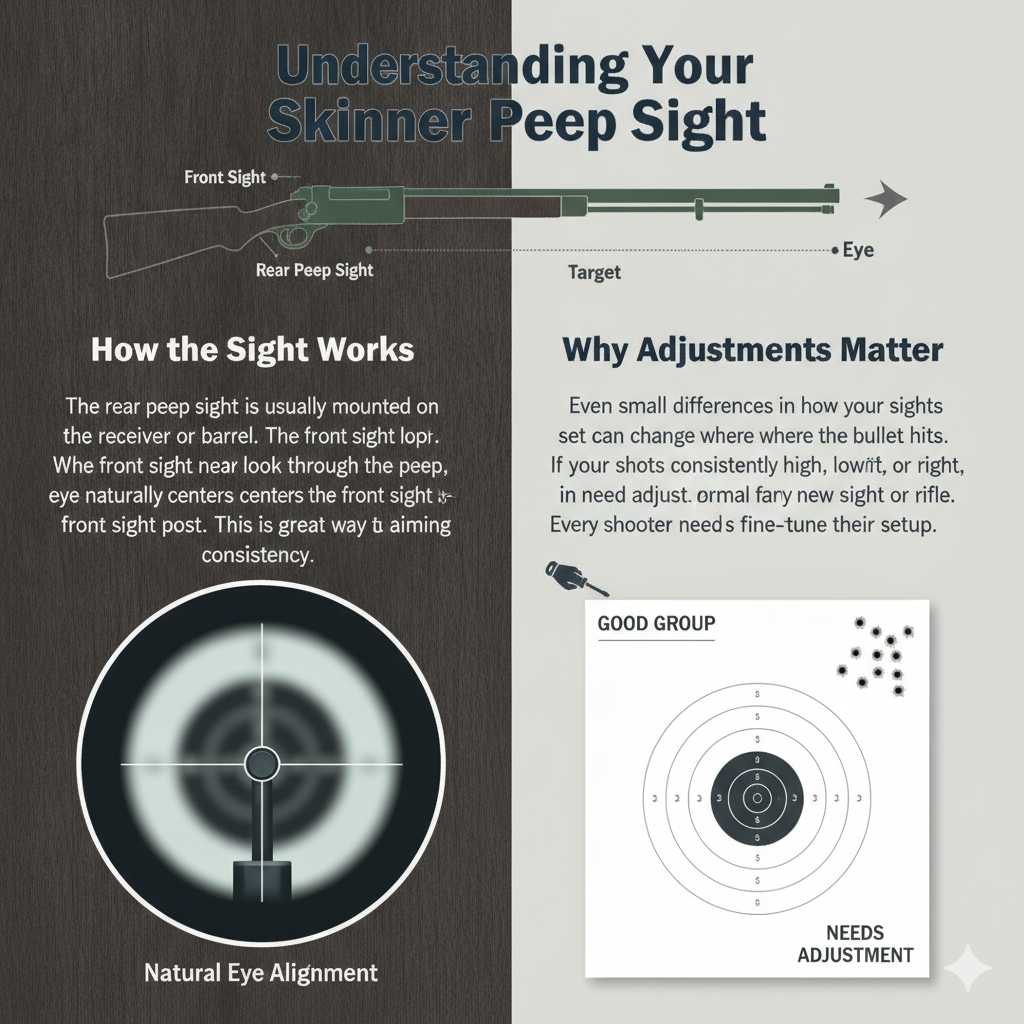
Understanding Your Skinner Peep Sight
A Skinner peep sight is a simple yet effective aiming device. It has a rear sight with a small hole (the “peep”) and a front sight post. You look through the peep hole at the front sight. Then, you line up the front sight with your target. This method helps focus your eye better than open sights.
How the Sight Works
The rear peep sight is usually mounted on the receiver or barrel. The front sight is on the barrel near the muzzle. When you look through the peep, your eye naturally centers the front sight post. This is a great way to improve aiming consistency.
Why Adjustments Matter
Even small differences in how your sights are set can change where your bullet hits. If your shots are consistently high, low, left, or right, you need to adjust. This is normal for any new sight or rifle. Every shooter needs to fine-tune their setup.
My Own Sight Adjustment Adventure
I remember the first time I put a Skinner sight on my old hunting rifle. I was so excited to try it out. I went to the range, feeling pretty good. After a few shots, though, I noticed something was off. My shots were grouping, but they were all about six inches low. I felt a pang of disappointment. Was the sight broken? Was I holding the rifle wrong? I checked everything. I took a deep breath and looked at the rear sight. I saw the small adjustment screws. I hadn’t really looked at them before. I remembered reading that you move the sight in the direction you want your bullet to go. My bullet was going low, so I needed to move the sight up. I made a tiny turn. Then, I fired another shot. It was closer! It took about ten more small turns, checking after each shot. Finally, my shots were hitting right where I aimed. That feeling of accomplishment was huge. It taught me that patience and small adjustments are key.
The Core of Adjustment: Understanding Direction
The most important thing to remember is how the adjustments work. This is where many people get confused. Think about where your shots are landing compared to where you want them.
Moving the Point of Impact
Here’s a simple way to think about it. The rear sight controls your point of aim. The front sight post is what you see.
If your shots are hitting LOW: You need to move the point of aim UP. To do this, you often adjust the rear sight UP. This sounds backward, but you’re moving the rear sight hole higher to make your aim move down. Some sights might work differently, so always check your manual. For many Skinner sights, moving the sight UP moves the point of impact UP. This means you are moving the aiming point higher on the target to bring the bullet hole down. Let’s rephrase for clarity.
If your shots are hitting LOW: You want your bullet to go UP. You adjust the rear sight DOWN. This moves the aiming point UP. When you aim with the adjusted sight, you will be aiming higher on the target. Your bullet will then strike lower, closer to your desired spot. This is a common confusion point.
If your shots are hitting HIGH: You want your bullet to go DOWN. You adjust the rear sight UP. This moves the aiming point DOWN. You’ll aim lower on the target, and your bullet will strike higher.
If your shots are hitting LEFT: You want your bullet to go RIGHT. You adjust the rear sight RIGHT. This moves the aiming point LEFT. You will aim to the left of your desired spot, and your bullet will strike to the right.
If your shots are hitting RIGHT: You want your bullet to go LEFT. You adjust the rear sight LEFT. This moves the aiming point RIGHT. You will aim to the right of your desired spot, and your bullet will strike to the left.
It can be helpful to sketch this out. Many manuals have diagrams too.
Quick Sight Adjustment Guide
Key Principle: Adjust the rear sight in the direction you want your bullet to strike.
- Shots Low? Adjust Rear Sight UP.
- Shots High? Adjust Rear Sight DOWN.
- Shots Left? Adjust Rear Sight RIGHT.
- Shots Right? Adjust Rear Sight LEFT.
Note: Always make small adjustments and test fire between each change.
Setting Up Your Shooting Session
Before you even touch those adjustment screws, you need a solid plan. A good setup makes the whole process much smoother.
Choose the Right Distance
Start at a distance where you are comfortable. For most rifles with peep sights, 25 yards is a good starting point. This is close enough to see your shots easily. It’s also far enough to see any significant deviation. Once you’re dialed in at 25 yards, you can move to 50, 100, or further.
Use a Stable Platform
Accuracy depends on a steady hold. Use a shooting bench with sandbags or a bipod. This removes your body as a variable. You want to know that the shots are going where they are because of the sights, not your shaky hands.
Use Consistent Ammunition
Different types or brands of ammunition can shoot differently. Stick to one type of factory load for your initial sight-in. If you plan to hunt with a specific load, sight in with that. Consistency is crucial for accurate adjustments.
Fire in Groups
Don’t just shoot one shot at a time. Fire a group of three to five shots. This shows you a pattern. A single stray shot can be misleading. Look for a tight group first. Then, look at where that group is located on the target.
Your Sight-In Checklist
- Stable Surface: Bench, bags, or bipod.
- Target: Clear bullseye.
- Distance: Start close (e.g., 25 yards).
- Ammo: One consistent type.
- Fire: Groups of 3-5 shots.
Making the Actual Adjustments
Now for the hands-on part. This is where the real work happens.
Locate the Adjustment Screws
Skinner peep sights typically have screws for windage (left/right) and elevation (up/down). These are usually on the side and top of the rear sight body. Consult your specific Skinner sight model’s manual if you’re unsure.
Windage Adjustments (Left and Right)
First, let’s get the left-right zero. Look at your group of shots. Are they too far left or right?
If your group is to the left of your aim point, you need to move the impact to the right.
Turn the windage screw to the right. This moves the rear sight’s aiming point to the left on the target. So, you’re aiming to the left of where you want the bullet to go, making the bullet hit to the right.
If your group is to the right of your aim point, you need to move the impact to the left.
Turn the windage screw to the left. This moves the rear sight’s aiming point to the right on the target. So, you’re aiming to the right of where you want the bullet to go, making the bullet hit to the left.
Remember the rule: Adjust the sight in the direction you want your bullet to strike.
Elevation Adjustments (Up and Down)
Once your windage is close, focus on the up-down zero.
If your group is too low on the target, you need to move the impact higher.
Turn the elevation screw up (or in the direction indicated for moving impact up). This moves the rear sight’s aiming point down. You’ll aim lower on the target to make the bullet hit higher.
If your group is too high on the target, you need to move the impact lower.
Turn the elevation screw down (or in the direction indicated for moving impact down). This moves the rear sight’s aiming point up. You’ll aim higher on the target to make the bullet hit lower.
Making Small Turns
The key here is small adjustments. Most peep sights have clicks. Each click represents a small change. Often it’s ¼ or ½ MOA (Minute of Angle). A ¼ MOA adjustment at 100 yards moves the point of impact by about ¼ inch. At 25 yards, it’s about 1/16 inch.
Make one or two clicks at a time. Fire another group. See where you are now. Repeat this process. This is better than making a big move and overshooting your zero.
Adjusting the Screws: What to Watch For
Windage:
- Group Left → Turn Windage Right (moves impact right)
- Group Right → Turn Windage Left (moves impact left)
Elevation:
- Group Low → Turn Elevation Up (moves impact up)
- Group High → Turn Elevation Down (moves impact down)
Rule: Always adjust the sight in the direction you want the bullet to strike.
Fine-Tuning for Precision
Getting on paper is one thing. Getting truly accurate is another. This takes a bit more attention.
The Importance of the Front Sight Post
Your front sight post is critical. Its thickness affects perceived accuracy. A thicker post covers more of the target. This makes precise aiming harder at longer ranges. A thinner post allows for finer aiming but can be harder to see. Many Skinner sights offer interchangeable front sight posts. Experiment to find what works best for your eyes and target.
Focusing Your Eye
The magic of peep sights is how they help your eye. When you look through the peep, your eye naturally centers the front sight. Don’t try to focus on the peep itself. Focus on the front sight post. Then, place that front sight post where you want your bullet to hit. Your target should be slightly blurry. This is correct.
Dealing with Light Conditions
Poor light can make adjustments difficult. The front sight might seem to float. If it’s very sunny, glare can be an issue. If it’s dim, the front sight might be hard to see. Some shooters use a small aperture insert in the rear sight if the main hole is too big. This can help in bright light. For dim light, a larger aperture or a tritium front sight (if available for your model) can help.
Practice Makes Perfect
The more you shoot and adjust, the better you’ll become. You’ll learn how your rifle and ammo behave. You’ll also develop a feel for the sight adjustments.
Advanced Tips for Accuracy
- Front Sight: Choose the right thickness for your needs.
- Eye Focus: Focus on the front sight, not the rear peep or target.
- Light: Be aware of how light affects sight visibility.
- Consistency: Shoot the same way every time.
Common Issues and How to Solve Them
Sometimes, things don’t go as planned. Here are a few common problems.
Inconsistent Groups
If your shots are scattered all over the place, the problem might not be the sight.
Rifle Issues: Check if your rifle’s barrel is loose or if the stock has cracks.
Shooter Error: Make sure you are holding the rifle consistently. Are you flinching?
Ammunition: Try a different brand or type of ammo.
Sight Won’t Adjust
If the adjustment screws feel stuck, don’t force them.
Dirt or Debris: Clean the sight threads carefully with a small brush and solvent.
Loctite: Sometimes, threads are secured with Loctite. You might need a bit of heat to break it loose, but be careful not to damage the sight. Check your manual or contact Skinner.
Losing Your Zero
If your sights were zeroed, but now they’re off, what happened?
Impact: Did the rifle get knocked around? A bump can shift sights.
Loose Mounts: Ensure the screws holding the sight to the rifle are tight.
Heat: Extreme temperature changes can sometimes cause metal to expand or contract slightly, affecting zero.
Troubleshooting Your Peep Sight
Problem: Scattered Shots
Likely Cause: Rifle or shooter error, ammo issues.
Problem: Stuck Screws
Likely Cause: Dirt, debris, or Loctite.
Problem: Losing Zero
Likely Cause: Impact, loose mounts, or extreme temperature.
When to Seek Expert Help
While most adjustments are simple, there are times to ask for help.
Unfamiliarity: If you’re new to firearms or peep sights, a more experienced shooter can guide you.
Persistent Problems: If you’ve tried everything and can’t get your rifle to shoot accurately, a gunsmith can diagnose potential rifle issues.
Sight Damage: If your sight is physically damaged, contact Skinner sights for repair or replacement advice.
Real-World Scenarios
Let’s look at how these adjustments play out in different hunting situations.
Scenario 1: Whitetail Deer in the Woods
Imagine you’re hunting deer in dense woods. Shots are usually 50 yards or less. You need to be sure of your first shot. You’ve sighted your rifle in at 25 yards. Your shots are hitting a bit high at 25 yards. You need to move the impact DOWN. So, you adjust the rear sight DOWN. You fire another group. Now you’re hitting the bullseye at 25 yards. This ensures that at 50 yards, you’ll still be very close.
Scenario 2: Prairie Dog Hunting
This is a different game. You might be shooting at targets 100 to 200 yards away. You need a precise zero at that longer range. You’ll likely sight in at 100 yards. If your shots are grouping at 100 yards, but they are 4 inches too low, you need to move the impact UP. You adjust the rear sight UP. You test again at 100 yards. Now you’re dead on.
What This Means for Your Shooting
Getting your Skinner peep sight adjusted properly is more than just a range task. It directly impacts your success and safety.
Confidence on Target
Knowing your rifle is zeroed gives you immense confidence. When you see your target, you can trust your aim. This is vital for ethical hunting and enjoyable target practice.
Ethical Hunting
Accurate shooting is ethical shooting. A well-adjusted sight means a clean, quick harvest. It minimizes suffering and waste.
Safety First
Always treat every firearm as if it were loaded. Make sure your target and the area beyond it are safe before you fire. Understanding your sight’s adjustments helps prevent unintended shots.
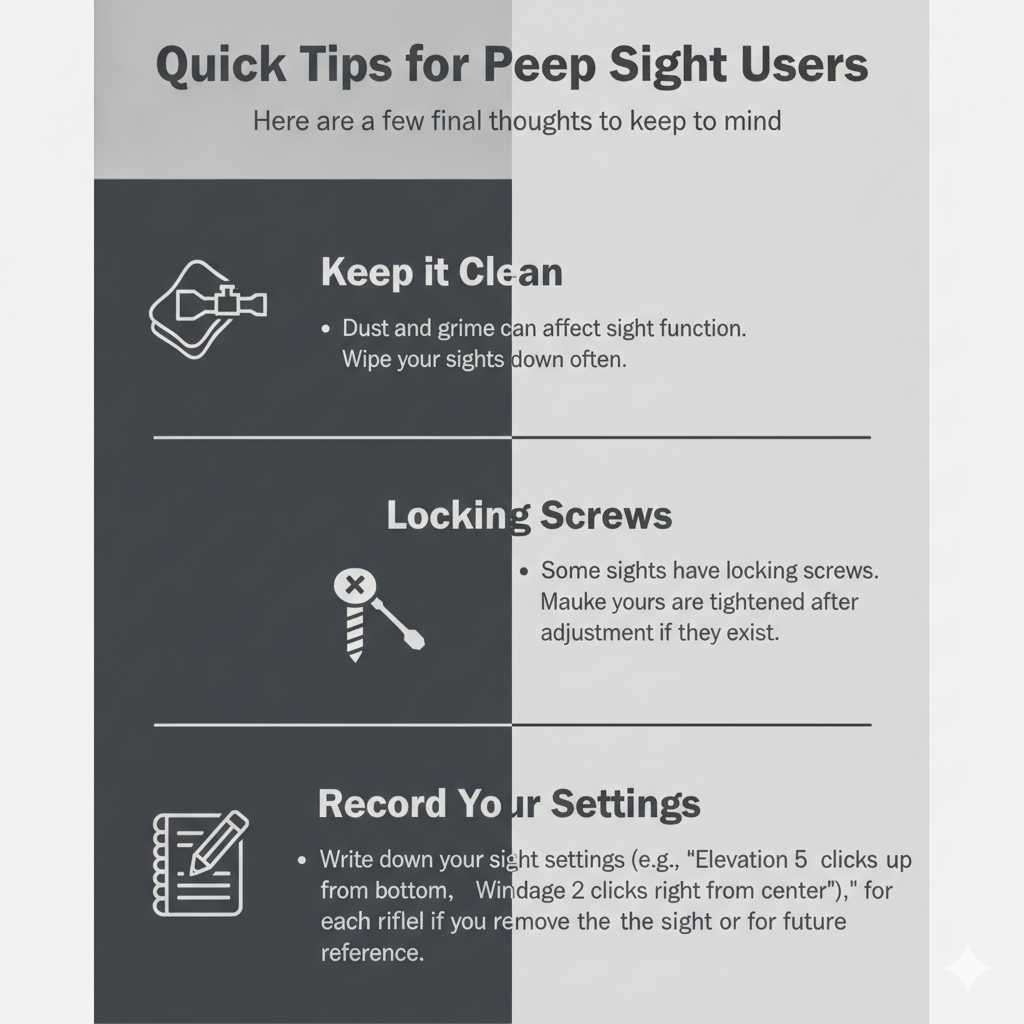
Quick Tips for Peep Sight Users
Here are a few final thoughts to keep in mind.
Keep it Clean: Dust and grime can affect sight function. Wipe your sights down often.
Locking Screws: Some sights have locking screws. Make sure yours are tightened after adjustment if they exist.
Record Your Settings: Write down your sight settings (e.g., “Elevation 5 clicks up from bottom, Windage 2 clicks right from center”) for each rifle. This is useful if you remove the sight or for future reference.
Frequently Asked Questions
How far should I sight in my peep sight?
How far should I sight in my peep sight?
It depends on what you plan to do with the rifle. For general hunting in wooded areas, 25 to 50 yards is a common starting point. For longer-range shooting like varmint hunting, you might sight in at 100 yards or more.
Always test at the distance you expect to shoot.
What is MOA?
What is MOA?
MOA stands for Minute of Angle. It’s a unit of angular measurement. One MOA is roughly 1 inch at 100 yards.
So, if your sight adjusts ¼ MOA, one click will move your bullet’s impact about ¼ inch at 100 yards. At 25 yards, ¼ MOA is about 1/16 of an inch.
How do I know if my peep sight is centered?
How do I know if my peep sight is centered?
Most sights have a “zero” or “center” position for windage. This is often marked with a line or a dot. If you don’t see one, you can find the center by turning the windage screw all the way in one direction, then backing it out the same number of turns.
Do the same for elevation. The middle point between these extremes is usually your center.
Can I adjust the front sight on a Skinner sight?
Can I adjust the front sight on a Skinner sight?
Some Skinner front sights are adjustable for elevation. Others have interchangeable posts of different heights. Check your specific Skinner front sight model to see its adjustment capabilities.
What if my shots are not grouping well?
What if my shots are not grouping well?
If your shots are not forming a tight group, the problem is likely not with your sight adjustment. Check your rifle’s condition, ensure your shooting technique is consistent, and try different types of ammunition. A gunsmith can help diagnose rifle issues.
Do I need a special tool to adjust my Skinner peep sight?
Do I need a special tool to adjust my Skinner peep sight?
Most Skinner peep sights use standard screws that can be turned with a small flathead screwdriver or sometimes even a coin. Check your specific sight model for the type of adjustment needed.
Conclusion
Adjusting your Skinner peep sight is a rewarding process. It requires patience and understanding. By making small, deliberate changes, you can achieve excellent accuracy. You’ll enjoy your shooting experience much more when you can trust your aim. Happy shooting!