To replace nocks on fiberglass arrows, first safely remove the old nock using pliers or gentle heat for stubborn, glued-on ones. Clean the arrow shaft end thoroughly. Then, press-fit or glue the new, correctly sized nock into place, ensuring it aligns perfectly with the index fletching. Let any adhesive cure completely before shooting for safety.
Hello, fellow archers! Salman Arfeen here. It’s a great day to be at the range, isn’t it? But what happens when you pull an arrow from the target and—snap!—the nock is cracked or gone? It’s a common frustration that can stop a fun practice session in its tracks. Don’t worry, this is one of the easiest fixes in archery. You don’t need to be an expert bowyer or buy a whole new set of arrows. I’m here to walk you through every simple step. By the end of this guide, you’ll be able to replace a nock in minutes, keeping your arrows flying true and your confidence high. Let’s get started!
Why Is a Good Arrow Nock So Important?
You might think the nock is just a small piece of plastic, but it’s a critical part of your archery setup. It has two incredibly important jobs: connecting your arrow to the bowstring and transferring the bow’s energy to the arrow upon release. A damaged or poorly fitted nock can cause major problems.
- Safety: A cracked nock can shatter on release, potentially causing the arrow to fall off the string. This could lead to a “dry fire” scenario, where the bow releases its energy without an arrow, which can severely damage your bow and even cause injury.
- Accuracy: A nock that fits too tightly or too loosely on the string will ruin your shot consistency. A proper fit ensures a clean, smooth release every single time, which is the key to tight groupings and hitting your mark.
- Arrow Flight: The nock helps guide the arrow as it leaves the bow. If it’s misaligned or damaged, it can cause the arrow to wobble or fly erratically, making it impossible to predict where it will land.
Taking a moment to inspect and replace your nocks is a small task that pays off big in safety, accuracy, and overall enjoyment of the sport. Think of it as essential maintenance, just like waxing your bowstring.
Gather Your Simple Tools and Materials
The good news is you don’t need a fancy workshop to replace a nock. Most of these items are probably already in your archery kit or garage. Having everything ready before you start makes the process smooth and quick.
- New Nocks: Make sure you have the correct size and type for your fiberglass arrows. We’ll cover how to choose the right ones in a bit.
- Pliers: A standard pair of household pliers or multi-tool pliers works perfectly for gripping and removing old nocks.
- A Soft Cloth or Paper Towel: For cleaning the arrow shaft.
- Rubbing Alcohol or Acetone: To ensure the inside of the arrow shaft is perfectly clean for a secure fit.
- Nock and Fletching Glue (Optional): Only needed if your arrows use glue-on nocks. Most beginner fiberglass arrows use press-fit nocks.
- Heat Source (For Glued Nocks Only): A hairdryer or a heat gun on a low setting. Extreme caution is required here.
- Safety Glasses: Always a good idea when working on equipment. Protect your eyes!
That’s it! With these simple items, you’re ready to get to work.
Safety First! A Quick Checklist Before You Begin
Before we dive into the steps, let’s talk about safety. It’s the most important part of archery, whether you’re shooting or working on your gear. Following these simple rules ensures you and your equipment stay safe.
- Wear Safety Glasses: Small pieces of plastic or old glue can break off unexpectedly. Protect your eyes at all times.
- Work in a Well-Ventilated Area: If you are using glue or solvents like acetone, good airflow is important to avoid inhaling fumes.
- Handle Arrows with Care: Always be mindful of the arrowhead (the point). It’s best to work on a stable surface like a table or workbench to prevent arrows from rolling away.
- Use Heat Cautiously (If Needed): Applying too much heat to a fiberglass arrow can damage the shaft, making it unsafe to shoot. Use the lowest possible heat setting and apply it for only a few seconds at a time. Never use an open flame like a lighter or a candle. According to safety guidelines from organizations like the Archery Trade Association, equipment integrity is paramount for safe shooting.
How to Replace Nocks on Fiberglass Arrows: A Step-by-Step Guide
Alright, you’ve got your tools and you’ve reviewed the safety rules. Now for the fun part! We’ll break this down into two simple stages: removing the old nock and installing the new one.
Part 1: Removing the Old or Broken Nock
Getting the old nock out is usually straightforward. How you do it depends on whether it’s a simple press-fit nock or one that has been glued in.
Step 1: Inspect the Arrow Shaft
Before you do anything else, take a close look at the end of the arrow shaft around the nock. You’re looking for any cracks, splits, or splintering in the fiberglass. If you see any damage to the shaft itself, that arrow is no longer safe to shoot. It’s better to retire one arrow than to risk it breaking upon release. If the shaft looks clean and solid, you’re good to go.
Step 2: Remove a Press-Fit Nock
Most fiberglass arrows for beginners use press-fit (also called friction-fit) nocks. These are held in place just by pressure.
- Grip the Nock: Take your pliers and get a firm, but not crushing, grip on the old nock.
- Twist and Pull: Gently twist the nock back and forth while pulling it straight out of the arrow shaft. It should pop out with a little effort. Avoid wiggling it side-to-side, as this can damage the end of the shaft.
If the nock is broken and you can’t get a good grip, you can sometimes use a small screw. Gently twist the screw a few turns into the remaining plastic of the nock, and then use your pliers to pull on the screw.
Step 3: Remove a Glued-On Nock (With Caution!)
Some nocks are secured with a small amount of hot-melt glue. If the nock won’t budge with a simple twist and pull, it’s likely glued.
- Apply Gentle Heat: Using a hairdryer or a heat gun on its lowest setting, warm the very end of the arrow shaft where the nock is inserted. Do this for just 5-10 seconds. Keep the heat source moving to avoid overheating one spot.
- Try Again: The heat should soften the glue. Use your pliers to grip the nock and try the twist-and-pull method again. It should come out much more easily.
- Repeat if Necessary: If it’s still stuck, apply another few seconds of heat and try again. Patience is key here. Never force it.
Warning: Overheating a fiberglass shaft will make it brittle and unsafe. The goal is to warm the glue, not cook the arrow.
Step 4: Clean the Arrow Shaft
This is a crucial step for a secure fit. Once the old nock is out, look inside the end of the arrow shaft. You might see old glue residue or dirt.
- Dab a small amount of rubbing alcohol or acetone onto a paper towel or cotton swab.
- Carefully wipe out the inside of the shaft until it’s completely clean and dry.
- This ensures your new nock will have a perfect, solid connection.
Part 2: Installing Your New Nock
With a clean shaft ready to go, installing the new nock will take less than a minute. The key here is proper alignment.
Step 1: Confirm You Have the Right Nock
Before you push it in, double-check that your new nock is the correct size for your arrow shaft. It should feel snug, not loose or impossibly tight. Most fiberglass arrows use a standard size, but it’s always good to be sure.
Step 2: Align the Nock with the Fletching
Look at your arrow’s fletching (the “feathers” at the back). You will see two vanes of one color and a third vane of a different color. This odd one out is called the “index fletch.”
- When shooting, the index fletch should always point away from the bow’s riser (the handle part).
- Therefore, the slot in your nock must be perpendicular (at a 90-degree angle) to the index fletch.
Hold the new nock over the shaft and line it up visually before you push it in. Getting this alignment right is essential for proper arrow flight and clearance as it leaves the bow.
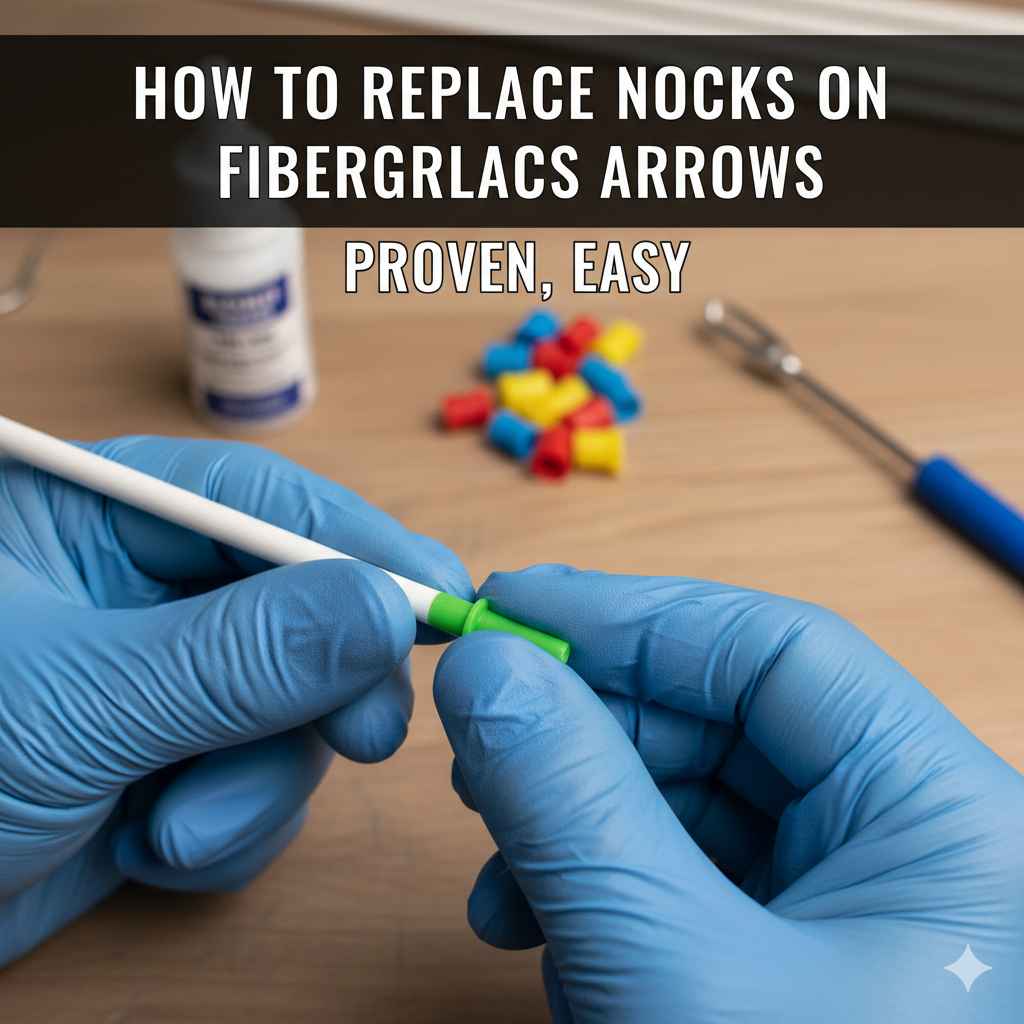
Step 3: Secure the New Nock
For a press-fit nock, this is the easiest step of all.
- Line up the nock as described above.
- Push the nock straight into the arrow shaft with firm, steady pressure. You can use your thumb or press it against a hard, flat surface (like a workbench) to seat it fully.
- You should feel it snap or click into place. It should be flush with the end of the arrow shaft with no gaps.
If you are using glue-on nocks, you would apply a very small, thin layer of nock glue to the nock insert before pressing it in, then wipe away any excess glue immediately.
Step 4: Do a Final Check
Your new nock is in! Now, just give it a final once-over.
- Does the nock alignment look correct relative to the index fletch?
- Is the nock seated all the way into the shaft?
- Gently try to twist it with your fingers. It should be snug and not spin freely.
If everything looks good, you’re done! If you used glue, be sure to let it cure completely according to the manufacturer’s instructions before you shoot the arrow.
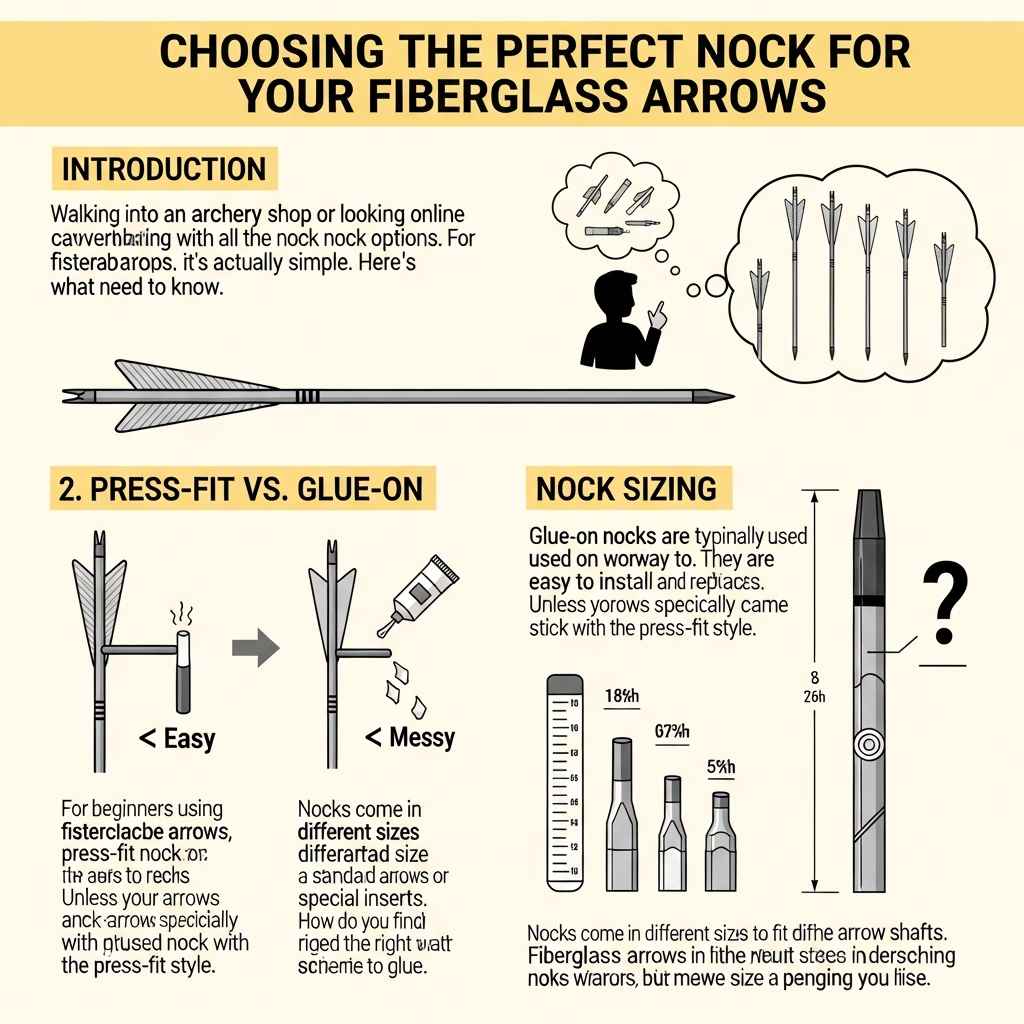
Choosing the Perfect Nock for Your Fiberglass Arrows
Walking into an archery shop or looking online can be overwhelming with all the nock options. For fiberglass arrows, it’s actually quite simple. Here’s what you need to know.
Press-Fit vs. Glue-On
For beginners using fiberglass arrows, press-fit nocks are the way to go. They are easy to install and replace without any messy glue. Glue-on nocks are typically used on wood arrows or arrows with special inserts. Unless your arrows specifically came with glued nocks, stick with the press-fit style.
Nock Sizing
Nocks come in different sizes to fit different arrow shafts. Fiberglass arrows often use a standard size, but it’s best to be sure. How do you find the right size?
- Check the Manufacturer’s Website: The easiest way is to look up your arrow model online. The product page will list the correct nock size.
- Take an Arrow to a Pro Shop: Any local archery shop can identify your nock size in seconds.
- Measure It: If you have a set of calipers, you can measure the inside diameter of your arrow shaft. However, this is less reliable for beginners.
The fit of the nock on the bowstring is also important. It should snap onto the string with an audible “click” but not be so tight that it’s hard to remove. It should be able to hang from the string without falling off, but slide off easily when you tap the string.
| Feature | Press-Fit Nocks | Glue-On Nocks | Recommendation for Fiberglass |
|---|---|---|---|
| Installation | Very easy; just push in. | Requires glue and curing time. | Press-Fit is highly recommended. |
| Tools Needed | Pliers (for removal). | Glue, heat source (for removal). | Fewer tools needed for Press-Fit. |
| Replacement Time | Under one minute. | Several minutes plus cure time. | Press-Fit is much faster. |
| Common Use | Carbon, aluminum, fiberglass arrows. | Wood arrows, some specific setups. | Press-Fit is the standard. |
Common Problems and Easy Fixes
Sometimes things don’t go perfectly, and that’s okay! Here are a few common issues you might run into and how to solve them in seconds.
| Problem | Possible Cause | Easy Solution |
|---|---|---|
| The new nock feels loose or spins easily. | The nock is the wrong size, or the arrow shaft is worn. | Confirm you have the right nock size. If it’s correct, you can add a tiny drop of fletching glue or even clear nail polish to help it stay put. Let it dry completely. |
| The new nock won’t go into the shaft. | It’s the wrong size (too big), or there is still debris inside the shaft. | Double-check the nock size. Re-clean the inside of the shaft thoroughly with a cotton swab and rubbing alcohol to remove any hidden residue. |
| The nock broke while I was installing it. | Too much force was applied at an angle, or the nock had a manufacturing defect. | Remove the broken pieces with pliers and try again with a new nock. Be sure to press it in straight and steady. |
| I’m not sure if my nock is aligned correctly. | It can be tricky to eyeball a perfect 90-degree angle. | Place the arrow on your bowstring (without drawing the bow). The index fletch should be pointing directly away from the bow riser. If not, pull the nock out and re-align it. |
Frequently Asked Questions (FAQ)
1. How do I know what size nock I need for my arrows?
The best way is to check the arrow manufacturer’s website for your specific arrow model. If you can’t find it, take one of your arrows (even one with a broken nock) to a local archery pro shop. They can measure it and tell you the exact size you need.
2. Can I reuse an old nock if it looks okay?
It’s not recommended. Nocks are very inexpensive, and plastic can develop tiny, invisible stress fractures over time. Once you pull a nock out, it’s best to replace it with a fresh one to ensure safety and a secure fit.
3. What happens if I shoot with a cracked nock?
Shooting with a cracked nock is very dangerous. It can fail during the shot, causing the arrow to fall and the bow to “dry fire,” which can damage the bow’s limbs and potentially injure you. Always inspect your nocks before shooting and replace any that show signs of damage.
4. Does the color of the nock matter?
Functionally, no. The color is purely for visibility. Bright colors like fluorescent green, orange, or pink make it easier to see your arrow in flight and find it in the grass or target. Choose whichever color you like and can see best!
5. How often should I check my arrow nocks?
It’s a good habit to give your nocks a quick visual inspection before every shooting session. Simply glance at each one to check for cracks. Also, give them a gentle twist to make sure they are still tight. If an arrow has a hard impact (e.g., hitting a tree or the target frame), be sure to inspect that nock carefully before shooting it again.
6. What kind of glue should I use for glue-on nocks?
If you have nocks that require glue, you should use a specialty archery adhesive often called “fletching glue” or “nock cement.” These are designed to bond with plastic and arrow shaft materials while remaining slightly flexible to withstand impact. Avoid using generic superglue, as it can become brittle and fail.
7. My nock fits the arrow, but it’s too loose on my bowstring. What do I do?
This means the nock’s “throat” or slot is too wide for your bowstring. You may need to buy nocks specifically designed for a smaller string serving size. Alternatively, a bow technician at a pro shop can add a few strands of serving thread to your bowstring’s center serving to build it up for a snugger fit.
Ready to Get Back to Shooting?
See? I told you it was easy! Replacing a nock on a fiberglass arrow is a fundamental skill that every archer should have. It saves you time, money, and keeps you safe on the range. By following these simple steps, you can fix a broken nock in just a few minutes and get right back to enjoying the sport you love.
Don’t be afraid to work on your own equipment. These small maintenance tasks build your confidence and give you a better understanding of how your gear works together to send that arrow flying straight to the bullseye. Now, grab your gear, inspect those nocks, and have a fantastic time at the range. Happy shooting!