Imagine crafting your own wooden arrows, feeling the smooth grain beneath your fingers, and knowing that each piece is a testament to your skill. You’re not just creating arrows; you’re creating a story, a connection to the age-old art of archery.
This hands-on project is more than a mere hobby—it’s a transformative experience that blends creativity, precision, and passion. As you delve into this fascinating world, you might feel a surge of excitement and anticipation. What if you could master the art of making wooden arrows from scratch?
What if you could customize them to suit your style and needs? This guide is here to show you how easy it can be, how rewarding it is to see your handiwork fly through the air with grace and accuracy. You’ll discover the secrets behind selecting the right wood, crafting the perfect shaft, and adding those finishing touches that make your arrows truly unique. Are you ready to unleash your inner craftsman and experience the satisfaction of saying, “I made this”? Dive in, and let’s explore the world of DIY wooden arrows together.

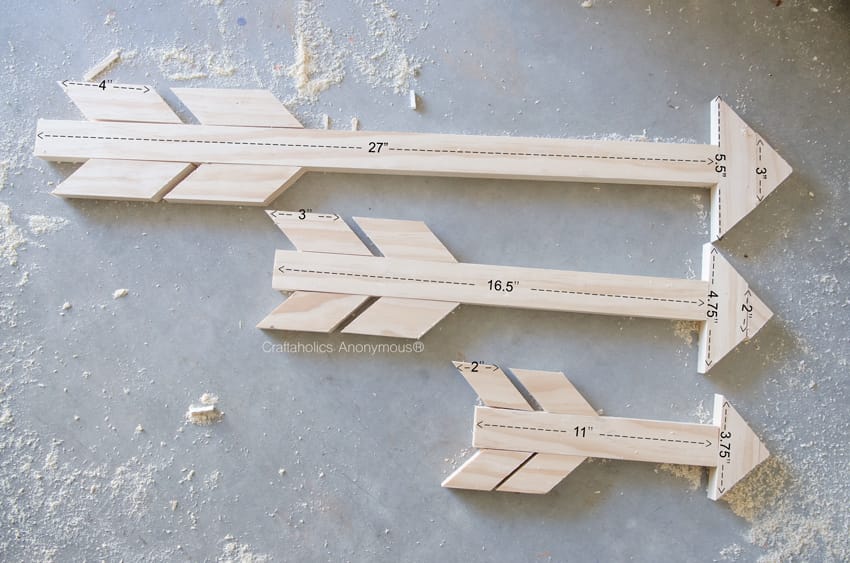
Credit: www.etsy.com
Materials Needed
Choosing the right wood is key. Cedar and pine are popular choices. They are both strong and lightweight. This makes them perfect for arrows. Straight grain wood is best. It helps the arrow fly straight. Avoid wood with knots or bends. These can cause the arrow to break.
You need some basic tools. A saw is needed to cut the wood. A knife helps to shape it. Use sandpaper to make the wood smooth. A measuring tape is important for accuracy. Gloves protect your hands while working.
Glue is used to attach feathers. Feathers help the arrow fly straight. Arrowheads are placed at the tip. Paint or stain can make your arrows look nice. String is needed for the bowstring. These supplies complete your arrow-making kit.
Designing Your Arrows
Picking the right arrow length is important. Short arrows fly fast. Long arrows offer more control. Measure your draw length first. Use this to decide arrow size. Too long arrows can break easily. Too short arrows may not fly straight. Safety matters most. Check size before using.
Arrow shape affects flight. Thin arrows fly quick. Thick arrows are stable. Choose a style for your needs. Traditional arrows have round shapes. Modern arrows can be flat. Flat arrows cut air better. Mix styles for fun. Try different shapes. See what works best.
Decorating arrows is fun. Paint adds color. Feathers add style. Use bright colors for easy spotting. Add stripes for flair. Wraps give grip. Personalize your arrows. Make them unique. Try stickers for fast designs. Enjoy the creative process. Show off your work.
Crafting Arrow Shafts
Start with a straight piece of wood. It needs to be long and thin. Use a saw to cut the wood to the right length. This makes the arrow shaft. Be careful while cutting. Sharp tools can hurt.
Shape the wood using a knife. The shaft should be smooth and round. Even edges are important. The arrow must fly straight. Check the shape with your hands. It should feel even and balanced.
Sanding makes the arrow smooth. Start with rough sandpaper. Rub it along the shaft. This removes big bumps. Next, use fine sandpaper. This makes the shaft very smooth. Smooth arrows fly better.
Always sand in one direction. It helps in keeping the shaft even. Feel the shaft with your hand. It should feel like glass. A smooth shaft is a good shaft.

Credit: www.lakeshorelearning.com
Fletching And Feathers
Choose the right feathers for your arrows. Feathers should be light and durable. Turkey feathers are a popular choice. They help arrows fly straight and smooth. Pick feathers that are about 5 inches long. This length is perfect for most arrows. Bright colors help you see arrows in grass.
Attach fletching with glue or tape. Ensure they are evenly spaced around the arrow. This helps the arrow stay balanced. Use a fletching jig for best results. It holds the arrow still. Place feathers at a slight angle. This makes the arrow spin when flying. Spinning keeps it stable and accurate.
Adding Arrowheads
There are different types of arrowheads you can use. Field points are great for practice. They are smooth and easy to pull out. Broadheads are sharp and used for hunting. They can be dangerous, so handle with care. Blunt tips are flat. They are good for small game and target practice. Each type has its own use. Choose the one that fits your need.
To secure an arrowhead, attach it to the shaft tightly. Use a strong glue to keep it in place. Wrap the base with thread or string. This helps hold it. Make sure the arrowhead does not wobble. A loose arrowhead can be unsafe. Check the arrowhead before every use. Safety first!
Balancing And Testing
Balancing is very important for wooden arrows. Each arrow should have equal weight distribution. This helps the arrow fly straight. Check the weight of each part. The arrowheadshould be heavier than the tail. Use a small scale to measure the parts. Make sure they are balanced. This helps in making the arrow strong.
Testing arrows ensures they fly straight. Use a target for practice. Shoot the arrow at the target. See if it hits the center. Check how far it goes. Adjust the arrow if needed. Repeat this step often. Keep testing until the arrow is accurate. Testing helps find errors in design. Try different techniques for better results. Make sure the arrows are safe to use.
Safety Tips
Tools can be sharp and dangerous. Always wear gloves to protect your hands. Keep tools in good condition for safe use. Use goggles to protect your eyes from flying wood chips. Pay attention while using sharp tools to prevent accidents. Never rush when using tools. Take breaks to avoid tiredness, which can lead to mistakes. Store tools safely when not in use.
Finished arrows should be checked for cracks. Cracks can cause arrows to break. Inspect arrows regularly. Keep arrows dry to prevent damage. Store arrows in a safe place. Handle arrows gently to maintain their shape. Do not point arrows at people or pets. Use arrows only in safe areas for practice. Follow all rules during archery activities.
Preserving And Maintenance
Always store wooden arrows in a dry and cool place. Avoid direct sunlight. Sunlight can damage the wood. Use a dedicated arrow case for better protection. This keeps arrows safe from dust and dirt. Ensure the case is free from moisture. Moisture can cause wood to warp or rot. Keep arrows away from heat sources. Heat can make the wood brittle. Place arrows horizontally in storage. This prevents bending and warping.
Check your arrows regularly for damage. Look for cracks or splinters. Inspect the fletching. Ensure it is not loose or torn. Check the arrow tips. Make sure they are not dull or loose. Tighten any loose parts. Replace damaged fletching quickly. This keeps arrows flying straight. Examine the nocks. Ensure they are not cracked. Replace if necessary. Regular checks help arrows last longer.
Credit: www.etsy.com
Frequently Asked Questions
What Materials Are Needed For Wooden Arrows?
To craft wooden arrows, you’ll need wooden shafts, arrowheads, fletching, and nocks. Select quality wood like cedar or pine for shafts. Ensure arrowheads are sharp and suitable for the intended use. Fletching, typically feathers, stabilizes the arrow’s flight. Nocks ensure a secure fit on the bowstring.
How Do You Choose The Right Wood?
Choose wood based on flexibility, strength, and weight. Cedar is popular for its balance of these traits. Pine is also a common choice. Ensure the wood is straight-grained and free from knots. This ensures better performance and durability for your arrows.
How Do You Attach Arrowheads Securely?
To attach arrowheads, use strong adhesive or glue. Ensure the shaft’s end is smooth and fits the arrowhead snugly. Some use thread wrapping for added security. Proper attachment prevents the arrowhead from detaching during use, ensuring safety and accuracy.
What Is The Best Way To Fletch Arrows?
Use a fletching jig for precise alignment of feathers. Apply adhesive to the feather’s base and attach it to the shaft. Ensure even spacing for stability during flight. Allow the adhesive to dry completely before use. Proper fletching enhances arrow flight and accuracy.
Conclusion
Crafting your own wooden arrows is rewarding and fun. You learn valuable skills and gain a deeper connection to archery. Each arrow tells a story of creativity and effort. Plus, they’re customizable to your liking. Whether for sport or hobby, your arrows will be unique.
Embrace the process and enjoy every moment of creation. It’s a journey of discovery and craftsmanship. Making arrows by hand brings satisfaction and pride. Share your creations with friends and family. Inspire others to explore this fascinating craft. Wooden arrows offer a blend of tradition and personal touch.