Carving your own wooden arrow is an essential, rewarding skill that lets you create custom, accurate arrows perfectly matched to your bow—building confidence and fun on the range.
Many new archers feel frustrated buying expensive arrows that break easily or fly poorly. Carving your own seems hard at first, with worries about getting the shaft straight or picking the right wood.
Don’t worry—it’s simpler than you think! With basic tools and clear steps, anyone can make strong, beautiful wooden arrows. This guide walks you through everything safely, from choosing wood to adding the final touches.
You’ll soon shoot arrows you made yourself. Let’s get started on your first set!
Why Carve Your Own Wooden Arrows?
Wooden arrows connect you to archery’s roots. They’re quiet, forgiving, and fun to craft.
Here are some key benefits:
- Custom fit: Match spine and length exactly to your bow for better accuracy.
- Cost savings: Make a dozen for less than buying premium ones.
- Satisfaction: Nothing beats hitting the target with an arrow you carved.
- Durability with care: Good wooden arrows last years with proper maintenance.
Plus, the process is relaxing and builds your skills.

Safety First: Essential Tips for Carving Arrows
Safety comes before everything in archery and crafting.
Follow these rules every time:
- Wear cut-resistant gloves and eye protection when carving or using tools.
- Work in a well-lit, stable area. Secure your workpiece.
- Keep knives and tools sharp—dull ones slip and cause accidents.
- Never point a finished arrow at anyone. Treat them like loaded weapons.
- Inspect arrows before shooting for cracks or damage.
- Start with low draw-weight bows until your arrows prove reliable.
Stay safe, and enjoy the process!
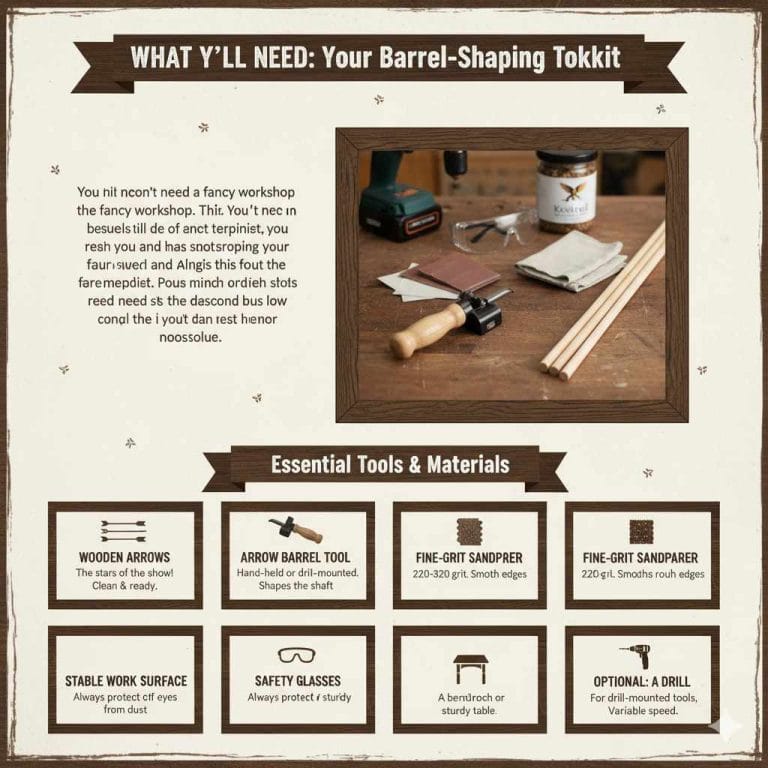
Tools You’ll Need to Carve Wooden Arrows
You don’t need fancy equipment to start. Here’s a beginner-friendly list:
| Tool | Purpose | Beginner Tip |
|---|---|---|
| Sharp carving knife or whittling knife | Shaping and straightening shafts | Start with a comfortable fixed-blade knife |
| Spokeshave or drawknife | Rounding and smoothing shafts | Great for quick material removal |
| Sandpaper (various grits) | Final smoothing | Go from coarse (120) to fine (400) |
| Taper tool | Shaping ends for points and nocks | Handheld versions are affordable |
| Fletching jig | Attaching feathers evenly | Simple clamp jigs work well |
| Arrow straightener (or hands) | Correcting bends | Heat gently if needed |
| Glue (fletching and hot-melt) | Attaching components | Ferr-L-Tite for points |
Many of these are available affordably online or at craft stores.
Choosing the Best Wood for Your Arrows
The wood matters most for performance and ease.
Top choices for beginners:
| Wood Type | Pros | Cons | Best For |
|---|---|---|---|
| Port Orford Cedar | Lightweight, straight grain, easy to straighten, pleasant smell | Less durable than harder woods | Target archery, general use |
| Sitka Spruce | Stronger than cedar, good strength-to-weight | Slightly heavier, harder to straighten | Hunting, durability needed |
| Douglas Fir | Very tough, heavy for penetration | Heavier, needs more work | Hunting with heavier bows |
For beginners, I recommend starting with **Port Orford Cedar** shafts. They’re forgiving and widely available pre-cut.
Learn more about wood properties from sources like the USDA Forest Service: https://www.fs.usda.gov/.
Understanding Arrow Spine: Getting the Right Flex
Spine measures how much the shaft bends—crucial for accurate flight.
Too stiff? Arrows veer left (for right-handers). Too weak? They veer right.
Use a spine chart based on your bow weight and arrow length. For example:
- 40# recurve at 28″ draw: 45-50 spine for cedar.
- Add heavier points to weaken spine slightly.
Test kits are the best way to dial it in perfectly.
Check dynamic spine calculators from reputable sites like 3Rivers Archery.
Step-by-Step: How to Carve a Wooden Arrow
Now the fun part! Follow these steps carefully.
- Select and prepare your shaft: Start with straight, seasoned wood blanks or shoots. Cut to length (your draw length + 2 inches).
- Rough shape the shaft: Use a spokeshave or knife to round it to about 5/16″ to 11/32″ diameter.
- Straighten the shaft: Sight down the shaft. Gently heat bends over low heat (coals or heat gun) and bend straight. Cool slowly.
- Sand smooth: Progress from coarse to fine sandpaper for a polished feel.
- Taper the ends: Use a taper tool—11° for nock, 5° for point.
- Attach the nock: Glue on plastic or carve a self-nock (advanced).
- Fletch your arrow: Use a jig to glue three feathers evenly. Turkey feathers are traditional and effective.
- Add the point: Glue on field points or broadheads with hot-melt.
- Seal and finish: Apply varnish or oil to protect from moisture.
Practice on scrap first—you’ll get better quickly!
Tuning and Testing Your Handmade Arrows
Shoot bare shafts first to check flight. Adjust spine or point weight as needed.
Paper tuning helps too. Aim for clean tears.
Your arrows will improve with practice and minor tweaks.
Maintenance: Keeping Your Wooden Arrows Shooting Great
- Check for cracks after every session.
- Re-straighten if needed.
- Refletch when feathers wear.
- Store in a dry place.
With care, your arrows will serve you well for years.
FAQ: Common Questions About Carving Wooden Arrows
1. Is carving wooden arrows hard for beginners?
No! Start with pre-cut shafts and basic tools. The skills come quickly with practice, and it’s very rewarding.
2. What wood is best for my first arrows?
Port Orford Cedar—it’s lightweight, easy to work, and forgiving for tuning.
3. Do I need expensive tools?
Not at all. A good knife, sandpaper, taper tool, and fletching jig are enough to start.
4. How do I know the right spine?
Use a spine chart for your bow weight and arrow length. Test kits are the surest way.
5. Can I use handmade wooden arrows for hunting?
Yes! Many traditional hunters do. Match spine carefully and use quality broadheads.
6. How long does it take to make one arrow?
Your first might take an hour or two. With practice, you’ll make a dozen in an afternoon.
7. Are wooden arrows safe?
Absolutely, when made properly and inspected regularly. Always prioritize safety.
Conclusion: Start Carving Your Arrows Today
Carving your own wooden arrows opens a whole new world in archery. You’ll gain deeper understanding of your gear, improve your shooting, and feel immense pride every time an arrow flies true.
Remember: Every expert was once a beginner. Take it one step at a time, stay safe, and enjoy the process.
Your first handmade arrow hitting the bullseye will be a moment you’ll never forget. Grab some wood, sharpen your knife, and get carving—you’ve got this!
Happy shooting,