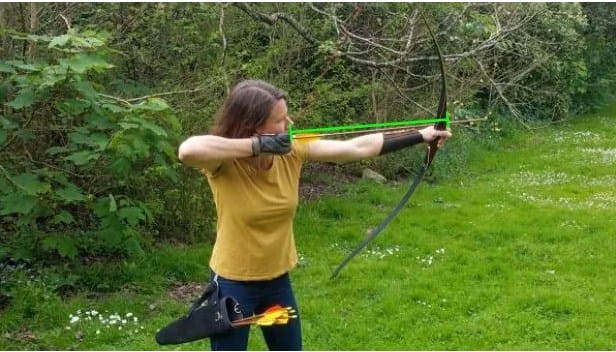
To measure arrow length for traditional bows, simply pull the bow back to your normal draw length and measure from the deepest part of the grip to the string. This ensures your arrows are the correct size for optimal performance and accuracy with your traditional bow setup.
Welcome, future archers! Ever feel like your arrows aren’t quite hitting the mark like you want them to? It’s a common feeling, especially when you’re just starting out with the beautiful world of traditional archery. Getting the right arrow length is more important than you might think, and it’s not as complicated as it sounds. Getting this detail right will make a huge difference in your shooting. We’re going to walk through exactly how to measure your arrow length so you can feel confident and shoot straighter. Let’s get your arrows singing with the bow!
The Importance of Correct Arrow Length for Traditional Bows
When you’re drawing back a traditional bow, there’s a chain reaction of energy transfer. The bow stores energy, and the arrow is the conduit that channels that energy toward your target. The length of your arrow is a critical link in this chain. If your arrows are too short, they can be unstable coming off the bow, potentially leading to dangerous “arrow spine” issues or erratic flight. Too long, and they might not be able to store and release energy efficiently, robbing you of power and accuracy.
For traditional archery, where consistency and intuition are key, having arrows that are the right length for your specific draw length and bow is paramount. It’s a foundational step towards developing good shooting habits and enjoying the sport to its fullest. Think of it like tuning an instrument – getting the notes right makes the whole melody work beautifully.
Understanding Your Draw Length: The Key Measurement
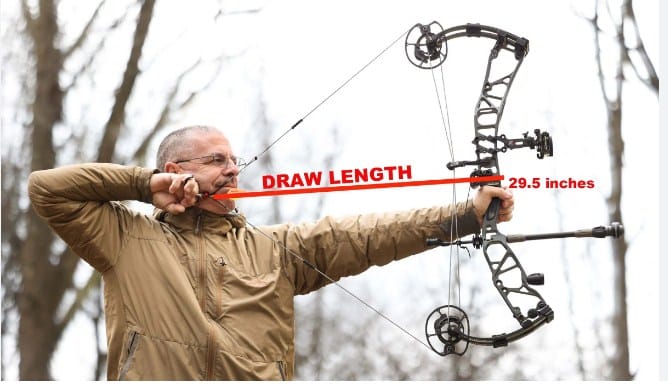
Before we can even think about measuring an arrow, we need to understand what your “draw length” is. This is the distance from your bow hand (the hand holding the bow) to the exact point where the bowstring rests against your fingers or release aid when you’re at full draw. It’s your personal shooting posture translated into a measurement. Knowing this number unlocks the secret to selecting the perfect arrow length.
There are a couple of common ways to determine your draw length:
- Using a Draw Length Arrow: This is a specialized arrow, often made of fiberglass or carbon, with a nock and a measured shaft. You can safely draw the bow back with it and note the measurement at your anchor point.
- Using a Tape Measure: While less precise than a dedicated tool, you can have a friend help you measure. Stand with your bow, draw it back to your anchor point, and have them measure from the back of your bow to the string. Be very careful during this process for safety.
- Measuring from your Bow Grip: A simpler, effective method for beginners involves measuring from the deepest part of your bow’s grip. This is the most common way to get a baseline for arrow length measurement.
For the purpose of measuring your arrow, we’ll focus on the comfortable, repeatable position you achieve at full draw.
How to Measure Arrow Length for Traditional Bows: Step-by-Step
This is where the magic happens! We’ll break it down into simple, actionable steps. You won’t need a lot of fancy tools, just a bit of care and perhaps a friend to help with the measurement.
What You’ll Need:
- Your Traditional Bow
- A Flexible Measuring Tape (a soft tailor’s tape works well)
- A Pencil or Pen
- A Helper (optional but recommended for accuracy and safety)
- An Unused Arrow (or a commercially available draw length arrow, if you have one)
Step 1: Safely Nock an Arrow
Begin by unstringing your bow, or ensure it’s in a safe, stable position that won’t allow it to fall. If your bow is strung, point it in a safe direction with your finger on the string or a bow stringer. Gently place an arrow on your bow shelf and nock it onto the bowstring, ensuring the nock is secure. If using a helper, they can hold the bow steady for you.
Step 2: Draw the Bow to Your Anchor Point
Stand in your normal shooting stance. Gently and smoothly draw the bowstring back to your familiar anchor point. This is the spot where you typically rest the string on your face (e.g., corner of your mouth, under your chin) for consistent aiming. Hold the bow firmly but without tension. If you have a helper, they should be ready to measure.
Step 3: Measure from the Bow Grip
This is the crucial measurement. You will measure from the point where the arrow shaft is resting against the deepest part of the bow’s riser (the grip section) when you are at full draw. Your helper can use the flexible measuring tape to mark this point on the arrow shaft with a pencil or pen. If you are measuring yourself, carefully manage the arrow and tape while holding draw. It’s best to have the arrow sticking out in front of you, away from your face and body.
Important Note: The measurement point on the arrow is typically taken from the inside of the nock throat (where the string sits) to the end of the arrow shaft. However, for the purpose of determining your arrow length, we are measuring the shaft itself from the point where it contacts the bow.
The measurement you’re looking for is the distance from the center of your arrow rest (the point on the bow where the arrow sits) to the deepest part of your grip. This initial measurement helps establish your shooting draw length. Once you have this, we’ll translate it to arrow length.
Step 4: Measuring the Arrow Shaft Itself
Once you’ve determined your draw length from the bow grip, lay your arrow on a flat surface. Place your tape measure along the arrow shaft. The measurement point on the arrow is generally from the:
- Bottom of the nock groove (where the string sits)
- To the back of the arrowhead.
However, what we’re ultimately interested in is the shaft length. A common beginner method is to measure from the string groove (nock) to the end of the shaft or to the edge of the tip of the point when the arrow is at full draw. For calculating arrow order size, here’s a simple guide:
Method 1: Measuring at Full Draw (Most Accurate)
- With the bow at your full draw length, using a flexible tape measure, measure from the deepest part of the bow’s grip out along the arrow shaft to the point where the string touches your index finger.
- Mark this point clearly on the arrow shaft with your pencil.
- Carefully let down the bow.
- Measure the arrow from the bottom of the nock groove to this mark you’ve made. This is your effective arrow length.
Method 2: Using Your Bowstring and a Tape Measure (Slightly Less Direct)
- String your bow.
- Place the arrow on the bow.
- Stand or sit comfortably and draw the bow to your anchor point.
- Have a helper hold the bow securely and point it safely.
- Take a flexible measuring tape and measure from the point where the arrow shaft meets the bow grip, along the arrow, to where the string meets your fingers. Mark this point on the arrow.
- Let down the bow string slowly.
- Measure the arrow from the bottom of the nock (the groove where the string sits) to the mark you made on the shaft. This is the recommended arrow length.
What About the Arrowhead?
Arrowheads can vary in length depending on the type (field points, broadheads). The measurement for purchasing arrows typically refers to the shaft length from the nock to the end of the shaft. When you buy arrows, they will be referred to by their full length, which includes the nock and will have space cleared for the arrowhead. Many archers add about 1 to 1.5 inches to their measured draw length for clearance and optimal spine performance.
Consider this: if your measured draw length is 28 inches from the bow grip to your finger, your arrow shaft might be around 29 to 30 inches long, depending on how far the arrow extends beyond the riser and any component systems.
Understanding Arrow Spine and Length
This is a slightly more technical aspect, but it’s important for traditional archery. Arrow spine refers to the stiffness of the arrow shaft. When you shoot an arrow, it flexes as it leaves the bow. The correct spine is crucial for the arrow to fly straight.
How Length Affects Spine:
- Cutting Arrows Shorter: If you cut an arrow shorter, you make it stiffer dynamically.
- Cutting Arrows Longer: If you cut an arrow longer, you make it weaker dynamically.
This is why having the correct initial length measurement is vital. If you plan on cutting your arrows yourself (which is common with carbon arrows), you’ll need to know your desired finished arrow length based on your draw length and then account for the nock and arrowhead space. Most archers aim for the front of the arrow point to be about 1-1.5 inches past the bow’s riser or the front of their hand.
Why it Matters for Traditional Bows:
Traditional bows, especially recurves and longbows, are less forgiving of incorrect arrow spine. Because they don’t typically have integrated arrow rests or complex tuning systems, the arrow flexing correctly is key. An arrow that’s too stiff or too weak will fly erratically, making it hard to group your shots.
Common Mistakes to Avoid When Measuring Arrow Length
Even with clear steps, a few common pitfalls can trip beginners up. Let’s make sure you avoid them:
- Inconsistent Draw Length: Always draw the bow to the exact same anchor point. Any variation here will lead to a flawed measurement.
- Not Accounting for Full Draw: Measure when you’re at your full, comfortable draw, not just pulling back a little.
- Measuring to the Wrong Point: Be precise about where you start (bow grip) and where you’re measuring to (point on the shaft). Understanding physics principles can help illustrate the energy transfer.
- Forgetting the Arrowhead Clearance: Ensure there’s enough shaft past the riser for the arrowhead to clear the bow without hitting it.
- Assuming All Bows are the Same: Draw length can feel different on different bows, even with the same manufacturer. Always measure for your specific bow.
- Ignoring Manufacturer Recommendations: Check what your bow manufacturer suggests for arrow lengths and spine.
Tools for Measuring Arrow Length Accurately
While a simple tape measure can work, some specialized tools can make the process even easier and more precise:
- Draw Length Arrow: As mentioned, these are marked shafts that allow you to safely reference your draw length.
- Bow Square: This tool helps ensure your arrow rest is set at the proper height relative to the bowstring (center shot for some disciplines, but traditionally can be higher or lower depending on the bow style). While not for measuring length, it’s crucial for arrow flight.
- Arrow Saw or Fletching Jig with Saw Attachment: If you plan to cut your own carbon or aluminum arrows, an arrow saw is essential for clean, square cuts. Many experienced archers choose to have their arrows cut by professionals at the archery shop to ensure perfect symmetry.
- Digital Caliper: For measuring the exact diameter of your arrow shaft or the shaft itself to ensure proper fit for fletching or inserts.
Table: Arrow Length vs. Draw Length Guidelines
This table provides a general guideline. Your specific bow and shooting style might require minor adjustments. It’s always best to confirm with your bow manufacturer or an experienced archery professional.
| Measured Draw Length (from bow grip) | Recommended Arrow Shaft Length | Approximate Overdraw Past Grip |
|---|---|---|
| 25 inches | 26-27 inches | 1-2 inches |
| 26 inches | 27-28 inches | 1-2 inches |
| 27 inches | 28-29 inches | 1-2 inches |
| 28 inches | 29-30 inches | 1-2 inches |
| 29 inches | 30-31 inches | 1-2 inches |
| 30 inches | 31-32 inches | 1-2 inches |
Note: This table assumes a standard measurement from the deepest part of the grip. The “Overdraw Past Grip” indicates how much of the arrow shaft typically extends past your bow hand. This clearance helps ensure the arrow is stable and clears the riser cleanly.
Adjusting for Different Traditional Bow Styles
While the measurement principle remains the same, slight adjustments might be considered for different traditional bow styles:
- Longbows: Often shot with the arrow resting on the shelf or a primitive arrow rest. The general measurement from the grip is usually the most straightforward guide.
- Recurve Bows: These often have adjustable arrow rests that might be centered or offset. The measurement from the deepest part of the grip to your anchor point is still the primary determinant. Some recurve shooters might have slightly longer arrow shafts for better clearance over plunger buttons or elevated rests.
- Self Bows: Simpler construction means the grip area is key. Stick to the basic measurement from the deepest part of the grip.
No matter the style, consistency in your draw length and anchor point is the most critical factor.
The Role of Your Anchor Point
“What is an anchor point?” you might ask. It’s a consistent reference point on your face or jaw that your drawing hand touches every single time you draw the bow. This consistency is what allows you to aim and release the arrow with repeatable results.
For example, some archers anchor the knuckle of their index finger to the side of their jaw, while others touch the string to the corner of their mouth. Whatever your chosen anchor point is, it’s where the bowstring should be when you’re at full draw. The measurement for your arrow length is directly tied to this anchor point, as it determines how far back you are pulling the string.
Frequently Asked Questions (FAQs)
Q1: Do I need specialized tools to measure my arrow length?
A1: Not necessarily! A flexible measuring tape is sufficient for a beginner. While specialized draw-length arrows or bow squares can help, they aren’t essential for starting out. The most important tool is your consistent draw and anchor point.
Q2: What happens if my arrows are too short?
A2: If your arrows are too short, they might not flex correctly as they leave the bow. This can lead to erratic flight, poor accuracy, and in some cases, can be dangerous due to the arrow potentially “kicking” off the riser or causing unsafe stresses on the bow. This is often referred to as “shooting too weak.”
Q3: What happens if my arrows are too long?
A3: Arrows that are too long won’t store and release energy as efficiently. This means you’ll lose some of the bow’s power, and the arrow might not fly as straight. It can feel like you’re “choking” the energy out of the shot. This is sometimes called “shooting too stiff.”
Q4: Should I measure from the inside or outside of the nock?
A4: For ordering purposes and general arrow length, you measure from the bottom of the nock’s groove ( where the bowstring sits) to the rear of the point of the arrowhead — or often, to the very end of the shaft if you haven’t attached a point yet. When taking your draw length measurement, you measure from the bow’s grip to your anchor point.
Q5: How much extra length should I add beyond my measured draw length?
A5: A common practice is to add 1 to 1.5 inches to your measured draw length from the bow’s grip. This extra length ensures adequate clearance for your arrowhead and riser, and it influences the arrow’s dynamic spine. For example, a 28-inch