
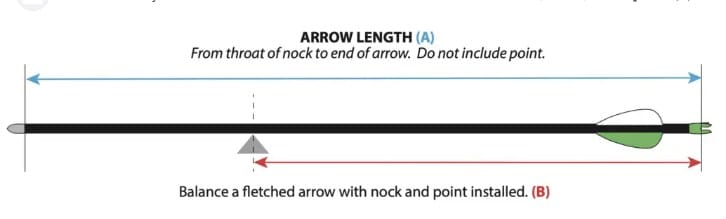
To measure arrow length correctly, measure from the bottom of your nock groove to the end of the shaft where it meets the string, or the back of the popped-out insert/bushel. Accurate measurement ensures proper arrow flight and bow performance.
Getting your arrow length just right is a big step in archery. It might seem like a small detail, but the right length can make a huge difference in how your arrows fly and how accurate you are. If your arrows are too long or too short, it can cause all sorts of problems. Don’t worry if this feels a bit confusing at first; many beginners find it tricky! We’ll break it down step-by-step, the simple way, so you can get your arrows measured accurately and get back to enjoying your time at the range.
Why Arrow Length Matters
In archery, the length of your arrow isn’t about guessing; it’s vital for consistent shooting. An arrow that’s too short can be dangerous, as it might rest too far in front of the bow’s riser, potentially hitting it during the shot. This can lead to inconsistent arrow flight and, more importantly, could cause the arrow to “porcupine,” meaning it flies erratically. On the other hand, an arrow that’s too long might not be as aerodynamic or efficient. Finding the correct length ensures your arrow leaves the bow smoothly and travels straight towards your target.
Think of it like tuning a musical instrument. You need all the parts to be calibrated correctly for it to produce the right sound. In archery, the arrow is a crucial component that needs to be tuned to your specific bow and draw length. This isn’t just about hitting the bullseye; it’s also about safety and getting the most out of your equipment. We’ll guide you through the simple process so you can feel confident about your arrow setup.
Understanding Arrow Components and Measurement Points
Before we start measuring, it’s helpful to know what we’re looking at on an arrow. An arrow is made up of several parts:
- Shaft: This is the main body of the arrow.
- Nock: This is the small plastic piece at the back of the arrow that attaches to the bowstring. It has a groove for the string to sit in.
- Insert: This is a piece, usually plastic or metal, glued into the front of the shaft. It’s where you screw in your arrow point (broadhead or field point).
- Fletching: These are the feathers or plastic vanes on the back of the arrow that help stabilize its flight.
- Arrow Point (Field Point/Broadhead): This is the tip of the arrow that hits the target. It’s usually screwed into the insert.
When measuring your arrow length, there are two primary methods, depending on whether you have an insert or a nock-point system. The goal is always to find a consistent, repeatable measurement that works for your setup.
How to Measure Arrow Length: The Proven Steps
Measuring your arrow length is a straightforward process once you know where to look. We’ll cover the two most common scenarios:
Method 1: Measuring to the End of the Shaft (with Insert)
This is the most common method for modern compound and recurve bows for arrows with glued-in inserts.
- Gather Your Tools: You’ll need a reliable measuring tape or a tailor’s measuring tape. A metal tape measure is often best for accuracy.
- Locate the Nock Groove: Find the notch on the nock at the back of your arrow.
- Find the Insert/Shaft End: Look at the front of the arrow. If your insert is glued in and flush with the end of the carbon shaft, this is your endpoint. If the insert protrudes slightly, or if you have a wooden arrow with a traditional point attachment, you’ll measure to the very end of the shaft where the point or insert begins. For shafts where the insert is glued in and not protruding, imagine the “end” of where the carbon shaft itself finishes before any external point is added.
- Perform the Measurement: Place the ‘0’ mark of your measuring tape at the deepest point of the nock’s groove. Make sure the tape measure is held straight along the shaft. Extend the tape measure to the very end of the shaft where the insert begins. Read the measurement at this point. It’s common to measure in inches.
Example: If your tape measure reads 28.5 inches from the bottom of the nock groove to the end of the shaft, your arrow length is 28.5 inches.
Method 2: Measuring to the Bowstring (for traditional shooting or specific setups)
This method is sometimes used in traditional archery circles for a slightly different reference point, especially when discussing how an arrow sits on the string. However, for practical purposes and consistency with most modern equipment, measuring to the end of the shaft is standard. If you are unsure, stick with Method 1. This alternative is more about understanding how the arrow interacts with the bowstring.
For most practical purposes, if you are shooting a traditional bow and using custom arrows, or if your setup inherently measures differently, you might encounter a method that measures to the center of the string. However, this is less common for determining the physical length of the arrow itself and more for setting up a shooting position.
For the most accurate and widely accepted arrow length measurement, we strongly recommend sticking to Method 1.
Checking Your Draw Length and Its Relation to Arrow Length
Your draw length is a critical factor that indirectly influences the arrow length you need. Your draw length is how far you pull the bowstring back. Measuring your draw length correctly ensures your arrows are appropriately spined (stiffness) and long enough for safe and efficient shooting.
How to Measure Your Draw Length (Approximate):
- Stand tall with your bow arm extended naturally, as if you were at full draw.
- Have someone else measure from the corner of your mouth (or your anchor point) to the string.
- Alternatively, you can extend your arms out to both sides, like a wingspan. Measure from the tip of one middle finger to the tip of the other. Divide this number by 2.5. This gives you a rough estimate of your draw length in inches. For example, a 60-inch wingspan divided by 2.5 gives you a 24-inch draw length.
It’s best to have a coach or experienced archer help you find your true draw length.
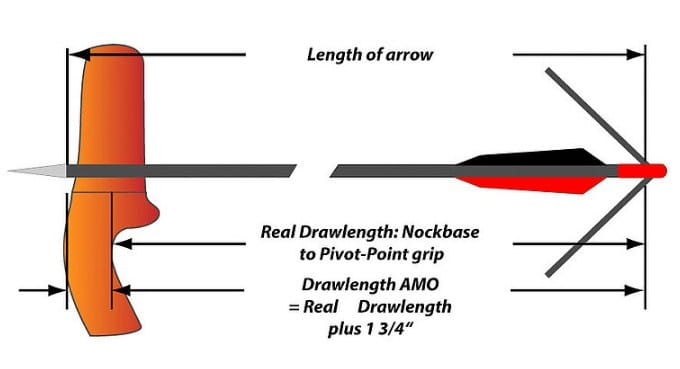
Why it matters: If your draw length is 28 inches, you’ll need an arrow that is cut to a length appropriate for that draw. An arrow that’s too short for your draw length can be dangerous, as noted before. The manufacturer’s recommendations for arrow spine often depend on your draw length.
It’s also important to understand that different bows have different “brace heights” (the distance from the deepest part of the riser to the string). This can affect the effective AMO/IFAA draw length measurement. For a standard AMO measurement, you draw to a point 1.75 inches in front of the bow’s physical dimension along the string.
For more precise measurements, especially for tuning, consider looking at resources from archery organizations. For instance, the “Archery Industry Association” (formerly the ATA) provides standards for equipment measurements that can be helpful.
Common Mistakes to Avoid
Even with clear instructions, it’s easy to make a small mistake. Here are some common pitfalls to watch out for when measuring your arrow length:
- Measuring to the Fletching: Always measure to the back of the nock or the end of the shaft/insert, not the end of the vanes or feathers. Fletching can easily get damaged or worn, and it’s not a fixed point.
- Not Using the Correct Endpoint: For arrows with protruding inserts, measure to the furthest point forward on the insert, not the end of the carbon shaft if it’s recessed. For flush inserts, the end of the carbon shaft is your guide. If in doubt, always measure to the absolute back of the insert or shaft, whichever is the terminal point before the arrowhead.
- Inconsistent Measurement: Ensure your measuring tape is held straight and aligned with the shaft. Don’t let it curve, as this will give an inaccurate reading.
- Using a Flexible Tape Measure: While a flexible tailor’s tape can work, a stiff metal tape measure often provides a more accurate, rigid line for measurement, reducing errors.
- Not Accounting for the Nock: For most systems, the measurement starts from the deepest point of the nock groove, as this is where the bowstring sits.
Choosing the Right Arrow Length for Your Bow
Once you know how to measure, it’s time to think about what length is best. Several factors influence this:
- Your Draw Length: As discussed, this is paramount. You need an arrow that is long enough to come to rest safely in front of your bow’s riser at full draw.
- Your Bow’s Type: Different bows may have different ideal arrow lengths. Recurve bows and compound bows can have slightly different optimal arrow lengths relative to draw length due to the way they store and release energy.
- Spine and Arrow Stiffness: Arrow length affects how stiff the arrow appears to the bow. A longer arrow acts like a weaker (more flexible) arrow, while a shorter arrow acts like a stiffer arrow. If your arrows are “porcupining” (wobbling or fishtailing), it might indicate an incorrect spine for your arrow length and draw weight, or an incorrect arrow length itself.
- Arrow Manufacturer Recommendations: Always check the manufacturer’s guidelines for your specific arrows and bow. They often provide charts linking draw weight, draw length, and recommended arrow length/spine.
The Impact of Arrow Length on Accuracy
Having the correct arrow length is a foundation for good accuracy. Here’s how it plays a role:
- Consistent Flight: Properly sized arrows will fly more consistently. They align themselves better with the bow’s trajectory, reducing fishtailing or porcupining.
- Clean Release: The arrow needs to slide off the rest and string cleanly. If it’s too long or too short, this release can be hampered, sending the arrow off course immediately.
- Arrow Spine Tuning: The length of an arrow directly impacts its “spine” (stiffness). An arrow that is too long for its spine will flex too much and fly erratically. Conversely, an arrow that is too short for its spine might fly too stiffly. Adjusting arrow length is a key part of “arrow tuning” to match your bow’s draw weight and your shooting style. Resources on energy dynamics in archery can give you a feel for how these factors interact, though your practical application will be simpler.
- Arrow Rest Interaction: The arrow needs to sit correctly on your arrow rest. If it’s too short, the fletching might collide with the rest. If it’s too long, it might not sit securely.
Arrow Length Measurement Table
To help you visualize the measurement points, here’s a quick reference:
| Arrow Part | Measurement Start Point | Measurement End Point |
|---|---|---|
| Standard Shaft with Insert | Bottom of Nock Groove | End of the Shaft/Insert |
| Wooden Arrow (traditional style) | Bottom of Nock Groove | End of Shaft where point attaches |
| Arrow with Protruding Insert | Bottom of Nock Groove | Farthest point of the protruding insert |
Remember, consistency is key. Whichever endpoint you choose for your specific arrow setup, use that same reference point every time you measure.
How to Cut Arrows to Length
If you find your current arrows are not the correct length, they may need to be cut. This is a task usually best left to an archery pro shop that has specialized arrow saws. These saws ensure a perfectly straight and clean cut, which is essential for the structural integrity and flight of the arrow.

Why Professional Cutting is Recommended:
- Precision: Archery saws are designed for precise, square cuts on carbon and aluminum shafts.
- Cleanliness: They produce a smooth cut surface that is ideal for gluing inserts.
- Safety: Cutting carbon arrows creates fine dust that can be harmful if inhaled. Professional shops have the proper ventilation and safety equipment.
- Reduced Risk of Damage: Improper cutting can weaken the arrow shaft, making it prone to breaking upon release.
If you’re buying new arrows, it’s often best to have them cut to your precise measurement before they are shipped to you. Many online archery retailers offer this service for free or a small fee.
Common Arrow Length Standards (AMO/IFAC)
You might hear about AMO or IFAC standards when discussing archery measurements. These are industry standards that help ensure consistency across different manufacturers and equipment.
- AMO (Amateur Archery Association) Standard: This standard, now largely superseded, used to define draw length and arrow length. A common way this was calculated involved measuring from the throat of the nock to the end of the shaft.
- IFAC Standard: Similar to AMO, IFAC standards aim for consistent measurement practices.
While understanding these standards is useful, for practical purposes, the measurement method described earlier (from the nock groove to the end of the shaft/insert) is the most direct and commonly used for determining your arrow’s physical length.
It’s worth noting that the official “draw length” measured by manufacturers for tuning purposes can differ slightly from your personal measurement point (like the corner of your mouth). This is often due to standardized anchor points and how the bow’s energy is transferred. For precise tuning, consult your bow manufacturer’s manual. Measurement standards in sports, like those seen in climbing, highlight the importance of precise, defined ways of measuring. Archery is no different.
Frequently Asked Questions (FAQ)
Q1: How do I measure arrow length for a traditional bow?
For traditional bows, like recurves or longbows, you measure arrow length the same way as for compounds: from the bottom of the nock groove to the end of the shaft or insert. Ensure it’s long enough to clear your fingers and riser at full draw.
Q2: Should I measure to the end of the vanes or the nock?
You should always measure to the back of the nock groove, or the end of the shaft/insert. Vanes or feathers are flexible and can wear down, making them an unreliable measurement point.
Q3: What happens if my arrows are too short?
If your arrows are too short, they can be very dangerous. The arrow may rest too far forward of the bow’s shelf or riser, potentially hitting parts of the bow during the shot. This can cause the arrow to fly erratically (porcupine) and can even damage your bow or cause injury.
Q4: What happens if my arrows are too long?
Arrows that are too long might not fly as efficiently. They can also be heavier than necessary, and in some cases, the extra length can cause the fletching to drag on the bow’s shelf or riser, affecting accuracy.
Q5: Can I measure arrow length myself accurately?
Yes, you can! With a reliable measuring tape and by following the steps carefully (measuring from the nock groove to the end of the shaft/insert), you can get an accurate measurement yourself.
Q6: How much longer than my draw length should my arrow be?
Typically, your arrow should be about 1 to 1.5 inches longer than your measured draw length. This ensures the nock sits correctly on the string and the shaft extends safely past your bow’s riser or fingers. Always check with your bow manufacturer for precise recommendations.
Q7: Do I measure a compound bow arrow the same as a recurve bow arrow?
Yes, the basic measurement points are the same: from the bottom of the nock groove to the end of the shaft/insert. The key difference is how your draw length is determined and how the arrow interacts with the specific riser geometry of each bow type.
Conclusion
Achieving the correct arrow length is a fundamental step towards becoming a more accurate and confident archer. By understanding where to measure – from the bottom of the nock groove to the end of the shaft or insert – and avoiding common mistakes, you can ensure your arrows fly true. This accuracy not only improves your score but also enhances the safety and enjoyment of your archery experience.
Remember that your draw length plays a crucial role in determining the right arrow