It’s a common worry. You’re out there, hitting the trails, feeling the thrill. But a little voice in the back of your head asks, “Is this thing really going to protect me if I go down?” Especially when it comes to your chest and torso.
Finding the right fit for your off-road chest protector isn’t just about comfort. It’s about making sure it actually does its job when you need it most. Let’s dive in and make sure you know exactly how it should feel.
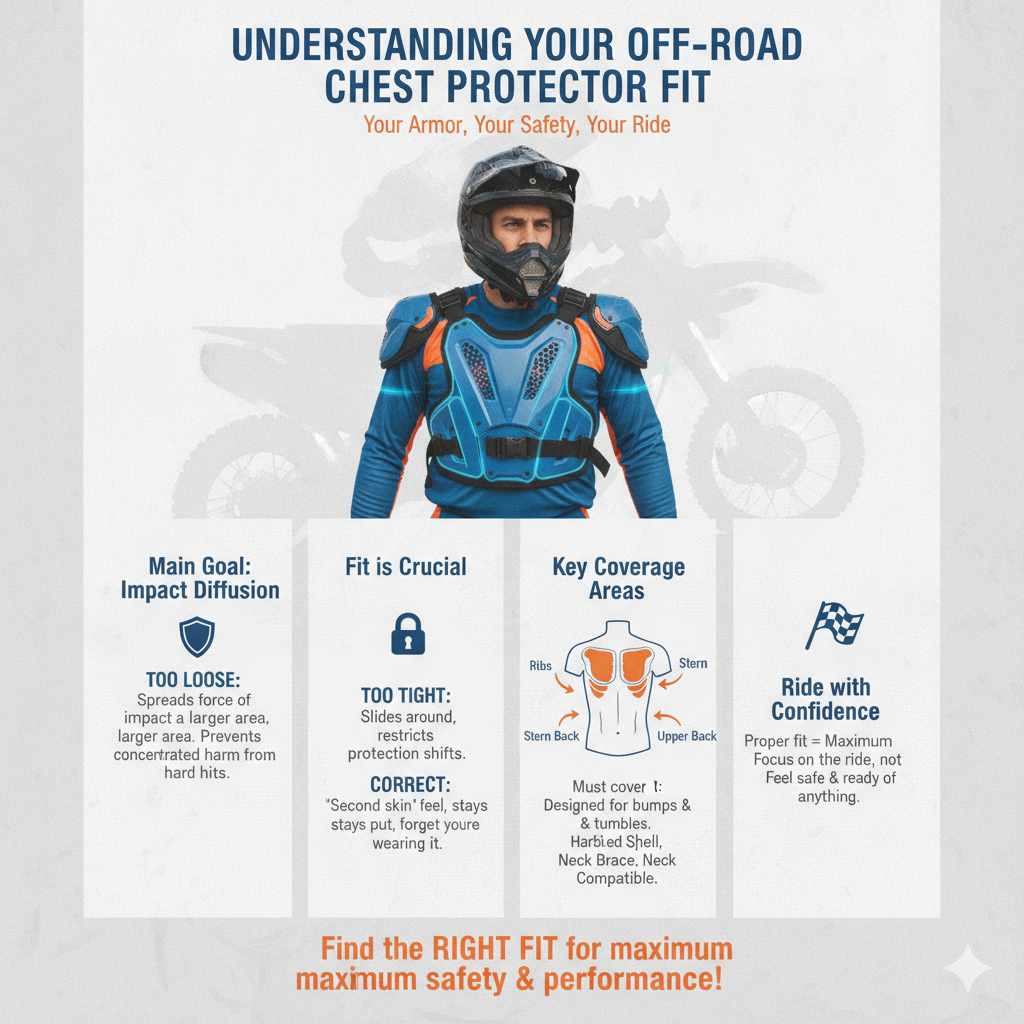
For optimal protection and comfort, an off-road chest protector should fit snugly but not restrict movement. It needs to stay in place during activity, cover vital areas without chafing, and allow for full range of motion in your arms and neck. Proper adjustment is key.
Understanding Your Off-Road Chest Protector Fit
Think of your chest protector as a second skin, but one that’s tough. Its main goal is to spread out the force of an impact. This stops one hard hit from causing serious harm. But if it’s too loose, it can slide around. If it’s too tight, it can pinch and make riding miserable. Neither of those is good.
This piece of gear shields your ribs, sternum, and often your back. It’s designed for the bumps and tumbles that come with riding dirt bikes, ATVs, or even mountain bikes on tough terrain. The way it fits is crucial for it to work right. It needs to cover the right spots on your body. It must stay put, no matter how much you move or how rough the ride gets.
You’ll find different styles. Some are hard shells. Others are more like padded vests. Some connect to your neck brace, if you wear one. All of them need to fit well. The best fit means you forget you’re wearing it. You can focus on the ride. You feel safe and ready for anything.
My Own Off-Road Fit Fiasco
I remember my first serious off-road riding trip. I’d bought a chest protector I thought looked cool. It seemed like a good deal. When I put it on, it felt a bit… off. The straps seemed to dig in. It felt bulky. But I figured, “It’s gear, it’s supposed to feel a little stiff, right?”
Wrong. The first time I hit a decent bump, the whole thing shifted upwards. It felt like it was trying to choke me. Then, on a sharper turn, it slid to one side. I had to pull over mid-trail, all sweaty and annoyed, to try and adjust it. The straps were a tangled mess. My shoulders felt raw from the rubbing. It was a constant distraction.
That day taught me a valuable lesson. Fit isn’t optional. It’s the foundation of protection. A poorly fitting protector can be as bad as no protector at all. It can chafe, restrict breathing, and worse, not be in the right place if you fall. I ended up buying a different one that day and spent hours getting it right. It was worth every penny and every minute of adjustment.
Chest Protector Fit Checklist
Shoulder Straps: They should rest comfortably on your shoulders. No pinching or digging.
Chest Coverage: The main hard plastic or padding should cover your sternum and ribs. It shouldn’t ride up into your throat.
Side Straps: These need to be snug. They hold the protector close to your body. They shouldn’t be so tight they cut off breathing.
Back Coverage: If it has a back protector, it should align with your spine. It shouldn’t stick out or feel awkward.
Movement: You must be able to turn your head freely. Your arms need to move without the protector pulling or restricting.
The Key Fit Points to Check
Let’s break down what you need to feel and see when you try on a chest protector. This is where you become your own expert fitter.
Shoulder Strap Placement
The straps over your shoulders are key. They hold the front and back pieces together. They should sit smoothly on your deltoids, the top of your shoulder muscles. If they’re too tight, they’ll feel like they’re pulling your shoulders forward. This can cause fatigue. If they’re too loose, the protector might sag. It could leave gaps.
Look for adjustable straps. Most good protectors have Velcro or buckles here. You want to be able to get a firm, yet comfortable, fit. When you shrug your shoulders, the straps shouldn’t dig in. They also shouldn’t slide off.
Sternum and Rib Coverage
This is the business end. The main protective plate, or padding, needs to cover your sternum (breastbone). It should extend down to protect your lower ribs. Think about where you’re most likely to hit handlebars or the ground. The protector must be positioned to shield these areas.
It’s common for protectors to extend upwards slightly. This is to protect your collarbones. But it should not push into your throat. When you look down, the protector should stay in place. It shouldn’t ride up your neck. This is a big sign of a bad fit.
Side and Waist Straps
These straps cinch the protector to your torso. They’re usually on the sides or around your waist. They’re vital for keeping the protector stable. You want them snug enough to keep the protector from shifting. But they must not restrict your breathing.
Try taking a deep breath while they’re fastened. Can you inhale fully? Does it feel like the straps are cutting into your sides? If so, loosen them slightly. You might need to adjust the front and back pieces. This ensures the protector stays centered as you tighten the sides.
Neck Brace Compatibility (If Applicable)
If you use a neck brace, this is a huge factor. Many modern chest protectors are designed to work with them. They have cutouts or specific shapes. This lets the brace fit properly. The protector should not push the brace away from your neck. It also shouldn’t prevent the brace from doing its job.
When you put on the chest protector with your neck brace, check the fit. Can you turn your head left and right? Can you tilt your head up and down? There should be no binding or rubbing between the two pieces of gear. If they interfere, you might need a protector designed for your specific brace model.
Arm and Shoulder Mobility
This is where the rideability comes in. You need to move your arms freely. Reach out in front of you. Reach to the sides. Mimic riding motions. Does the chest protector pull or restrict your shoulders? Does it feel like it’s fighting your natural movements?
A good fit allows for a full range of motion. You should be able to grip the handlebars comfortably. You should be able to shift your weight easily. If the protector is too large, or the straps are positioned incorrectly, it can feel like you’re wearing a straitjacket. That’s not safe or fun.
Fit vs. Size Chart
Size Charts are a Starting Point: Don’t rely on them alone. Every brand fits differently. Your chest measurement is important, but so is your torso length and build.
Try Before You Buy: If possible, always try on a chest protector in person. Feel the fit. Move around in it.
Consider Your Riding Style: Racers might want a more snug, performance fit. Trail riders might prioritize comfort for longer days.
Common Fit Mistakes and How to Avoid Them
We’ve all been there. You’re eager to hit the dirt, and you grab your gear. But sometimes, enthusiasm leads to mistakes. Knowing these common pitfalls can save you a lot of discomfort and even reduce your protection.
Mistake 1: Thinking “Tighter is Better”
A lot of riders think that if it’s snug, it’s protective. While a chest protector needs to be snug, “tight” is the wrong word. Too tight, and you’ll have trouble breathing. It can restrict blood flow. It can chafe your skin raw. This is especially true on hot days. Sweat and tight gear are a bad mix.
The goal is a secure fit. It should hug your body without squeezing it. Imagine wearing a firm but comfortable sports bra. That’s the kind of snugness you want. Not a vise grip.
Mistake 2: Ignoring the Neck Gap
This is a critical one. If there’s a big gap between the top of your chest protector and your neck, it’s a problem. This area is vulnerable. The protector should come up high enough to offer protection there.
Some protectors are designed to work with specific neck braces. They might have a lower front edge. If you don’t wear a neck brace, ensure your protector offers good coverage at the top. Look for adjustable shoulder straps that let you fine-tune this.
Mistake 3: Letting Straps Dig In
Straps that dig into your shoulders or sides are a sign of a bad fit. This isn’t just uncomfortable. It can lead to blisters and sores. On a long ride, this can be completely debilitating. It can also indicate that the protector is too big for your torso. Or that you haven’t adjusted the different strap points correctly.
Always check the strap routing. Make sure they lie flat against your body. If they twist or bunch up, try readjusting them. Sometimes, a different adjustment on the front or back piece can help the side straps lie better.
Mistake 4: Overlooking Movement Restrictions
You might put on the protector and feel like it’s okay. But it’s only when you’re on the bike, moving around, that you notice the real issues. That feeling of being restricted in your arms or torso. This is dangerous. You need to be able to react quickly.
Before you ride, do some exaggerated movements. Twist your torso. Reach forward. Lift your arms. If the protector holds you back, it’s not a good fit. You need to feel free and agile.
Quick Fit Adjustment Steps
1. Loosen All Straps: Start with everything loose.
2. Position Front & Back: Put on the front piece. Then the back.
Connect them.
3. Adjust Shoulders: Get the shoulder straps snug but comfy.
4. Cinch Sides: Tighten the side or waist straps. Breathe deeply.
Adjust as needed.
5. Check Neck & Movement: Ensure no throat restriction and full arm mobility.
How Different Riding Styles Affect Fit
The kind of riding you do can influence how your chest protector should feel. A motocross racer has different needs than a dual-sport adventurer.
Motocross and Supercross
Racers need a very secure, streamlined fit. The protector must stay put through high speeds, jumps, and hard landings. There’s no room for shifting. It needs to integrate well with body armor and potentially a neck brace. Comfort is still key, but performance and security are paramount. A slightly tighter, more dialed-in fit is often preferred.
Trail Riding and Enduro
For longer trail rides, comfort becomes a bigger factor. You’re spending more time on the bike. The protector needs to breathe well and not chafe over hours of riding. It still needs to be protective, but the fit might be slightly less aggressive than a race setup. You need to be able to move and shift your weight as the terrain changes.
Dual-Sport and Adventure Riding
These riders often cover long distances. They might encounter varied conditions. Protection from impacts is important, but so is protection from the elements. Some dual-sport chest protectors have more built-in padding. They might integrate with hydration packs. The fit needs to accommodate layers of clothing. It should feel comfortable for many hours on the saddle.
Mountain Biking (Downhill/Enduro)
While often called a “body armor” or “chest guard,” these have similar fit principles. They need to protect against impacts with trees, rocks, and the ground. The fit is crucial for allowing pedaling and maneuvering the bike. They often integrate with elbow and shoulder pads. The focus is on impact absorption and unimpeded movement on the bike.
Adjusting Your Chest Protector: A Step-by-Step Guide
Getting the fit right takes a little effort. But once you know how, it becomes second nature. Here’s a clear path to a perfect fit.
Step 1: Loosen Everything Up
Before you even put it on, release all the straps. This includes shoulder straps, side straps, and any buckles or Velcro closures. You want a blank slate. This prevents you from trying to force a good fit over a pre-existing bad one.
Step 2: Put It On Correctly
Most chest protectors have a front and back piece. Put on the back piece first. Then, position the front piece over your chest. If it’s a full wrap-around style, bring the sides forward. If it’s a simpler vest style, you’ll connect the front to the back.
Step 3: Connect the Main Closures
If you have buckles or clips that connect the front and back, do those first. This gets the basic structure in place. Don’t tighten them fully yet. Just get them secured.
Step 4: Adjust Shoulder Straps
Now, focus on the shoulder straps. They should rest comfortably on your shoulders. Adjust them so they are snug but not pulling your shoulders down or forward. You should be able to lift your arms easily without the straps digging in.
Step 5: Cinch the Side Straps
This is where you secure the protector to your body. Tighten the side or waist straps. Do this evenly on both sides. As you tighten, take deep breaths. You should feel the protector snugging up, but not constricting your lungs. If you can’t take a full breath, loosen them a bit.
Step 6: Fine-Tune and Test
Once everything is snug, do a final check.
Neck Clearance: Is there any pressure on your throat? Can you turn your head freely?
Arm Movement: Reach, twist, and mimic riding motions. Does it feel restrictive?
Coverage: Is your sternum and rib area well-covered? Is the top edge too high or too low?
Stability: Give it a little shake. Does it feel like it will stay in place during a ride?
If something feels off, loosen a strap or two and try again. Small adjustments can make a big difference.
Post-Adjustment Checks
The Deep Breath Test: Can you fill your lungs completely?
The Range of Motion Test: Can you move your arms, shoulders, and neck without resistance?
The “Forget It’s There” Test: After a few minutes of wearing it, do you stop noticing it? That’s a good sign.
The Chafing Check: Run your hand under the straps and edges. Are there any spots that feel like they might rub uncomfortably?
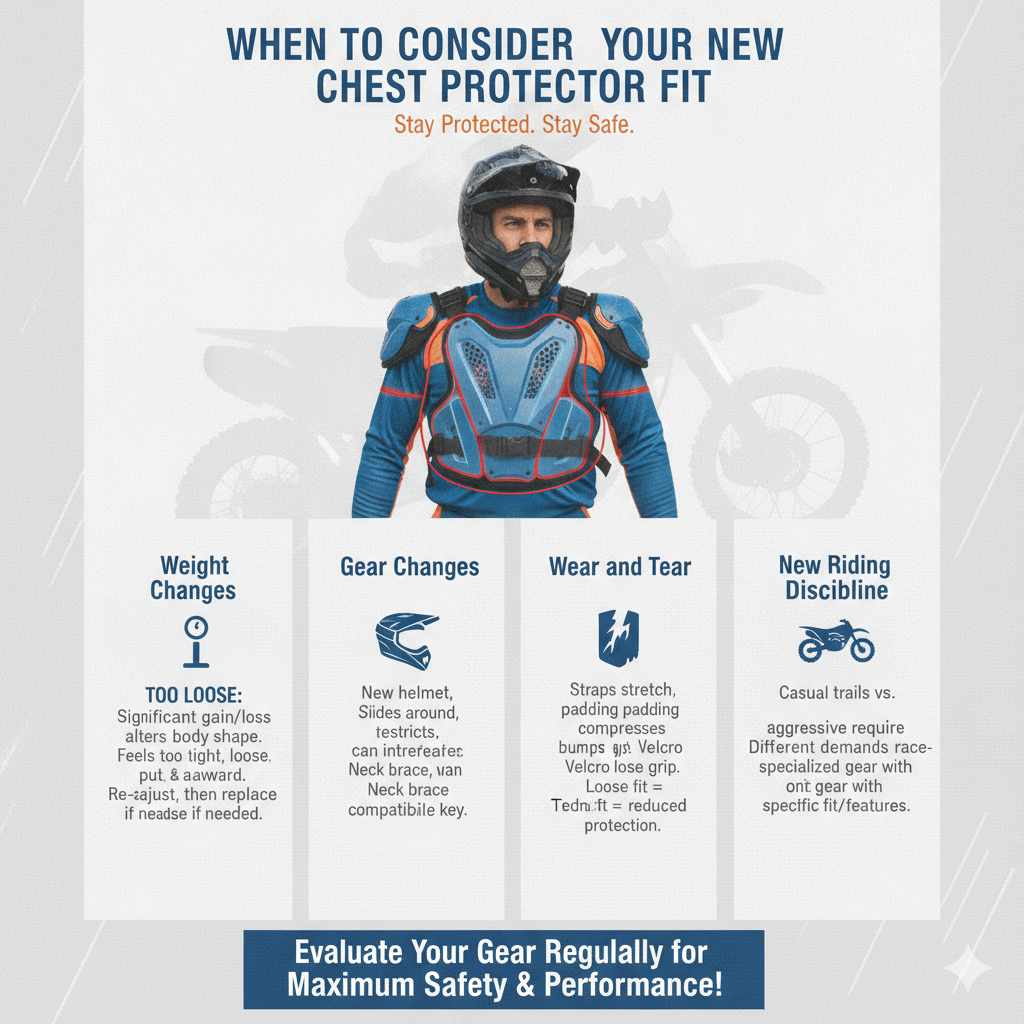
When to Consider a New Chest Protector Fit
Sometimes, even a well-fitting protector can start to feel wrong. Or your needs might change. Knowing when it’s time to re-evaluate your gear is important.
Weight Changes
If you’ve gained or lost a significant amount of weight, your body shape has likely changed. This can affect how your chest protector fits. It might feel too tight, too loose, or just generally awkward. Re-adjusting is the first step. If it still doesn’t feel right, it might be time for a new one.
Gear Changes
Did you get a new helmet? A neck brace? Maybe new riding pants that fit differently around the waist? These changes can sometimes interfere with your chest protector’s fit. A new neck brace, for example, might require a chest protector with a different neckline or compatibility features.
Wear and Tear
Straps can stretch out over time. Padding can compress. Velcro can lose its grip. If your protector feels looser than it used to, or if the straps don’t hold as well, it’s a sign of wear. This means its protective capabilities might be reduced. It’s time for a replacement.
New Riding Discipline
As mentioned, different riding styles have different demands. If you’re moving from casual trail riding to aggressive motocross racing, you might need a more specialized, race-oriented chest protector. This means a different fit and perhaps different features.
Frequently Asked Questions
Can a chest protector be too loose?
Yes, absolutely. If a chest protector is too loose, it won’t stay in place during a crash. It can shift around, leaving vital areas unprotected.
It can also be a major distraction while riding, leading to a loss of control.
How tight should the side straps be on a chest protector?
The side straps should be snug enough to keep the protector secure against your body without shifting. However, they should not restrict your breathing. You should be able to take a full, deep breath without feeling choked or squeezed.
Test this by taking a deep breath after fastening them.
What if my chest protector rubs my neck?
If your chest protector rubs your neck, it’s likely not fitting correctly. This could be because the shoulder straps are too long, the front piece is too high, or it’s not designed to work with your neck brace (if you use one). Try adjusting the shoulder straps first.
If that doesn’t help, you may need to look for a protector with a different neckline or one specifically made for your neck brace.
How do I know if my chest protector covers my ribs properly?
When the protector is on and adjusted correctly, the main protective plate or padding should extend down your torso to cover your sternum and the majority of your rib cage. You can check this by feeling where the protection ends. It should cover the most vulnerable parts of your upper and middle chest area.
Is it okay if my chest protector feels a little stiff at first?
Yes, it’s normal for a new chest protector to feel a bit stiff. The materials might need a little time to break in and conform to your body shape. However, “stiff” is different from “restrictive” or “painful.” It should never feel like it’s pinching, digging, or preventing you from moving naturally, even when new.
Can I wear a t-shirt under my chest protector?
Yes, wearing a t-shirt under your chest protector is common and often recommended. It helps to prevent chafing and can absorb sweat, keeping the protector cleaner. Choose a comfortable, moisture-wicking material if possible.
Avoid wearing anything too bulky that might interfere with the fit.
Conclusion: Prioritize Fit for Peak Protection
Ultimately, how your off-road chest protector fits is as important as the protection it offers. A well-fitting piece of gear feels secure, comfortable, and allows for full movement. It’s the foundation of your safety on the trails. Don’t compromise on it. Take the time to adjust it properly. Your body will thank you.