
Attaching field points to wooden arrows is a straightforward process. Ensure your arrow shafts are clean and the inserts are properly installed. Use a bit of fletting glue or shaft glue for a secure fit, then hand-tighten the field points. This guide breaks down the simple steps for a safe and accurate archery experience.
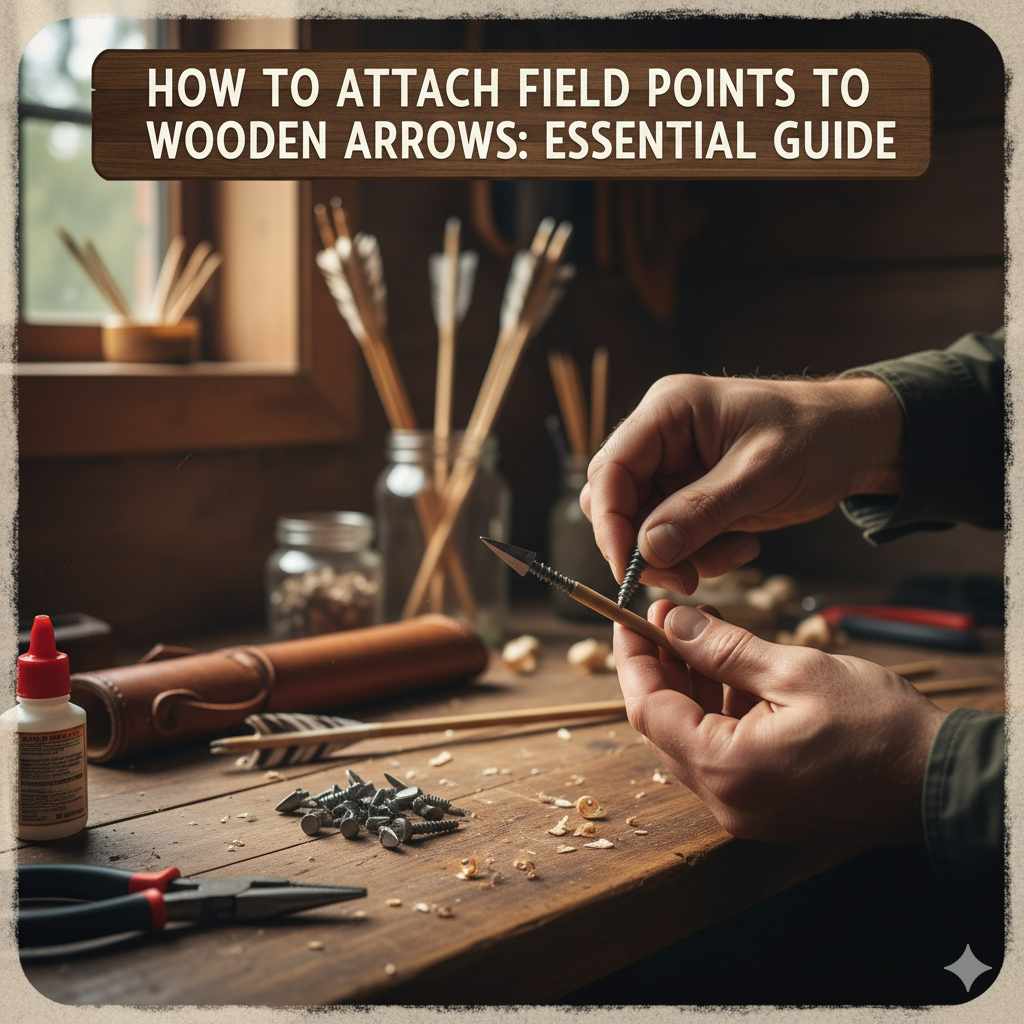
Hello fellow archers! Salman here. So, you’ve got your beautiful wooden arrows and a set of shiny new field points, ready to hit the range or the woods. But how do you get them connected securely? It’s a common question for beginners, and getting it right is key for both safety and accuracy. Don’t worry, it’s simpler than you might think! We’ll walk through each step together, making sure your arrows are ready for action in no time. Let’s get those arrows built!
Why Properly Attaching Field Points Matters
Attaching field points securely to your wooden arrows isn’t just about making them look complete; it’s crucial for several reasons. A loose field point can fly erratically, severely impacting your accuracy and potentially leading to dangerous situations. Imagine your arrow veering off course during a shot – that’s not only frustrating but can also be unsafe for you and anyone nearby. For wooden arrows, a proper attachment also helps protect the end of the shaft from splitting or damage when it impacts a target.
When you first start out in archery, understanding the basic components and how they fit together can seem a bit daunting. But trust me, once you understand the ‘why’ behind each step, it all makes much more sense. A well-attached field point ensures that the arrow flies true, transferring energy efficiently to your target. It’s a cornerstone of good shooting form and accurate arrow flight. This guide will break down the process into easy-to-follow steps, so you can feel confident in preparing your own arrows.
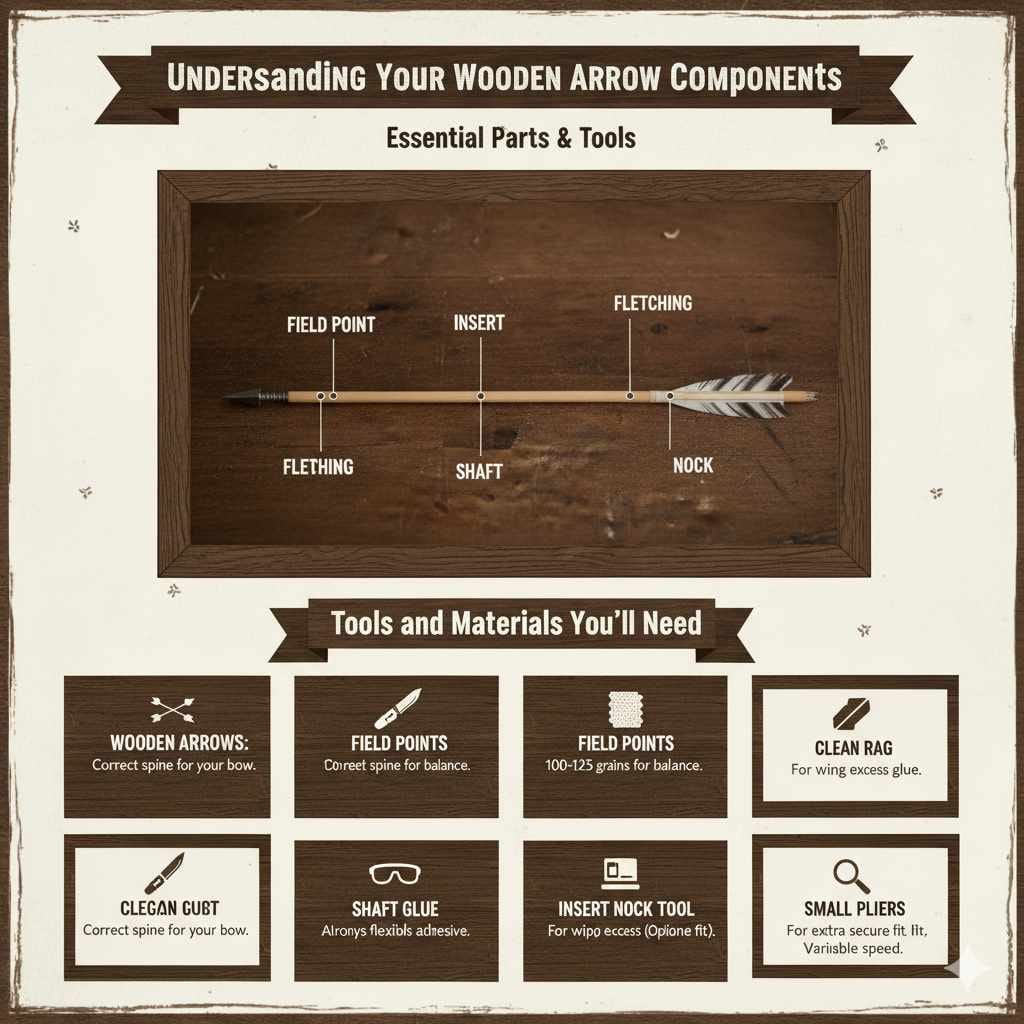
Understanding Your Wooden Arrow Components
Before we dive into attaching the field points, let’s quickly go over the main parts of your wooden arrow that we’ll be working with. Understanding these will make the whole process much clearer.
- Shaft: This is the main body of the arrow, typically made from wood like cedar, pine, or ash. It needs to be straight and free from major cracks or defects.
- Nock: This is the small piece at the back of the arrow that attaches to your bowstring. It ensures the arrow is held correctly on the string.
- Fletching: These are the vanes or feathers attached to the back of the shaft that help stabilize the arrow in flight.
- Insert: This is a small component, usually made of aluminum or brass, glued into the front of the shaft. It provides a threaded connection for field points and broadheads, and it also adds a little weight to the front of the arrow for better balance (an important concept called “spine” and “balance”).
- Field Point: This is the bullet-shaped metal tip screwed onto the insert at the front of the arrow. It’s designed for target practice and general shooting.
Tools and Materials You’ll Need
Gathering your supplies beforehand is always a good tip for any DIY project, and arrow building is no different. Here’s what you’ll want to have ready:
- Wooden Arrows: Make sure they are the correct spine (stiffness) for your bow.
- Field Points: Choose the weight that suits your arrow setup. Common weights are 100, 125, or 145 grains.
- Shaft Glue or Fletting Glue: A good quality, flexible glue specifically designed for archery components is best. Some archers prefer a specialized insert adhesive. A strong, flexible wood glue can also work in a pinch, but dedicated arrow glues offer better performance. You can find reliable options at most archery shops or online retailers.
- Clean Rag or Paper Towels: For wiping away any excess glue and keeping things tidy.
- (Optional) Insert Nock Tool: If your inserts are a bit loose or you want extra reassurance, a small tool that helps lightly crimp the insert can be useful. However, for most standard wooden arrows with pre-installed inserts, this isn’t strictly necessary.
- (Optional) Small Pliers or Vice Grips: For gently removing an old field point if you’re replacing one.
Step-by-Step Guide: Attaching Field Points to Wooden Arrows
Let’s get down to business! Follow these steps carefully, and you’ll have your arrows ready for shooting in no time.
Step 1: Inspect Your Arrow Shaft and Insert
Before you do anything else, take a close look at the front of your wooden arrow. The insert should be firmly seated inside the shaft. There shouldn’t be any gaps between the insert and the wood, and the shaft shouldn’t be split or damaged around the insert. If you see any damage, it’s safer to set that arrow aside and inspect it further. A damaged shaft can be dangerous.
Make sure the threads inside the insert are clean and clear of debris. Sometimes, a bit of wood dust or old glue can get in there. You can gently clean it out with a toothpick or a small brush if needed. A clean thread ensures the field point screws in smoothly and securely.
Step 2: Prepare the Field Point
Pick up your field point. For brand new field points, the threads are usually clean. If you’re replacing an old field point, unscrew it. If it’s stuck, you might need to gently grip the shaft with a cloth-covered pair of pliers (to avoid damaging the wood) and then use another pair of pliers on the point itself. Sometimes warming the point slightly with a hairdryer can help loosen old glue, but be careful not to overheat the wood.
Once the old point is off, clean the threads of the field point if necessary. Sometimes old glue residue can stick to them. A little bit of rubbing alcohol on a cloth can help clean the threads.
Step 3: Apply Glue to the Insert Threads (Recommended for Durability)
While many archers simply screw in field points and find they stay put, especially if the insert fit is very tight, adding a little glue to the threads provides extra security and prevents the point from backing out during vigorous shooting or landing in rough terrain. This is a great habit for wooden arrows.
Take your shaft glue or fletting glue. Apply a small, thin bead of glue directly onto the threads of the insert inside the arrow shaft. You don’t need a lot – just enough to coat the threads evenly. Too much glue can squeeze out excessively and make it messy.
Alternatively, some archers prefer to apply a tiny amount of glue directly to the threads of the field point itself. The key is to ensure the glue only contacts the threads and doesn’t seep into the main body of the insert or the wood. If you’re using a glue that requires mixing (like some epoxies), make sure you mix it thoroughly according to the instructions on a clean surface.
Step 4: Thread the Field Point Onto the Insert
Now, carefully take your field point and begin to screw it into the prepared insert. Do this by hand, turning the point clockwise. You’ll feel it thread into the insert. Screw it in as far as you can by hand. It should feel snug and thread in smoothly.
Continue to turn until the field point is fully seated against the insert. You want the shoulder of the field point to be flush with the end of the insert and the shaft. Avoid overtightening. You don’t want to force it to the point where you feel you might damage the wood or the insert. Hand-tight is usually sufficient, especially if you used glue.
Step 5: Clean Up Any Excess Glue
If you applied glue, you might see a small amount squeeze out around the base of the field point. Use a clean rag or paper towel to wipe away any excess glue immediately. If you let it dry, it can be difficult to remove and might look untidy. Alcohol can sometimes help clean up fresh glue residue.
Step 6: Allow Glue to Cure (If Used)
If you used glue, it’s best to let it cure completely before you start shooting. Check the glue manufacturer’s instructions for their recommended drying or curing time. This usually ranges from a few hours to 24 hours. Allowing the glue to properly set ensures the field point is as secure as possible. While you can often shoot an arrow immediately, letting it cure provides the best long-term adhesion.
Step 7: Double-Check and Test
Once the glue has cured (or right after you’ve screwed them in if you skipped the glue), give each field point a final check. Gently try to wiggle the point. It should feel very solid with no looseness. If it wiggles, you might need to unscrew it, reapply a bit of glue, and reattach it, ensuring it’s seated fully.
When you’re ready to shoot, always start with a few gentle shots to ensure everything is holding up. Observe how your arrows fly. If they are consistently veering off course, it could indicate an issue with arrow assembly (like a loose point) or other factors like fletching or bow tuning. Proper attachment is the first step to consistent shooting.
When to Replace Field Points
Field points, especially those used for target practice, can take a beating. Here’s when you might need to consider replacing yours:
- Damage: If the tip is bent, chipped, or deformed, it will affect accuracy and can be dangerous.
- Stripped Threads: If the threads on the point or inside the insert become worn or damaged, the point won’t screw in securely.
- Looseness: As mentioned, any wiggling means it’s time for a replacement or reattachment.
- Weight Change: Sometimes, if a point gets significantly damaged, it might also change weight, affecting arrow balance.
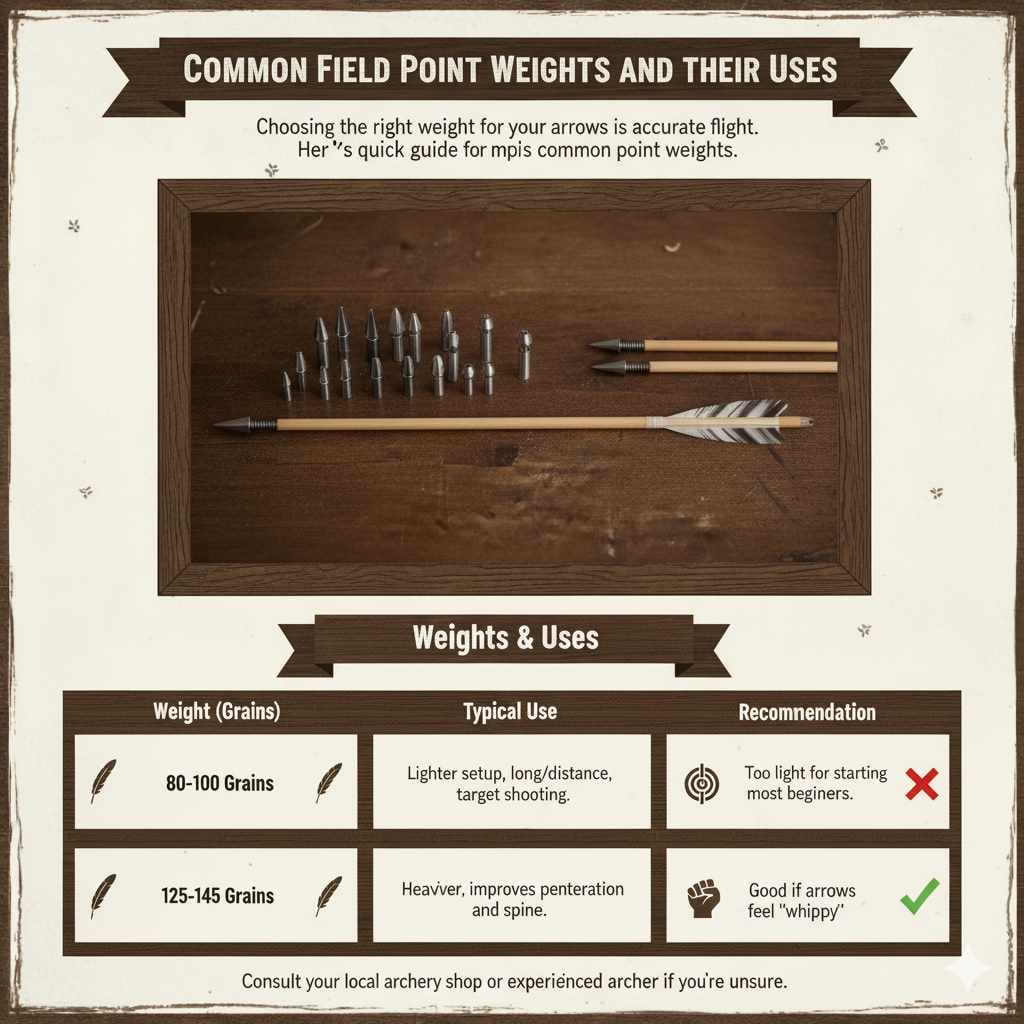
Table: Common Field Point Weights and Their Uses
| Field Point Weight (Grains) | Typical Use Case | Beginner Recommendation |
|---|---|---|
| 80-100 Grains | Lighter setup, often for very fast bows or long-distance target shooting where trajectory is paramount. | Generally too light for most beginner wooden arrows; can make them underspined. |
| 100-125 Grains | Versatile weight. Good for indoor target practice, general outdoor shooting, and many beginner setups. Offers a good balance of speed and forgiveness. | Excellent starting point for most beginner archers with wooden arrows. |
| 125-145 Grains | Heavier option. Can improve arrow penetration and momentum, good for outdoor shoots, and can help stiffen an arrow slightly (improving spine). Also used for some hunting applications (though broadheads are specific). | A good option if your arrows feel a bit too “whippy” or if you want more momentum. |
Choosing the right weight for your field points is important. Too light, and your arrow might be too “weak” (underspined) for your bow, leading to poor flight. Too heavy, and you might lose too much arrow speed. For most beginners using wooden arrows around 40-55 lbs draw weight, 100 or 125 grains is a safe and effective bet. Always consult with your local archery shop or a more experienced archer if you’re unsure. They can help you match your arrow components to your bow’s specifications. Proper arrow spine means the arrow bends correctly when shot from your bow, ensuring it flies straight, as recommended by organizations like the U.S. Fish and Wildlife Service regarding regulations and equipment considerations.
Frequently Asked Questions (FAQ)
Q1: Do I need to glue field points onto wooden arrows?
It’s highly recommended, especially for wooden arrows. While some inserts fit so snugly that points might stay put without glue, glue adds significant security. This prevents points from backing out during shooting, which can affect accuracy and potentially be unsafe. It also helps prevent moisture from getting into the shaft around the insert.
Q2: What kind of glue should I use?
Use a strong, flexible glue specifically designed for archery components, like a fletting glue or a specialized shaft glue. Some archers use two-part epoxies, but ensure they are flexible once cured. Avoid standard craft glues or super glue, as they can become brittle and fail under stress.
Q3: How tight should I screw in the field point?
Screw it in by hand until it is snug and the shoulder of the point is flush with the end of the insert. You shouldn’t have to force it. Overtightening can damage the insert or the wooden shaft.
Q4: My field point feels a little loose even after screwing it in. What should I do?
If it’s significantly loose, you may need to unscrew it, clean the threads, reapply a bit of glue, and screw it back in firmly. If the insert itself is loose in the shaft, that’s a bigger issue that might require replacing the insert. For minor looseness without glue, try adding a small amount of glue to maintain a secure fit.
Q5: Can I use the same field points for target shooting and hunting?
Field points are designed for target practice. For hunting, you would typically use broadheads, which are specifically designed to create lethal wounds. Broadheads require different considerations for tuning and setup. Always follow local regulations regarding hunting equipment.
Q6: My wooden arrow shaft is slightly cracked where the insert goes. Is it safe to shoot?
No, absolutely not. A cracked shaft, especially near the point or nock, can lead to the arrow breaking during the shot, which is extremely dangerous for the archer and anyone nearby. Discard any wooden arrow with visible cracks or damage.
Q7: How do I remove a stuck field point?
First, try gripping the wooden shaft securely with a cloth-wrapped pair of pliers to avoid damaging the wood. Then, use another pair of pliers to grip the field point. Twist firmly but carefully. If it’s still stuck, gently warming the field point (not the shaft) with a hairdryer can sometimes help loosen old glue. Be cautious not to overheat the wood.
Maintaining Your Arrows for Peak Performance
Once your field points are securely attached, taking good care of your arrows will ensure they perform well for a long time. Regularly inspect your wooden arrows for any signs of damage, such as cracks, splinters, or bends. Check that the fletching is still firmly attached and not peeling away. Ensure the nocks are all intact and spin freely on the string. If you notice any damage, it’s always better to be safe and replace the arrow.
Keep your arrows stored in an arrow case when not in use. This protects them from moisture, impacts, and extreme temperatures, all of which can degrade wooden shafts. Clean field points and inserts periodically if needed to prevent rust or debris buildup, which could affect how they screw in. This attention to detail will not only keep your arrows in great shape but also contribute to consistent and accurate shooting, making your archery experience more enjoyable and rewarding.
Conclusion
And there you have it! Attaching field points to your wooden arrows is a well-defined process that, with a little care and attention, ensures your arrows are safe, accurate, and ready for whatever you aim them at. We’ve covered inspecting your gear, the simple steps involved with applying glue and screwing in the points, and even when it’s time to replace old ones. Remember, consistency in your equipment setup is a huge part of becoming a better archer.
Don’t be discouraged if your first few attempts aren’t perfect. Archery, like any skill, improves with practice and patience. The confidence you gain from building and maintaining your own arrows is a valuable part of the archery journey. So, go ahead, gather your tools, and get those arrows ready. Happy shooting, and may your arrows fly true!


