
Barreling wooden arrows involves gently shaping them into a slightly tapered form, which can improve their flight stability and consistency. This guide provides a simple, step-by-step method for beginners to achieve this crucial archery preparation. Learn the easy way to barrel your wooden arrows for better performance.
Welcome, fellow archer! Ever noticed how your wooden arrows sometimes wobble a bit in flight, or how their accuracy isn’t quite where you want it? There’s a simple trick that helps many archers improve their arrow’s performance, and it’s called barreling. It sounds a bit technical, but don’t worry! I’ll walk you through exactly how to do it nice and easy. We’ll get those arrows flying straighter and truer, making your shooting experience even more enjoyable. Stick with me, and you’ll be barreling your own arrows like a pro in no time!
Why Barrel Wooden Arrows? The Magic Behind the Taper
Before we grab our tools, let’s quickly understand why we even bother with barreling. Think of it like tuning a musical instrument. When you barrel an arrow, you’re gently shaping the shaft near the nock end. This creates a slight taper, meaning the arrow gets a tiny bit thinner as it gets closer to the nock. This subtle change helps the arrow leave your bowstring more cleanly and consistently.
A well-barreled arrow often flies straighter because the fletching (those feathers or vanes) can orient itself more effectively around the tapered shaft as it launches. It can also help your arrows spin more predictably, which is key for accuracy. For wooden arrows, which can have slight variations in their natural shape, barreling is a fantastic way to standardize them and reduce inconsistencies. It’s a small step that can lead to a noticeable improvement in your arrow’s flight path.
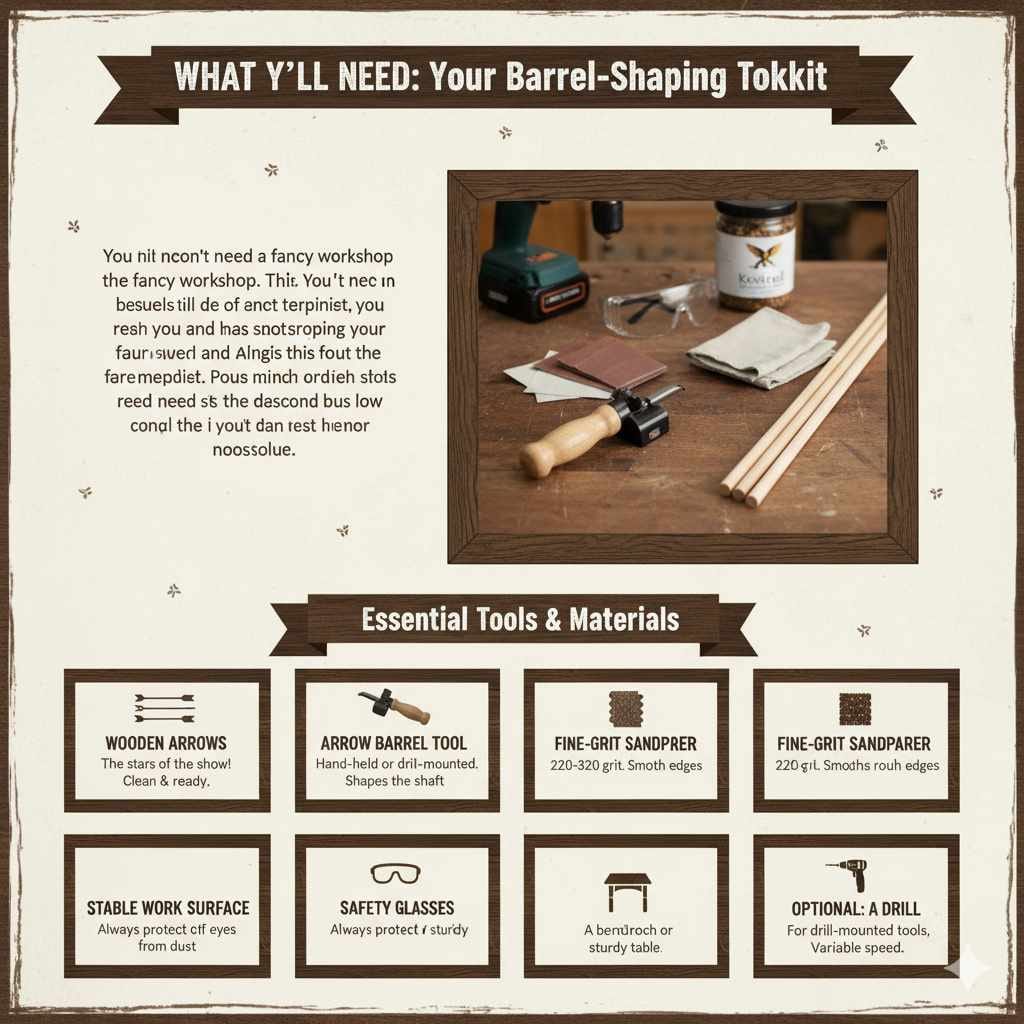
What You’ll Need: Your Barrel-Shaping Toolkit
Getting ready to barrel your arrows is super straightforward. You won’t need a fancy workshop, just a few common items. Having these ready will make the process smooth and efficient. Safety first, always!
Essential Tools and Materials:
- Wooden Arrows: Of course, the stars of the show! Make sure they are clean and ready to go.
- Arrow Barrel Tool: This is the specialized tool for the job. They come in various forms, but most work on a similar principle of gently shaving wood. Some are simple inserts for a drill, others are hand-held. For beginners, a simple, fixed-angle hand tool is often easiest to control. You can often find good quality ones from archery suppliers like Kestrel Archery Supplies.
- Fine-Grit Sandpaper (around 220-320 grit): To smooth out any rough edges after barreling.
- A Soft Cloth or Rag: For wiping away dust.
- Safety Glasses: Always protect your eyes, especially when working with tools that remove material.
- A Stable Work Surface: Like a workbench or a sturdy table.
- Optional: A Drill (if using a drill-mounted barrel tool): Make sure it has variable speed if possible.
Step-by-Step: How to Barrel Your Wooden Arrows
Here’s where the action happens! We’ll go through this step-by-step, keeping it simple and clear. Remember, patience is key. It’s better to take your time and do it right than to rush and potentially damage your arrow.
Step 1: Prepare Your Workspace and Arrows
Find a well-lit area with a stable surface. Lay out your tools. Carefully inspect each arrow you plan to barrel. Make sure the shafts are free from any major dents or cracks. If an arrow has significant damage, it might be best to set it aside. Gently wipe down each arrow with your cloth to remove any dust or debris. This ensures a clean surface for the barreling tool to work on.
Step 2: Understand Your Barrel Tool
Different barrel tools work slightly differently. If you have a hand-held tool, it will likely have a small blade that cuts or shaves wood. You’ll typically place the arrow shaft into a designated slot and then twist or turn the tool to make a gradual taper. If you have a drill-mounted tool, it will look like a small specialized jig that attaches to your drill. You’ll insert the arrow into the jig and use the drill to spin the arrow while the blade shaves it. Always read the specific instructions that come with your tool!
For this guide, we’ll describe the common hand-tool method, which offers excellent control for beginners.
Step 3: Set Up the Barrel Tool
If you have a hand-held barrel tool, it usually has a fixed angle. You’ll likely insert the nock end of the arrow into the tool. Ensure the tool is held firmly. Some tools might require you to adjust the depth, but most beginner tools have a set depth for a standard taper. The goal is to create a gradual slimming effect towards the nock.
Step 4: The Barreling Process (Gentle is Key!)
- First Pass: Place the arrow shaft into the tool at the nock end. Gently start rotating the arrow while simultaneously applying very light pressure. You’re not trying to cut a lot of wood at once. Think of it as shaving rather than cutting. Rotate the arrow a full 360 degrees.
- Inspect: Remove the arrow and inspect the area you just worked on. You should see a slight change in the wood’s surface. It won’t look perfectly smooth yet, nor will it be dramatically thinner.
- Subsequent Passes: Repeat the rotation process. After each pass, inspect the shaft. Continue making very light passes, rotating the arrow each time. The goal is to gradually create a smooth, tapering surface. It’s crucial not to over-shave, as this can weaken the arrow shaft. You’re looking for a slight reduction in diameter, typically just enough for roughly 1-1.5 inches back from the nock.
- Consistency: Try to maintain consistent pressure and rotation. For a drill-mounted tool, use a slow, steady speed.
The taper should be very subtle. Aim for a smooth transition from the normal shaft diameter to a slightly smaller diameter near the nock. You don’t want a sharp ledge or a drastic change.
Step 5: Sanding for a Smooth Finish
Once you’ve achieved the desired taper, it’s time to smooth it out. Take your fine-grit sandpaper and gently sand the tapered area. Use a back-and-forth motion, or wrap the sandpaper around the shaft and rotate it. The goal here is to remove any slight ridges left by the barrel tool and create a perfectly smooth surface. This smoothness is important for the arrow to fly cleanly off the string.
Wipe away the dust often with your cloth to see your progress. You want the tapered section to feel as smooth as the rest of the shaft, with no rough spots.
Step 6: Final Inspection
After sanding, give your arrow a final look-over. Run your fingers over the tapered area. Does it feel smooth? Is the taper gradual and even all the way around? Gently flex the arrow slightly to check for any new cracks that might have appeared (though this is rare with careful barreling).
Repeat these steps for all your arrows, ensuring each one is treated with the same care and attention. Aim for consistency between all your arrows.
Common Barreling Challenges (And How to Solve Them)
Even with the best intentions, you might run into a few minor hiccups. Don’t get discouraged! Most are easily fixed.
Challenge 1: Uneven Taper
Problem: The taper looks lumpy or uneven around the shaft.
Solution: This usually happens if you’re not rotating the arrow consistently or applying uneven pressure. Go back to Step 4 and be more mindful of rotating the arrow a full 360 degrees with each pass. Gentle sanding (Step 5) can also help smooth out minor inconsistencies.
Challenge 2: Over-Shaving
Problem: You’ve removed too much wood, and the taper is too drastic or the shaft feels weakened.
Solution: If it’s only slightly over-shaved and still feels strong, proceed with extra thorough sanding to make the transition as smooth as possible. If you’ve significantly weakened the shaft, it’s best to retire that arrow to avoid potential breakage. It’s always better to err on the side of removing too little wood rather than too much. You can always go back for another pass, but you can’t put wood back on.
Challenge 3: Rough Edges
Problem: Even after sanding, the tapered area feels rough.
Solution: You might need finer grit sandpaper, or you might need to sand for a little longer. Ensure you’re using a consistent, smooth sanding motion. Sometimes, applying a very light coat of a wood finish (like a clear lacquer or even beeswax) after sanding can seal the wood and make it feel smoother. Let it dry completely before shooting.
The Science Behind the Taper: A Deeper Dive
Barreling isn’t just an old archery tradition; it has roots in understanding arrow dynamics. When an arrow is shot, it experiences several forces. One significant force is the “Archer’s Paradox,” described by Dr. Saxton Pope, where the arrow flexes around the bow riser as it leaves the string. A slight taper near the nock can influence how the arrow leaves the string, potentially helping it recover from this flex more quickly and consistently.
Furthermore, the taper can reduce the surface area of the shaft that interacts with air just as it’s released. This can marginally reduce drag and provide a cleaner launch. Think of it like the nose cone of a rocket – a smoother, more aerodynamic shape helps it fly better. For wooden arrows, which can have slight inconsistencies, this process helps create a more uniform launch platform for the fletching to guide the arrow accurately.
Barreling vs. Other Arrow Preparations
It’s worth noting that barreling is just one step in preparing wooden arrows. Archers often use other techniques too:
Other Arrow Preparation Techniques:
- Shaft Straightening: Essential for wooden arrows, as wood can warp. This is typically done with gentle heat and pressure.
- Fletching: Attaching feathers or vanes to help stabilize flight.
- Nocking Point Adjustment: Ensuring the nock sits correctly on the bowstring.
- Weight Matching: Selecting arrows that are similar in weight for consistent trajectory.
Barreling complements these by optimizing the transition from the bowstring to the arrow, a critical micro-moment that impacts the arrow’s initial flight path. It’s a refinement that, when done well, contributes to a more predictable and accurate shot.
Barreling Tools: Hand vs. Drill
As mentioned, there are different types of barrel tools. Understanding the options can help you choose what’s best for you.
| Tool Type | Pros | Cons | Best for |
|---|---|---|---|
| Hand-Held Barrel Tool | Simple to use, portable, great control, does not require power. | Can be slower, requires some manual effort, consistency depends on user. | Beginners, small batches of arrows, those who value precision over speed. |
| Drill-Mounted Barrel Tool | Faster, can achieve very consistent results when used correctly, good for larger batches. | Requires a drill, less tactile feedback, potential to over-shave if not careful, requires more setup. | Archers who prepare many arrows, those comfortable with power tools, looking for speed and consistency. |
For most beginners just starting out or those with a few arrows to prepare, a simple hand-held tool is an excellent choice. It allows you to feel the wood and control the process with greater nuance.
For those interested in more advanced arrow building, resources like the Traditional Archers’ Wood Shafting Guide from the Woodland Archery can offer deeper insights into shaft preparation techniques, including advanced barreling methods.
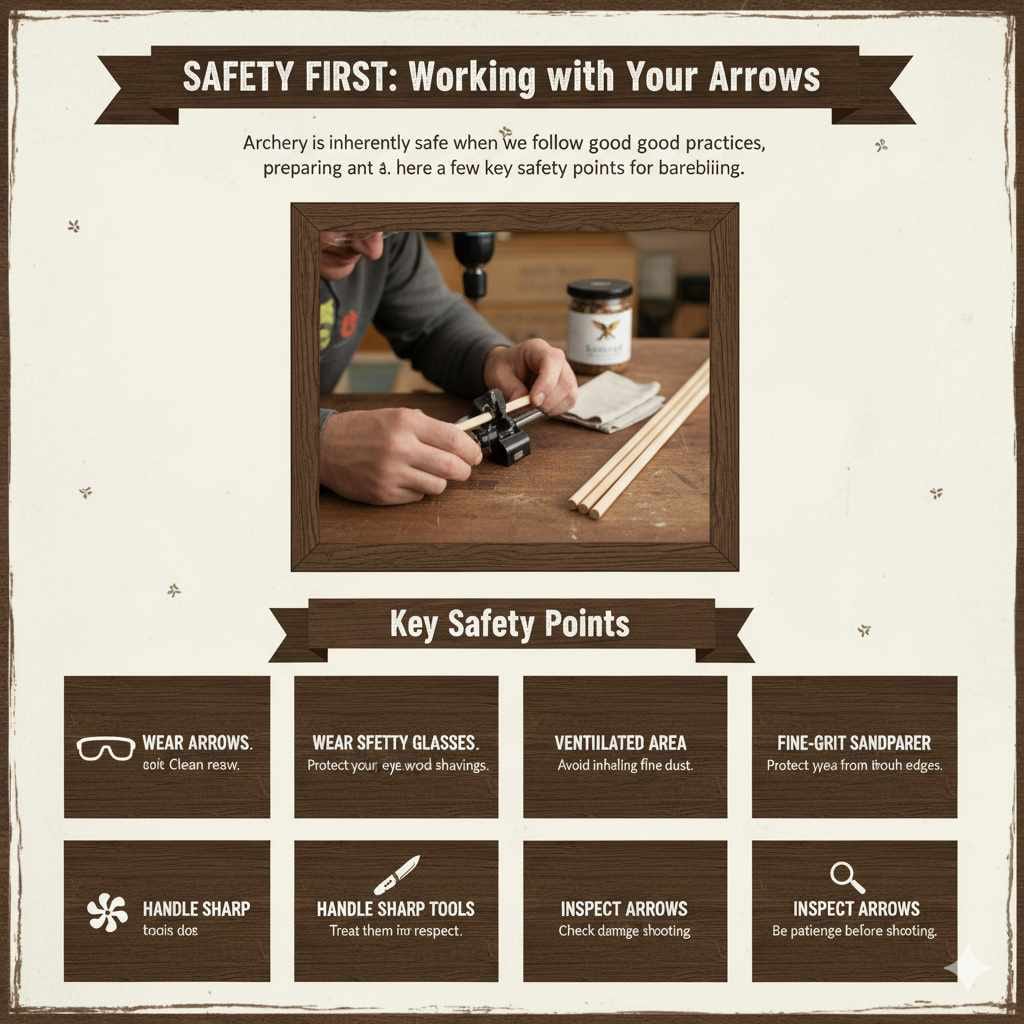
Safety First: Working with Your Arrows
Archery is inherently safe when we follow good practices, and preparing your equipment is part of that. Here are a few key safety points for barreling:
- Wear Safety Glasses: Wood shavings can fly unexpectedly. Always protect your eyes.
- Work in a Ventilated Area: While wood is natural, fine dust can be irritating to the lungs.
- Handle Sharp Tools with Care: Whether it’s the blade on your barrel tool or sandpaper, treat them with respect.
- Inspect Arrows Regularly: Before and after barreling, check for any signs of damage that could lead to breakage during shooting. A damaged arrow can be dangerous. Archery equipment should be routinely inspected for wear and tear by following guidance such as that found in USA Archery’s Safety Guidelines.
- Don’t Over-Work: Be patient. Forcing the tool or removing too much wood too quickly is the fastest way to damage an arrow or even create a hazard.
FAQ: Your Barreling Questions Answered
Q1: How much wood should I remove when barreling?
A1: You should remove only a very small amount. The goal is a gradual taper, not a significant thinning. You’re creating a smooth transition, not an aggressive reduction in diameter. Aim for a difference of no more than a millimeter or two in diameter.
Q2: Can I barrel carbon or aluminum arrows?
A2: No, barreling is primarily a technique for wooden arrows. Carbon and aluminum arrows are manufactured to precise specifications and don’t typically require or benefit from this kind of shaping. Attempting to barrel them could damage them and compromise their integrity.
Q3: How often should I barrel my wooden arrows?
A3: Barreling is a preparation step. You generally barrel new arrows once before you start shooting them, or if you notice a significant issue with how they’re leaving the string. You don’t need to re-barrel them regularly unless they get damaged or you’re rebuilding them.
Q4: What’s the difference between barreling and tapering?
A4: They are essentially the same thing in this context. Barreling” is the archery term for the process of creating a slight taper near the nock end of a wooden arrow shaft.
Q5: Is there a specific size or length for the tapered section?
A5: Not a strict rule, but typically the taper extends about 1 to 1.5 inches back from the nock. The key is that the taper is gradual and smooth. Focus on the transition rather than a specific measurement.
Q6: What if I don’t have a barrel tool? Can I use anything else?
A6: While specialized tools make the job easier and safer, some very experienced archers might use a knife or sandpaper very carefully. However, for beginners, I strongly recommend getting a proper barrel tool to ensure consistent results and maintain arrow integrity. The risk of damage or inconsistency is much higher without the right equipment.
Conclusion: Straight Arrows, Straight Shots!
There you have it! You’ve learned how to barrel wooden arrows. It’s a fantastic, simple technique that truly makes a difference in how your arrows fly. By following these steps, you’re not just preparing your arrows; you’re investing in your skill and your enjoyment of archery. Remember, every little bit of care you put into your equipment can translate into more confidence and better shots downrange. Keep practicing, keep learning, and most importantly, have fun out there with your perfectly tuned arrows!


