Generally, yes. A stiffer arrow, which bends less, usually needs a stiffer plunger spring to push it correctly away from the bow’s riser for a clean flight. However, this is a starting point, not a strict rule. The perfect setting comes from tuning your specific bow and arrow combination to achieve perfect arrow flight.
Welcome, fellow archers! If you’ve ever stood at the shooting line, wondering why your arrows aren’t grouping together, you’re not alone. The world of bow tuning can seem complicated, and questions about arrow spine and plunger settings are common. It’s easy to feel overwhelmed by all the technical terms. But don’t worry, I’m here to help.
Think of your bow, arrow, and plunger as a team. For your arrows to fly straight, the team members need to work together perfectly. One of the most important relationships is between how much your arrow bends (its spine) and how much your plunger pushes back. In this guide, we’ll break it down step-by-step. We’ll explore what these parts do, how they interact, and how you can tune them for tack-sharp accuracy.
First, Let’s Understand the Key Players
Before we dive into tuning, let’s get to know the two main components we’re talking about: the arrow spine and the cushion plunger. Understanding their jobs makes the tuning process much easier.
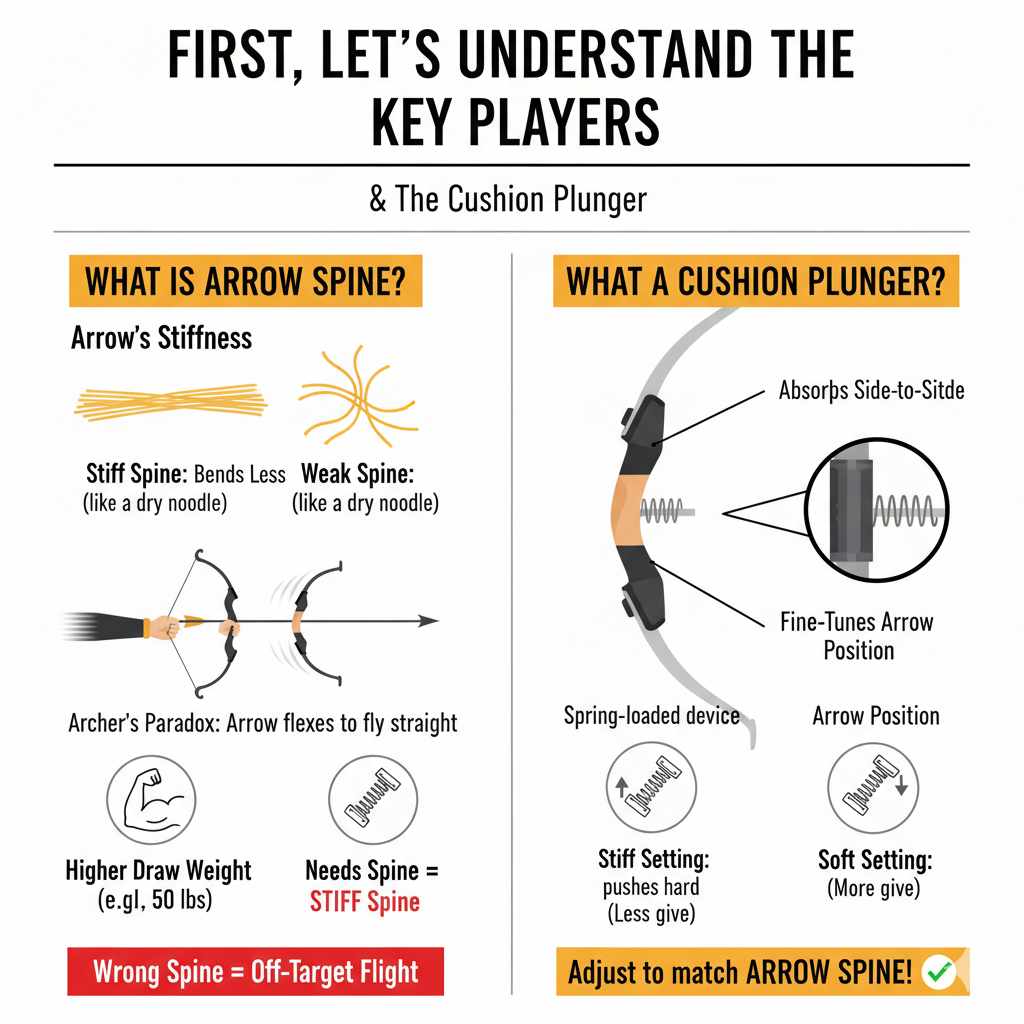
What is Arrow Spine?
Arrow spine is simply a measure of an arrow’s stiffness. Imagine trying to bend a dry spaghetti noodle versus a cooked one. The dry noodle is very stiff (like a high spine number for its length), while the cooked noodle is very flexible (like a low spine number).
When you release the bowstring, a massive amount of energy is transferred to the arrow. This forces the arrow to bend or flex as it pushes past the bow’s riser. This bending is a good thing! It’s a crucial part of a phenomenon called the “Archer’s Paradox,” which helps the arrow fly straight.
- Stiff Spine: The arrow bends less. This is needed for bows with a higher draw weight.
- Weak Spine: The arrow bends more. This is suited for bows with a lower draw weight.
Choosing the correct spine is vital. An arrow that’s too stiff won’t bend enough, and one that’s too weak will bend too much. Both scenarios will cause your arrows to fly off-target.
What is a Cushion Plunger?
A cushion plunger, sometimes called a pressure button, is a small, spring-loaded device that screws into the side of your bow’s riser. It sits right where your arrow rests. Its job is twofold:
- It absorbs some of the arrow’s side-to-side flexing as it leaves the bow, acting like a tiny shock absorber.
- It allows you to fine-tune the arrow’s position, pushing it slightly away from the riser to ensure it clears the bow cleanly.
You can adjust the tension of the spring inside the plunger. A “stiff” setting means the spring pushes back hard, while a “soft” or “weak” setting means it has more give. This adjustment is how you match the plunger’s action to your arrow’s spine.
The Relationship: How Spine and Plunger Work Together
Now, let’s connect the dots. The amount your arrow flexes (spine) and the amount your plunger pushes back (tension) must be in harmony for a clean, straight shot. This balance is what allows the arrow to navigate the Archer’s Paradox successfully.
The Archer’s Paradox describes how an arrow bends around the bow riser upon release before straightening out in flight. For this to happen correctly, the arrow needs just the right amount of “help” from the plunger.
- A Stiff Arrow: Because it doesn’t want to bend much on its own, it needs a stronger push from the plunger to get it to move sideways and clear the riser. Therefore, a stiff arrow generally requires a stiffer plunger setting.
- A Weak Arrow: This arrow bends very easily. If the plunger pushes too hard, it will over-flex and fly erratically. It needs a gentler push, so a weaker arrow pairs well with a softer plunger setting.
Think of it like pushing a swing. Pushing a heavy, adult-sized swing requires a strong shove. Pushing a lightweight, child-sized swing requires a much gentler touch. The arrow spine is the weight of the swing, and the plunger tension is your push.
The Ultimate Test: How to Tune Your Plunger with Bare Shaft Tuning
Reading charts is one thing, but the best way to find the perfect setting is to see how your arrows actually fly. The most effective method for beginners is called “bare shaft tuning.” This involves shooting an arrow with no fletchings (feathers or vanes) and comparing where it lands to your regular, fletched arrows.
Fletchings are amazing at correcting an arrow’s flight, like the rudder on a boat. By removing them, you expose any underlying tuning problems. The bare shaft tells you the honest truth about your setup.
What You’ll Need
- Your bow
- 3-5 fletched arrows
- 1-2 bare shaft arrows (same spine, length, and point weight as your fletched arrows)
- A large target butt set at a safe, close distance (around 15-20 yards is perfect to start)
- The small wrenches that came with your plunger
Step-by-Step Bare Shaft Tuning Guide
Follow these steps carefully. Remember, small adjustments make a big difference!
- Get Close: Stand about 15-20 yards from the target. At this distance, the bare shaft won’t have time to fly too erratically, making it safer and easier to read the results.
- Shoot a Fletched Group: Shoot your 3-5 fletched arrows, aiming for the center of the target. Focus on good, consistent form. Don’t worry if they aren’t all in the bullseye; you’re just establishing a baseline group.
- Shoot the Bare Shaft: Now, carefully shoot your bare shaft arrow, aiming at the very same spot. Use the exact same form and aiming process. Repeat this a couple of times to be sure of the result.
- Analyze the Results: Go to the target and look at where the bare shaft landed in relation to your fletched arrow group. This is the key to tuning.
Interpreting the Results (The Fun Part!)
The bare shaft’s position tells you exactly what adjustment to make. The table below is your cheat sheet. Note that the instructions are different for right-handed and left-handed archers.
For Right-Handed Archers (RH)
| If the Bare Shaft Hits… | This Means… | How to Adjust Your Plunger |
|---|---|---|
| Left of the fletched group | The arrow spine is too stiff. | Decrease plunger spring tension (make it weaker/softer). Turn the adjustment screw counter-clockwise. |
| Right of the fletched group | The arrow spine is too weak. | Increase plunger spring tension (make it stiffer/harder). Turn the adjustment screw clockwise. |
| High of the fletched group | Your nocking point is too low. | Move your nocking point up on the string in very small increments. |
| Low of the fletched group | Your nocking point is too high. | Move your nocking point down on the string in very small increments. |
For Left-Handed Archers (LH)
| If the Bare Shaft Hits… | This Means… | How to Adjust Your Plunger |
|---|---|---|
| Right of the fletched group | The arrow spine is too stiff. | Decrease plunger spring tension (make it weaker/softer). Turn the adjustment screw counter-clockwise. |
| Left of the fletched group | The arrow spine is too weak. | Increase plunger spring tension (make it stiffer/harder). Turn the adjustment screw clockwise. |
The Goal: You want your bare shaft to land right inside your fletched arrow group. When it does, your plunger tension and arrow spine are perfectly matched!
Making Adjustments: A Golden Rule
Only make one small adjustment at a time! Turn your plunger’s adjustment screw just a tiny bit (about 1/8 of a turn). Then, go back to the line and shoot your groups again. Repeat this process of shooting, analyzing, and adjusting until your bare shaft flies with your fletched arrows.
Patience is your best friend here. Rushing the process or making large, drastic changes will only lead to frustration. Enjoy the feeling of slowly dialing in your bow until it feels like an extension of your body.
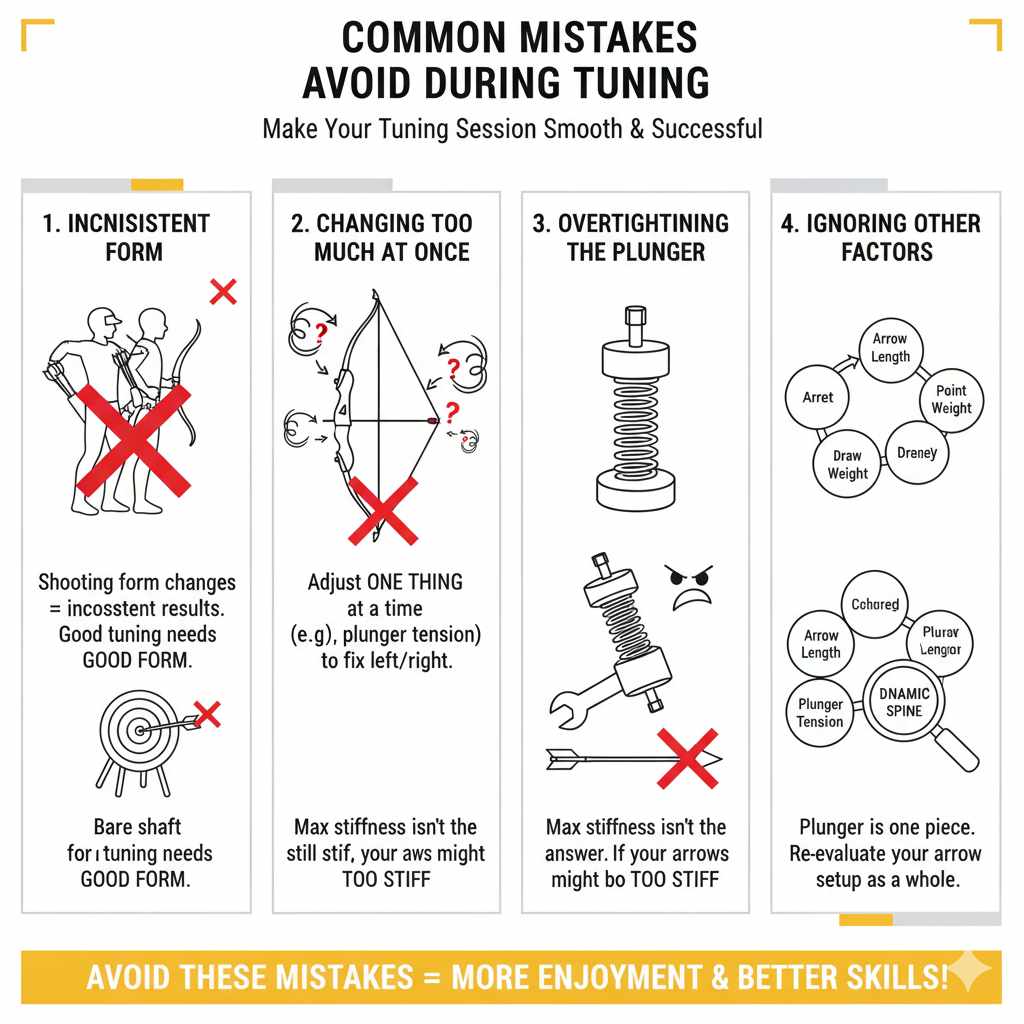
Common Mistakes to Avoid During Tuning
As you get started, it’s easy to fall into a few common traps. Keep these in mind to make your tuning session smooth and successful.
- Inconsistent Form: If your shooting form changes from shot to shot, you’ll get inconsistent results. Before you blame the equipment, make sure your stance, grip, anchor point, and release are the same every time. Good tuning relies on a foundation of good form. You can find excellent resources on proper form from organizations like the University of Nebraska-Lincoln Archery Program.
- Changing Too Much at Once: Don’t adjust your plunger tension, nocking point, and sight all at the same time. You won’t know which change made the difference. Stick to adjusting one thing—in this case, the plunger spring tension—until the left/right impact is fixed. Then, address the up/down impact by adjusting the nocking point if needed.
- Overtightening the Plunger: Cranking the plunger spring to its maximum stiffness isn’t the answer. If your bare shaft is still hitting stiff (left for a RH archer) with a very weak plunger setting, your arrows might be significantly too stiff for your bow’s draw weight.
- Ignoring Other Factors: Plunger tension is just one piece of the puzzle. Arrow length, point weight, and your bow’s draw weight all affect the arrow’s dynamic spine (how it behaves when shot). If you can’t get a good tune, it might be time to re-evaluate your arrow setup as a whole.
Frequently Asked Questions
What happens if my plunger is too stiff for my arrow?
If the plunger is too stiff, it will push the arrow too hard and too far away from the riser. For a right-handed archer, this will cause the back of the arrow (the nock end) to kick out to the right, making the arrow’s point aim left. The result is that your arrows will consistently hit to the left of where you are aiming.
What happens if my plunger is too weak for my arrow?
If the plunger is too weak, it won’t provide enough push to get the arrow to clear the riser cleanly. The arrow will press too hard against the bow. For a right-handed archer, this causes the nock end to kick left, sending the arrow’s point to the right. Your arrows will consistently hit to the right of your aiming point.
How do I know what my arrow spine is?
The spine rating is usually printed on the arrow shaft as a number (e.g., 350, 400, 500, 600). A lower number indicates a stiffer spine, while a higher number indicates a more flexible (weaker) spine. Arrow manufacturers provide charts that recommend a spine based on your bow’s draw weight and your arrow length.
Does changing my bow’s draw weight affect my tune?
Absolutely! Increasing your draw weight puts more energy into the arrow, making it bend more (act weaker). Decreasing the draw weight makes the arrow act stiffer. If you make a significant change to your draw weight, you will need to re-tune your plunger and may even need arrows with a different spine.
Can I tune without a cushion plunger?
If you’re shooting a modern recurve bow, a plunger is essential for fine-tuning. Bows shot “off the shelf,” like many traditional longbows or barebows, do not use plungers. For those styles, archers tune by adjusting arrow spine, point weight, or the thickness of the shelf rest material.
How often should I check my plunger settings?
It’s a good idea to check your tune periodically, especially if you notice your groups starting to open up. Check it after you travel, if you change anything on your bow (like a new string), or after every few hundred shots, as parts can sometimes vibrate loose. A quick bare shaft check can give you peace of mind.
Is a more expensive plunger better?
More expensive plungers often offer smoother action and finer, more repeatable adjustments (with clicks you can feel and hear). However, even an inexpensive, basic plunger can be tuned to work perfectly. The key is understanding how to adjust it, not how much it costs.
Bringing It All Together: Your Path to Perfect Arrow Flight
So, does a stiff arrow spine need a stiff plunger setting? As we’ve learned, the answer is generally yes, but it’s the starting point for a conversation, not the final word. The real answer lies in the hands-on process of tuning. By using the bare shaft method, you are letting your arrows tell you exactly what they need to fly true.
Don’t be intimidated by the process. Every archer, from a weekend hobbyist to an Olympian, goes through this tuning process. It’s a fundamental skill that connects you more deeply to your equipment and makes you a better, more confident shooter.
Take your time, be patient, and trust the process. With each small adjustment, you are one step closer to that perfect, satisfying “thwack” of an arrow hitting right where you aimed. Now, grab your gear, head to the range, and start your journey to a perfectly tuned bow. Happy shooting!