
When installing a door latch, the arrow marking on the mechanism should almost always point towards the hinges, away from the door’s edge. This ensures the angled side of the latch bolt hits the strike plate first, allowing your door to close smoothly and latch securely every single time.
Hello, I’m Salman Arfeen, your guide to making home projects simple and successful. If you’ve ever found yourself staring at a tiny arrow on a new door latch, completely stumped, you are not alone! It’s one of those small details that seems confusing but makes a huge difference. Many people install it the wrong way and end up with a door that just won’t click shut.
But don’t worry. This is an easy problem to solve. Getting it right is simple once you understand the “why” behind it. In this guide, I’ll walk you through exactly what that arrow means, which way it should point, and how to get your door latch installed perfectly. Let’s make sure your door closes with a satisfying click, not a frustrating thud.
What Is That Little Arrow Anyway? Understanding Its Purpose
That small, stamped arrow on your door’s latch mechanism is your best friend during installation. It’s not just a random mark; it’s a directional guide provided by the manufacturer. Its one and only job is to tell you the correct orientation for the latch before you slide it into the door.
So, what is it actually pointing out? The arrow indicates the direction of the latch bolt’s bevel—the angled or sloped surface. For a door to close and latch without you needing to turn the handle, the angled side of the bolt must hit the metal strike plate on the door frame first. This contact pushes the bolt back into the door, allowing it to clear the frame and then spring back into the hole, securing the door.
If you install it backward, the flat, vertical side of the bolt will hit the strike plate. It has no way to retract on its own, so the door will simply bounce back open unless you manually turn the handle to retract the bolt while closing it. The arrow is there to prevent this common headache.
The Two Key Parts: Latch Bolt and Strike Plate
To really get it, let’s quickly look at the two parts involved:
- The Latch Bolt: This is the spring-loaded metal pin that sticks out from the edge of your door. Notice how one side is angled (the bevel) and the other is flat.
- The Strike Plate: This is the metal plate on the door frame with a hole in it. The latch bolt goes into this hole to keep the door shut.
The magic happens when the angled side of the bolt glides against the edge of the strike plate, creating a smooth, ramp-like action. The arrow simply ensures this smooth action happens automatically.
The Golden Rule: Arrow Points Towards the Hinges
Here is the most important takeaway, the one rule to remember: The arrow on the latch mechanism must point toward the hinge side of the door.
Think of it this way: the door swings shut from the handle side toward the hinge side. For the latch to work, its angled surface needs to meet the door frame first. By pointing the arrow toward the hinges (or the back of the door), you are correctly positioning the angled face of the latch bolt to face the outside, ready to meet the strike plate.
Let’s break down the logic with a simple table:
| If the Arrow Points... | What Happens When You Close the Door? | Result |
|---|---|---|
| Towards the Hinges (Correct) | The angled side of the latch bolt hits the strike plate, smoothly retracting into the door. | The door closes easily and latches with a satisfying “click.” Success! |
| Towards the Lock/Handle (Incorrect) | The flat side of the latch bolt hits the strike plate with a thud. It cannot retract on its own. | The door bounces back open. You have to turn the handle to close it every time. |
This rule applies whether your door is left-handed or right-handed, and whether it’s an interior or exterior door. The physics are always the same. The ramp needs to face the direction of closing.
A Step-by-Step Guide to Perfect Latch Installation
Feeling confident? Great! Now let’s turn that knowledge into action. Follow these simple steps to ensure your latch is installed correctly the first time.
Step 1: Determine Your Door’s “Handing”
First, you need to know if you have a left-hand or right-hand door. This is easy. Stand in the hallway or outside the room so the door opens away from you.
- If the hinges are on your left, you have a left-hand door.
- If the hinges are on your right, you have a right-hand door.
Knowing this helps you visualize which way the arrow needs to point before you even begin. For a left-hand door, the arrow will point to the left. For a right-hand door, it will point to the right.
Step 2: Locate the Arrow on the Latch
Take the latch mechanism out of its packaging. It’s the rectangular piece that slides into the hole on the edge of the door. Look closely at the metal casing. You should see a small, stamped arrow, often near the top or bottom. Some are more obvious than others, so you might need to catch it in the right light.
Step 3: Orient the Latch Correctly
Now, hold the latch so the arrow is pointing in the direction of your door’s hinges. For a right-hand door, the arrow should point right. For a left-hand door, it should point left. This is the moment of truth! Double-check that you have it right before moving on.
Step 4: Slide the Latch In and Secure It
With the arrow pointing the correct way, carefully slide the latch mechanism into the large hole on the edge of the door. The latch bolt itself should fit through the smaller hole on the door’s face. Once it’s flush, secure it with the two small screws that came with your kit. Don’t overtighten them just yet.
Step 5: What If There Is No Arrow?
Occasionally, you might get a latch from a budget brand that doesn’t have an arrow. Don’t panic! You can still get it right by looking at the latch bolt itself.
- The goal is to have the angled/beveled side of the bolt facing the door jamb where the strike plate is.
- The flat/vertical side of the bolt should face the room the door swings into.
Hold the latch up to the door and visualize it closing. The “ramp” side should always be the one that will make first contact with the door frame.
Step 6: Install the Handles and Test Everything
Proceed with installing the interior and exterior handles as per the manufacturer’s instructions. Once they are in place but before you tighten all the screws down, test the mechanism. Turn the handle to make sure the latch retracts smoothly. Then, gently push the door closed. It should click shut without any force. If it does, you’ve done it! Now you can tighten all the screws and celebrate a job well done.
Common Mistakes and How to Avoid Them
Even with simple jobs, it’s easy to make a small mistake. Here are a few common slip-ups when installing a door latch and how you can steer clear of them.
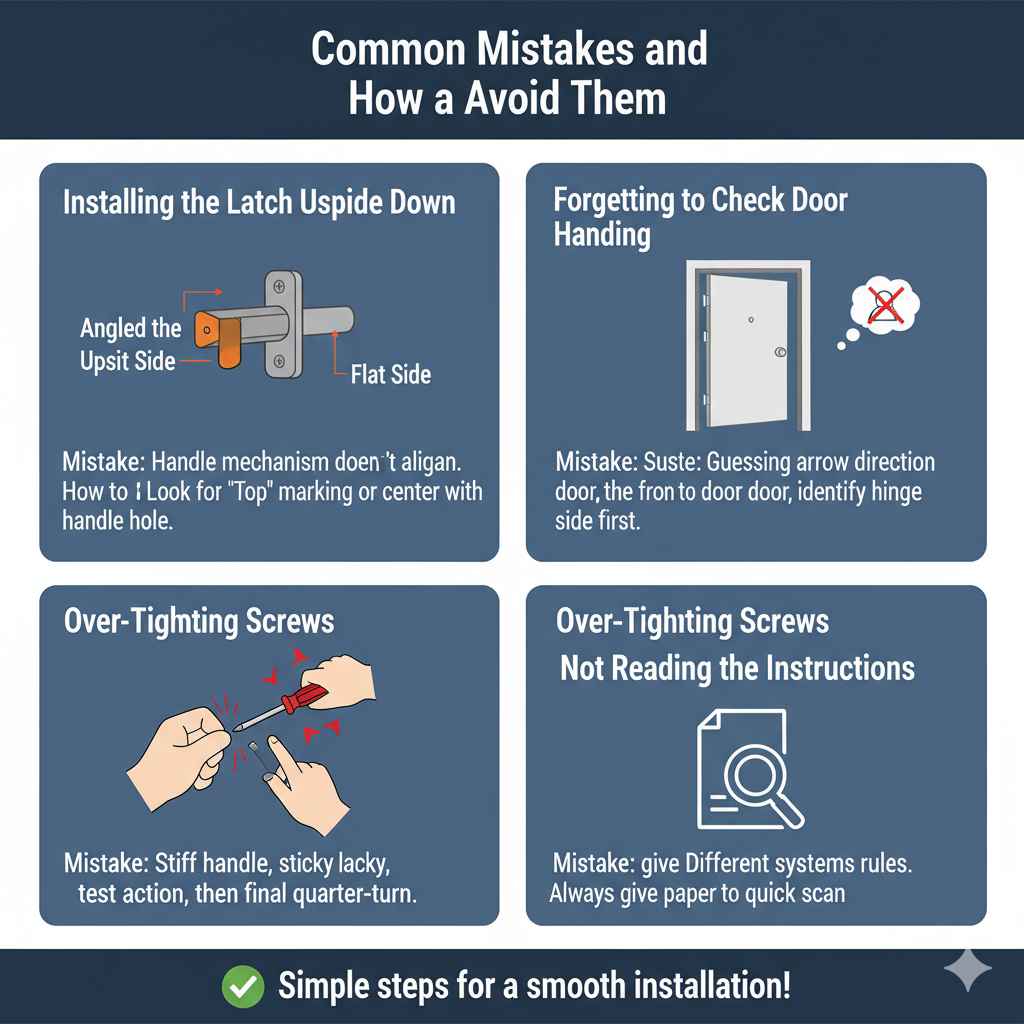
Mistake: Installing the Latch Upside Down. Some latches are symmetrical and can accidentally be inserted upside down. This can cause the handle mechanism to not align properly.
How to Avoid: Look for a “Top” marking or ensure the latch bolt is centered with the handle hole before screwing it in.
Mistake: Forgetting to Check the Door Handing First. Guessing the direction of the arrow is a 50/50 shot, and it’s frustrating to have to take everything apart again.
How to Avoid: Take 10 seconds to stand in front of your door and identify the hinge side. It’s the most important first step.
Mistake: Over-Tightening the Screws Immediately. If you crank down the screws too hard right away, you can bind the mechanism, making the handle feel stiff or causing the latch to stick.
How to Avoid: Screw everything in so it’s snug, but not final. Test the door and handle action. If everything is smooth, then give the screws a final quarter-turn to secure them.
Mistake: Not Reading the Instructions. While the “arrow points to the hinges” rule is nearly universal for residential locks, some complex or commercial locks may have different systems.
How to Avoid: Always give the paper instructions a quick scan. It’s better to confirm than to assume. For complex installations, consulting official guidelines, like the GSA’s standards for building hardware, can provide deeper insight into industry best practices.
Troubleshooting Common Latch Problems
If your door still isn’t latching correctly, here’s a quick troubleshooting table to help you diagnose the issue.
| Problem | Likely Cause | Simple Solution |
|---|---|---|
| The door won’t stay shut and bounces open. | The latch is installed backward. | Unscrew the handles and latch, flip the latch 180 degrees so the arrow points to the hinges, and reinstall. |
| The handle is hard to turn or feels gritty. | The handle spindles or screws are misaligned or too tight. | Loosen the handle screws, gently jiggle the handles to align them, and retighten them evenly without over-torquing. |
| The latch bolt doesn’t line up with the strike plate hole. | The door has settled or the strike plate is misaligned. | Unscrew the strike plate, fill the old holes with wood filler, and reposition it slightly up or down so it aligns perfectly with the latch. |
| The latch gets stuck and won’t spring back out. | The latch mechanism is faulty or needs lubrication. | Remove the latch and spray a small amount of graphite lubricant inside. If it still sticks, the internal spring may be broken, and the latch needs to be replaced. |
Frequently Asked Questions (FAQ)
1. What happens if I install the latch with the arrow pointing at the lock side?
If the arrow points toward the lock (the edge of the door), the latch is backward. The flat side of the bolt will hit the door frame, and the door won’t close on its own. You will have to turn the handle every time you want to shut the door, which is inconvenient and not how it’s designed to work.
2. Can I fix a backward latch without buying a new one?
Absolutely! This is a very easy fix. You just need a screwdriver. Simply uninstall the handles and the latch mechanism, rotate the latch 180 degrees so the arrow points the correct way (toward the hinges), and then reinstall everything. It should only take a few minutes.
3. Does the arrow rule apply to both interior and exterior doors?
Yes, it does. The principle of how a spring-loaded latch works is the same for nearly all standard residential doors, whether they are for a bedroom, bathroom, or your front entry. The angled side of the latch must always face the direction of closing to ensure it retracts smoothly.
4. My door latch doesn’t have an arrow. What do I do?
No arrow? No problem. Ignore the arrow and look directly at the latch bolt itself. One side is angled (beveled), and the other is flat. Install the latch so that the angled side is the part that will hit the strike plate on the door frame when you close the door. The flat side should be on the inside of the door swing.
5. Do I need special tools to fix the latch direction?
No, you typically only need one tool: a Phillips head screwdriver. Most doorknob and handle sets are designed for easy DIY installation with basic hand tools that almost everyone has at home.
6. Why is it called “door handing”?
“Handing” is an industry term used to describe the direction a door swings. It’s crucial for ordering pre-hung doors or specific types of commercial hardware. For simple residential latches, it just helps you visualize which way the latch needs to be oriented before you slide it into the door.
7. Can I reverse the bevel on the latch bolt itself?
On most standard latches, no. The latch bolt is fixed in place. However, some higher-end or specialized latches have a reversible bolt. These often have a small pin or clip at the back of the bolt that allows you to pull it out, rotate it, and pop it back in. But for 99% of residential locks, you simply flip the entire latch mechanism.
Conclusion: The Small Arrow That Makes a Big Difference
You did it! You’ve mastered one of the most common stumbling blocks in DIY door hardware installation. That little arrow, once a source of confusion, is now a helpful guide. By remembering the golden rule—the arrow points toward the hinges—you’ve empowered yourself to install any standard doorknob or lever set correctly and confidently.
It’s these small details that separate a frustrating project from a satisfying one. Now, every time you close that door and hear that clean, crisp click, you’ll know you got it exactly right. Keep tackling these projects one step at a time, and you’ll continue to build the skills and confidence to handle any task around the house. Happy building!