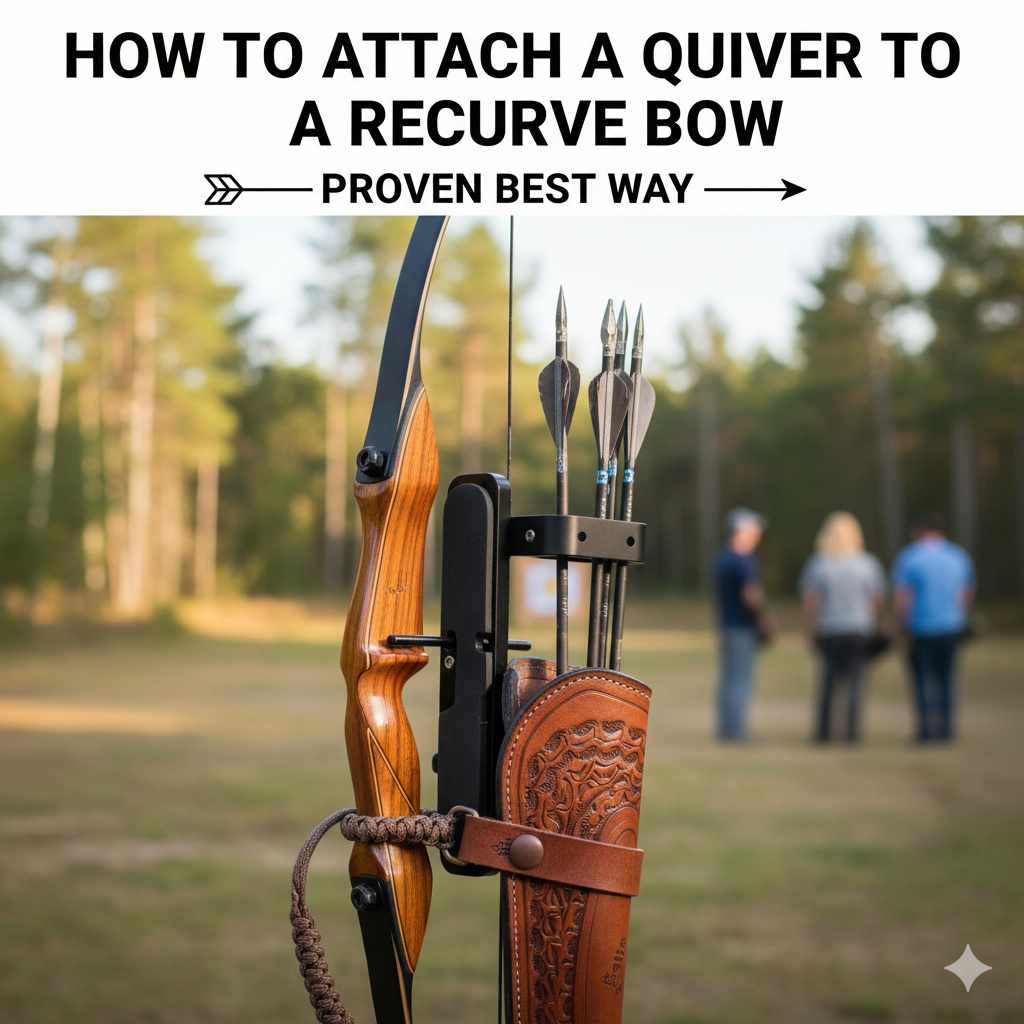
The proven best way to attach a quiver to a modern recurve bow is by using the pre-drilled accessory bushings on the riser. Align the quiver’s mounting bracket with these holes, insert the provided bolts through the bracket into the bushings, and tighten them securely with an Allen wrench for a stable, rattle-free fit.
Hello, archers! Salman here. If you’re wondering how to get those arrows from your bag onto your bow, you’re in the right place. Attaching a quiver might seem tricky at first, but it’s one of the simplest and most rewarding upgrades you can make. It keeps your arrows ready and makes you more efficient, whether you’re at the range or walking through the woods.
Many new archers feel a little lost when they see the brackets, bolts, and pieces that come with a new quiver. Don’t worry! We are going to walk through it all, step by step. I’ll show you the most common and secure way to attach a quiver so you can feel confident and ready to shoot. Let’s get started!
Why Attach a Quiver to Your Bow?
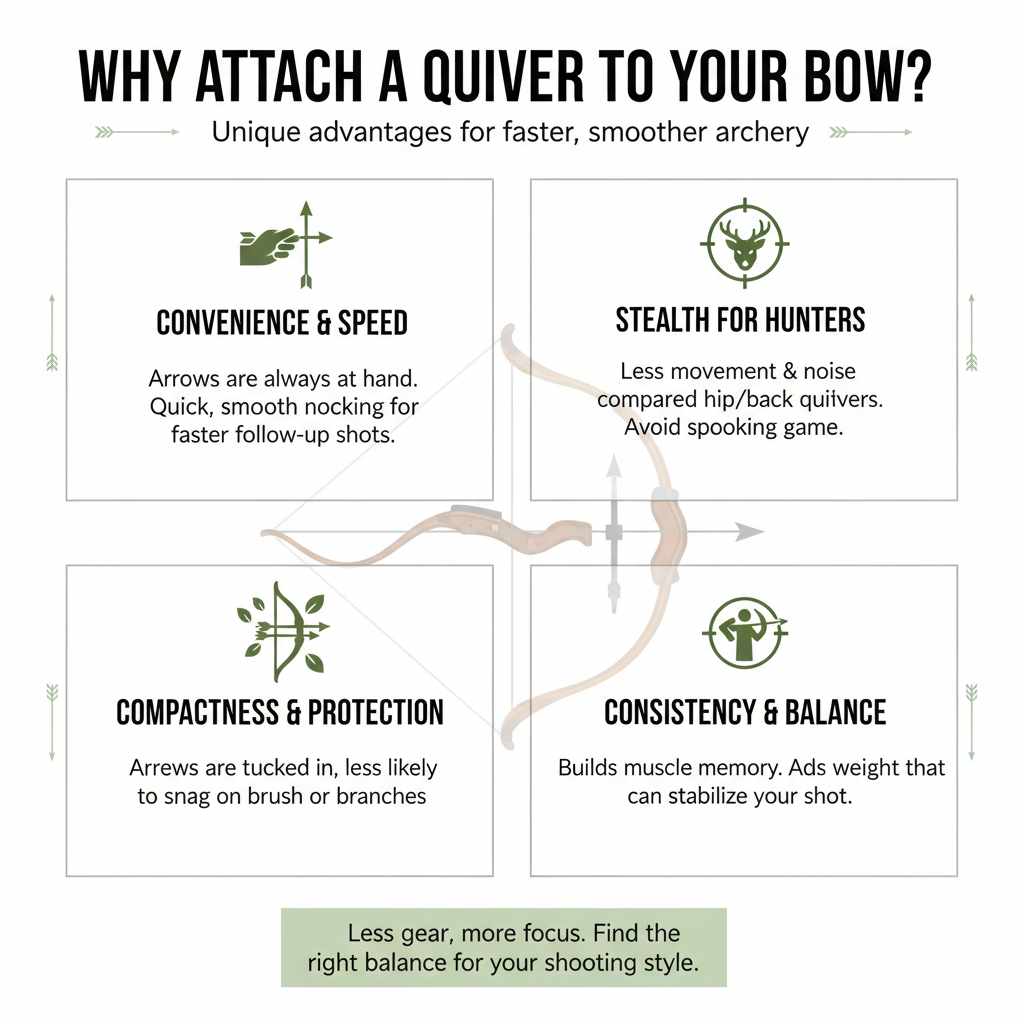
You might be wondering, “Why not just use a hip quiver or a back quiver?” Those are great options, but a bow-mounted quiver offers some unique advantages, especially for certain types of archery. Having your arrows directly on your bow means less movement, faster follow-up shots, and one less piece of gear to strap to your body.
Here are the key benefits:
- Convenience: Your arrows are always right where you need them. No reaching for your back or hip. This makes nocking your next arrow smooth and quick.
- Stealth: For bowhunters, less movement is critical. A bow quiver eliminates the noise and motion of pulling an arrow from a hip or back quiver, which can spook game.
- Compactness: When moving through brush or tight spaces, a bow quiver keeps your arrows tucked in and protected. They are less likely to snag on branches compared to arrows sticking out from your hip.
- Consistency: Having your arrows in the exact same place every time builds muscle memory and a more fluid shooting rhythm.
While a bow quiver adds a little weight, many archers find that it can actually help stabilize their shot. It’s all about finding the right balance for you and your shooting style.
Understanding the Types of Bow-Mounted Quivers
Before we grab our tools, it’s important to know what kind of quiver you’re working with. For recurve bows, there are two main styles of bow-mounted quivers. Your choice depends on your bow’s design and your personal preference.
One-Piece Quivers
A one-piece quiver is the most common type you’ll see. As the name suggests, it’s a single unit that holds both the arrow gripper (where the shaft clips in) and the hood (which covers the broadheads or field points). It typically attaches to the side of the bow’s riser using two bolts.
Pros:
- Easy to attach and remove as a single unit.
- Often lighter than two-piece models.
- Great for archers who want to take their quiver off for transport or target practice.
Cons:
- Can sometimes be less rigid than a two-piece quiver.
- The arrows are held closer together, which can be a minor issue for large fletchings.
Two-Piece Quivers
A two-piece quiver consists of a separate gripper and hood. Each piece mounts independently to the bow—one on the upper part of the riser and one on the lower part. This design spreads the arrows out along the length of the riser.
Pros:
- Extremely secure and stable with no vibration.
- Offers better arrow separation, which is great for large fletchings.
- Provides a very streamlined and integrated look.
Cons:
- More involved installation and removal process.
- Not all bows have the mounting points for a two-piece quiver.
Here is a quick comparison to help you decide:
| Feature | One-Piece Quiver | Two-Piece Quiver |
|---|---|---|
| Installation | Simple and fast (usually two bolts) | More complex (two separate parts to align) |
| Stability | Good to very good | Excellent, very rigid |
| Convenience | Very easy to detach for storage | Meant to stay on the bow |
| Best For | Beginners, target archers, and hunters who remove their quiver | Bowhunters and archers seeking maximum stability |
For most beginners with a modern recurve, a one-piece quiver is the perfect place to start. It offers a fantastic balance of convenience, stability, and ease of use.
Step-by-Step Guide: Attaching a Bolt-On Quiver to Your Recurve Bow
This is the main event! We’ll be focusing on the most common method: attaching a one-piece, bolt-on quiver. This method works for the vast majority of modern recurve bows made for target archery or bowhunting.
What You’ll Need
Before we start, let’s gather our tools. The good news is you don’t need a full workshop. Most quivers come with the necessary hardware.
- Your recurve bow
- Your new bow quiver
- The bolts and washers included with the quiver
- A set of Allen wrenches (hex keys)
Step 1: Inspect Your Bow Riser
First, take a look at the side of your bow’s riser (the handle section). You are looking for two small, threaded holes. These are called accessory bushings. They are usually located above and below the grip, often in the same area where you would mount a sight or a stabilizer.
These bushings are the key to a secure mount. If your bow has them, you’re all set for the easiest installation method. If it doesn’t, don’t worry! We’ll cover an alternative method later on.
Step 2: Prepare the Quiver and Hardware
Unpack your quiver. You should have the quiver itself, a mounting bracket (sometimes it’s already attached), and a small bag with bolts. The bolts are almost always a standard size that matches the bushings on your bow. Lay everything out on a soft surface, like a towel, to avoid scratching your equipment.
Step 3: Align the Quiver Bracket with the Bushings
Take the mounting bracket and hold it against the side of your bow’s riser. Line up the holes on the bracket with the threaded bushings on the riser. The bracket should sit flat and snug against the bow without any gaps.
Most brackets are designed to be installed along with a sight. If you already have a sight mounted, you may need to temporarily remove it. The quiver bracket will typically sit between the sight and the riser, using longer bolts that go through both.
Step 4: Hand-Tighten the Bolts
Take the bolts provided with your quiver. It’s a good practice to put one hand on the bow to keep it steady. With your other hand, insert a bolt through the top hole of the bracket and into the bushing. Turn it clockwise with your fingers. It should thread in smoothly. If you feel resistance, back it out and try again to avoid cross-threading.
Once the top bolt is in a few turns, do the same for the bottom bolt. Getting both started by hand ensures the bracket is properly aligned before you apply any real force.
Step 5: Use an Allen Wrench to Secure the Bolts
Now, grab the correct size Allen wrench. Begin to tighten the bolts, alternating between the top and bottom one. Turn the top bolt a few times, then the bottom bolt a few times. This ensures the pressure is applied evenly, just like tightening lug nuts on a car wheel. Continue until both bolts are snug.
How tight is “snug”? You want it to be firm and secure, but do not overtighten. Cranking down too hard can strip the threads in your riser, which is a difficult and expensive repair. Just tighten until you feel solid resistance, and then give it a tiny extra nudge. That’s it.
Step 6: Attach the Quiver and Check for Clearance
With the bracket firmly in place, it’s time to attach the main quiver body. Most one-piece quivers use a dovetail slide or a quick-detach lever system. Slide the quiver onto the bracket until it clicks into place or lock the lever down.
Give the quiver a gentle wiggle. It should feel solid with no rattling or movement. Now, place an arrow in the quiver. Check for a few things:
- Fletching Clearance: Does the arrow’s fletching touch the bowstring or cables?
- Sight Picture: Does the quiver hood block your view through the sight?
- Hand Clearance: Does the quiver interfere with your bow hand grip?
Most quivers are adjustable. You can often slide them up or down, or angle them closer or farther from the riser to get the perfect fit.
And that’s it! You’ve successfully attached a quiver to your recurve bow. It’s ready for arrows and action.
What If Your Bow Doesn’t Have Bushings?
Some traditional recurve bows, especially wooden one-piece models, don’t have accessory bushings. If that’s the case for your bow, you still have great options. You’ll need a “strap-on” or “limb-bolt” style quiver.
Strap-On Quivers
These quivers use durable rubber or nylon straps to wrap around the bow’s riser. They are surprisingly secure and are designed not to scratch or damage the bow’s finish. Installation is simple: you just position the quiver and tighten the straps until it’s secure.
Limb-Bolt Quivers
For takedown recurve bows, some quivers are designed to mount directly under the limb bolts. You would unscrew the main bolts holding the limbs to the riser, place the quiver bracket over the hole, and then re-tighten the limb bolts. This creates an incredibly strong connection. Always follow the manufacturer’s instructions for this method, as it involves a core component of your bow.
Here’s a comparison of the mounting styles:
| Mounting Style | Pros | Cons | Best For |
|---|---|---|---|
| Bolt-On (Bushings) | Very secure, easy to install, lots of options | Requires a bow with pre-drilled bushings | Most modern recurve and compound bows |
| Strap-On | Universal fit for most bows, no permanent modification | Can sometimes shift if not tightened properly | Traditional bows or bows without bushings |
| Limb-Bolt | Extremely secure and integrated | Only works on takedown bows, more involved setup | Takedown recurve bows |
Tips for a Perfect, Rattle-Free Quiver Setup
Once your quiver is on, a few small adjustments can make a big difference in your shooting experience. A quiet bow is an accurate bow.
- Check Your Screws Regularly: Bows vibrate. It’s a fact of archery. Check the quiver mounting bolts before each shooting session to make sure they haven’t loosened.
- Consider a Dab of Threadlocker: For a semi-permanent setup, a small drop of blue (non-permanent) Loctite on the bolt threads can prevent them from vibrating loose. Avoid red Loctite, which requires heat to remove.
- Listen for Noise: After attaching the quiver, draw your bow and listen. If you hear any new buzzing or rattling, something is loose. Check the bolts, the quiver connection, and even the arrows in the gripper.
- Balance is Key: A full quiver adds weight to one side of your bow. This can affect your balance at full draw. Many archers find that a stabilizer on the opposite side can help counteract this weight, leading to a steadier hold. According to a safety guide from Michigan State University Extension, proper equipment setup is a key part of archery safety.
How a Bow Quiver Affects Your Shot
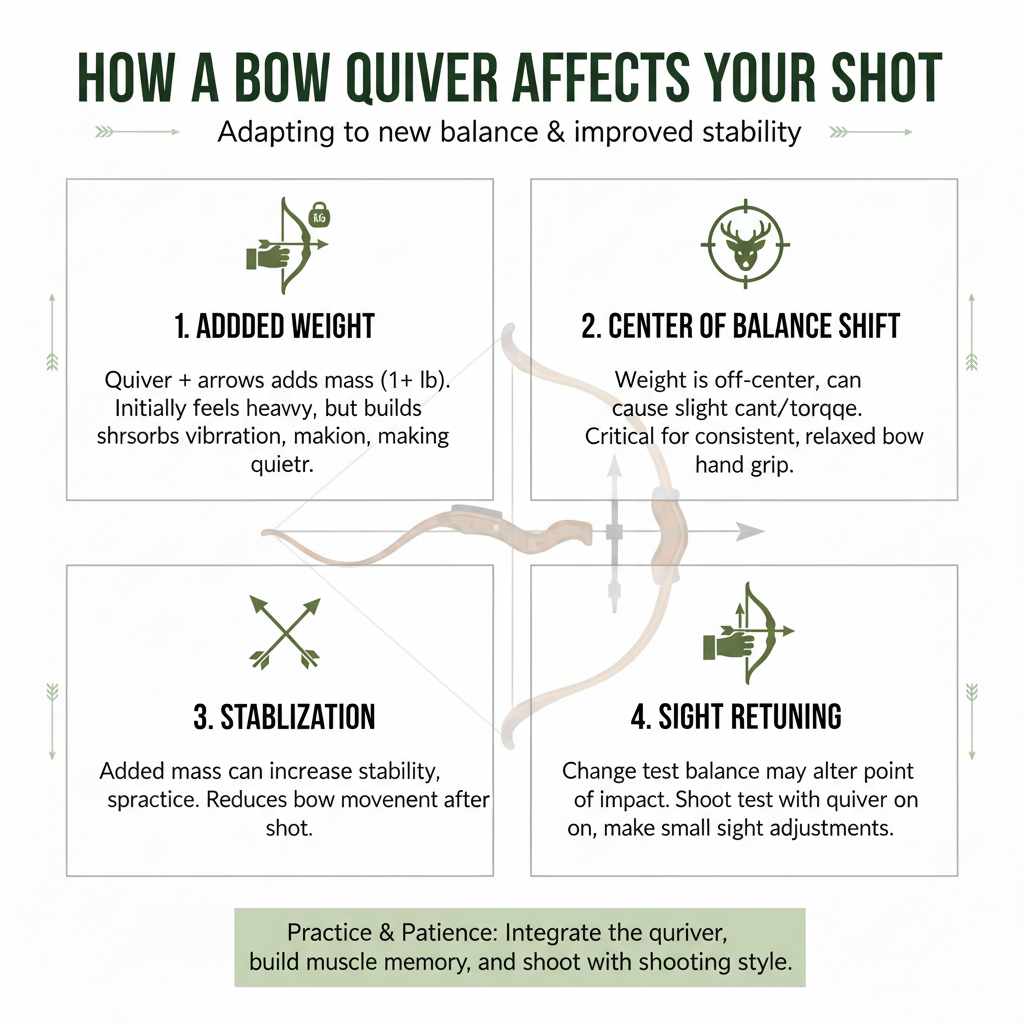
Adding anything to your bow will change how it feels and shoots. A quiver is no exception. Understanding these changes will help you adjust and maintain your accuracy.
The biggest change is the addition of weight. A quiver loaded with five or six arrows can add over a pound to your setup. Initially, your bow might feel heavier and harder to hold steady. But with practice, this added mass can actually help you. The extra weight can absorb more vibration upon release, making the bow feel deader in the hand and quieter overall.
The weight is also off-center, which can introduce a slight cant or torque if your grip isn’t perfect. This is why a consistent grip is so important. Focus on keeping your bow hand relaxed and letting the bow sit naturally. Over time, your muscles will adapt, and holding the extra weight will feel normal.
Don’t be surprised if you need to slightly re-tune your sight after adding a quiver. The change in balance and vibration can subtly alter your arrow’s point of impact. Shoot a few groups with the quiver on and make small adjustments as needed. The goal is to make the quiver a natural part of your bow so you can shoot with confidence, whether it’s on or off.
Frequently Asked Questions (FAQ)
Can I attach any quiver to my recurve bow?
Not all quivers are universal. The most important factor is your bow’s design. If your recurve has accessory bushings, a bolt-on quiver is best. If not, you’ll need a strap-on or limb-bolt model. Always check the quiver’s compatibility with recurve bows before buying.
Will a bow quiver make my bow a lot heavier?
It will add some weight, typically about a pound when full of arrows. While noticeable at first, most archers quickly get used to it. The added mass can also help stabilize your bow and quiet it down, which many people see as a benefit.
Does a quiver affect bow accuracy?
It can, but not always negatively. The change in weight and balance might require you to make minor adjustments to your sight or form. However, once you’re used to it, a well-balanced quiver setup should not hurt your accuracy. For many, the added stability improves it.
How many arrows should a bow quiver hold?
Most bow quivers hold between 3 and 6 arrows. A 4 or 5-arrow quiver is a great all-around choice. It provides enough arrows for a typical hunting situation or a round of 3D archery without adding excessive weight.
Is a bow-mounted quiver better than a hip quiver?
It depends on the type of archery you’re doing. For bowhunting, a bow quiver is often preferred for its stealth and convenience. For Olympic-style target archery, where you shoot from a fixed position, a hip quiver or ground quiver is the standard. It’s a matter of personal preference and practicality.
How do I remove the quiver?
Most modern one-piece quivers are designed for quick removal. They usually have a lever, latch, or thumbscrew that allows you to slide the quiver body off the mounting bracket that stays on the bow. This is great for transporting your bow in a case.
What if my arrows don’t fit the quiver gripper?
Arrow grippers are designed for standard arrow shaft diameters. If you use very thin or very thick arrows, you might need a quiver with an adjustable gripper. Some high-end quivers allow you to swap out the gripper to match your arrow size perfectly.
Conclusion: You’re Ready to Go!
There you have it—everything you need to know to confidently attach a quiver to your recurve bow. By following these simple steps, you’ve added a huge amount of convenience and efficiency to your archery setup. You’ve learned how to identify your bow’s mounting system, choose the right quiver, and install it securely for a rattle-free fit.
Remember, the goal is to make your equipment work for you. Don’t be afraid to make small adjustments to get the balance and feel just right. The more comfortable you are with your gear, the more you can focus on what really matters: making a great shot.
So load up your new quiver, head to the range, and get some practice in. Feel how the bow handles and enjoy the freedom of having your arrows right where you need them. Happy shooting!