To replace a nock on a fiberglass arrow, gently heat the old nock with a hairdryer or hot water to soften it. Then, use pliers or a nock tool to twist and pull it straight out. Clean the inside of the arrow shaft, align the new nock with the cock feather, and press it firmly into place.
Hello, fellow archers! Salman Arfeen here. If you’ve ever had that sinking feeling when you see a cracked or broken nock on your favorite fiberglass arrow, you’re not alone. It’s a common issue, especially when you’re just starting out. You might think the arrow is ruined, but I’m here to tell you that’s not the case at all. Replacing a nock is one of the easiest and most important skills you can learn in archery. It saves you money and keeps you shooting safely. In this guide, I’ll show you a genius, beginner-friendly way to get it done in minutes. Let’s get you back to the range!
Why You Need to Replace Your Arrow Nocks
You might be tempted to ignore a tiny crack in a nock, but that small piece of plastic is incredibly important. It’s the only thing connecting your arrow to the immense power of your bowstring. A faulty nock isn’t just a minor inconvenience; it’s a serious risk. Let’s break down why replacing them is non-negotiable.
Safety is Always First
This is the most critical reason. A damaged nock can fail to grip the bowstring properly. If it breaks or slips off during your draw, the bow can “dry fire.” A dry fire is when the bowstring is released without an arrow to absorb its energy. That energy has to go somewhere, and it goes right back into the bow limbs, which can cause them to crack, splinter, or even explode. This can lead to serious injury. A $0.50 nock is a cheap insurance policy against a damaged bow and a trip to the emergency room. According to USA Archery safety guidelines, equipment inspection before every shot is fundamental to preventing accidents.
Accuracy and Consistency
Archery is all about consistency. You want every arrow to fly the same way. A loose, warped, or cracked nock will cause the arrow to leave the bowstring inconsistently. This wobble, however small, will send your arrow off-target. You might blame your form or your aim, when the real culprit is a faulty nock. A fresh, properly seated nock ensures a clean, consistent release every single time, which is the foundation of tight arrow groups and improved accuracy.
Protecting Your Investment
Fiberglass arrows are durable and budget-friendly, making them perfect for beginners. But they aren’t free! A single arrow can cost a few dollars, and a set can be a significant purchase. Nocks, on the other hand, are very inexpensive. Replacing a damaged nock costs pennies but saves the entire arrow shaft and its fletching. Learning this simple maintenance skill extends the life of your equipment and protects your investment, allowing you to spend more time practicing and less time buying new gear.
Understanding Your Fiberglass Arrow and Nock
Before we start swapping parts, it helps to know exactly what we’re working with. Understanding the components makes the whole process less intimidating and much more straightforward.
What is a Fiberglass Arrow?
Fiberglass arrows are the workhorses of the beginner archery world. They are made from woven glass fibers held together by resin. This construction makes them tough, straight, and affordable. While not as high-performance as carbon or aluminum arrows, their durability makes them ideal for learning, practice, and recreational shooting where you might miss the target and hit something harder. Their strength is a huge advantage, but even they have a weak point: the nock.
The Humble Nock: A Critical Component
The nock is the small plastic piece at the very back of the arrow. It has a groove that clips onto the bowstring. Its job is simple but vital:
- Secure Connection: It holds the arrow firmly on the string as you draw the bow.
- Energy Transfer: It ensures a smooth and direct transfer of energy from the string to the arrow upon release.
- Proper Alignment: It helps align the arrow correctly on the bowstring and arrow rest.
For most beginner fiberglass arrows, you’ll be dealing with “press-fit” nocks. These are designed to be pressed directly into the hollow end of the arrow shaft, held in place by friction.
Types of Nocks You Might Encounter
While press-fit nocks are most common for fiberglass arrows, it’s good to know about others. This helps you confirm you have the right type.
| Nock Type | Description | Commonly Used On |
|---|---|---|
| Press-Fit (or Insert) Nock | The most common type. It has a shank that is pushed directly into the hollow end of the arrow shaft. Simple and effective. | Fiberglass, Carbon, and Aluminum arrows. |
| Overnock | This nock fits over the outside of the arrow shaft. It’s often found on older or specific types of wooden arrows. | Wood arrows. |
| Pin Nock | This is a two-part system with a metal pin inserted into the shaft and a nock that fits over the pin. It protects the arrow from rear impacts. | High-end Carbon and Aluminum competition arrows. |
| Lighted Nock | A nock with a small, battery-powered LED that lights up when the arrow is shot, making it easy to track the arrow’s flight and find it. | Hunting arrows of all materials. |
For this guide, we are focusing exclusively on the press-fit nock, which is what you’ll almost certainly have on your fiberglass arrows.
Gathering Your Tools: The Simple Toolkit You Need
You don’t need a professional workshop to do this. The “genius way” is all about using simple tools you probably already have at home. Here’s your short and simple list:
- New Replacement Nocks: Make sure you have the correct size for your arrows! We’ll cover how to choose the right ones later.
- Pliers: A pair of regular household pliers will work perfectly. If you have pliers with a rubber grip, that’s even better to avoid scratching the plastic.
- A Heat Source: This is our secret weapon! You can use either a cup of hot water (from the tap or gently heated, not boiling) or a hairdryer on a low setting.
- A Dull Knife or Flathead Screwdriver: For cleaning out the arrow shaft. We want to scrape, not cut.
- Safety Glasses: Always a good idea when working on equipment. Protect your eyes from any flying bits of old plastic.
The “Genius Way”: A Safe and Simple Step-by-Step Guide
Alright, let’s get to it! This method is safe, fast, and doesn’t risk damaging your arrow shaft. Follow these steps, and you’ll be done in no time.
Step 1: Inspect the Old Nock and Arrow Shaft
Before you remove anything, take a close look at the arrow. Is the nock just cracked, or is the damage more severe? Look for any cracks or splinters in the fiberglass shaft right behind the nock. If the arrow shaft itself is damaged, the arrow is no longer safe to shoot and must be discarded. A damaged shaft can break upon release, which is extremely dangerous. If the shaft looks good, you’re ready to proceed.
Step 2: Gently Heat the Old Nock (The Secret Trick!)
Here’s the genius part. Many people try to yank the old nock out with brute force. This can damage the arrow shaft. Instead, we’ll use gentle heat to soften the plastic nock and any adhesive that might be holding it in place, making it much easier to remove.
Method A: The Hot Water Bath
- Heat some water. It needs to be hot, but not boiling. Hot tap water is often sufficient.
- Pour the water into a mug or cup.
- Dip only the nocked end of the arrow into the water. Let it sit for about 30-60 seconds. This will be enough to make the plastic pliable.
Method B: The Hairdryer
- Set a hairdryer to its lowest heat setting.
- Hold the hairdryer a few inches away from the nock.
- Gently warm the nock for about 20-30 seconds, rotating the arrow to heat it evenly. Avoid pointing the heat directly at the shaft for too long, as excessive heat can damage the resin that holds the fiberglass together. As noted by material science resources, like this page from the University of Pennsylvania on polymers, plastics soften significantly with moderate heat.
Step 3: Remove the Old Nock
Now that the nock is warm and soft, it’s time to take it out.
- Grip the nock firmly with your pliers.
- Gently twist the nock back and forth. This will break any remaining seal from glue or friction.
- While twisting, pull the nock straight out from the shaft. It should slide out much more easily now that it’s warm. Don’t wiggle it side-to-side, as this can stress the end of the shaft. A straight pull is best.
Step 4: Clean the Arrow Shaft
A clean surface is essential for a good fit. Look inside the end of the arrow shaft. You might see old bits of plastic or glue residue.
- Take your dull knife or small flathead screwdriver.
- Carefully scrape the inside walls of the shaft to remove any debris.
- Turn the arrow upside down and tap it gently to let any loose particles fall out. The inside of the shaft should be completely clean and smooth.
Step 5: Prepare the New Nock
For press-fit nocks, you generally do not need any glue. The tension fit is designed to hold them in securely. Only use adhesive if the nock feels very loose after you insert it. If you need glue, use a tiny drop of a flexible, archery-specific nock cement. Do not use superglue, as it becomes brittle and can make future removal nearly impossible.
Step 6: Install the New Nock
This is the final and most satisfying step!
- Look at your arrow’s fletching (the “feathers” or vanes). You’ll see one vane that is a different color. This is called the “cock vane.”
- Align the new nock so that the slit (the part that grabs the string) is perpendicular (at a 90-degree angle) to the cock vane. For most bows, the cock vane should point up or away from the bow riser when nocked.
- Once aligned, push the nock into the shaft with your thumb. It should go in part of the way.
- To seat it fully, place the nock against a hard, flat surface (like a tabletop or workbench) and press down firmly on the tip of the arrow. You should feel it pop securely into place. Do not hammer the nock in!
Step 7: Final Check and Alignment
Your new nock is in! Just do one last check. Make sure it’s fully seated and perfectly aligned with the fletching. Give it a gentle twist with your fingers. It should be snug and not spin freely. If it does, the nock might be the wrong size, or you may need a tiny bit of nock cement.
Congratulations! You’ve just replaced your arrow nock the smart, safe, and genius way.
Common Mistakes to Avoid (And How to Fix Them)
Even a simple process can go wrong. Here are a few common pitfalls for beginners and how you can steer clear of them.
| Mistake | The Unfortunate Consequence | How to Avoid or Fix It |
|---|---|---|
| Using too much force to remove the nock without heat. | You can crack or splinter the end of the fiberglass arrow shaft, ruining the entire arrow. | Always use gentle heat! A minute in hot water saves you from a costly mistake. Patience is key. |
| Using the wrong size nock. | A nock that’s too small will be loose, affecting accuracy and potentially falling out. A nock that’s too big can crack the shaft when you force it in. | Always match the nock to your arrow’s specifications. Take an old nock to an archery shop to get an exact match if you’re unsure. |
| Not cleaning the shaft properly. | The new nock won’t seat fully or straight, leading to wobbly arrow flight and poor accuracy. | Take an extra 30 seconds to thoroughly scrape and clear out any old glue or plastic bits. A clean fit is a perfect fit. |
| Overheating the arrow shaft. | Excessive heat can weaken the resin that binds the fiberglass, compromising the structural integrity of the arrow. | Use low, indirect heat. Hot water is safer than a heat gun. If using a hairdryer, keep it moving and don’t let one spot get too hot. |
| Misaligning the nock with the fletching. | Your arrow won’t sit correctly on the rest, causing poor clearance and erratic flight. The fletching might hit the bow upon release. | Double-check your alignment before you press the nock in all the way. The groove should be at a 90-degree angle to the cock vane. |
Choosing the Right Replacement Nocks for Your Arrows
Getting the right nock is just as important as installing it correctly. A mismatched nock just won’t work. Here’s how to find the perfect fit.
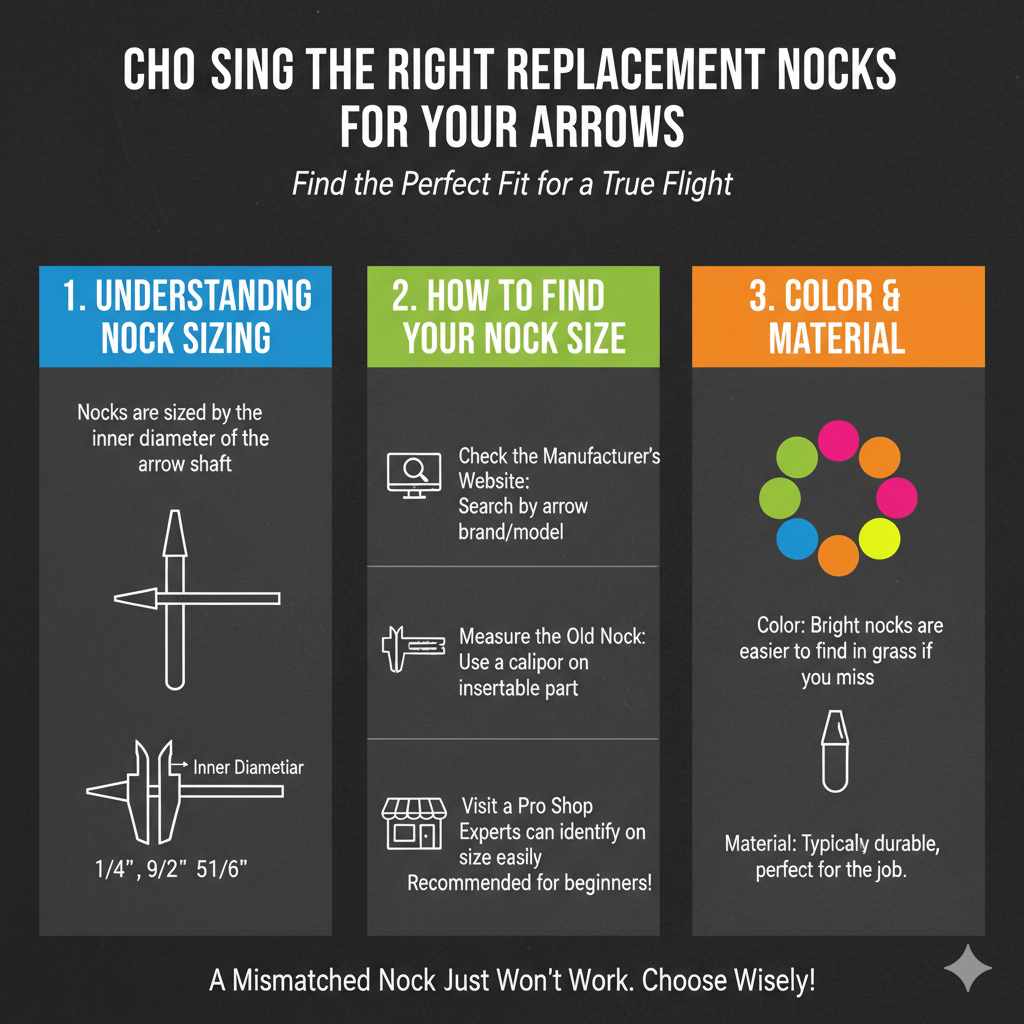
Understanding Nock Sizing
Nocks are sized based on the inner diameter of the arrow shaft. Unfortunately, there isn’t one universal size. Different arrow brands and models have different shaft diameters. The most common sizes for fiberglass arrows are 1/4″, 9/32″, and 5/16″.
How to Find Your Nock Size
- Check the Manufacturer’s Website: If you know the brand and model of your arrows, a quick search online will usually tell you the correct nock size.
- Measure the Old Nock: If you have a caliper, you can measure the diameter of the part of the old nock that inserts into the shaft.
- Visit a Pro Shop: This is the most foolproof method. Take your arrow (or just the old, broken nock) to a local archery shop. The staff can identify the size in seconds and get you the exact replacement you need. They are a fantastic resource for beginners.
Color and Material
Nocks come in a rainbow of colors. While it might seem like a cosmetic choice, color can be practical. Brightly colored nocks (like fluorescent green, pink, or orange) are much easier to find in the grass if you miss the target. The material is almost always a durable plastic, which is perfect for its purpose.
Frequently Asked Questions (FAQ)
Can I use glue on my press-fit nocks?
You shouldn’t need to. They are designed for a tight friction fit. However, if a new nock feels slightly loose after installation, you can use a very small drop of flexible nock adhesive (often called nock cement). Avoid hard glues like superglue, as they can make future replacements very difficult and may damage the shaft.
How do I know what size nock I need?
The best way is to take an old nock or one of your arrows to a local archery pro shop for a perfect match. Alternatively, check the arrow manufacturer’s website for specifications. Don’t guess, as an incorrect size can damage your arrow or affect your shot.
What’s the difference between a fiberglass arrow and a carbon arrow?
Fiberglass arrows are heavier, more durable, and more affordable, making them great for beginners. Carbon arrows are lighter, faster, and have a smaller diameter, offering better performance for intermediate and advanced archers. The process for replacing press-fit nocks is nearly identical for both.
How often should I replace my arrow nocks?
You should inspect your nocks before every shooting session. Replace a nock immediately if you see any cracks, warping, or if it feels loose on the bowstring. There’s no set lifespan; replace them at the first sign of wear and tear to ensure safety.
Is it safe to shoot an arrow with a slightly cracked nock?
Absolutely not. This is one of the most dangerous things you can do in archery. A cracked nock can shatter on release, causing the bow to dry fire. This can destroy your bow and cause serious injury. Never take a chance with a damaged nock.
Why is my new nock so loose or too tight?
This almost always means you have the wrong size nock. If it’s too tight, don’t force it, as you could split the arrow shaft. If it’s too loose, it won’t be safe to shoot. Double-check that you have the correct nock size for your specific arrow model’s inner diameter.
Can I reuse an old nock that I’ve removed?
It’s not recommended. The process of heating and pulling can stress the plastic, and there’s a reason you replaced it in the first place. Nocks are very inexpensive, so it’s always better to use a brand new one for safety and reliability.
Conclusion: You’ve Got This!
And there you have it! Replacing a nock on your fiberglass arrow isn’t some complex, technical task reserved for the pros. It’s a simple, quick, and incredibly valuable skill that every archer should have. By using a little bit of gentle heat, you can make the job easy, safe, and effective, extending the life of your arrows and ensuring every shot you take is as safe and accurate as possible.
Don’t let a broken nock end your day at the range or put a dent in your wallet. Embrace this small act of maintenance. It will build your confidence, deepen your understanding of your equipment, and keep you focused on what truly matters: the joy of sending an arrow perfectly to its target. Now, go grab those tools and give it a try. You’ll be surprised at how easy it is.
Happy and safe shooting!