Enlarge your pointer arrow on a Lenovo laptop easily! Navigate to Mouse Properties via Windows Settings, adjust the pointer size and color for better visibility. This simple change can significantly improve your computer experience.
Sometimes, the little things can make a big difference in how we use our computers every day. One common little thing is the size of the mouse pointer, or arrow, that you move around your screen. If you’ve ever found yourself squinting to see it or struggling to track it, especially on a bright background or if you have vision challenges, you’re not alone. Thankfully, adjusting the size of this pointer on your Lenovo laptop is a straightforward process. This guide will walk you through it step-by-step, making it effortless to find a pointer size that works perfectly for you.
We’ll cover all the settings you need to change, ensuring your pointer is always easy to see and control. No more hunting for that tiny arrow! Let’s get your Lenovo set up so your pointer is just right.
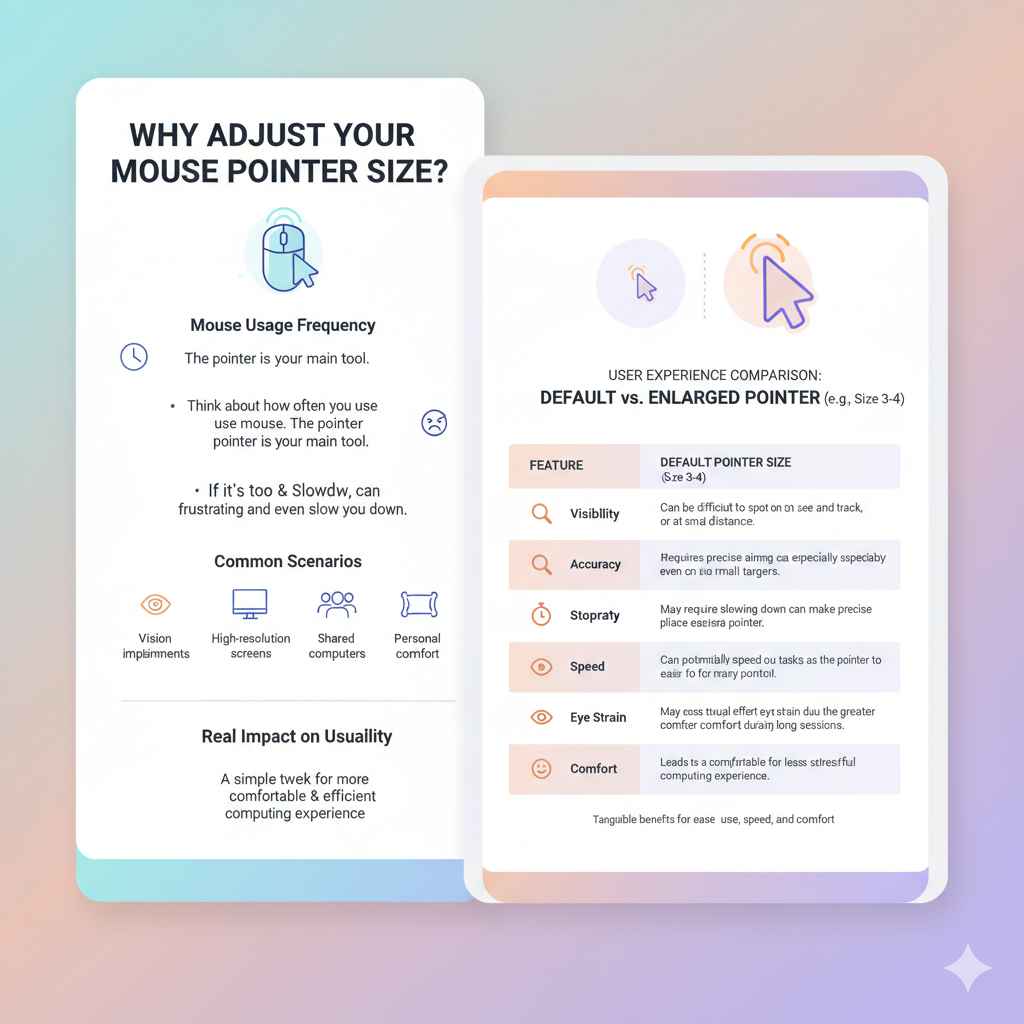
Why Adjust Your Mouse Pointer Size?
Think about how often you use your mouse. The pointer is your main tool for interacting with your computer. If it’s too small, it can be frustrating and even slow you down. This is especially true if you:
- Have any vision impairments, even mild ones.
- Are working on a high-resolution screen where everything appears smaller.
- Are sharing a computer and need a more visible cursor.
- Simply prefer a larger, more noticeable pointer for comfort.
Making this small adjustment can lead to a much more comfortable and efficient computing experience. It’s a simple tweak that has a real impact on usability.
Step-by-Step Guide to Enlarging Your Lenovo Pointer Arrow
Accessing Mouse Settings on Your Lenovo Laptop
The exact steps might look slightly different depending on which version of Windows your Lenovo laptop is running (like Windows 10 or Windows 11), but the core process is very similar. We’ll cover the most common ways.
Method 1: Using Windows Settings (Recommended)
This is the standard and easiest way to change your pointer settings.
- Open Settings: Click on the Start menu (the Windows icon usually in the bottom-left corner of your screen). Then, click on the gear icon to open “Settings.”
- Navigate to Accessibility (or Ease of Access): In the Settings window, look for “Accessibility” (on Windows 11) or “Ease of Access” (on Windows 10). Click on it.
- Select Mouse Pointer & Touch: Within the Accessibility/Ease of Access menu, find and click on “Mouse pointer and touch” (Windows 11) or “Cursor & pointer” (Windows 10).
- Adjust Pointer Size: You’ll see an option for “Pointer style” or “Cursor & pointer size.” There will likely be a slider or several size options. Click on the larger sizes or drag the slider to the right until the pointer is a size you find comfortable.
- Choose a Color (Optional but Helpful): Right below the size options, you might also find options to change the pointer’s color. Experiment with different colors (like a bright yellow or white) against your desktop background to find what stands out best for you.
- See it in Action: As you make changes, you’ll see the pointer change in real-time. Move your mouse around to test the new size and color.
Once you’re happy with the size and color, you can simply close the Settings window. Your new pointer settings will be saved automatically.
Method 2: Using the Control Panel (Classic Method)
This method uses the older Control Panel, which some users might be more familiar with.
- Open Control Panel: Click the Start menu, type “Control Panel,” and click on the Control Panel app when it appears in the search results.
- Find Mouse Settings: In the Control Panel, if it’s set to “Category” view, click on “Hardware and Sound,” then click “Mouse” under “Devices and Printers.” If it’s set to “Large icons” or “Small icons” view, you can click directly on “Mouse.”
- Go to the Pointer Tab: In the Mouse Properties window that opens, click on the “Pointers” tab.
- Change Scheme: Here, you’ll see a “Scheme” option. While this doesn’t directly change the size of the default pointer in the same way as Settings, certain schemes might offer different cursor designs. However, for size adjustments, the Windows Settings method is generally more effective and recommended. For fine-tuning specific pointer types, you can select individual pointers (like “Normal Select,” “Working in Background”) and click browse to change them, but this is more advanced and doesn’t typically involve just increasing the default arrow size.
Note: For simply enlarging the default pointer arrow and changing its color for better visibility on your Lenovo laptop, using the Windows Settings > Accessibility > Mouse pointer and touch (or Cursor & pointer) is the most direct and recommended approach.
Understanding the Pointer Options
When you’re in the mouse settings, you’ll typically see a few key areas:
- Size Slider/Options: This is where you’ll find the controls to make the pointer bigger or smaller. On Windows 11, you often have preset sizes and a slider. On Windows 10, it’s usually a slider.
- Color Options: You can often choose between the default Windows pointer, a black pointer, an inverted pointer, or a custom color. Selecting a bright, contrasting color can be very helpful.
- Pointer Schemes: Sometimes, changing the entire “Scheme” can offer different cursor designs. However, if your goal is just to enlarge the standard arrow, adjusting the size slider is the primary action.
Experimenting with these settings is key to finding what works best for your eyes and your workflow.
Choosing the Right Pointer Size and Color
There’s no single “perfect” size for everyone. It’s a matter of personal preference and how it interacts with your screen and your vision.
Tips for Selecting the Best Size:
- Start Big: If you’re unsure, start by selecting one of the largest available sizes and see how it feels.
- Fine-Tune: Gradually decrease the size using the slider until you find a point where it’s easy to see but not so large that it feels intrusive or covers too much of what you’re trying to click on.
- Consider Screen Resolution: A higher screen resolution means elements on your screen are sharper and smaller. You might need a larger pointer on a 4K display compared to a standard HD display.
- Test on Different Backgrounds: Move your cursor over light areas, dark areas, and busy application windows to ensure it’s visible everywhere.
Tips for Selecting the Best Color:
- Contrast is Key: The goal is for the pointer to stand out against any background.
- Common Choices: Bright yellow, white, or even red can work well. Some systems offer an “inverted” or “black” option which automatically switches between light and dark to provide contrast.
- Avoid Colors Similar to Your Wallpaper: If your desktop background has a lot of blue, a blue pointer might get lost.
Best Practices for Pointer Customization
Beyond just size and color, here are some other aspects to consider that can make using your Lenovo laptop even easier.
Touch Pointer Settings (if applicable)
If your Lenovo laptop has a touchscreen, you might see additional settings related to touch input. While less common for pointer enlargement, it’s worth noting if you see options that seem to relate to touch gestures or how your finger is represented on screen.
Enabling Pointer Trails
Some users find it helpful to enable “pointer trails.” This makes the pointer leave a faint shadow or trail as you move it, which can help some people track its movement. You can usually find this option under advanced mouse settings or within the same accessibility menus.
To enable pointer trails:
- Go back to the Mouse Properties window (via Control Panel > Mouse, or sometimes accessible from the Settings app).
- Look for a tab like “Pointer Options” or “Motion.”
- Check the box that says “Display pointer trails.”
- Adjust the slider for trail length if available.
- Click “Apply” and then “OK” to save your changes.
Test this out – it can be a surprisingly effective way to keep track of your pointer, especially on fast-moving applications.
High Contrast Mode
For users who need very significant visual adjustments, Windows offers a High Contrast mode. This mode changes the overall color scheme of Windows to maximize contrast, which can make the pointer, text, and other interface elements appear much more distinct. While it changes your entire system’s look, it’s a powerful accessibility tool.
You can usually find High Contrast settings under:
- Windows 11: Settings > Accessibility > Contrast themes
- Windows 10: Settings > Ease of Access > High contrast
Be aware that this will alter the entire look of your operating system, not just the mouse pointer.
Troubleshooting Common Issues
While enlarging your pointer is usually straightforward, here are a few things to do if you run into trouble:
- Changes Not Saving: Ensure you’re clicking “Apply” and “OK” in any dialog boxes. Sometimes a restart of an application or even the computer can help if settings seem wonky.
- Pointer Still Hard to See: Revisit the color options. A bright, solid color is usually best. Also, consider the screen’s brightness and contrast settings on your Lenovo laptop itself.
- Accidentally Changing Other Settings: If you’ve made too many changes and want to go back, you can often select “Windows Default” or the original scheme from the pointer options in Settings or Control Panel.
If you are experiencing significant issues with your mouse cursor that don’t seem to be resolved by these settings, it might be worth checking if there are any specific driver updates for your touchpad or mouse available for your Lenovo model. You can often find these on the Lenovo Support website.
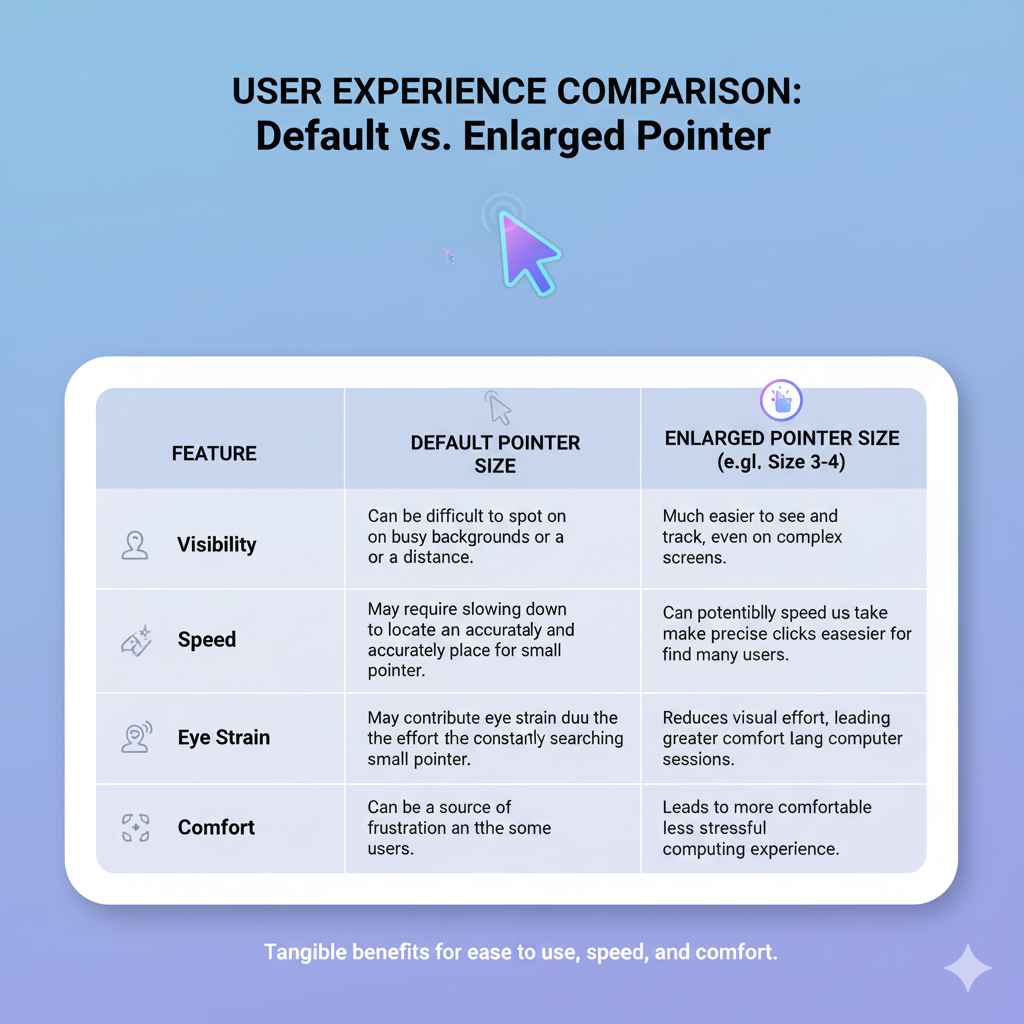
User Experience Comparison: Default vs. Enlarged Pointer
To illustrate the benefits, let’s look at a simple comparison table. Imagine you are trying to quickly select a small icon or click on a link in a dense piece of text.
| Feature | Default Pointer Size | Enlarged Pointer Size (e.g., Size 3-4) |
|---|---|---|
| Visibility | Can be difficult to spot on busy backgrounds or at a distance. | Much easier to see and track, even on complex screens. |
| Accuracy | Requires precise aiming, especially with small targets. | A larger target area can make precise clicks easier for many users. |
| Speed | May require slowing down to locate and accurately place the pointer. | Can potentially speed up tasks as the pointer is easier to find and control. |
| Eye Strain | May contribute to eye strain due to the effort of constantly searching for the small pointer. | Reduces visual effort, leading to greater comfort during long computer sessions. |
| Comfort | Can be a source of frustration for some users. | Leads to a more comfortable and less stressful computing experience. |
As you can see, the enlarged pointer often offers tangible benefits for ease of use, speed, and comfort.
Frequently Asked Questions (FAQ)
Q1: How do I make the mouse pointer bigger on my Lenovo laptop running Windows 11?
In Windows 11, go to Settings > Accessibility > Mouse pointer & touch. Use the slider or size options under “Pointer style” to enlarge the arrow.
Q2: Can I change the color of the pointer on my Lenovo?
Yes! In the same “Mouse pointer & touch” settings on Windows 11 (or “Cursor & pointer” on Windows 10), you can select different pointer colors like white, black, or an inverted option, or choose a custom color.
Q3: I can barely see my pointer on my Lenovo screen, what’s the best solution?
The best solution is to increase the pointer size significantly in your Accessibility settings and choose a bright, contrasting color like yellow or white. You might also consider enabling pointer trails for easier tracking.
Q4: Will changing the pointer size affect performance on my Lenovo laptop?
No, changing the pointer size is a very minor adjustment that does not consume significant system resources and will not negatively impact your Lenovo’s performance.
Q5: Is there a way to reset the pointer to its original size and color if I don’t like my changes?
Yes, in the Mouse Properties (via Control Panel) or Accessibility Settings, you can often select a default “Windows Standard” scheme or reset the individual pointer styles back to their original settings.
Q6: My pointer keeps disappearing on my Lenovo. What can I do?
This could be a software or hardware issue. First, try the accessibility settings to ensure it’s not set to a color that blends in. If it persists, check for driver updates for your touchpad or mouse on the Lenovo Support website. Ensure your mouse is functioning correctly.
Conclusion
Making your mouse pointer larger on your Lenovo laptop is a simple yet incredibly effective way to improve your daily computer interactions. By following the step-by-step guide through Windows Settings, you can easily adjust the size and color of your pointer to perfectly suit your vision and preferences. This small change can lead to fewer mistakes, less eye strain, and a generally more pleasant computing experience. Don’t hesitate to experiment with the different size and color options until you find the perfect setup for you. Your eyes will thank you!