Make your pointer arrow bigger by adjusting system settings for display size, resolution, or specific accessibility features. This simple tweak can significantly improve visibility and comfort while using your computer, especially for those with visual needs or who prefer a larger cursor. Follow these easy steps to find the perfect size for your pointer arrow.
Welcome, fellow archery enthusiasts! Ever feel like your computer’s pointer arrow is playing hide-and-seek? It’s a common frustration, especially when you’re trying to focus on detailed tasks or when glare makes it tricky to spot. Like finding the perfect nock or drawing your bowstring smoothly, managing your computer’s cursor shouldn’t be complicated. The good news is, you don’t need a special tool or advanced technical skills to make that little arrow more visible. We’re going to walk through simple, effective ways to enlarge your pointer arrow. Get ready to feel more confident and comfortable with every click!
Why Making Your Pointer Arrow Bigger Matters
In the world of archery, the right equipment makes all the difference. A perfectly tuned bow, a comfortable grip, and clear sight pins help you aim true. Similarly, on your computer, the pointer arrow is your primary tool for interaction. If it’s too small or hard to see, it can slow you down, cause frustration, and even lead to misclicks. This is especially true for:
- Beginners who are still getting used to computer navigation.
- Individuals with visual impairments where a larger cursor can make a huge difference.
- Anyone working on a high-resolution display where elements can appear smaller.
- Users who simply prefer a more prominent cursor for better tracking.
Adjusting the size of your pointer arrow is a simple but powerful way to enhance your computing experience, making it more efficient and enjoyable. Let’s dive into how you can achieve this right away!

Understanding Pointer Arrow Settings
Most operating systems offer built-in options to customize the appearance of your mouse pointer, also known as the cursor or arrow. These settings are usually found within the system’s “Mouse” or “Accessibility” menus. They allow you to change not only the size but also the color and even the shape of your pointer, tailoring it to your specific needs and preferences. Think of it like choosing the right fletching for your arrows – a small adjustment that improves performance and control. These settings are designed to make your digital experience smoother and more inclusive.
How to Make Your Pointer Arrow Bigger: Step-by-Step Guides
We’ll cover the most popular operating systems: Windows and macOS. These guides are straightforward, designed for ease of use, and will have your pointer arrow looking just right in no time. Let’s get started!
For Windows Users
Making your pointer arrow bigger on Windows is a quick process. These steps apply to Windows 10 and Windows 11, with very similar paths for older versions.
Method 1: Using Display Settings (Recommended for Overall Size)
This method affects the overall scaling of your display, which includes the pointer. It’s great if you find everything on your screen a bit too small.
- Open Settings: Click the Start button (the Windows logo) and select the gear icon for “Settings.” Or, press
Windows Key + Ion your keyboard. - Navigate to Display: In the Settings window, click on “System,” and then select “Display” from the sidebar on the left.
- Adjust Scale: Under the “Scale & layout” section, you’ll see an option for “Change the size of text, apps, and other items.” There’s a dropdown menu with percentages. Select a higher percentage (e.g., 125%, 150%) to make everything, including your pointer, larger.
- Apply Changes: Windows will confirm the changes. You might need to sign out and sign back in for some changes to take full effect.
Method 2: Using Mouse Pointer Settings (Specific Pointer Size)
This method allows you to specifically change the size and color of your mouse pointer without affecting other on-screen elements.
- Open Settings: Again, click the Start button and select “Settings” (
Windows Key + I). - Navigate to Accessibility: Click on “Accessibility” (or “Ease of Access” in older Windows versions).
- Select Mouse Pointer: In the Accessibility menu, find and click on “Mouse pointer.”
- Choose Pointer Style: You’ll see several options for the mouse pointer style:
- White: Default pointer.
- Black: Inverted pointer.
- Inverted: Changes color based on what it’s pointing at.
- Custom: Allows you to pick your own color.
- Adjust Size: Below the style options, you’ll find a slider labeled “Text cursor size” (or similar, depending on the specific Windows version). Drag this slider to the right to increase the size of your pointer arrow. You’ll see a live preview of the pointer size as you adjust it.
- Select Size and Color: For even more control, under “Mouse pointer style,” you might have options to pick a specific size (like large or extra-large) and a custom color if you’ve chosen the custom style.
Using the specific Mouse Pointer settings (Method 2) is often the most direct way to achieve a bigger pointer arrow without altering the size of other text and apps. It’s like adjusting the sight on your bow without touching the draw weight.
For macOS Users
Mac users can also easily adjust their pointer size through System Settings. Here’s how:
- Open System Settings: Click the Apple menu in the top-left corner of your screen and select “System Settings” (or “System Preferences” in older macOS versions).
- Navigate to Accessibility: Scroll down the sidebar and click on “Accessibility.”
- Select Pointer: In the Accessibility options, click on “Display” (or “Screen” in some older versions), and then select “Pointer.”
- Adjust Pointer Size: You’ll see a slider labeled “Pointer size.” Drag this slider to the right to increase the size of your pointer. A preview of the pointer will appear as you adjust it.
- Change Pointer Color (Optional): Below the size slider, you can also change the “Pointer color.” This can make it stand out more, especially against different backgrounds. You can choose from a palate of colors or select “other” for more options.
- Close Settings: Once you’re happy with the size and color, simply close the System Settings window. The changes are applied instantly.
macOS makes this incredibly intuitive. It’s designed to be user-friendly, much like how archery equipment is designed for consistent performance.
Advanced Customization and Third-Party Tools
While the built-in options are usually sufficient, there are times when you might want even more control. For Windows users, third-party software can offer an expansive range of cursor customization beyond what the operating system provides natively. These tools can offer animated cursors, custom themes, and more advanced size and color controls.
Some useful resources for finding custom cursors include:
- WinCustomize: A popular site for Windows customization, offering a huge library of cursors.
- DeviantArt: Many artists share custom cursor packs on this platform.
When using third-party software or downloaded cursor themes, always exercise caution:
- Download only from reputable sources to avoid malware.
- Read reviews and check compatibility with your operating system.
- Be aware that some advanced customization might require administrator privileges.
For context on cursor behavior in different applications, you might find resources from Microsoft’s accessibility page helpful, as they detail how various accessibility features interact with the Windows environment.
Tips for Choosing the Right Pointer Size and Style
Selecting the perfect pointer size and style is a personal journey, much like finding your ideal archery stance. What works best for one person might not be ideal for another. Here are some tips to help you find your sweet spot:
Consider Your Environment
- Screen Resolution: Higher resolutions pack more pixels onto your screen, making everything appear smaller. If you have a 4K monitor, you’ll likely need a larger pointer than someone with a standard HD display.
- Lighting Conditions: If you often work in brightly lit rooms or face screen glare, a bold, high-contrast pointer color and larger size can significantly improve visibility.
- Task Complexity: For detailed tasks like photo editing or graphic design, a slightly larger pointer can offer more precision. For general web browsing, a medium-large size is usually comfortable.
Experiment with Styles
Don’t be afraid to try different pointer styles provided by your operating system:
- Solid Colors: White, black, or custom colors can offer consistent visibility.
- Inverted/Outline Styles: These can automatically adapt to the background color, making them stand out better in various situations. For instance, an inverted pointer might appear black on a white background and white on a black background.
Test and Adjust
The best way to find what works is to try it. Set a larger size, use your computer for a while, and see how it feels. If it’s still not quite right, make small adjustments. It’s a process of fine-tuning. Aim for a size that is easily visible without being so large that it obstructs your view of what you’re clicking on.
Troubleshooting Common Issues
Sometimes, even after making adjustments, you might encounter a few hiccups. Here’s how to tackle them:
Pointer Size Doesn’t Change
Cause: Settings might not have been applied correctly, or another application is interfering. On some systems, especially company-managed computers, administrator rights might be needed to change these settings.
Solution:
- Restart your computer.
- Ensure you are logged in with an administrator account or have permissions for these changes.
- Check if a specific application is overriding system settings (rare, but possible with certain graphics or utility software).
- Look for a specific “apply” button in the settings window, although most modern OS versions apply changes instantly.
Pointer Becomes Pixelated or Blurry
Cause: This can happen if the chosen pointer size is too extreme for the display’s resolution or if the cursor theme is low quality.
Solution:
- Try a slightly smaller size.
- If using custom cursors, try a different set known for higher quality.
- Ensure your display drivers are up to date. Outdated drivers can sometimes cause graphics rendering issues. You can typically find driver updates on your computer manufacturer’s website or through your Windows Update settings.
Pointer Disappears or Freezes
Cause: This is usually a driver issue or a conflict with hardware.
Solution:
- Update your mouse drivers. Go to Device Manager (search for it in Windows search), find your mouse, right-click, and select “Update driver.”
- Try a different USB port for your mouse.
- Test with a different mouse if possible to rule out hardware failure.
- If using a wireless mouse, check the batteries and receiver connection.
Understanding Accessibility Features
Adjusting pointer size is just one part of a larger picture concerning computer accessibility. Accessibility features are designed to make technology usable for everyone, regardless of their abilities. Beyond pointer size, most operating systems offer:
- High Contrast Modes: These change the color scheme of your entire operating system to maximize contrast between text and backgrounds, making everything easier to read.
- Magnifier Tools: Built-in software that enlarges portions of your screen, similar to a magnifying glass.
- Sticky Keys and Filter Keys: These assist users who have difficulty pressing multiple keys at once or holding keys down.
- Text Size Adjustments: Options to change the general text size across your system.
For more information about comprehensive accessibility options on Windows, you can visit Microsoft’s official support page on accessibility features. These features, including pointer customization, are vital for creating an inclusive digital environment.
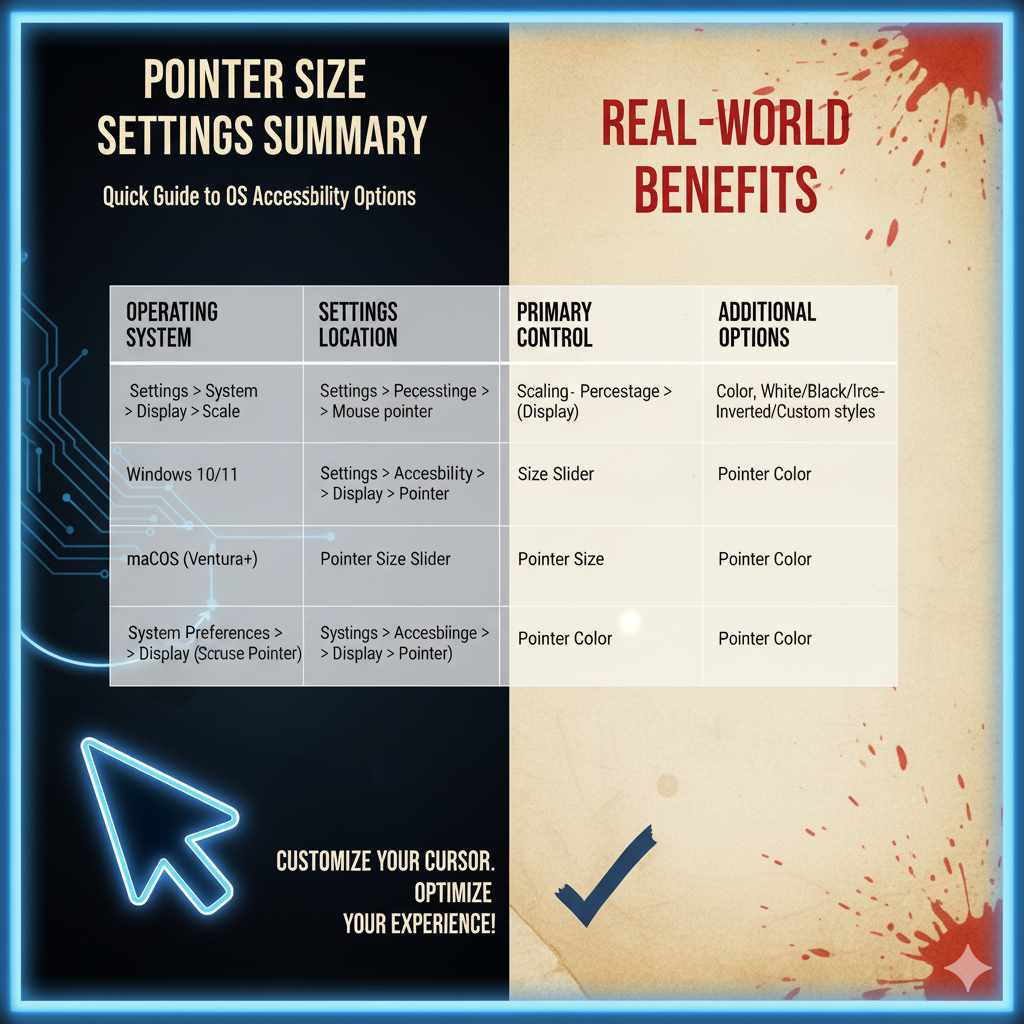
Table: Pointer Size Settings Summary
Here’s a quick look at where to find pointer size settings across popular operating systems and the typical options you’ll encounter:
| Operating System | Settings Location | Primary Control | Additional Options |
|---|---|---|---|
| Windows 10/11 | Settings > System > Display > Scale & layout OR Settings > Accessibility > Mouse pointer | Scaling Percentage (Display) or Size Slider (Mouse Pointer) | Pointer color, White/Black/Inverted/Custom styles |
| macOS (Ventura and later) | System Settings > Accessibility > Display > Pointer | Pointer Size Slider | Pointer Color |
| macOS (Monterey and earlier) | System Preferences > Accessibility > Display > Screen (or Pointer) | Pointer Size Slider | Pointer Color |
FAQ: Your Pointer Arrow Questions Answered
Q1: Can I make my pointer arrow a different shape?
A1: Yes, in Windows, under “Mouse pointer” settings, you can often choose from different styles like white, black, inverted, or custom colors. macOS also allows for custom colors. Some third-party tools offer entirely different cursor shapes.
Q2: Will changing my pointer size affect my gaming performance?
A2: Generally, no. Changing the pointer size is a visual setting and doesn’t typically impact your computer’s processing power or graphics performance, so it shouldn’t affect gaming. Ensure you select a size that’s visible without being distracting during gameplay.
Q3: I’ve increased the pointer size, but it still feels too small. What else can I do?
A3: If increasing the pointer size isn’t enough, consider using the “Magnifier” tool available in both Windows and macOS accessibility settings. This feature enlarges a portion of your screen, making everything, including your pointer, much bigger within that magnified area.
Q4: Is it safe to download custom cursor packs from the internet?
A4: Be cautious. Always download from reputable websites known for sharing safe customization files. Look for reviews and avoid suspicious links. Install custom cursors carefully, and it’s wise to have antivirus software running.
Q5: My pointer is now too big and covers up text. How do I fix this?
A5: You might have selected too large a size. Revisit your pointer settings and try a slightly smaller size. If you utilized display scaling in Windows, try a lower percentage. Finding the balance is key.
Q6: Does changing pointer size require restarting my computer?
A6: Most modern operating systems apply pointer size and color changes instantly. However, very rarely, or if you’ve made widespread display scaling changes in Windows, a sign-out/sign-in or a full restart might be necessary for everything to adjust correctly.
Conclusion: A Clearer View, A Brighter Computing Experience
There you have it! Making your pointer arrow bigger is a simple, yet incredibly effective, way to enhance your computing comfort and efficiency. Whether you’re navigating complex spreadsheets, editing photos, or simply browsing the web, a clearly visible cursor can make all the difference.
We’ve covered how to do this in both Windows and macOS, explored the nuances of choosing the right size and style, and even touched upon troubleshooting common issues and the broader world of accessibility. Remember, just like in archery, practice and small adjustments lead to significant improvements. Don’t hesitate to experiment until you find the perfect fit for your eyes and your workflow.
So go ahead, adjust that pointer, and enjoy a clearer, more comfortable, and more productive time at your computer. Happy clicking!