To draw a Minecraft bow and arrow on paper, you need to simplify the blocky shapes into basic 2D forms. Start with the iconic bow’s curved center and straight limbs, adding string. Then, draw a simple rectangular arrow with fletching at the back. Focus on the blocky silhouette for that instantly recognizable look.
Welcome! Are you looking to sketch your favorite Minecraft weapon? The bow and arrow are essential tools in the game, but sometimes capturing that distinct, blocky charm on paper can feel tricky. Many new artists struggle to translate the 3D pixel art into a simple, recognizable 2D drawing. Don’t worry; it is much easier than you think!
We are going to break this down into fun, easy steps. Forget about complex shading or perspective. We will focus purely on the basic shapes that make the Minecraft bow look like itself. By the end of this guide, you will have a clean, awesome-looking drawing ready to show off. Let’s grab our pencils and get started!
Why Draw the Minecraft Bow and Arrow?
The Minecraft bow is more than just a weapon; it represents exploration, survival, and accuracy. Whether you are drawing for fun, making a gift, or just trying to capture your favorite in-game moment, knowing how to draw it simply is a great skill to have.
This guide focuses on simplicity. We are aiming for the classic, recognizable look, perfect for beginners. Think of this as learning the foundational shape before adding extra detail. This clean approach makes the drawing process fast and rewarding.
Materials You Will Need for Drawing
Before we jump into the steps, let’s make sure you have everything ready. You don’t need fancy art supplies for this! Simple tools work best for capturing the blocky Minecraft style.
Essential Drawing Tools:
- Pencil (HB or #2): Great for light sketching. We want to make light lines first so we can erase them later.
- Eraser: A good quality eraser will keep your paper clean when fixing small mistakes.
- Paper: Any standard printer or sketch paper will work perfectly.
- Black Fineliner Pen (Optional): This is for tracing over your final pencil lines to make them sharp and permanent.
- Coloring Supplies (Optional): If you want to color it in, have brown, tan, and maybe yellow/orange ready for the classic look.
For those interested in the history of game art and pixel design, you might find resources like those from the World Wide Web Consortium (W3C) helpful in understanding digital design principles, though our focus here is simple hand-drawing.
Step-by-Step Guide: How Do You Draw a Minecraft Bow and Arrow?
We will tackle the bow first, as it is the main part. Then we will add the arrow. Remember to keep your pencil lines light in the initial stages!
Part 1: Drawing the Minecraft Bow
The Minecraft bow is not a smooth, elegant curve like a real wooden bow. It is made of distinct, rectangular segments, giving it that instantly recognizable blocky look.
Step 1: Draw the Central Grip Block
Start by drawing a small, vertical rectangle in the center of your paper. This is the thickest part of the bow where Steve or Alex would hold it. Make it wider than it is tall—maybe about 1 inch wide and 1.5 inches tall, depending on how big you want your drawing to be.
Step 2: Sketch the Bow Limbs (The Arms)
From the top and bottom edges of your central rectangle, draw two slightly shorter, horizontal rectangles extending outwards. These are the limbs of the bow. These should be parallel to each other, sticking out left and right. They should be slightly thinner than the center grip.
Think of it like a plus sign (+) that has been squashed to look like a thick, straight line extending from the center.
Step 3: Adding the “Bend” (The Blocky Curve)
This is key to making it look like Minecraft! Instead of drawing a smooth curve connecting the ends of the limbs, we will use straight lines to suggest the curve.
- On the left limb, draw a short vertical line upwards near the end.
- Then, draw a slightly longer horizontal line pointing towards the left.
- Repeat this on the right side, but curve the ends slightly inward toward each other, making a very rough, angular ‘C’ shape using straight segments.
The goal is to make the ends look like they are angled in, ready to hold the string, but without any actual smooth arcs.
Step 4: Drawing the Bowstring
The bowstring in Minecraft connects the very tips of the limbs. Since the tips are blocky, the string appears slightly pulled.
- Draw a simple, slightly taut straight line connecting the inside edges of the two angled ends you created in Step 3. It should look tight, not droopy.
- You can add a small, thin horizontal line right where the string crosses the central grip block to show where the arrow rests.
Part 2: Drawing the Minecraft Arrow
The Minecraft arrow is very simple: a long stick with a pointed tip and square feathers (fletching) at the back.
Step 5: Drawing the Arrow Shaft
Decide where you want your arrow pointing (usually straight out from the bow). Draw a long, thin, straight rectangle extending from the center grip area. This is the shaft.
If the bow is drawn horizontally, the arrow should also be horizontal, lying just in front of the bowstring.
Step 6: Creating the Arrowhead
At the front tip of the shaft, draw a small triangle pointing forward. This is the blocky arrowhead. It doesn’t need to be sharp; just a simple triangle attached to the end of the shaft rectangle.
Step 7: Adding the Fletching (Feathers)
At the very back end of the arrow shaft (the end farthest from the arrowhead), we add the fletching. In Minecraft, these are blocky and rectangular.
- Draw a small, square shape attached to the very end of the shaft.
- From this back square, draw two or three small, rectangular “fins” sticking out. They should look like small blocks stacked behind the shaft, not delicate feathers.
Step 8: Finalizing and Inking
Now that you have the basic shapes down, it’s time to clean it up.
- Carefully erase any overlapping construction lines inside the bow and arrow.
- If you are using a fineliner pen, trace over your final pencil lines. Make the outline firm and dark.
- Let the ink dry completely before erasing any remaining pencil marks.
Coloring Your Blocky Weapon
To complete the look, we need the classic Minecraft colors. The bow is generally made of wooden textures, and the arrow has a distinct look as well.
Minecraft Bow Color Guide:
The classic bow texture uses browns and tans. Think of it as light brown wood.
| Part of Bow | Recommended Color | Notes |
|---|---|---|
| Main Body (Limbs and Grip) | Medium Brown or Tan | Keep the colors relatively flat; avoid excessive blending to maintain the blocky feel. |
| Bowstring | Dark Gray or Black | This provides high contrast against the wood. |
Minecraft Arrow Color Guide:
The arrow is usually simpler, combining wood and stone textures.
| Part of Arrow | Recommended Color | Notes |
|---|---|---|
| Shaft | Light Tan or Pale Yellow | Represents wood or reed. |
| Arrowhead | Gray or Silver | To mimic stone or iron. |
| Fletching (Feathers) | Dark Brown or Red/Orange | In classic Minecraft, the fletching often matches the shaft color or is a contrasting block color like red. |
If you decide to use colored pencils or markers, remember that Minecraft art relies on solid blocks of color. Try to keep your shading minimal to honor the source material!
Tips for Capturing the Minecraft Aesthetic
Drawing like Minecraft is really about subtraction—removing smooth curves and replacing them with sharp angles. Here are a few coaching tips to make your drawings look authentic.
Focus on the Angles:
- No True Curves: If you find yourself drawing a smooth arc, stop! Replace it with two or three short, straight lines meeting at slight angles. This mimics the segmented look of pixels.
- Uniform Thickness: Keep the thickness of the bow limbs consistent. In the game, all parts have a clear, defined thickness.
Proportional Simplicity:
The Minecraft bow is relatively short and thick compared to a realistic longbow. Ensure the overall length of the bow is only slightly longer than the arrow shaft when it is “nocked.”
Practice Drawing Cubes:
Since everything in Minecraft is based on cubes, practicing drawing simple cubes (or cuboids) will drastically improve your ability to draw any item, including weapons. A great resource for understanding 3D shapes in drawing is often found in introductory guides to technical drawing, which emphasize orthographic projections, though we use simplified versions here.
To further enhance your understanding of how these simple shapes build complexity, you might look at tutorials explaining isometric drawing, which is essentially how 3D objects are represented in many video games.
Troubleshooting Common Drawing Mistakes
Even simple drawings can hit a snag. Here are solutions for the most common issues beginners face when drawing the Minecraft bow.
| Problem | Why it Happens | Quick Fix |
|---|---|---|
| The bow looks too smooth. | You might be using a continuous, sweeping line instead of angular segments. | Go back and intentionally break the curve into three straight sections. Sharp corners equal Minecraft! |
| The arrow seems too flimsy. | The shaft might be drawn too thin compared to the bow’s thick limbs. | Make the arrow shaft about half the thickness of the central grip block. It needs substance. |
| The overall drawing looks unbalanced. | The limbs of the bow are uneven in length or angle. | Use a ruler (or just hold your pencil up) to check that the left limb is the same length as the right limb. |
| The string looks droopy. | You drew the string with a curve, suggesting slack. | Erase and draw a perfectly straight line connecting the two tips. The bow is always drawn ready to fire. |
Advanced Step: Drawing the Bowstring Drawn Back (Nocked Arrow)
Once you master the resting pose, you might want to draw the bow in action. This means drawing the string pulled back and an arrow placed on it.
Step A: Draw the Nocked Arrow Position
Instead of the arrow resting horizontally in front of the string, you will now draw it overlapping the string, slightly angled toward the shooter (to the right, if the bow opens left).
Step B: Redrawing the Bowstring
This is the most significant change. The string must now form a pronounced V-shape or a deep curve between the two limb tips.
- Keep the bow limbs the same.
- Draw the new string line running from the top tip, sharply inward toward the center, passing behind where the arrow shaft will sit.
- Draw the line continuing from the center point, sharply outward to the bottom tip.
Step C: Positioning the Drawn Arrow
The arrow shaft should now sit exactly along the drawn string line, resting where the string bends inward.
Ensure the arrowhead points outward (left) and the fletching is near the grip block. The arrow should look slightly compressed by the tension of the string.
Drawing tension requires slightly more complex lines, but remember the fundamental rule: keep every connection point angular! This action pose is challenging but incredibly rewarding once you get the angles right.
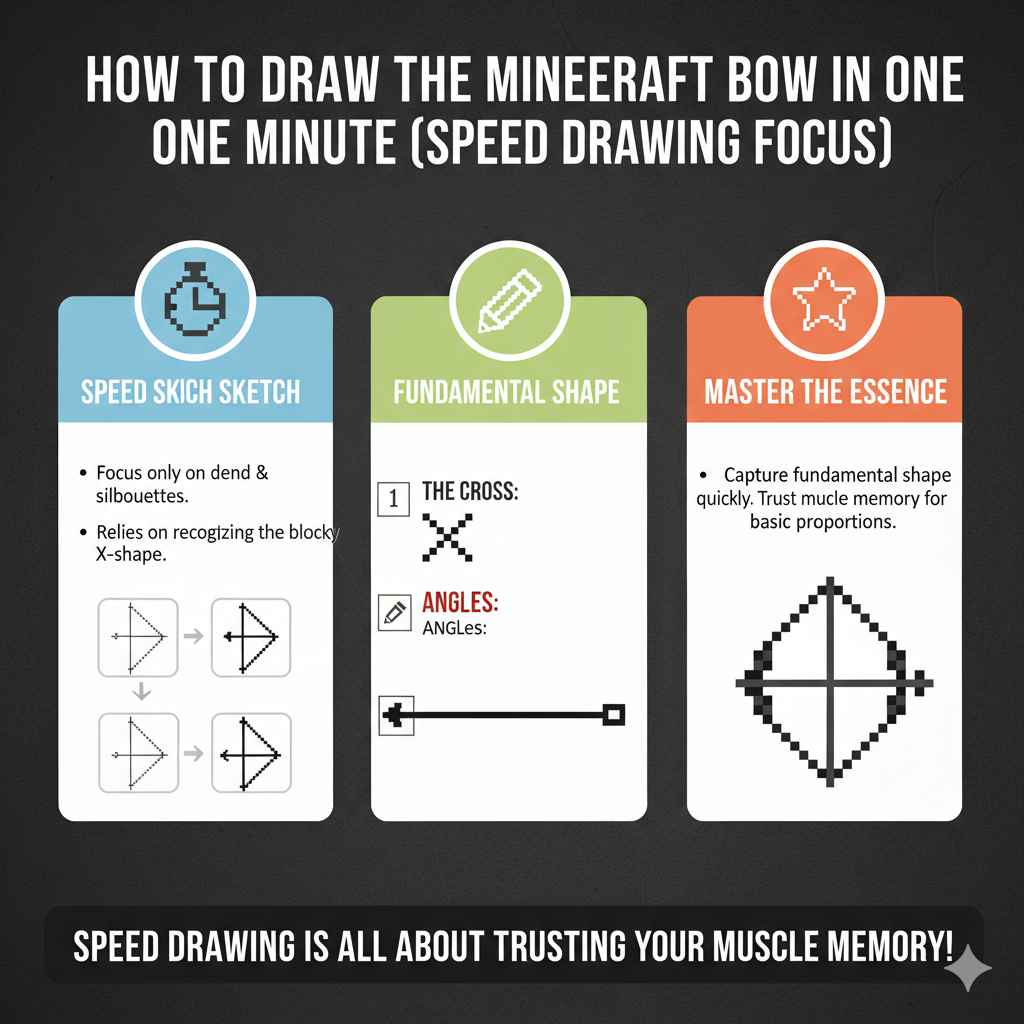
How to Draw the Minecraft Bow in One Minute (Speed Drawing Focus)
If you need a super-fast sketch for a quick doodle or background element, focus only on the silhouettes. This relies heavily on recognizing the blocky X-shape.
- The Cross: Draw a thick, short vertical line. Draw a slightly thicker, wider horizontal line crossing it in the middle.
- The Angles: At the ends of the horizontal line, add short diagonal lines pointing inward, completing the ‘C’ shape outline.
- The Arrow: Draw one long, thin rectangle coming out from the center, with a small triangle on the tip and a small square on the end.
If you can draw that fundamental shape quickly, you’ve captured the essence of the Minecraft bow. Speed drawing is all about trusting your muscle memory for those basic proportions.
Frequently Asked Questions (FAQ) about Drawing Minecraft Items
Q1: Should I use a ruler to draw the straight lines?
A: For beginners aiming for the perfect blocky look, yes, a ruler can help ensure your limbs and shaft are perfectly straight and parallel. However, experienced artists often freehand these lines to give the drawing a slightly more organic, hand-drawn feel.
Q2: How do I make the wood look textured without complex shading?
A: To imply wood texture simply, use very light, thin, parallel lines running along the length of the bow limbs and arrow shaft. Keep these lines close together but not touching. This hatching technique adds texture without needing deep shading.
Q3: Is the bow symmetrical in the game?
A: Yes, the basic resting bow is highly symmetrical. The left side is a mirror image of the right side. Paying close attention to symmetry will make your drawing look immediately more accurate.
Q4: What if my arrow is too short?
A: The arrow shaft is quite long relative to the bow’s width. If your arrow looks too stubby, try making the shaft three to four times the length of the bow’s central grip block. A long shaft emphasizes the length needed for flight.
Q5: Do I have to color it brown?
A: While the standard bow is brown wood, remember you can be creative! In the game, bows can be crafted from various materials. Feel free to draw a white, blue, or even black bow if you prefer a different aesthetic, just maintain the blocky shape.
Q6: How can I practice drawing other Minecraft tools?
A: Follow the same philosophy: break everything down into basic shapes. The pickaxe is three rectangles. The sword is two rectangles joined. Start with the simplest shapes first, just like we did with the bow.
Q7: What is the best way to draw the string so it looks tight?
A: A tight string in a 2D drawing is achieved by making the line perfectly straight and placing it very close to the center grip block. If it’s too far away from the grip, it will look loose.
Conclusion: You Are Now Ready to Create!
Mastering how to draw a Minecraft bow and arrow is all about simplifying complex shapes into their most basic, blocky components. You have learned that the key isn’t smooth artistry; it’s about clean angles, basic rectangles, and recognizing that iconic silhouette.
We covered everything from the initial sketch of the grip block to the final coloring touches that bring that classic Minecraft texture to life. Whether you are drawing the bow at rest or visualizing the tension of a drawn string, remember the steps we took today: light pencil lines first, then firm outlines.
Archery, both in the game and in real life, requires focus and practice. Keep practicing these simple geometric steps, and soon you will be able to sketch any Minecraft weapon with confidence. Every sketch you complete builds your confidence and sharpens your artistic eye. Now go grab that pencil, and show off your new skill!