Are you struggling to highlight key points in your iMovie projects? Adding arrows can make a world of difference.
Whether you’re creating a tutorial, a presentation, or just want to emphasize something in your video, arrows can guide your audience’s attention exactly where you want it. But how do you add them in iMovie without breaking a sweat? This guide will walk you through simple, step-by-step instructions to seamlessly incorporate arrows into your videos.
Imagine the clarity and professionalism your projects will exude with this handy trick up your sleeve. Dive in to discover just how easy it can be to enhance your video storytelling skills!

Credit: www.youtube.com
Preparation
Find arrow images online. Choose clear and simple ones. Pick arrows that fit your video theme. Save them to your computer. Make sure they are easy to see.
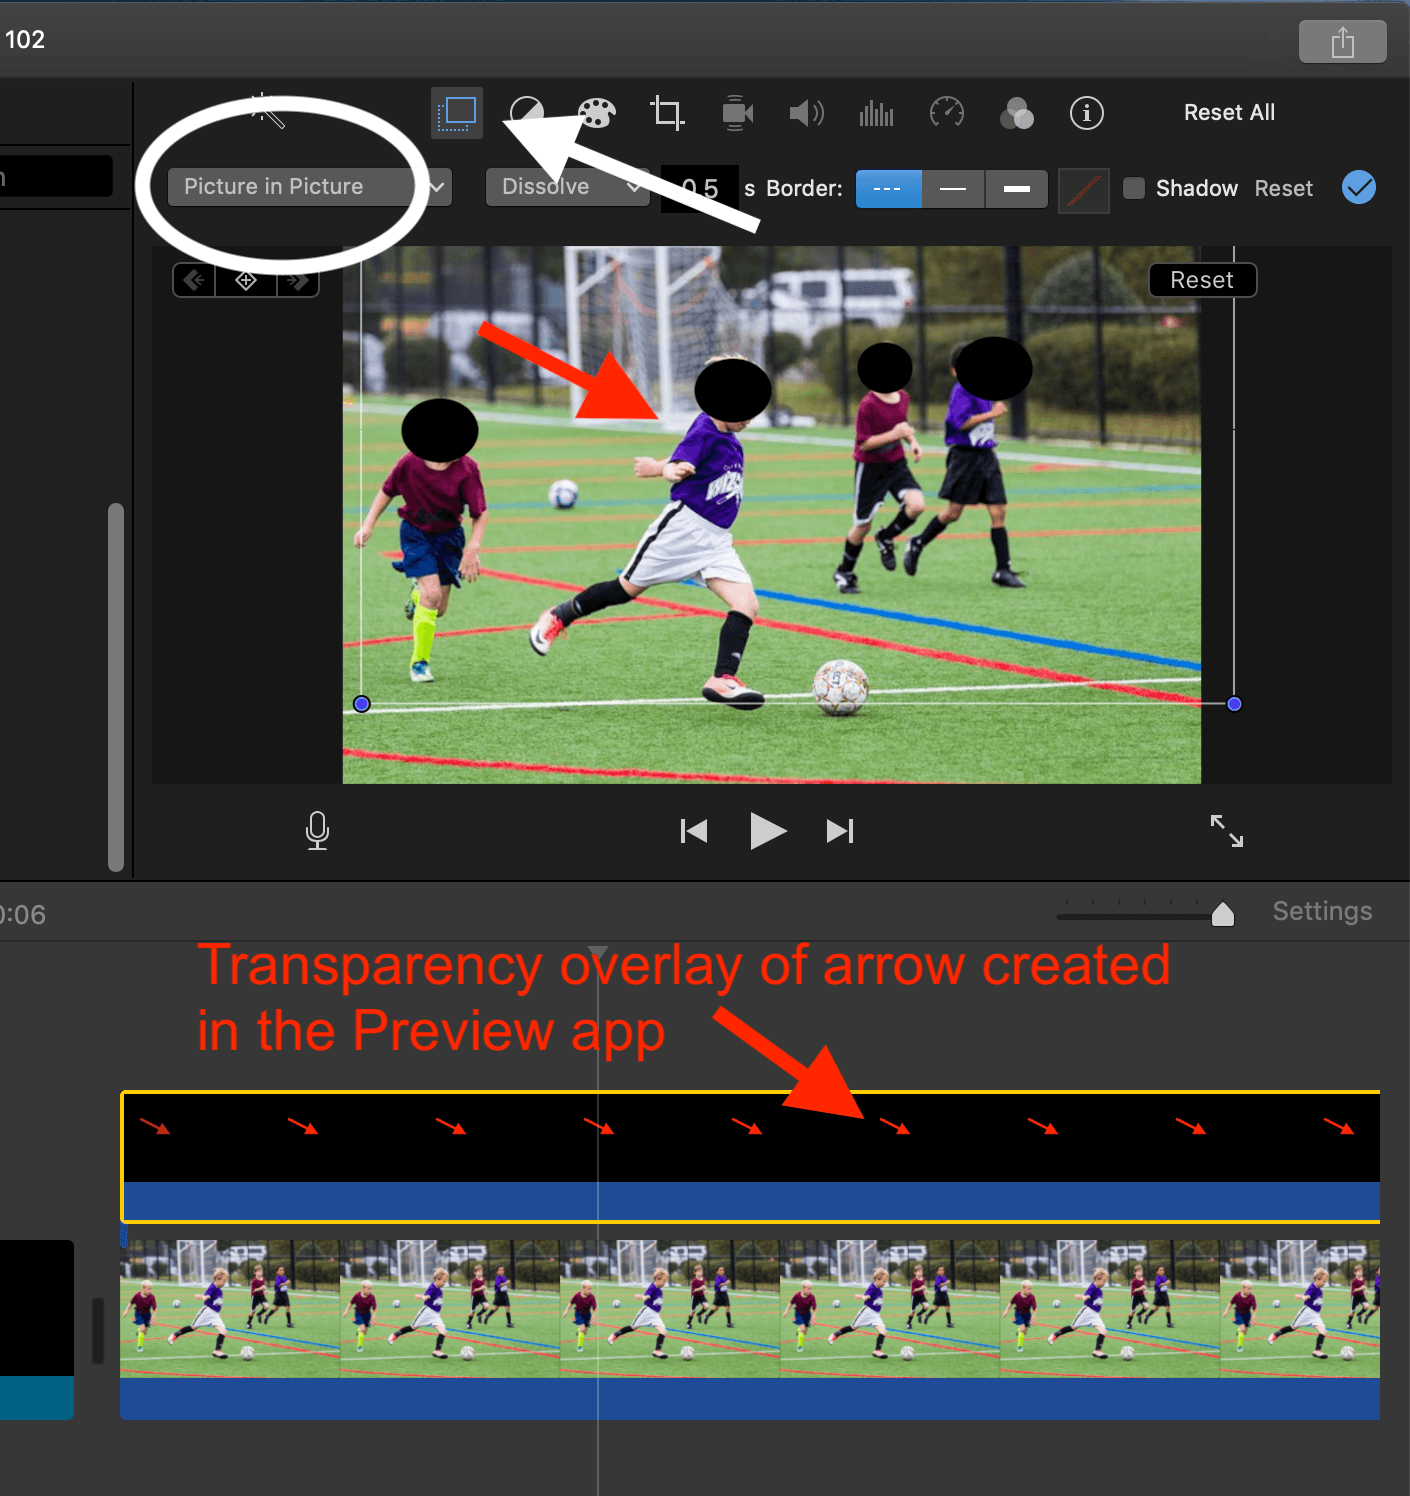
Use photo editing software. Open your arrow image. Remove the background. Make it transparent. This helps arrows blend in videos. Save your edited image as PNG. PNG keeps transparency. Now, your arrows are ready for iMovie.

Credit: www.youtube.com
Importing Media
Start iMovie. Choose the project you want. Click on it to open. You are now ready to add media. Ensure you have your arrow images ready.
Click the Importbutton. Find the arrow images on your computer. Select them one by one. Hit Import Selectedto bring them into iMovie. Check if they appear in the Media Library. You can now drag them onto your timeline.
Positioning Arrows
First, open iMovie and find your video project. Locate the arrow graphic you want. Drag it to the timeline. Place it where you need. The arrow will appear on the screen. Adjust its position by clicking and dragging.
Click on the arrow. Look for handles at the corners. Drag a handle to change the size. Make the arrow bigger or smaller. Keep the size proportionate. Ensure it looks good in the video.
Customizing Arrows
Arrows in iMovie can be fun to customize. Change the color to make them stand out. Click on the arrow to select it. Find the color option in the menu. Choose a color you like. Bright colors work best. Red, blue, and green are popular choices. Experiment with different colors. Make your video unique and colorful.
Rotating arrows adds style to your video. Click the arrow you want to rotate. Look for the rotate option in the menu. Turn the arrow left or right. Adjust until it looks right. Small changes make a big difference. Try different angles. Find the perfect position. Rotating helps point things out clearly.
Enhancing With Effects
Arrows can make videos more fun. Motion effects add life to arrows. They draw attention and make points clear. In iMovie, motion effects are easy to use. Choose an arrow and decide its path. Set the start point and end point. Watch the arrow move on screen. It can slide, fade, or spin. These effects make videos exciting. Kids love watching arrows move. Practice using these effects. Soon, you’ll create amazing videos. Play with different effects. Find what works best for your story. Everyone can learn motion effects. It’s simple and fun!
Animations make arrows look cool. They add energy to clips. In iMovie, animations are easy to add. Pick an arrow to animate. Select from many animation styles. Try a bounce or a zoom effect. These animations catch viewers’ eyes. Experiment with different styles. See which animation fits your video. Kids enjoy animated arrows. They make learning fun. Add animations to teach new ideas. Animated arrows are great tools. Explore iMovie’s animation options. Create videos that stand out!
Credit: www.flexclip.com
Saving And Exporting
Always check your edits. Click the play buttonto see changes. Make sure the arrow is in the right place. Does it point where you want? If not, adjust and preview again. Repeat until you are happy. This ensures your video looks perfect.
Ready to share your work? Click on Fileand choose Export. Select the video quality you prefer. Higher quality means a bigger file. Name your video and choose where to save it. Click Saveand wait for the export to finish. Check the video file to ensure everything is correct.
Frequently Asked Questions
How Do I Add Arrows In Imovie?
To add arrows in iMovie, first create an arrow image using any graphic tool. Import the image into your iMovie project. Drag it onto the timeline and position it where you need. Adjust the size and duration as needed to match your video.
Can I Customize Arrow Colors In Imovie?
IMovie itself doesn’t allow direct customization of arrow colors. However, you can create an arrow with the desired color using graphic design software. Import the customized arrow into iMovie and incorporate it into your project as needed.
Are There Arrow Templates In Imovie?
IMovie doesn’t include built-in arrow templates. You need to create or download arrow images separately. Once you have them, you can import these images into your iMovie project to use as overlays or markers.
Can I Animate Arrows In Imovie?
Yes, you can animate arrows in iMovie. Use the Ken Burns effect to create movement. Import the arrow image and apply the effect to pan or zoom. This gives the appearance of the arrow moving across the screen.
Conclusion
Adding arrows in iMovie simplifies your editing tasks. It’s easy and quick. Follow the steps to enhance your videos with clarity. Visual cues like arrows guide viewers effectively. They highlight important details in your content. Remember to experiment with colors and sizes.
This keeps your videos engaging and informative. Practice these steps to get comfortable. Soon, you’ll add arrows effortlessly. Editing becomes more creative and fun. Share your improved videos confidently. Your audience will appreciate the added clarity. Enjoy your new editing skills in iMovie.
Happy editing!