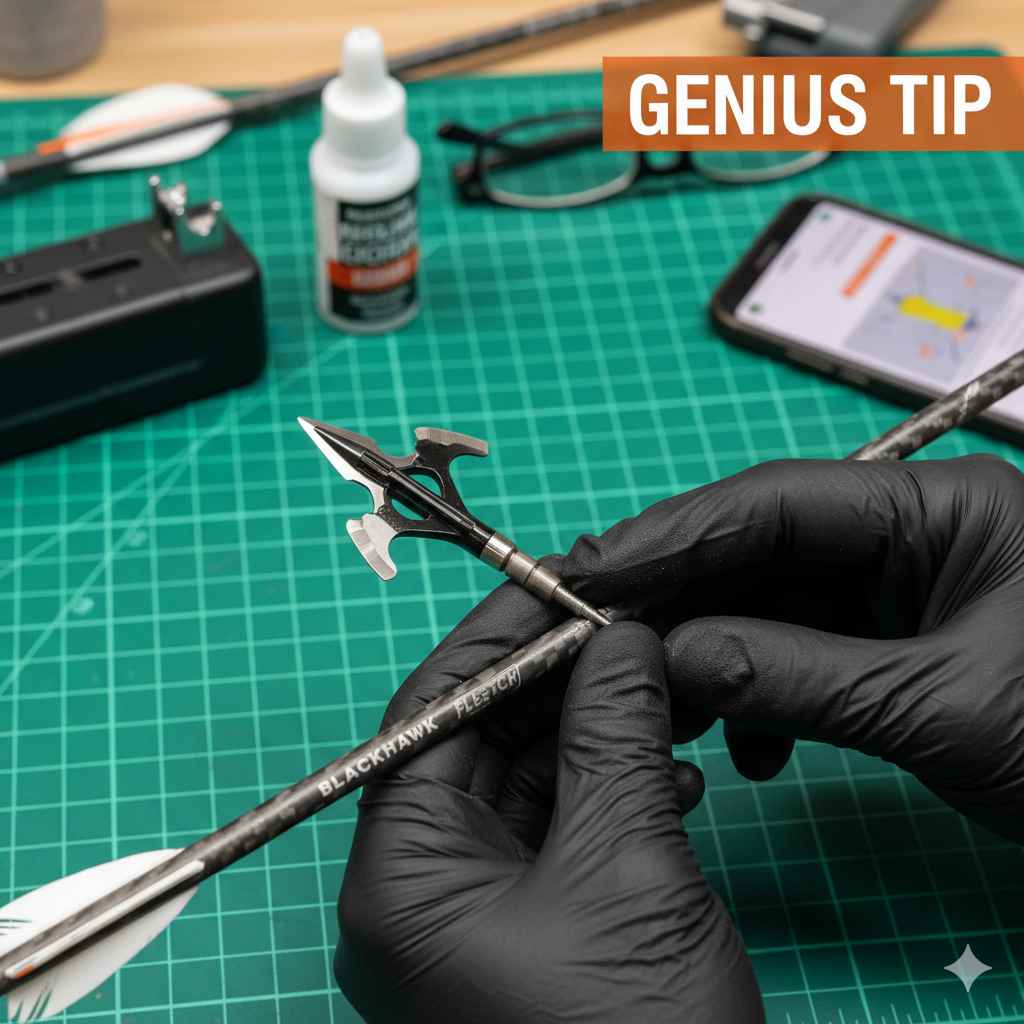
To index broadheads on carbon fiber arrows, use hot melt glue on the insert. Heat the insert, apply a thin layer of hot melt, and install it into the arrow shaft. While the glue is still warm, screw in your broadhead and rotate it until its blades align perfectly with your arrow’s fletchings for improved flight and accuracy.
Have you ever noticed your arrows flying a little funny after switching to broadheads? You’re not alone. It’s a common frustration for many archers. You spend time sighting in your bow, and suddenly your arrows are hitting left, right, or low. It can feel like you have to learn to shoot all over again.
But don’t worry! The fix is often much simpler than you think. The problem might be how your broadhead is aligned with your arrow’s feathers or vanes, also known as fletchings. In this guide, I’m going to show you a simple, genius trick to fix this. It’s a method that pro shops and seasoned hunters have used for years. We will walk through it step-by-step, and you’ll see just how easy it is to get your arrows flying straight and true.
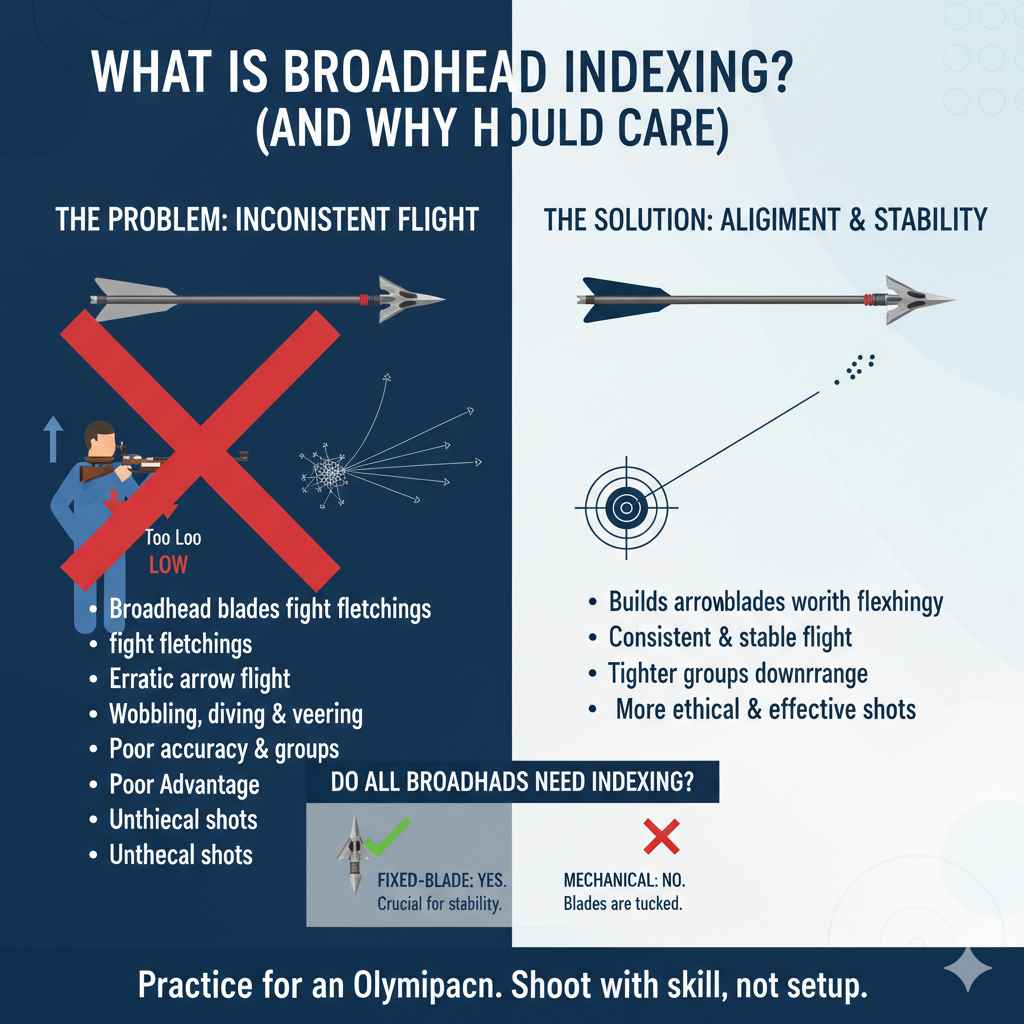
What is Broadhead Indexing? (And Why You Should Care)
Let’s start with the basics. What does “indexing your broadheads” even mean? Think of it like this: your arrow’s fletchings act like the rudder on a boat or the tail on an airplane. They are designed to steer the arrow and keep it stable as it flies through the air.
When you add a fixed-blade broadhead to the front, you are adding another set of “wings” or “rudders.” If the broadhead’s blades are fighting against the fletchings, the arrow’s flight can become erratic. It might wobble, dive, or veer off course.
Broadhead indexing is simply the process of aligning the broadhead’s blades with the arrow’s fletchings.
By making sure these two sets of “wings” work together, you create a more aerodynamic and stable arrow. This simple step can dramatically improve your accuracy and give you tighter groups downrange. It’s especially important for fixed-blade broadheads, which have a larger surface area and can catch more air during flight. For hunters, this means more ethical and effective shots. For target shooters, it means more confidence and better scores.
Do All Broadheads Need Indexing?
This is a great question. The answer depends on the type of broadhead you are using.
- Fixed-Blade Broadheads: Yes, absolutely. These broadheads benefit the most from indexing. Their blades are always exposed and act like small wings. Aligning them is crucial for consistent arrow flight.
- Mechanical (Expandable) Broadheads: Generally, no. Since their blades are tucked away during flight, they have the same aerodynamic profile as a field point. They typically don’t require indexing, which is one reason many archers like them. However, it never hurts to spin-test them to ensure they are mounted straight.
The Genius Tip: Using Hot Melt Glue for Perfect Alignment
So, how do you get those broadheads perfectly lined up? Many people use strong epoxies or super glues to secure their arrow inserts. The problem is that these glues set very quickly and are permanent. If your broadhead doesn’t line up perfectly on the first try, you’re stuck.
Here’s the genius tip: use hot melt adhesive instead.
Hot melt glue is a type of thermoplastic adhesive. It’s solid at room temperature but becomes a liquid when heated. This gives you a crucial window of time where the glue is melted, allowing you to install your insert, screw on your broadhead, and rotate it into the perfect position. Once it cools, it creates a strong, shock-resistant bond. Best of all? It’s reversible! If you ever need to adjust or replace an insert, you can just add a little heat to soften the glue again.
This method is forgiving, easy for beginners, and incredibly effective. Let’s get into how you can do it yourself.
Tools and Materials You’ll Need
The good news is you don’t need a lot of fancy equipment. You probably have most of these items already. Here is a simple checklist of what to gather before you start.
- Your Carbon Fiber Arrows: Make sure they are cut to the correct length and the ends are squared.
- Arrow Inserts: The small metal components that go into the end of the arrow shaft.
- Your Broadheads: The ones you plan to hunt or practice with.
- Hot Melt Glue: You can find this at any archery shop. It often comes in a stick form specifically for this purpose.
- A Heat Source: A small butane torch or a simple candle will work perfectly. Avoid high-temperature heat guns, as they can damage the carbon fiber.
- Pliers or Vise-Grips: To safely hold the hot insert.
- A Field Point: One that is the same weight as your broadhead. This will act as a “handle” for the insert.
- Rubbing Alcohol and a Rag/Cotton Swab: For cleaning the inside of the arrow shaft.
- Safety Glasses: Always a good idea when working with heat and sharp objects.
How to Index Broadheads on Carbon Fiber Arrows: A Step-by-Step Guide
Ready to get started? We’ll take this one step at a time. It’s easier than it sounds, so just follow along. Remember to prioritize safety throughout the process.
Step 1: Prepare Your Workspace and Arrows
First, set up in a well-ventilated area away from any flammable materials. Lay out all your tools so they are within easy reach. Then, prepare your arrows.
- Take a cotton swab or a small piece of a rag and dip it in rubbing alcohol.
- Thoroughly clean the inside of the carbon arrow shaft where the insert will go. This removes any dust or residue from the factory cutting process.
- A clean surface ensures the hot melt glue will form a strong bond. Let the alcohol evaporate completely, which should only take a minute or two.
Step 2: Gently Heat the Arrow Insert
This is the most important part to get right. Your goal is to heat the metal insert, not the carbon arrow shaft. Carbon fiber can be damaged by excessive heat.
- Screw a field point into the insert you are about to install. This gives you a safe handle to hold onto.
- Using your pliers, grip the field point. This keeps your fingers safely away from the heat.
- Hold the insert (not the field point) over your flame from the torch or candle. Keep the flame moving constantly to heat the insert evenly.
- You only need to heat it for about 5-10 seconds. You are not trying to get it red hot! You just want it warm enough to melt the glue.
Step 3: Apply the Hot Melt Glue
With the insert still warm, it’s time to apply the adhesive. This step moves quickly, so be ready.
- Take your stick of hot melt glue.
- Touch the glue stick to the warm insert. The heat from the insert will melt the glue.
- Rotate the insert to apply a thin, even layer of melted glue all the way around the shank (the part that goes inside the arrow). You don’t need a lot—just enough to create a complete ring of adhesive.
Step 4: Install the Insert into the Arrow Shaft
While the glue is still hot and liquid, you need to place the insert into the arrow shaft.
- Hold the arrow shaft firmly in one hand.
- With your other hand still holding the pliers, push the glue-covered insert straight into the arrow shaft.
- Give it a slight twisting motion as you push it in. This helps spread the glue evenly for a secure bond.
- Push it in until the insert collar is flush against the end of the carbon arrow shaft. You may see a small ring of excess glue squeeze out, which is perfectly fine.
Step 5: Quickly Screw on Your Broadhead
Don’t wait! The glue will start to cool and harden. You need to perform the alignment while it’s still pliable.
- Quickly unscrew the field point you were using as a handle. Be careful, as it may still be warm.
- Immediately screw in your broadhead. Tighten it so it is snug, but don’t overtighten. Hand-tight is perfect.
Step 6: Align the Broadhead with the Fletchings
This is the “indexing” part. You have a short window of about 20-30 seconds while the glue is still soft to get the alignment just right.
Look down the arrow shaft from the nock end. You want the blades of your broadhead to line up with the vanes or feathers on the back. There are two common ways to do this, and both work well:
- Vertical/Horizontal Alignment: For a 3-fletch arrow, align two of the broadhead blades horizontally, which will leave the third blade pointing straight up, in line with your cock vane (the single-colored vane).
- In-Line Alignment: Align each blade of a 3-blade broadhead so that it points directly in line with one of the three fletchings.
Gently turn the broadhead (and the entire insert assembly) until the blades are in your desired position. The soft glue will allow everything to rotate smoothly inside the shaft.
Step 7: Let it Cool and Set
Once you are happy with the alignment, simply set the arrow aside and let it cool down completely. Dipping the tip of the arrow in a cup of cool water can speed up this process. The hot melt glue will solidify and lock the insert and broadhead into that perfect position.
Step 8: Test and Readjust if Needed
The final step is to check your work. Lay the arrow on a flat surface or an arrow spinner and give it a gentle flick. This is called a “spin test.” Watch the tip of the broadhead. If it spins perfectly smooth without any wobble, you have a perfectly installed broadhead. If you see a wobble, it means something is off-center.
But here’s the beauty of the hot melt method: if it’s not perfect, you can easily fix it! Simply re-heat the tip of the arrow very carefully to soften the glue, and then repeat steps 6 and 7 to readjust the alignment. You can do this as many times as you need to get it just right.
Why Hot Melt Glue is a Game-Changer for Archers
Using hot melt glue isn’t just a clever trick; it offers real advantages, especially for beginners who are still learning the finer points of arrow building. It takes the pressure off getting everything perfect on the first try.
| Pros of Hot Melt Glue | Cons of Hot Melt Glue |
|---|---|
| It’s Forgiving and Reversible: Made a mistake? No problem. Just add a little heat to soften the glue and adjust the insert. This is impossible with permanent epoxy. | Sensitive to Extreme Heat: If you leave your arrows in a hot car on a summer day, the glue could potentially soften, causing inserts to shift. |
| Fast Setup Time: The glue cools and sets in just a few minutes. You can build and shoot your arrows on the same day. Epoxy can take up to 24 hours to fully cure. | Requires a Heat Source: You need a torch or candle, which requires careful handling. Epoxies are often a simple two-part mix. |
| Excellent Shock Absorption: Hot melt glue remains slightly flexible when cured, which helps it absorb the shock of impact. This can lead to fewer damaged inserts. | Can Be Messy: If you use too much glue, it can squeeze out and create a messy ring around the insert that you’ll need to clean up. |
| Easy to Learn: The process is simple and intuitive. It’s a great confidence-builder for anyone new to working on their own gear. |
Common Mistakes to Avoid When Indexing Broadheads
While the hot melt method is beginner-friendly, there are a few common pitfalls to watch out for. Avoiding these will ensure you get a great result every time.
- Overheating the Arrow Shaft: This is the biggest mistake. Never apply direct flame to the carbon fiber arrow. Carbon can become brittle and unsafe if overheated. Always heat the metal insert only.
- Using Too Much Glue: A little goes a long way. If you apply a huge glob of glue, it will squeeze out and make a mess inside and outside your arrow shaft. A thin, even coat is all you need.
- Not Cleaning the Components: Oil, dust, and carbon residue can prevent the glue from bonding properly. Always clean the inside of the shaft and the outside of the insert with rubbing alcohol first.
- Rushing the Cooling Process: Make sure the glue is completely cool and hard before you handle the arrow too much or shoot it. If it’s still soft, you might knock the broadhead out of alignment.
- Forgetting to Use a Handle: Trying to hold a tiny, hot metal insert with your fingers is a recipe for a burn. Always use a field point and pliers as a handle to keep your hands safe.
Alternative Methods for Indexing Broadheads
The hot melt method is my favorite for its balance of strength and flexibility, but it’s not the only way to index your broadheads. Here are a couple of other options you might see people use.
| Method | How It Works | Best For |
|---|---|---|
| Broadhead Alignment Washers (BAWs) | These are very thin, precisely made plastic or metal washers. You place one or more between your broadhead and your insert to slightly change how the broadhead tightens down, allowing you to fine-tune its final orientation. | Archers who have already glued in their inserts with permanent epoxy and need to make small adjustments. |
| Rubber O-Rings | A small rubber o-ring is placed on the broadhead’s threads before screwing it in. It creates friction, allowing you to stop tightening the broadhead at the desired alignment point without it being loose. | A quick field fix or for those who don’t want to use washers. However, the o-ring can sometimes compress over time, causing the broadhead to loosen. |
| The “Barely Loose” Method | This involves tightening the broadhead fully, then backing it off just enough to align it. A drop of thread-locking compound or even wax can be used to keep it from vibrating loose. | Not generally recommended as it can be unreliable, but it’s a last-resort option if you have no other tools available. |
While these methods can work, they are often solutions for inserts that are already permanently installed. By using the hot melt method from the start, you build that adjustability right into your arrows, giving you more control and a more reliable setup.
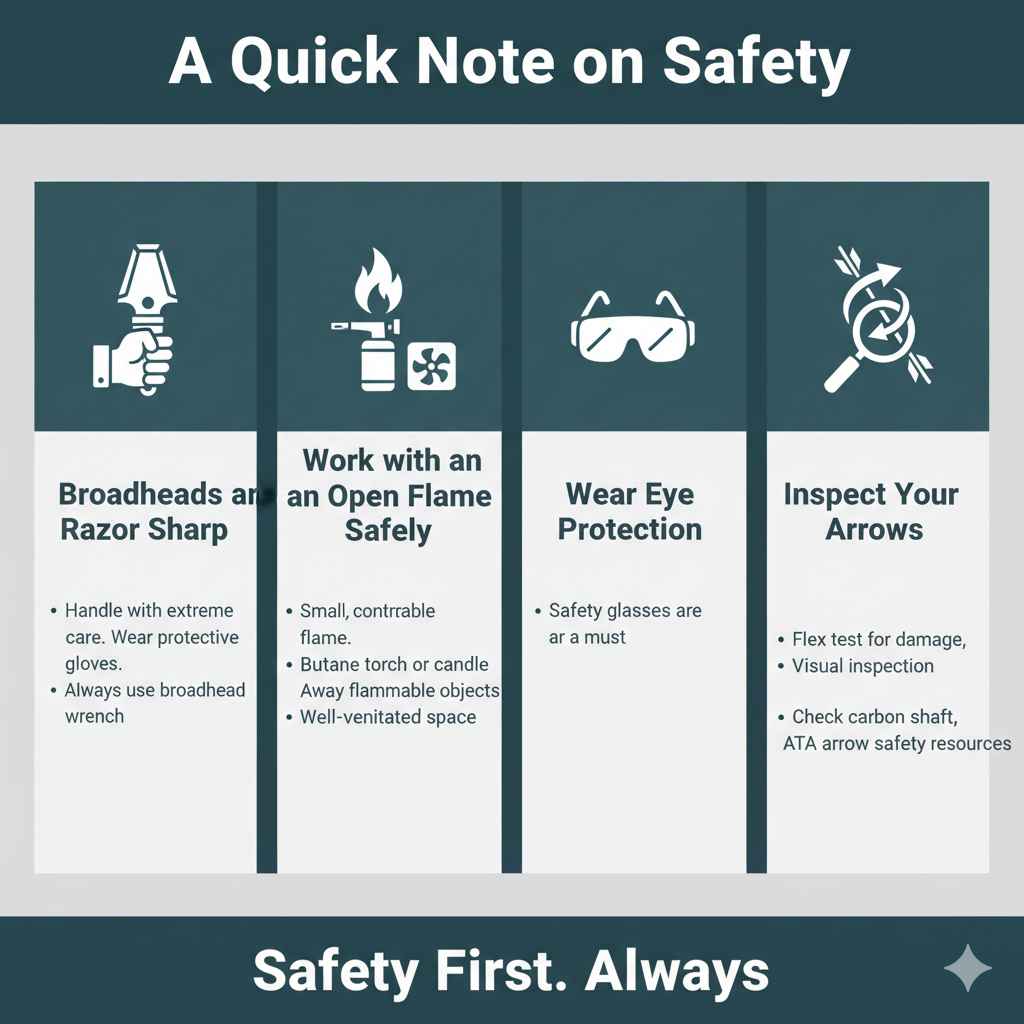
A Quick Note on Safety
Working on your own archery equipment is rewarding, but safety should always be your top priority. Remember these key points:
- Broadheads are Razor Sharp: Handle them with extreme care. Consider wearing protective gloves when screwing them in and out of your arrows. Always use a broadhead wrench.
- Work with an Open Flame Safely: Use a small, controllable flame like a butane torch or candle. Keep it away from flammable objects and work in a well-ventilated space.
- Wear Eye Protection: Safety glasses are a must when working with tools and adhesives.
- Inspect Your Arrows: Before shooting any arrow you’ve worked on, give it a quick flex test and visual inspection to ensure the carbon shaft is not damaged. The Archery Trade Association has great resources on arrow safety.
Frequently Asked Questions (FAQ)
What does “indexing” a broadhead mean?
Indexing a broadhead means aligning its blades with the fletchings (vanes or feathers) on your arrow. This creates a more stable, aerodynamic projectile, which leads to better accuracy and more consistent arrow flight.
Do I need to index mechanical broadheads?
Typically, no. Mechanical broadheads fly with their blades closed, giving them a profile similar to a field point. Because of this, their flight is not usually affected by blade orientation. However, you should always spin-test them to ensure they are mounted straight on the insert.
Can I use a regular glue gun for this?
It’s not recommended. The hot melt glue sold in archery shops is specifically formulated to be strong and shock-resistant for arrow components. Craft store glue from a glue gun is often more brittle and may not hold up to the force of an arrow’s impact.
Will hot melt glue hold up in cold weather?
Yes, archery-specific hot melt adhesive is designed to perform well in a wide range of temperatures, including cold hunting conditions. It will not become overly brittle or fail in the cold.
How do I remove an insert installed with hot melt glue?
It’s simple! Screw a field point into the insert, and gently heat the point (not the carbon) with a flame for a few seconds. The heat will transfer to the insert and soften the glue. Then, use pliers to pull the insert straight out.
What happens if my broadheads aren’t indexed?
If your broadheads are not indexed, their blades can act like rudders that fight against your fletchings. This can cause the arrow to plane, wobble, or fly erratically, leading to poor accuracy and inconsistent groups, especially at longer distances.
Is it safe to heat a carbon fiber arrow?
It is not safe to apply direct heat to a carbon fiber arrow shaft. High heat can damage the epoxy resins that hold the carbon fibers together, making the arrow weak and unsafe to shoot. That is why this method stresses heating only the metal insert before installing it.
Conclusion: Your Path to a Straighter Shot
There you have it—a simple, effective, and “genius” way to get your broadheads flying like darts. Learning how to index broadheads on carbon fiber arrows using the hot melt glue method is a true game-changer. It puts you in complete control of your equipment and removes one of the biggest variables that can affect accuracy.
Don’t be intimidated by the idea of working on your own arrows. This process is forgiving and builds a great foundation of skill and confidence. By taking the time to align your broadheads properly, you are ensuring that your equipment is performing at its absolute best. This means more confidence on the range and more ethical, accurate shots in the field.
So gather your tools, be patient, and give it a try. You’ll be amazed at the difference this one small detail can make. Happy shooting!