How To Build A Carpet Archery Target
Ever feel like you’re spending a fortune on archery gear? It’s tough when you just want to practice. Buying target after target adds up fast.
Plus, some targets just don’t last. You might be looking for a way to make your own. Something that works well without breaking the bank.
This guide will show you exactly how to build a carpet archery target. It’s a simple project. You can do it with common materials.
It’s a great way to save money. And it gives you a target that holds up well.
Building a carpet archery target is a budget-friendly and straightforward DIY project. It uses readily available materials to create a durable practice surface. This method offers a cost-effective alternative to store-bought targets, allowing for more frequent practice sessions without significant expense.
Understanding Your Carpet Archery Target
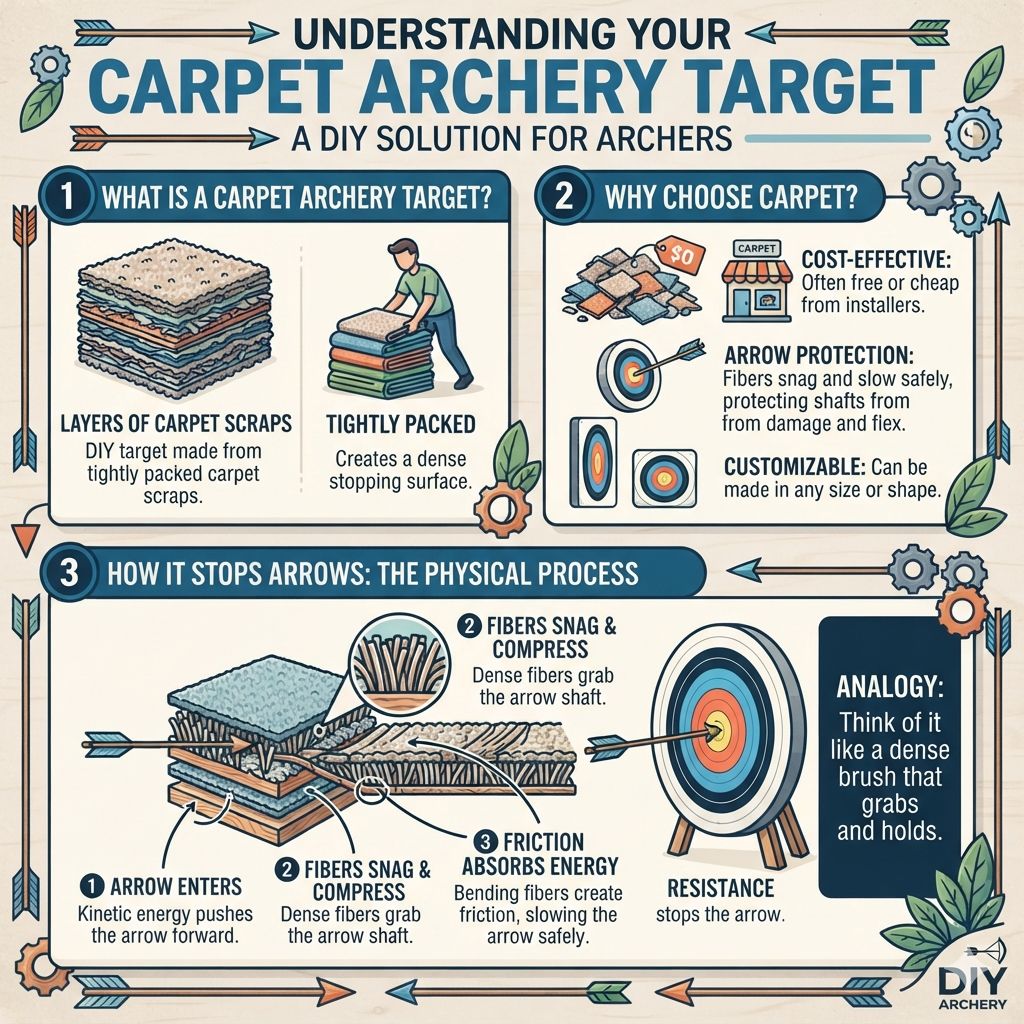
So, what exactly is a carpet archery target? It’s a DIY target made primarily from layers of carpet scraps. These layers are packed tightly together.
This creates a dense stopping surface for your arrows. It’s not just any carpet, though. The type and how you stack it matter.
This design works because the carpet fibers snag the arrow shafts. This slows them down safely. It also helps protect your arrows from damage.
Unlike foam targets that can get torn up, carpet can be very forgiving. It’s a clever use of materials.
Why do people choose carpet? Several reasons stand out. First, it’s often free or very cheap.
You can get carpet scraps from local carpet stores. Sometimes, carpet installers have leftovers. Construction sites might have them too.
Secondly, it’s surprisingly effective. When packed right, it stops arrows well. It doesn’t usually cause excessive arrow flex.
This means fewer broken arrows. Lastly, it’s customizable. You can make it any size or shape you need.
How does it stop arrows? Think of it like a dense brush. When an arrow enters, the fibers grab it.
They bend and compress. This absorbs the arrow’s kinetic energy. The tighter the carpet is packed, the more resistance it offers.
This resistance is what stops the arrow. It’s a physical process. The friction between the arrow and the fibers is key.
It’s a simple yet effective system. It uses everyday materials to solve a common problem for archers.
My Own Carpet Target Adventure
I remember when I first got serious about archery. I was thrilled with my new bow. But my old target was falling apart.
It was a foam block. Every shot felt like it was shredding it more. I looked at new targets online.
Wow, they were expensive! My wallet started to cry. I needed practice, but I couldn’t afford a new high-end target.
Then, a friend told me about carpet targets. I was skeptical. Could old carpet really stop my arrows?
I went to a local carpet store. They had a pile of remnants in the back. The manager said I could have them for free!
I loaded up my car. I had pieces of different colors and textures. I went home and started cutting.
It was a messy job. Sawdust and carpet fibers got everywhere. I layered them up in a wooden frame.
I stomped on them, trying to make them dense. It felt solid. I took my bow out.
The first arrow flew true. It hit the target with a thud. I pulled it out.
It was stuck in there good! But it came out clean. No damage.
I shot again. And again. It was working!
I felt so proud. I had made a great target myself. And I spent almost no money.
That was a huge win.
Essential Materials for Your Target
Gathering your supplies is the first real step. You don’t need much. Most items are probably around your house already.
Or they are very easy to find. This is where the “cheap” part really kicks in. Let’s look at what you’ll need.
Carpet Scraps: The Heart of Your Target
What to look for: Different types of carpet work. Loop pile carpet is good. Cut pile carpet is also fine.
Avoid very thin carpets. You want thick, dense pieces. The more fiber per square inch, the better.
You can get these from:
- Local carpet stores (ask for remnants or scraps)
- Carpet installers
- Construction sites (with permission!)
- Friends or family who are replacing carpet
How much? This depends on the size of your target. You’ll need enough to build a block at least 12-18 inches thick. More is always better for stopping power.
You’ll also need something to hold it all together. This is the frame. It keeps the carpet packed tightly.
It also gives the target a shape. And it makes it easier to move.
A Sturdy Frame: Keeping it All Together
Common materials:
- Wood: Lumber like 2x4s or 2x6s are great. Plywood sheets can also work for the sides.
- Metal: Some people use old metal frames. This is less common for DIY carpet targets.
Frame size: A common size is 2 feet by 2 feet. You can make it larger or smaller. Just make sure it’s big enough for your arrows.
And wide enough to catch them reliably.
Tools: You’ll need basic tools. A saw to cut wood. A drill and screws.
A staple gun can be helpful too. Safety glasses are a must.
Don’t forget about how you’ll put the carpet in. And how you’ll pack it down. This is important for the target’s performance.
Packing and Tools: Making it Dense
Tools for packing:
- Heavy objects: Bricks, concrete blocks, or even weights work.
- A tamper: You can buy one or make one.
- Your feet: Lots of stomping!
Cutting the carpet: A utility knife or a sturdy pair of scissors is needed. Make sure they are sharp. Carpet blades for saws can also speed things up.
And of course, you need a way to see where you’re shooting. You’ll want a target face. This is usually a printed paper or cloth.
You can buy these or print them yourself. Many archers also use spray paint to create their own bullseyes directly on the carpet.
Target Face: Aiming Point
Options include:
- Printed target faces: Available online or at archery shops.
- DIY bullseyes: Use spray paint or markers to draw rings.
- Durable materials: Laminated paper or outdoor fabric targets last longer.
Attachment: You can use staples, tape, or clips to attach the face. Make sure it’s smooth and flat against the carpet.
Step-by-Step: Building Your Carpet Target
Let’s get building! Follow these steps. They are simple to understand.
You’ll have a target ready for shooting in no time.
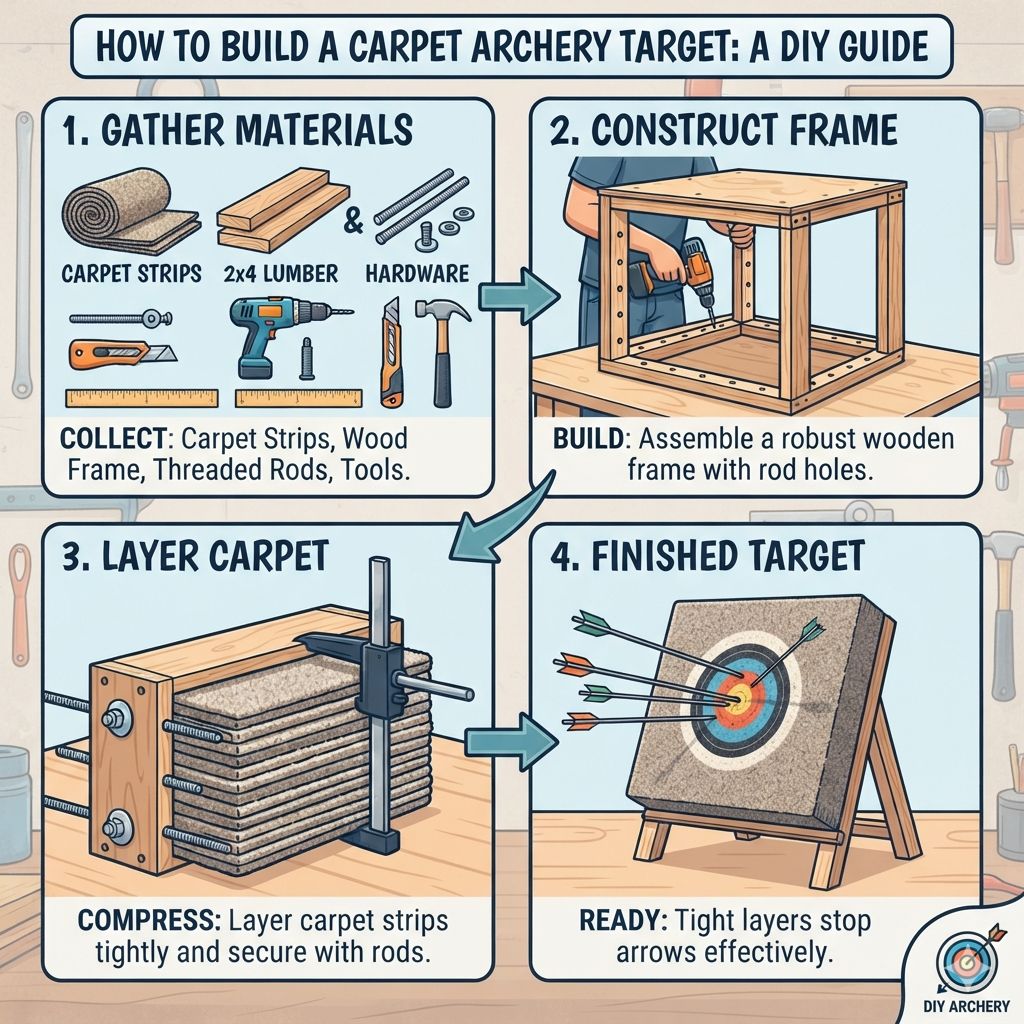
Step 1: Prepare Your Carpet
First, you need to get your carpet scraps ready. If the carpet has a thick backing, you might want to remove it. This makes the carpet easier to cut and pack.
However, some people leave it on. It depends on the carpet type. You’ll need to cut the carpet into pieces.
These pieces should fit your frame. Think about making them roughly square or rectangular. This makes stacking easier.
Don’t worry about perfect shapes. Just get them to a manageable size.
I found that cutting the carpet into strips about 6-12 inches wide worked well. Then I cut those strips into lengths. This made them easier to handle.
It also helped me fit them into tight spaces later. Use a sharp utility knife for this. Be careful!
Cutting carpet can be tough work. Wear gloves to protect your hands.
Step 2: Build the Frame
Now it’s time to build your frame. For a wooden frame, you can make a simple box. Use 2x4s or 2x6s.
Cut four pieces for the sides. Screw them together to form a rectangle. Make sure the corners are square.
You can add a bottom if you want. This helps keep everything contained. Or, you can just leave it open at the bottom.
If you do this, you’ll need to place it on a level surface. Or create a base for it. For a stronger frame, you can add cross braces inside.
This helps support the carpet weight.
I opted for a simple open-bottom box. I used 2×6 lumber. This gave me a good depth.
I screwed the sides together. Then I added some plywood to the back. This gave me something to staple the carpet to.
It also made it a bit more solid. Make sure the inside dimensions are what you want for your target. Think about the size of arrows you shoot.
Step 3: Start Packing the Carpet
This is the most important part for stopping power. You need to pack the carpet scraps in very tightly. Start by laying down a layer of carpet pieces in the frame.
Try to fill as much space as possible. Then, use your feet to stomp them down. Really put your weight into it.
You can also use heavy objects. Place bricks or weights on top. Leave them there for a while.
Then add more carpet. Keep adding layers. And keep stomping and pressing.
Your goal is to make it as dense as you possibly can. There should be no air pockets. Every fiber should be touching another.
I learned that alternating the direction of the carpet pieces helps. Lay one layer horizontally. Then the next layer vertically.
This creates a denser weave. It stops arrows more effectively. I also found that smaller pieces packed better.
It’s a bit like building with LEGOs. You fill in the gaps. It takes time and effort.
But it’s worth it for a good target.
Infographic: Packing Density is Key
Loose Packing:
- Arrows fly through easily.
- Little stopping power.
- Arrows might pass through.
- Damages arrows and target face.
Dense Packing:
- Arrows snag and stop effectively.
- Saves your arrows.
- Lasts much longer.
- Requires consistent effort during build.
My Tip: If you can’t easily press a carpet piece in by hand, it’s packed well!
Keep adding carpet and packing it down. Continue until the frame is full. Or until you reach your desired depth.
The deeper the target, the better it will stop powerful bows.
Step 4: Secure and Finish
Once your frame is packed tight, you need to secure everything. If you have a back piece of plywood, staple the carpet edges to it. This keeps the carpet from shifting.
If your frame is open at the bottom, you can staple carpet edges to the inside of the frame. This helps hold it all in place. You want to make sure no loose edges are sticking out.
You can also wrap the sides of the frame. Use some strong fabric or even more carpet. This protects the wood.
And it makes the target look cleaner. It also helps prevent arrows from glancing off the sides. Some people add a front face.
This is usually a piece of thin plywood or hardboard. You can attach your target face to this. Then attach the face to the carpet.
This can make replacing the target face easier.
Finally, attach your target face. You can use staples, tape, or clips. Make sure it’s flat and smooth.
A wrinkled or bumpy face can affect your aim. Now your carpet archery target is ready to go!
Real-World Scenarios and Considerations
Building a carpet target isn’t just about putting stuff in a box. It’s about how you’ll use it. And what might happen in real life.
Let’s think about that.
The Environment: Where Will It Live?
Carpet targets are great for many places. You can use them in your backyard. They are good for indoor ranges too, if space allows.
However, carpet is porous. It can soak up water. If you leave your target out in the rain, it will get wet.
This can make it heavy. It can also lead to mildew. Or the backing can degrade over time.
So, if possible, keep your target covered. Or bring it inside when it’s not in use. Especially if you live in a humid climate or get a lot of rain.
Consider where you’ll be shooting. If you’re in a backyard, you need a safe backstop. This is an area behind your target that will catch any missed shots.
It could be a sturdy fence, a hill, or even a dedicated backstop net. Never shoot without a safe backstop. This protects people and property.
Habits and Use: How Often Will You Shoot?
Your shooting habits will affect how long your target lasts. If you shoot dozens of arrows every day, it will wear out faster. If you shoot a few times a week, it will last much longer.
The type of arrows you use matters too. Heavier arrows or broadheads will cause more wear. Traditional archery arrows with field points are usually best for carpet targets.
Also, consider how you pull your arrows. Yanking them out can damage the carpet fibers. Try to pull them straight.
Some archers use arrow lube. This helps them slide out more easily. Regularly check your target face.
Replace it when it gets too torn up. This makes aiming easier.
Design and Materials: Choices Matter
The type of carpet you use makes a difference. Some carpet fibers are more durable than others. Older, denser carpets often perform better.
Newer, synthetic carpets can be a bit slicker. Sometimes they don’t grab arrows as well. If you have a choice, go for thicker, denser carpet.
The backing also plays a role. A stiff backing might hold shape better. But it can also make it harder to pack.
The size and depth of your target are also important. For a powerful compound bow, you’ll need a deeper target. Maybe 18 inches or more.
For a lighter recurve or longbow, 12 inches might be enough. A wider target gives you a larger area to aim at. This is good if you’re not a perfect shot yet.
User Behavior: How You Treat It
How you treat your target directly impacts its life. Don’t leave it leaning against a wall for months. Don’t let pets chew on it.
Don’t shoot at it with things other than arrows. Basic care goes a long way. If you notice a spot is getting heavily shot, try to rotate the target.
Or add more carpet to that section. This spreads out the wear.
If the carpet starts to loosen, add more staples. Re-pack any areas that feel soft. It’s a living thing, in a way.
It needs a little maintenance. But it’s usually minimal. It’s still far less work than buying a new one every few months.
What This Means for You
So, what’s the takeaway from all this? Building a carpet target offers some clear advantages. But there are also things to be aware of.
When It’s Perfectly Normal
It’s perfectly normal for your carpet target to feel solid. It’s normal for arrows to stick in it. It’s normal to have to pull them out with some effort.
It’s normal for the target face to get shot up quickly. All these are signs that your target is working as it should. It’s doing its job of stopping arrows safely.
It’s also normal for the target to be a bit messy to build. Carpet fibers can get everywhere. You might find them on your clothes.
You might find them in your hair. That’s part of the DIY process for this project. Just have a broom and vacuum ready.
And maybe wear old clothes.
When to Pay Attention and Worry a Little
You should pay attention if arrows are passing all the way through your target. This means it’s not dense enough. Or it’s not deep enough for your bow.
You need to add more carpet. Or pack it down much tighter. This is a safety issue.
You don’t want arrows going beyond your target.
Another sign to watch for is if the carpet is starting to fray badly. If large chunks are coming loose, it’s degrading. This might happen if it gets too wet.
Or if the carpet type isn’t very durable. If this happens, you might need to replace sections of the carpet. Or consider a different type of carpet for your next target.
If the frame starts to break apart, that’s also a concern. It means the carpet is no longer contained. This can lead to the target losing its shape and density.
Repair the frame as needed. Make sure it’s strong enough to hold the packed carpet.
Simple Checks You Can Do
Periodically, give your target a poke. Press down on the surface. Does it feel firm?
Or does it give way easily? If it feels soft, it needs more packing. You might need to open up a section and add more carpet.
Then re-pack it tightly. This is especially true if you’ve shot a lot of arrows into one spot.
Check the sides of the frame. Are they still secure? Are there any loose staples?
Fix them. Also, look at the target face. Is it easy to see the scoring rings?
If it’s too torn up, replace it. A clear target face is essential for good practice.
Consider the weight of your target. If it suddenly feels much lighter, it might be degrading or drying out too much. If it feels much heavier, it might have absorbed water.
Adjust its storage or location as needed.
Contrast Matrix: Carpet Target vs. Foam Target
Myth: Carpet targets are messy and fall apart.
Reality: While building can be messy, a well-built carpet target is durable and holds its shape. Proper packing is key.
Normal: Arrows stick firmly.
Concerning: Arrows pass through the target.
Normal: Target face needs frequent replacement.
Concerning: Target frame is breaking apart.
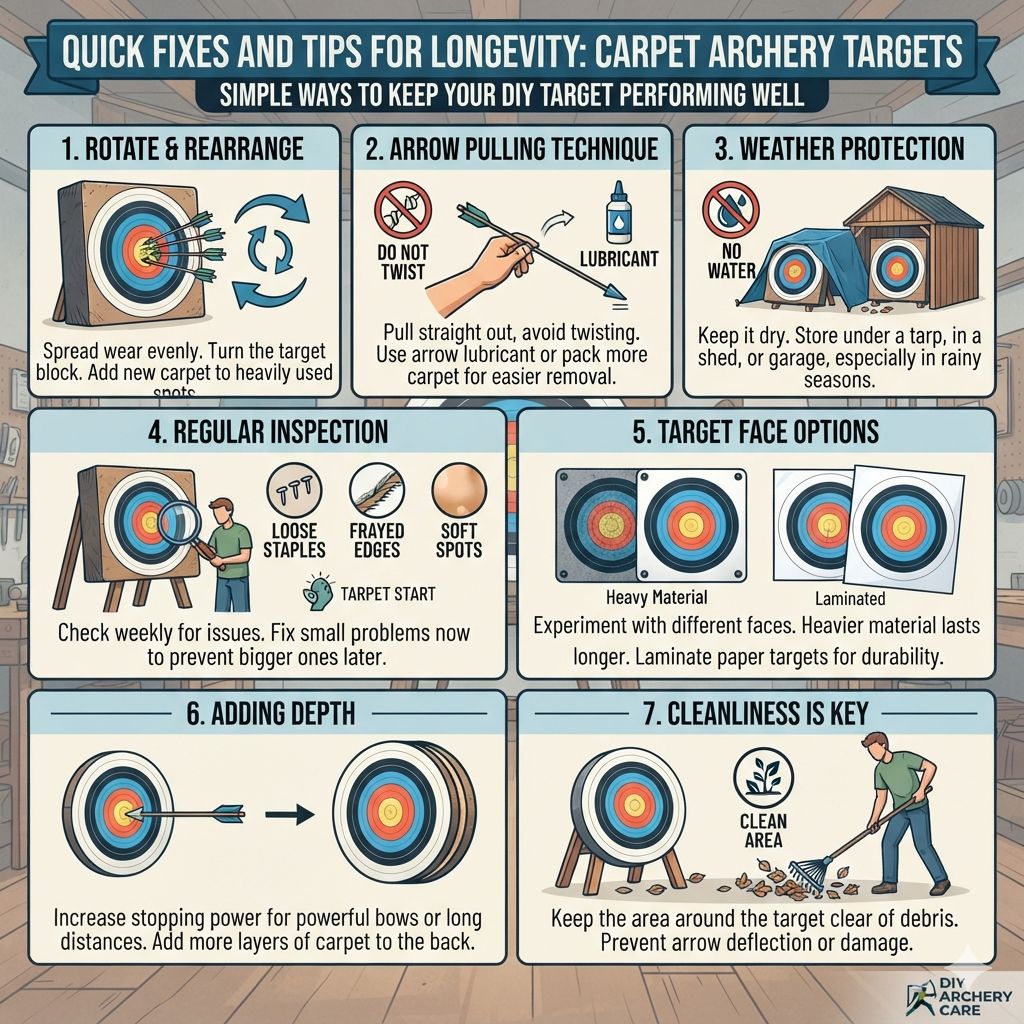
Quick Fixes and Tips for Longevity
Even the best-made targets need a little care. Here are some simple ways to keep your carpet target performing well. And to make your archery practice more enjoyable.
- Rotate and Rearrange: If you notice one area of the target gets hit more than others, try rotating the entire target. This spreads the wear evenly. You can also try adding new carpet to heavily used spots.
- Arrow Pulling Technique: Always try to pull arrows straight out. Avoid twisting or yanking. If arrows are difficult to pull, consider using arrow lubricant. Or try to pack more carpet into the entry point to create a smoother exit.
- Weather Protection: As mentioned, water is not a carpet target’s best friend. Store it under a tarp, in a shed, or inside your garage when not in use. Especially during rainy seasons.
- Regular Inspection: Take a few minutes each week to look over your target. Check for loose staples, frayed edges, or soft spots. A quick fix now can prevent bigger problems later.
- Target Face Options: Experiment with different types of target faces. Some are made of heavier material. They might last longer. You can also laminate paper targets to give them more durability.
- Adding Depth: If you get a more powerful bow or start shooting at longer distances, you might need more stopping power. You can often add more layers of carpet to the back of an existing target. This increases its depth.
- Cleanliness is Key: Keep the area around your target clean. Remove any debris that could cause an arrow to deflect or damage the target.
Frequently Asked Questions
Can I use any kind of carpet for my archery target?
While you can use many types, thicker, denser carpets work best. Loop pile and cut pile carpets are good choices. Avoid very thin or loosely woven carpets.
They won’t provide enough stopping power. Getting free carpet scraps from stores is common.
How deep should my carpet archery target be?
The required depth depends on your bow’s draw weight and arrow speed. For most recreational bows (like recurves or lighter compounds), 12 to 18 inches is usually sufficient. For powerful compound bows, 18 inches or more is recommended to ensure arrows stop safely.
Will carpet damage my arrows?
A well-built, dense carpet target should not damage your arrows. The carpet fibers snag the arrow shaft, slowing it down gradually. This is much gentler than hitting a hard surface or a worn-out foam target.
Proper packing density is crucial here.
How do I make my carpet target last longer?
Protect it from the elements by storing it indoors or under cover. Rotate the target regularly to distribute wear. Ensure it’s packed very densely.
And pull your arrows straight out to avoid damaging the fibers. Regular inspection and minor repairs also help a lot.
Can I use a carpet target with broadheads?
It’s generally not recommended to use broadheads on a carpet target. Broadheads are designed to cut. They will quickly destroy the carpet fibers and the target face.
For broadhead practice, specific targets designed for them are necessary. Field points or judo points are ideal for carpet targets.
How do I attach a target face to my carpet target?
You can use various methods. Staples are effective for attaching the target face to the carpet or a plywood backing. Heavy-duty tape can also work.
Some archers use clips or bungee cords to attach a more durable target face. Make sure the face is smooth and flat.
Conclusion
Building your own carpet archery target is a rewarding project. It’s cost-effective and practical. You get a durable target for practice.
It saves you money. And it’s a great way to learn more about archery gear. Enjoy your new target!