Learn how to make a magic composite bow with this straightforward guide! While “magic” in archery refers to superior performance, this guide focuses on crafting a high-performing composite bow using proven modern materials and techniques. Follow these steps for a custom bow that feels magical in your hands.
Welcome, fellow archery enthusiasts! Have you ever dreamt of owning a bow that feels perfectly balanced, powerful, and truly one-of-a-kind? When archers talk about a “magic” bow, they’re often referring to a composite bow that performs exceptionally well, offering a shooting experience that feels almost effortless. Building your own composite bow might sound like a daunting task, but it’s an incredibly rewarding journey. This guide will break down the process, making it easy to understand and follow, even if you’re new to bow making. Get ready to transform raw materials into a bow that will bring you endless enjoyment and precision!
Understanding the Magic Behind Composite Bows
Let’s demystify what makes a composite bow so special. Unlike simple self-bows made from a single piece of wood, composite bows combine different materials to achieve superior strength, speed, and durability. Historically, these were made using wood, horn, and sinew, each layer contributing unique properties. Modern composite bows leverage advanced materials that enhance these benefits even further. Think of it as a carefully engineered blend of strength where needed, flexibility where required, and a smooth, forgiving draw for the archer.
The Core Components of a Composite Bow
Every composite bow, whether ancient or modern, relies on a few key elements working in harmony:
- Core: This is the central part of the bow limbs, providing the main structure and flex. Traditionally wood was used, but modern designs might incorporate fiberglass or specialized synthetics for consistent performance.
- Backing: This layer goes on the side of the bow that faces away from the archer when drawn (the “back”). It’s designed to withstand tension, preventing the bow from breaking under strain. In traditional bows, this often meant animal sinew; in modern builds, high-strength fiberglass or carbon fiber is common.
- Belly: This is the side of the bow that faces the archer (the “belly”) and is compressed during the draw. Historically, this was often horn, prized for its compressive strength. Modern equivalents might use a different composite material or a specialized wood.
- Handle: The grip area, designed for comfort and stability. This can be integrated into the core or built up separately.
- Tips: The ends of the bow where the string attaches. These need to be robust to handle the string tension.
Why Build Your Own Composite Bow?
The satisfaction of shooting an arrow from a bow you crafted with your own hands is unparalleled. Beyond that, building your own composite bow offers several advantages:
- Customization: You can design a bow to perfectly fit your draw length, draw weight, and aesthetic preferences.
- Performance: By carefully selecting materials and construction methods, you can create a bow with exceptional speed and accuracy.
- Deeper Understanding: You’ll gain a profound appreciation for the engineering and craftsmanship involved in archery tools.
- Cost-Effectiveness (Potentially): While initial material costs can vary, building over time can be more economical than purchasing high-end commercial bows.
- Therapeutic Hobby: The process of bow making is focus-intensive and can be a wonderfully meditative and rewarding way to spend your time.
Materials You’ll Need
For this guide, we’ll focus on a modern approach to composite bow making, utilizing readily available high-performance materials. This blend of modern technology and traditional principles creates a truly “magic” performance.
Essential Materials List
- Core Material: A strong, flexible wood like hard maple or hickory, or a pre-made fiberglass bow stave. For this guide, we’ll assume a wood core for demonstrating composite layering.
- Backing Material: Black fiberglass cloth (e.g., 6-ounce E-glass or S-glass for higher performance). You can find this at most composite supply stores or online retailers.
- Belly Material: Hardwood veneers (like oak or ash) or specialized composite laminates if available. For a more traditional feel, some opt for phenolic resin-impregnated wood.
- Handle Material: Strong wood, leather, or cork for grip.
- High-Strength Epoxy Resin: A quality laminating epoxy specifically designed for bonding wood and fiberglass. Look for slow-cure epoxies to give you ample working time.
- String Material: Dacron B50/B55 or Fast Flight for modern bows.
- Bowstring Serving: Serving thread for the string nocks.
Tools You’ll Need
A good set of tools is crucial for precision and safety.
- Saw: A bandsaw or jigsaw for shaping wood.
- Planes and Spokeshaves: For refining shapes and reducing material.
- Rasps and Files: For detailed shaping and smoothing.
- Sanding blocks and sandpaper: Various grits from coarse to very fine.
- Clamps: A variety of C-clamps, bar clamps, and potentially vacuum bagging equipment for laminating.
- Measuring tools: Tape measure, ruler, calipers, pencil.
- Safety Gear: Safety glasses, dust mask, gloves.
- Tillering Stick/Tree: Essential for carefully flexing the bow during the tillering process, ensuring even limb bend.
- Bow Square: For ensuring string alignment.
- String Jig: To build your bowstring.
Step-by-Step Guide to Making Your Composite Bow
This is where the magic truly begins! Take your time, be precise, and enjoy the process. We’ll cover a basic laminate composite bow construction here.
Step 1: Designing Your Bow
Before you cut anything, plan your bow. Consider:
- Length: Typically 60-70 inches for recurve or longbow styles.
- Draw Weight: Crucial for safe shooting. For beginners, 25-35 lbs is recommended. Research safe draw weights for your intended use.
- Draw Length: The maximum length you can comfortably pull the string. Measure your arm span and divide by 2.5 for a rough estimate.
- Limb Taper: How the limbs narrow from the handle to the tips.
- Camber/Recurve: Decide if you want a simple longbow shape, a recurve, or a compound design (which is significantly more complex and not covered here).
Many resources offer free bow design templates and calculators online. For example, the US Forest Products Laboratory has detailed information on wood properties relevant to bow making.
Step 2: Preparing the Core Stave
If using a wood stave, cut it to your desired length, plus a little extra for tillering. Ensure it’s straight and free from major knots or defects. You’ll then carefully split or saw this stave into three sections: two limb sections and a handle section, though for a simple laminate, you might use a single broad stave that you’ll face and back.
For a simpler composite build often called a “flatbow” or “Asian-style” laminate, you might start with a single, flat stave of wood. From this stave, you will carefully shape the limbs, then apply your backing and belly layers.
Step 3: Shaping the Limbs (if using a wood stave as a base)
Using your saw, spokeshave, and sandpaper, carefully shape the wood stave according to your design. The limbs should be thicker at the handle fade-outs and gradually taper towards the tips. Ensure symmetry between the limbs. For a laminate, the base wood needs to be flat and smooth.
Step 4: Preparing and Cutting Laminations
Cut your backing (fiberglass) and belly (veneer/composite) materials to the exact shape and dimensions of your limbs, including the handle area. Precision here is key for a strong bond.
Step 5: Dry Fitting and Layout
Lay out your core, backing, and belly layers without glue. Ensure everything aligns perfectly. Mark any adjustments needed. It’s critical that the backing material forms the outermost layer on the back of the bow, and the belly material on the belly.
Step 6: Gluing and Clamping (Laminating)
This is the most critical step for creating a strong composite. Work in a clean, temperature-controlled environment.
- Mix your epoxy resin according to the manufacturer’s instructions.
- Apply a thin, even coat of epoxy to the core material’s surface where the first lamination will attach.
- Carefully place the first lamination (e.g., belly veneer) onto the epoxy, ensuring perfect alignment.
- Apply epoxy to the surface of that lamination, then place the next layer (e.g., backing fiberglass).
- Repeat for all layers. Some bowyers prefer to glue the belly and backing to a central core simultaneously, while others might glue one side at a time, allowing for full cure before proceeding. For a beginner, gluing all layers at once is often more manageable within the epoxy’s working time.
- Once all layers are in place, compress the laminate using your clamps or vacuum bag. The goal is to create very even pressure across the entire surface to ensure a solid bond with no gaps.
- Let the epoxy cure completely, following the manufacturer’s recommended cure time (this can be 24-72 hours depending on the epoxy).
Having a well-organized workspace and all materials prepped before mixing epoxy is vital if you’re using a fast-curing resin. For a more consistent bond, consider using a vacuum bagging system. These systems apply uniform pressure, ensuring no voids. Reputable suppliers of vacuum bagging systems can be found through an internet search for “vacuum bagging for composites.”
Step 7: Shaping the Bow After Curing
Once the epoxy is fully cured, remove the clamps. You’ll now have a solid composite stave. Begin shaping the limbs and handle according to your design using saws, rasps, spokeshaves, and sandpaper. Aim for symmetrical limbs that taper smoothly from the handle to the tips.
Step 8: Tillering – The Heart of Bow Making
Tillering is the art of carefully flexing the bow’s limbs to ensure they bend evenly and in a smooth arc. This is crucial for the bow’s performance and longevity. This step requires extreme patience and precision.
- Initial Bending: Gently fasten the bow to a tillering stick or tree. Attach a temporary string or pull the actual string partway. Observe how the limbs bend.
- Identifying Stiff Spots: Arrows or marks indicate areas that are bending less than others. These are “stiff spots.”
- Scraping: Carefully scrape or sand wood away from these stiff spots on the belly side of the limbs. Never remove wood from the back of the bow!
- Repeat: Repeatedly string the bow a little further and observe the bend. Scrape away any stiff spots. The goal is a smooth, parabolic curve on both limbs.
- Progressive Draw: Gradually increase the draw length as the limbs become more flexible, always checking for even bend.
Never pull the bow to its full intended draw weight or length until the tillering is complete and the bend is perfect. Rushing tillering is the most common way to break a new bow.
Step 9: Shaping the Nocks and Handle
Once tillering is satisfactory, carefully shape the tips (nocks) where the string will attach. Ensure they are strong enough to hold the string securely. Then, wrap the handle area with your chosen grip material for comfort.
Step 10: Stringing and Final Checks
Apply a string to your finished bow. Check the brace height (the distance from the deepest part of the grip to the string) – typically 5-7 inches for a longbow or recurve. Adjust by twisting or untwisting the string. Ensure the string lies perfectly centered on the nocks.
Step 11: Finishing and Sealing
Sand the entire bow smooth with fine-grit sandpaper. Apply a protective finish, such as polyurethane, Tru-Oil, or a wax-based finish, to protect the wood and laminations from moisture and UV damage. Apply several thin coats, allowing each to dry thoroughly.
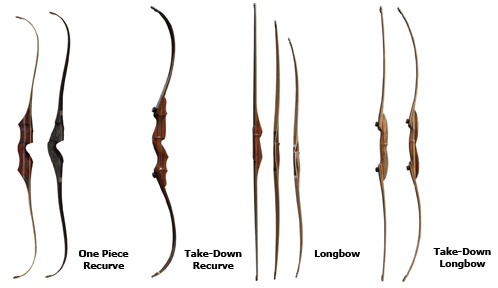
A Comparison of Composite Construction Methods
There are several popular ways to build composite bows, each with its advantages. Understanding these can help you choose the right path for your skills and goals.
| Method | Description | Pros | Cons | Beginner Friendliness |
|---|---|---|---|---|
| Wood Core with Fiberglass Back/Belly | Uses a wood stave as the core, laminated with fiberglass on the back and a wood veneer or composite on the belly. | Good balance of performance and tradition, can be very durable. | Requires careful tillering, gluing can be tricky. | Moderate. Tillering is the main challenge. |
| Full Fiberglass/Composite Stave | Starts with a pre-made fiberglass or carbon composite stave and shapes it. | Excellent performance, very durable, less tillering required as the material is already engineered. | Less “traditional” feel, can be more expensive upfront. | High. Primarily shaping and finishing. |
| Traditional Wood, Sinew, Horn | Uses wood, animal sinew (back), and animal horn (belly) bonded with natural glues. | Historically accurate, beautiful aesthetic, unique feel. | Requires specialized knowledge, materials can be difficult to source, very time-consuming, can be less forgiving. | Low. Expert level. |

Troubleshooting Common Bow Making Issues
Even with the best intentions, you might encounter hiccups. Here are a few common problems and how to address them:
- Delamination (Layers Separating): Usually caused by poor surface preparation, insufficient clamping pressure, or incorrect epoxy mixing. Make sure surfaces are clean and free of dust. Use adequate, even clamping. Ensure your epoxy is mixed precisely. If it’s a small area and caught early, sometimes it can be re-glued!
- Uneven Limb Bend: This is a tillering issue. Go back to your tillering stick and carefully remove wood from the stiff spots. Be patient and remove small amounts at a time.
- Twisting Limbs: A limb twist can happen if the stave was not straight to begin with, or due to asymmetrical stresses during gluing or curing. Sometimes minor twists can be corrected during tillering by applying pressure to the stiff spot, but severe twists might mean starting over with a new core.
- Brittle Bow: This often indicates too much wood was removed during tillering, or that the materials selected weren’t suitable for the draw weight. Always err on the side of caution during tillering.
Frequently Asked Questions (FAQ)
Q1: Is it safe to build my own bow?
Yes, with proper safety precautions and by following established techniques, it is safe. Always wear safety glasses, a dust mask when sanding, and gloves. Never dry-fire a bow (draw and release without an arrow), as this can damage it severely. Ensure your draw weight is suitable for your strength.
Q2: How long does it take to make a composite bow?
The time can vary greatly depending on your experience, the complexity of the design, and the curing times for adhesives. A simple composite flatbow might take 1-2 weeks of dedicated work, including drying and tillering time. More complex recurves can take a month or more.
Q3: What is the best draw weight for a beginner?
For most adult beginners, a draw weight between 25 and 35 pounds is ideal. This allows you to learn proper form and technique without overexerting yourself, which can lead to injury or bad habits. It’s always best to start lower and work your way up.
Q4: Can I use regular wood glue instead of epoxy?
For laminating composite bow layers, especially those involving fiberglass, high-strength epoxy resin is highly recommended. Wood glues like Titebond are generally not as strong or flexible enough to withstand the stresses of a bow, and they may not bond well with fiberglass. Epoxy provides a much more durable and resilient bond.