Removing inserts from carbon arrows is usually best avoided. If needed, gentle heat and patience are key. Aggressive methods can damage your arrows, so proceed with caution! This guide offers a simple, effective, and beginner-friendly fix.
Have you ever found yourself in a bit of a pickle with your carbon arrows? Perhaps you’ve got an insert that’s come loose, or maybe you’re trying to swap out an old one for a new tip. Whatever the reason, figuring out how do you remove inserts from carbon arrows can feel like a daunting task. It’s a common issue, and many archers, especially those just starting out, worry about damaging their valuable arrows. But don’t you worry! It’s not as tricky as it might seem. With the right approach and a little bit of know-how, you can tackle this common problem safely and effectively. We’re going to walk through a straightforward, ‘genius’ method that’s beginner-friendly and focused on preserving your arrows. Let’s get those inserts out without a fuss!
Why Removing Carbon Arrow Inserts Can BeTricky (And Why You Might Need To)
Carbon arrows are fantastic tools for archery. They’re lightweight, durable, and fly true. However, like any piece of equipment, they can sometimes present minor challenges. One such challenge is dealing with the insert – that small component glued inside the front of your arrow shaft, where you screw in your field points, broadheads, or other points. Most of the time, inserts stay put, and you never have to think about them. But sometimes, things change.
You might need to remove an insert for a few reasons:
- A Loose Insert: Over time, or due to a hard impact, the glue holding an insert can weaken. A loose insert can cause inconsistent arrow flight and accuracy, making it essential to fix.
- Replacing a Damaged Insert: If an insert gets bent or damaged during a shot, it needs to be replaced to ensure your arrow flies straight.
- Swapping Components: Some archers like to experiment with different insert weights or styles for tuning their arrows.
- Arrow Repair: In some rare cases, you might need to remove an insert as part of a larger arrow repair.
The main reason it feels tricky is because carbon shafts are sensitive to heat and excessive force. Unlike aluminum arrows, which can tolerate more aggressive handling, carbon requires a gentler touch. Applying too much heat can delaminate the carbon fibers, weakening the shaft and potentially making it unsafe. Too much force can crush or splinter the shaft. So, the key is finding a method that loosens the old glue without harming the arrow itself. That’s where our “genius fix” comes in!
Understanding Arrow Inserts: What They Are and How They Work
Before we dive into the removal process, let’s quickly look at what arrow inserts are. Think of them as the tiny but mighty connectors at the front of your arrow. They are usually made of aluminum or brass and are glued into the pre-drilled nock end of your carbon arrow shaft.
Here’s a breakdown of their role:
- Threaded Connection: The primary job of an insert is to provide a threaded receptacle for your arrow points (like field points or broadheads). This means you can easily screw and unscrew your points without damaging the arrow shaft itself.
- Weight and Balance: Inserts add a small amount of weight to the front of the arrow. This weight distribution is crucial for arrow flight and stability. Different insert weights can be used by archers to fine-tune their arrow setup, a process often called “tuning” or “spine indexing.”
- Shaft Protection: Without an insert, screwing a point directly into the carbon shaft would likely damage the carbon fibers. The insert acts as a durable buffer.
The insert is typically bonded to the inside of the carbon shaft using a type of epoxy or strong adhesive. When you need to remove it, the goal is to break down this bond without damaging the surrounding carbon material. This is why methods that rely on brute force or extreme heat are generally not recommended for carbon arrows. The magic often lies in finding the right balance of gentle heat and mechanical persuasion.

The “Genius Fix”: A Beginner-Friendly Method for Removing Carbon Arrow Inserts
Alright, let’s get to the good stuff! This method is designed to be safe, effective, and easy for beginners to follow. It focuses on using controlled heat and a bit of gentle leverage to do the job. Remember, patience is your best friend here!
What You’ll Need: Essential Tools for the Job
Gathering your tools beforehand makes the process much smoother. Here’s a simple list:
- Heat Source: A hairdryer is ideal. A heat gun on its lowest setting can also work, but use extreme caution to avoid overheating.
- Penetrating Lubricant (Optional but helpful): Products like WD-40 or a specialized penetrating oil can help loosen old glue.
- A Vice or Clamp: To hold the arrow securely while you work. A specialized arrow vise is best, but a regular workbench vise with soft jaws or a buffer (like cloth or wood) works too.
- Insert Pliers or Arrow-Specific Tool: These are designed to grip the insert without damaging the shaft. If you don’t have these, a pair of needle-nose pliers might work, but be very careful not to slip and damage the carbon.
- A Fletching Jig and Glue (for re-installation): If you plan to re-install an insert or a new one.
- Rubbing Alcohol: For cleaning any residue.
- Gloves: To keep your hands clean and provide a better grip.
Step-by-Step Guide: Removing Your Carbon Arrow Insert
Follow these steps carefully. Each one is designed to be straightforward and safe for your carbon arrows.
- Secure the Arrow:The first step is to firmly secure the arrow. The best way to do this is by using a dedicated arrow vise. If you don’t have one, a regular workshop vise can be used, but it’s crucial to protect the arrow shaft. Wrap the shaft in a soft cloth, a piece of leather, or use specialized soft jaws for your vise. Clamp the arrow shaft gently. You want it held firmly enough so it doesn’t move when you apply force to the insert, but not so tight that you crush the carbon. Ensure the insert is facing upwards or outwards, easily accessible.
- Apply Gentle Heat:This is the most critical step. Heat is used to soften the old adhesive holding the insert in place. Grab your hairdryer and set it to a medium or high heat setting. Hold it about 4-6 inches away from the insert area. Move the hairdryer constantly in a circular or back-and-forth motion around the insert and the front inch or two of the arrow shaft. Do this for about 1-2 minutes. The goal is to warm the insert and the immediate area of the shaft enough to soften the glue, not to make the arrow hot to the touch. If you’re using a heat gun, set it to its lowest setting and keep it moving constantly, maintaining a greater distance (6-8 inches) and heating for shorter bursts (30-45 seconds) to avoid overheating. Overheating can damage the carbon shaft, so always err on the side of caution.
Why this works: Most arrow glues are thermosetting epoxies, meaning they get softer when heated and harden again when cooled. Gentle heat expands the metal insert slightly and weakens the bond of the glue, making it easier to remove. For a visual aid on arrow care and basic maintenance, resources from organizations like the U.S. Fish & Wildlife Service often offer insights into equipment handling, though they may not detail specific repair processes.
- Apply Penetrating Lubricant (Optional Step):If the glue is particularly stubborn, you can try a penetrating lubricant. After applying gentle heat, carefully apply a small amount of lubricant (like WD-40) around the seam between the insert and the shaft. Let it sit for a few minutes to work its way into the bond. The heat helps to open up any small gaps for the lubricant to seep into. Wipe away any excess lubricant that runs down the shaft.
- Grip and Twist:Now, it’s time for the gentle persuasion. Use your insert pliers or needle-nose pliers to get a firm grip on the insert. Make sure you’re gripping the metal insert itself, not the carbon shaft. Apply steady, gentle, counter-clockwise pressure. You’re looking for a slow, controlled twist. Avoid sudden jerks or excessive force. If it doesn’t budge easily, it might need a little more heat.
- Reapply Heat and Repeat:If you encounter significant resistance, don’t force it. Apply more gentle heat for another minute, using the same careful technique. After heating, try twisting again. You may need to repeat the heating and twisting process several times. Patience here is key – slow and steady will win the race and save your arrow.
- Removing the Insert:Once the insert starts to turn, continue to twist steadily. It should eventually come free from the shaft. If it feels like it’s binding or grinding excessively, stop, reapply a touch more heat, and try again. Sometimes, an insert can be slightly bent, which makes removal harder. Work it gently back and forth if needed, but always with heat applied.
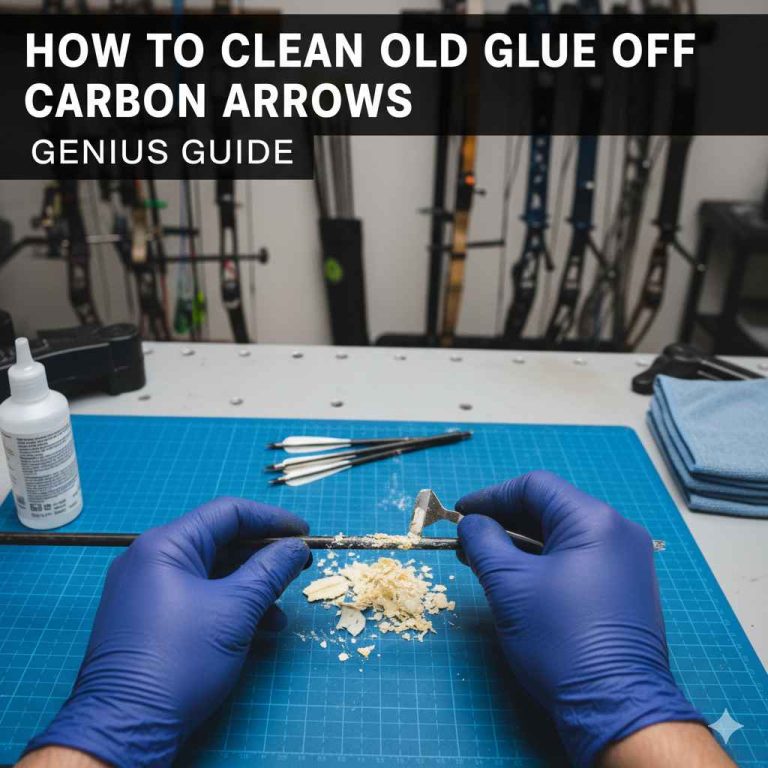
- Clean Up:Once the insert is out, you’ll likely have some old glue residue on both the insert and inside the arrow shaft. Use rubbing alcohol and a clean cloth or Q-tip to carefully clean out the inside of the arrow shaft. Make sure all old glue is removed. Clean the insert as well if you plan to reuse it. Inspect the inside of the shaft for any signs of damage (cracks, splintering) where the insert was seated. If you see any damage, it’s best to discard the arrow for safety reasons.
An Alternative Method: The Boiling Water Technique (Use with Caution!)
While the hairdryer method is generally preferred for its control, some archers use boiling water. This can be effective but also carries a higher risk if not done carefully. The principle is the same: heat softens the glue.
Here’s how it’s typically done:
- Heat a pot of water to just below boiling point.
- Submerge the front end of the arrow shaft (insert end) into the hot water for about 60-90 seconds. Ensure the water level does not go past the insert.
- Remove the arrow, dry the insert area quickly, and then attempt to twist the insert out using pliers as described in the previous method.
Why caution is advised: Carbon shafts can absorb moisture, and prolonged submersion or very hot water can potentially affect the shaft’s integrity or internal components if not managed perfectly. The hairdryer method offers much more precise temperature control.
When You SHOULDN’T Remove an Insert
As Salman Arfeen, I always advocate for safety and preserving your gear. While knowing how to remove an insert is useful, it’s important to recognize when intervention might cause more harm than good. Here are scenarios where you might want to reconsider:
- Minor Scratches on the Shaft: Surface scratches on the carbon shaft itself, away from the insert area, are usually cosmetic and don’t affect performance or safety. Don’t attempt removal just for these.
- Slight Finishes Issues: Small nicks in the paint or clear coat on your arrow are normal wear and tear.
- When in Doubt about Damage: If you suspect the arrow shaft might already be compromised (e.g., from a severe impact where the insert didn’t come loose), trying to remove the insert could potentially cause it to shatter or splinter, further damaging it and creating a safety hazard. It’s better to retire the arrow.
- Arrow is New and Functioning: If your arrow is flying well and there are no issues with the insert, leave it be! Over-tinkering can sometimes lead to problems.
Always trust your instincts. If an arrow feels “off” or you’re unsure about its integrity, it’s always safer to replace it. A new arrow is much cheaper than an injury or a damaged bow.
Table: Pros and Cons of Removing Inserts
Here’s quick look at the advantages and disadvantages of performing this common archery task:
| Pros (Advantages) | Cons (Disadvantages) |
|---|---|
| Allows replacement of damaged or worn inserts. | Risk of damaging the carbon shaft if done improperly (overheating, excessive force). |
| Enables experimentation with different insert weights for arrow tuning. | Requires specific tools and a gentle, patient approach. |
| Facilitates repair of a loose or faulty insert bond. | Old adhesive residue can be difficult to remove completely. |
| Can help salvage an arrow that might otherwise be unusable. | Time-consuming, especially if multiple heating and twisting cycles are needed. |
| Helps maintain arrow accuracy by ensuring a solid point connection. | If the insert is severely bent, removal can be extremely difficult and may damage the shaft. |
Re-installing Inserts: A Quick Overview
Once you’ve successfully removed the old insert and cleaned the shaft, you might want to put a new one in. This is usually done with specialized arrow-building epoxies. Here’s a very simplified overview:
- Clean Everything: Ensure the inside of the shaft and the new insert are thoroughly cleaned with rubbing alcohol.
- Apply Glue: Apply a small amount of arrow-specific epoxy to the outside of the new insert. Don’t overdo it; too much glue can squeeze out and interfere with the point.
- Insert the New Insert: Carefully insert the glued insert into the shaft.
- Align and Set: Ensure the insert is seated fully and is straight. Some inserts have a small indicator line or specific orientation.
- Cure Time: Let the glue cure completely according to the manufacturer’s instructions. This can take 24 hours or more.
It’s always a good idea to check the manufacturer’s guide for your specific arrows and inserts, as there can be variations. For more detailed information on arrow building, resources from archery manufacturers or specialized archery forums can be incredibly helpful.
Common Mistakes to Avoid When Removing Inserts
Even with a foolproof method, beginners can sometimes make errors. Being aware of these pitfalls will help you succeed:
- Too Much Heat: This is the absolute number one mistake. Overheating carbon can cause it to delaminate, creating weak spots or even making the arrow unsafe to shoot. Always use controlled, moving heat.
- Excessive Force: Yanking or forcing the insert can damage the shaft. Work patiently with heat.
- Using the Wrong Tools: Pliers that grip the carbon shaft can easily crush it. Always aim to grip the metal insert.
- Not Securing the Arrow Properly: If the arrow slips while you’re twisting, you could damage it or injure yourself.
- Ignoring Signs of Damage: If the shaft shows cracks or splintering after removal, that arrow should be retired immediately for safety.
- Rushing the Process: Patience is crucial. Trying to do it too quickly often leads to mistakes.

Frequently Asked Questions (FAQ)
Q1: How do I know if my carbon arrow insert is loose?
A: A loose insert will often feel wobbly, or you might hear a “rattling” sound inside the arrow shaft when you tap it. More importantly, a loose insert will prevent your arrow points from screwing in straight and may cause your arrows to fly erratically.
Q2: Can I use a heat gun to remove inserts?
A: Yes, but with extreme caution. Always use the lowest heat setting and keep the gun moving constantly about 6-8 inches away from the insert. Overheating is a major risk with heat guns and can damage carbon shafts. A hairdryer is generally a safer option for beginners.
Q3: What if the insert won’t budge after heating?
A: Don’t force it! Reapply gentle heat for a bit longer, ensuring you’re moving the heat source constantly. You can also try adding a small amount of penetrating lubricant around the seam. Sometimes, it takes multiple cycles of gentle heating and twisting.