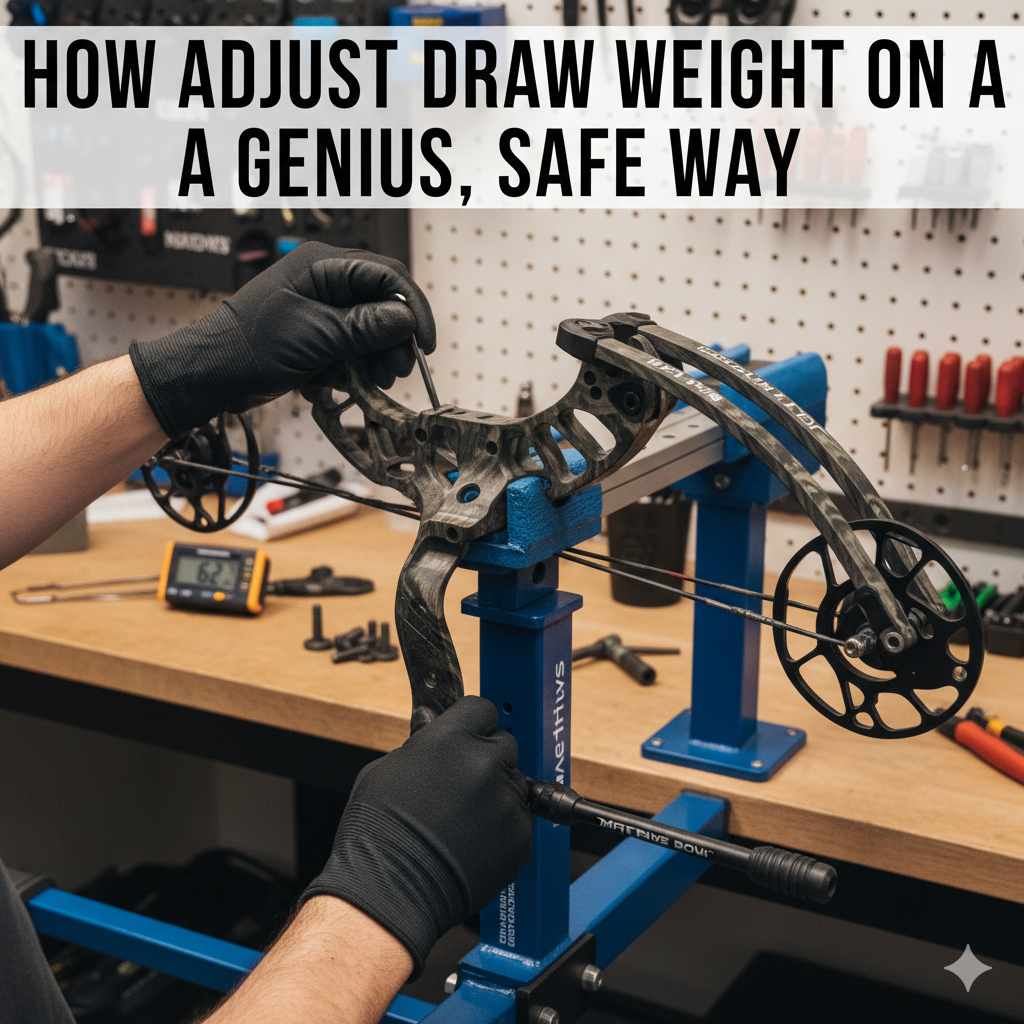
To safely adjust the draw weight on a Mathews bow, use the correct size Allen wrench to turn the top and bottom limb bolts equally. Turn counter-clockwise to decrease the weight and clockwise to increase it. Never turn the bolts more than the manufacturer’s recommended limit, which is typically 8-10 full turns from the fully tightened position.
Welcome, fellow archer! I’m Salman Arfeen, and I’m here to guide you through one of the most common questions I hear: “How do I adjust the draw weight on my bow?” It can feel a bit scary at first. You have this powerful piece of equipment, and the idea of turning bolts can be intimidating. Maybe your bow feels too tough to pull back, or perhaps you’re getting stronger and ready for more power. Don’t worry. Adjusting the draw weight on a Mathews bow is surprisingly simple and safe when you know the right steps. This guide will walk you through everything, making it easy and stress-free. Let’s get your bow feeling perfect for you.
Why Should You Adjust Your Bow’s Draw Weight?
Before we grab any tools, let’s talk about the “why.” Your bow’s draw weight—the amount of force needed to pull the string back to your anchor point—is one of the most important settings for your success and enjoyment in archery. It’s not about pulling the heaviest weight you possibly can; it’s about pulling the right weight for you.
Benefits of a Lower Draw Weight
- Better Form: When you’re not struggling to pull the string, you can focus on proper technique. This means a steadier stance, a smoother release, and a more consistent anchor point. Good form is the foundation of accuracy.
- Reduced Risk of Injury: Trying to pull too much weight can lead to shoulder pain, muscle strain, and other injuries. A comfortable draw weight lets you practice longer and safer.
- Increased Enjoyment: Archery should be fun, not a workout that leaves you sore and frustrated. A bow that’s easy to handle makes every shot more enjoyable.
When to Consider a Higher Draw Weight
- Increased Strength: As you practice, your muscles will get stronger. A slight increase in draw weight can translate to faster arrow speeds and a flatter trajectory, which is great for longer-distance shooting.
- Hunting Applications: For ethical hunting, state and provincial regulations often require a minimum draw weight to ensure enough kinetic energy for a clean harvest. You can check your local regulations, like those from the U.S. Fish & Wildlife Service, for specific requirements.
The key is to find your personal sweet spot. Your ideal draw weight is one you can pull back smoothly and hold steady for several seconds without shaking or straining. For a beginner, starting low and building up is always the best path.
Understanding Your Mathews Bow: A Quick Overview
Mathews bows are famous for their smooth draw cycles and cutting-edge technology. Models like the Phase4, V3X, and others often feature their Crosscentric Cam system, which is engineered for a smooth pull and high efficiency. But at its core, the draw weight on these compound bows is controlled by a simple principle: limb tension.
The bow’s limbs are the flexible planks at the top and bottom. The more they are flexed, the more energy they store and the higher the draw weight. The limb bolts are what control this tension. Tightening them (turning clockwise) pulls the limbs deeper into their pockets, increasing tension and draw weight. Loosening them (turning counter-clockwise) allows the limbs to relax slightly, decreasing tension and draw weight. It’s a beautifully simple and effective system.

Safety First: The Golden Rules of Bow Adjustment
Before you touch a single bolt, we need to talk about safety. Your bow is a powerful tool, and treating it with respect is non-negotiable. Follow these rules every single time.
- Always Know Your Bow’s Limits: The most important rule is to never, ever loosen the limb bolts more than the manufacturer allows. Most Mathews bows have a limit of 8 or 10 full turns from the fully tightened position. Exceeding this can cause the limb bolts to disengage from the riser, which can lead to a sudden and dangerous failure. Your owner’s manual is your best friend here.
- Work in a Safe Space: Make sure you have a clear, well-lit area to work. Point the bow in a safe direction at all times, even when you’re not actively working on it.
- Wear Safety Glasses: This is a simple step that protects you from any unforeseen issues. It’s a small precaution with a big payoff.
- No Dry Firing: Never draw and release a bowstring without an arrow nocked. This can cause the bow to essentially explode in your hands, leading to serious injury and a destroyed bow. This rule always applies, even during adjustments.
The Tools You’ll Need for the Job
The good news is you don’t need a full workshop to adjust your draw weight. The list is short and simple.
- A Set of Allen Wrenches (Hex Keys): You’ll need the specific size that fits your bow’s limb bolts. Most modern Mathews bows use a 1/4 inch or 5/16 inch Allen wrench. A good quality set will prevent you from stripping the bolt heads.
- A Handheld Bow Scale: This is a must-have tool. Guessing your draw weight is a bad idea. A bow scale gives you an accurate reading, so you know exactly what weight you are pulling. They are affordable and easy to use.
- Your Bow’s Owner’s Manual: I can’t stress this enough. Every bow model can have slightly different specifications. The manual tells you the maximum number of turns the limb bolts can be backed out. You can find digital copies on the official Mathews Archery website if you’ve misplaced yours.
The Step-by-Step Guide to Adjusting Your Draw Weight
Alright, you’ve done your reading, you have your tools, and you understand the safety rules. Let’s get to the main event. We’ll walk through this one step at a time. The “genius” part of this method is its simplicity and methodical nature. By being careful and consistent, you ensure a safe and effective adjustment.
Step 1: Find Your Starting Point
First, we need to know where your bow is currently set. For safety and consistency, it’s best to start from the fully tightened position. This is called “bottoming out” the limbs.
- Secure your bow so it won’t slip. You can hold it firmly in your lap or place it on a soft surface.
- Insert your Allen wrench into the top limb bolt.
- Gently turn the bolt clockwise until it stops. Do not overtighten it or use excessive force. Just turn it until it feels snug.
- Repeat the exact same process for the bottom limb bolt.
Your bow is now at its maximum draw weight. This is your baseline, or “zero turns out.”
Step 2: Back Out the Bolts to Decrease Weight
Now we’ll start decreasing the draw weight. The absolute most important rule here is to make equal adjustments to both the top and bottom limb bolts. This keeps the bow’s tiller (the balance between the top and bottom limb) even, which is critical for accuracy and safety.
- Insert the Allen wrench into the top limb bolt.
- Turn it counter-clockwise one full 360-degree rotation. This is “one turn out.”
- Now, move to the bottom limb bolt.
- Turn it counter-clockwise one full 360-degree rotation.
You have now adjusted both limbs by one full turn. If you want to decrease the weight further, repeat the process. For example, to go to two turns out, you would make another full counter-clockwise turn on the top bolt, followed by another full counter-clockwise turn on the bottom bolt.
Keep a careful count of your turns! Never exceed the maximum number of turns listed in your owner’s manual.
Step 3: How to Increase Draw Weight
Increasing the draw weight is the exact opposite process. You will be turning the bolts clockwise. Again, you must keep the turns equal between the top and bottom limbs.
- Start from your current position (for example, let’s say you are at 5 turns out).
- Insert the Allen wrench into the top limb bolt.
- Turn it clockwise one full 360-degree rotation.
- Now, move to the bottom limb bolt.
- Turn it clockwise one full 360-degree rotation.
You have now moved from 5 turns out to 4 turns out, increasing the draw weight. Continue this process until you reach your desired weight or the fully tightened position.
Step 4: Verify with Your Bow Scale
Once you’ve made your adjustments, it’s time to check your work. This step is not optional! It confirms the actual draw weight and ensures everything is set correctly.
- Attach the hook of your handheld bow scale to the D-loop on your bowstring.
- Hold the bow grip firmly in one hand and the scale handle in the other.
- In a safe direction, pull the scale back smoothly, just as if you were drawing the bow.
- Pull until you hit the “back wall” (the point where you can’t pull any further). The scale will record the peak weight.
- Slowly and carefully let the string down. Do not let it snap forward.
- Read the peak weight displayed on the scale. This is your new draw weight.
If the weight is perfect, you’re done! If it’s still a little too high or low, you can make another small, equal adjustment to the limb bolts and measure again.
Understanding Turns vs. Pounds
A common question is, “How much does one turn change the draw weight?” This varies slightly by bow model, but a good rule of thumb is that one full turn on a Mathews bow will change the draw weight by approximately 1.5 to 2.5 pounds. Here is a general guide, but remember to always trust your bow scale over these estimates.
| Mathews Bow Model (Examples) | Max Recommended Turns Out | Approximate Weight Change Per Turn |
|---|---|---|
| Phase4, V3X, V3 | 8 Full Turns | ~2 lbs |
| Prima, Stoke, Avail | 10 Full Turns | ~1.5 lbs |
| Atlas, Traverse | 8 Full Turns | ~2.5 lbs |
Disclaimer: This table is for general reference only. Your bow’s performance may vary. Always consult your official owner’s manual for the exact specifications of your model and use a bow scale for accurate measurements.
Common Mistakes to Avoid
Even simple processes have pitfalls. Here are some of the most common mistakes beginners make and how to avoid them. Staying mindful of these will keep you and your bow safe.
| The Mistake | Why It’s a Problem | The Safe & Smart Solution |
|---|---|---|
| Uneven Adjustments | Adjusting one limb bolt more than the other throws off the bow’s tiller, which ruins accuracy and can put unsafe stress on the limbs and cams. | Always adjust the top and bottom bolts in equal increments. One turn on top, one turn on the bottom. Repeat. |
| Exceeding Max Turns | This is the most dangerous mistake. The limb bolt can lose its thread hold and detach from the riser, causing a catastrophic failure that can destroy the bow and cause serious injury. | Read your manual! Know your bow’s maximum turn limit and never, ever go past it. If in doubt, stop and take it to a pro shop. |
| Guessing the Weight | You can’t know the true draw weight just by feel or by counting turns. This can lead to shooting a weight that is too heavy, hurting your form and risking injury. | Use a handheld bow scale after every adjustment. It’s the only way to know the true peak weight for certain. |
| Using the Wrong Tool | Using a poorly fitting Allen wrench can easily strip the head of the limb bolt, making future adjustments difficult or impossible without a costly repair. | Use a high-quality Allen wrench of the correct size that fits snugly into the bolt head. |
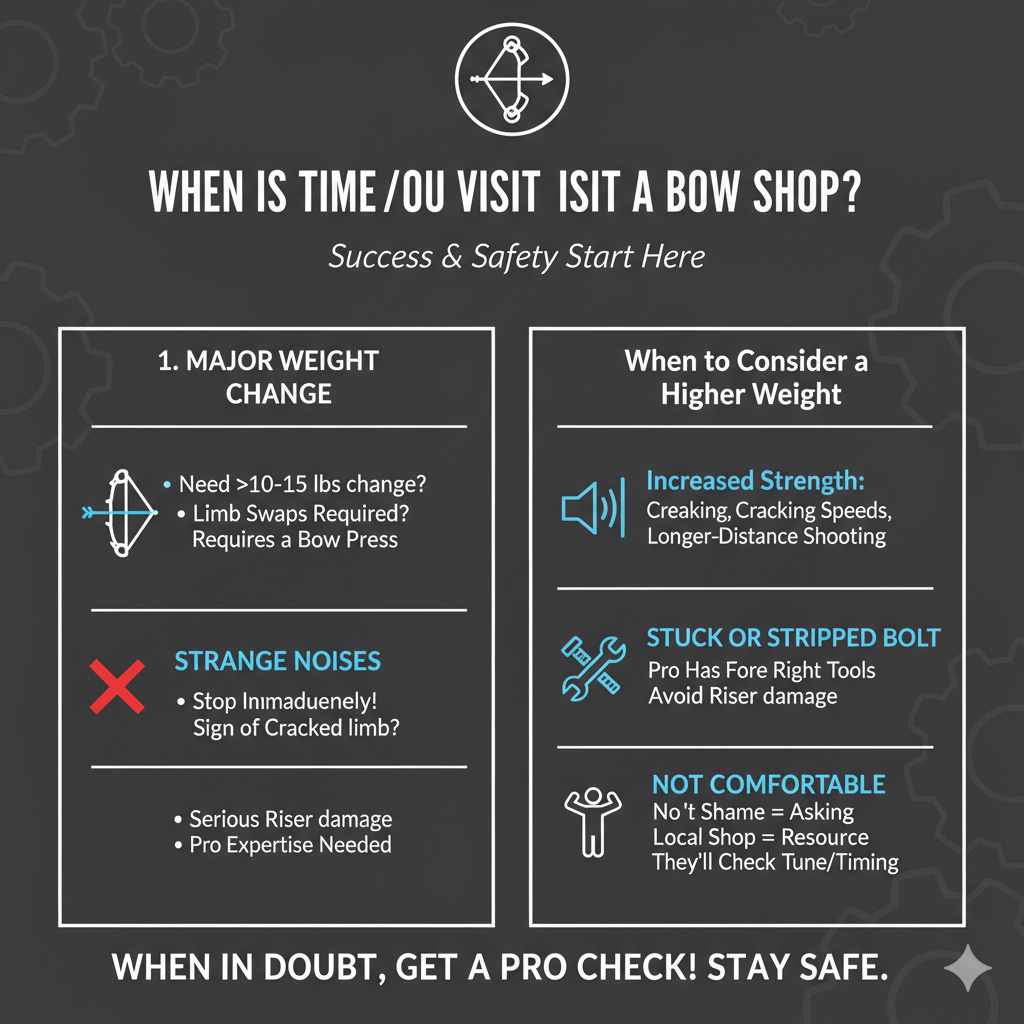
When Is It Time to Visit a Pro Bow Shop?
While adjusting the draw weight within the bolt range is a great DIY skill, there are times when you absolutely should seek professional help from a qualified bow technician.
- If You Need a Major Weight Change: Limb bolts typically offer about 10-15 pounds of adjustment range. If you have 70-pound limbs and need to get down to 45 pounds, you’ll need to have the limbs themselves swapped out. This requires a bow press and professional expertise.
- If You Hear Any Strange Noises: If you hear any creaking, cracking, or popping sounds while adjusting the bolts or drawing the bow, stop immediately. This could be a sign of a cracked limb or another serious issue.
- If a Bolt is Stuck or Stripped: Don’t try to force a stuck bolt. A pro has the right tools and techniques to handle it without damaging your riser.
- If You’re Simply Not Comfortable: There is no shame in asking for help! Your local bow shop is a fantastic resource. They can make the adjustment for you and can also check your bow’s timing and tune while you’re there.
Frequently Asked Questions (FAQ)
1. Do I need a bow press to adjust the draw weight on my Mathews bow?
For standard draw weight adjustments using the limb bolts, you do not need a bow press. You only need a bow press for major work like changing limbs, strings, or cables.
2. How do I know what my bow’s maximum draw weight is?
The maximum draw weight is usually indicated on a sticker on the inside of the bottom limb. For example, it might say “60-70 lbs,” meaning the peak weight is 70 pounds and it can be safely adjusted down to 60 pounds.
3. What happens if I turn the limb bolts too far out?
Turning the limb bolts beyond the manufacturer’s recommended maximum is extremely dangerous. The bolt can disengage from the riser, causing the limb to fly off under high tension. This can destroy the bow and cause severe injury. Always follow the manual’s guidelines.
4. Is it better to shoot a higher or lower draw weight?
For beginners, a lower draw weight is always better. It allows you to develop proper form without struggling. An ideal weight is one you can pull back smoothly and hold for at least 10 seconds without shaking. Accuracy from good form is far more important than raw power.
5. Does changing the draw weight affect my bow’s sight pins?
Yes, it most likely will. Decreasing the draw weight will make your arrow fly slower, causing it to hit lower at a distance. You will need to re-sight your bow after making any significant draw weight adjustment. It’s a great opportunity to get some practice in!
6. How is draw weight different from draw length?
Draw weight is the force required to pull the string back. Draw length is the distance from the nocking point on the string to the throat of the grip at full draw. They are two separate and independent adjustments. Adjusting draw weight with the limb bolts does not change your draw length on a Mathews bow.
Conclusion: Your Bow, Perfectly Tuned for You
There you have it—a safe, simple, and genius way to adjust the draw weight on your Mathews bow. By being methodical, patient, and always putting safety first, you’ve just unlocked a key skill in archery. You no longer have to struggle with a bow that’s too heavy or wonder if you’re ready for more power. You now have the control to make your bow a perfect extension of yourself.
Remember the core principles: always make equal adjustments, never exceed your bow’s limits, and always verify your work with a bow scale. This careful process is what turns a potentially intimidating task into a confident and rewarding one.
Now, go and enjoy your perfectly adjusted bow. Feel how much smoother the draw is, how much steadier you can hold your aim, and watch your groups get tighter. This is what archery is all about—precision, control, and the deep satisfaction of a well-placed shot. Happy shooting!