How to Braid a Bow Wrist Sling: Step-by-Step Guide
Braid a bow wrist sling and enhance your archery accuracy and comfort with a custom-made accessory that fits you perfectly. A well-braided sling not only looks great but also provides crucial support, preventing your bow from falling and ensuring a more stable shot. This comprehensive guide will walk you through the entire process, from selecting materials to finishing your unique wrist sling.
For another bow accessory project, How to Braid a Paracord Bow Sling Easily gives readers a useful follow-up.
We’ll cover everything you need to know to successfully braid a functional and stylish bow wrist sling. Whether you’re a seasoned archer or new to the sport, this guide will equip you with the knowledge and steps to create a personalized sling that elevates your shooting experience.
Simply put, braiding a bow wrist sling involves selecting quality cordage, preparing it for braiding, executing a chosen braid pattern, and securely attaching it to your bow. This guide provides a detailed, step-by-step process to ensure a durable and personalized sling for improved archery performance.
Key Takeaways
- Braid a bow wrist sling using durable paracord or similar synthetic materials for longevity.
- Properly prepare your cords by cutting them to an appropriate length and securing the ends.
- Master a chosen braid pattern, such as a four-strand round braid, for a strong and aesthetically pleasing sling.
- Ensure secure attachment points to your bow using strong knots and hardware.
- Personalize your sling by choosing colors and adding decorative elements.
What is a Bow Wrist Sling?
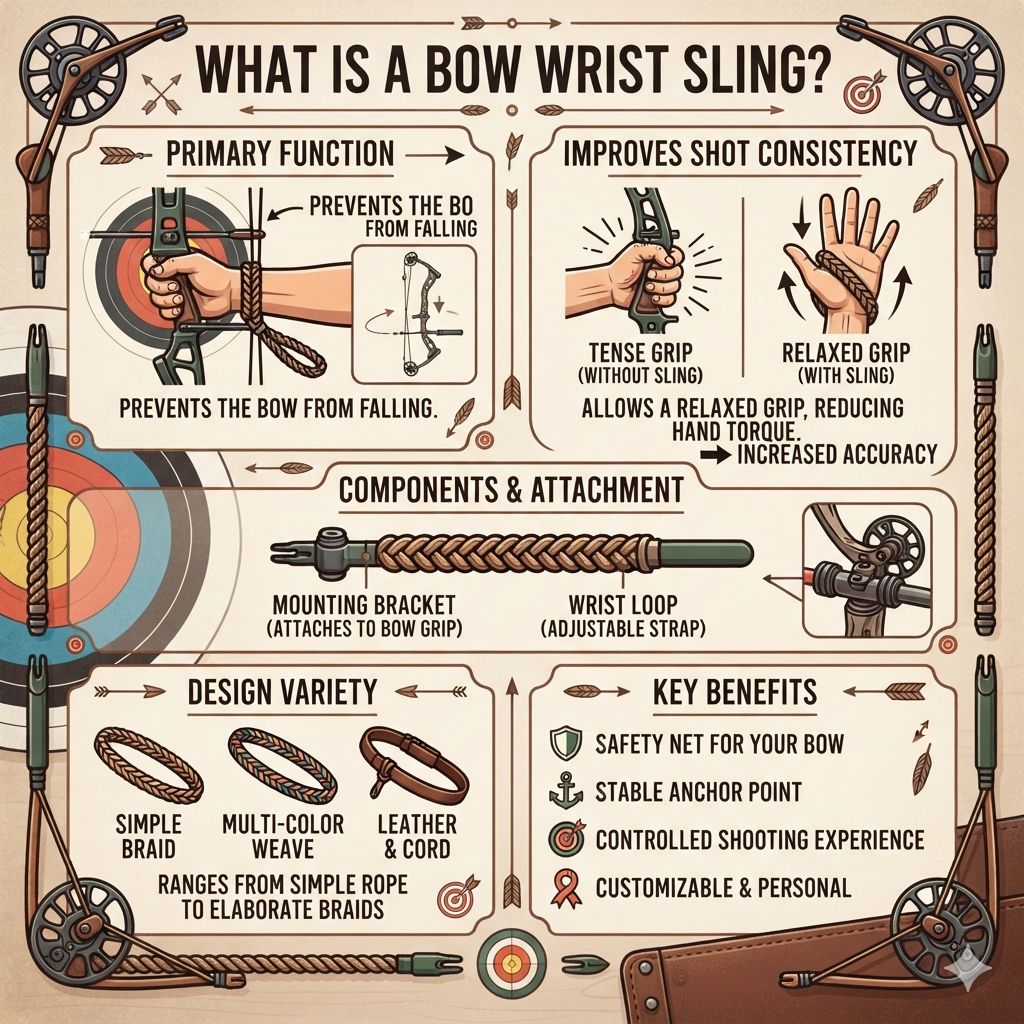
A bow wrist sling is a piece of equipment used in archery that attaches to the grip of a compound or recurve bow and wraps around the archer’s wrist. Its primary function is to prevent the bow from falling from the archer’s hand during or after the shot. This is particularly important for compound bows, which often have a free-fall mechanism where the string moves freely without interference once released.
Beyond preventing accidental drops, a properly fitted wrist sling can also contribute to shot consistency. By taking some of the weight off the archer’s hand and providing a secure anchor point, it allows for a more relaxed grip, which can lead to fewer hand-induced torque variations during the shot cycle. This ultimately translates to improved accuracy and a more controlled shooting experience.
The design of a wrist sling can vary, from simple single-strand ropes to elaborate multi-strand braids. The choice often comes down to personal preference, the type of bow, and the desired level of customization. However, the core purpose remains the same: to provide a reliable safety net for your bow and a stable anchor for your wrist.
Materials Needed to Braid Your Bow Wrist Sling
Gathering the right materials is the first crucial step to successfully braiding a bow wrist sling. The quality and type of materials you choose will directly impact the durability, comfort, and overall appearance of your finished product. For most applications, synthetic cords are preferred due to their strength, resistance to stretching, and ability to withstand outdoor elements.
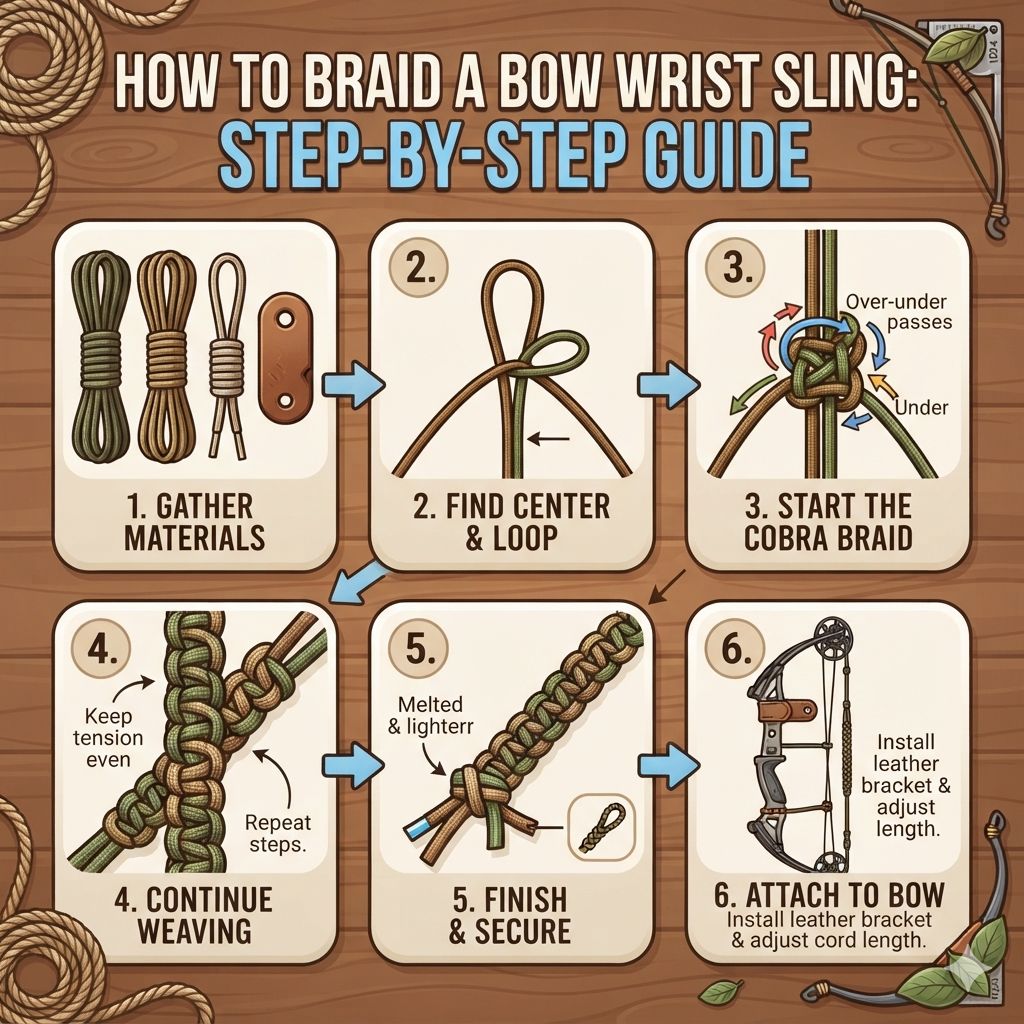
The most common and highly recommended material for braiding bow wrist slings is paracord, specifically Type III 550 paracord. This cord is known for its strength (rated for 550 pounds of tensile strength), its inner strands which can be used for finer work or added strength, and its wide availability in a vast array of colors. You’ll typically need at least three to four strands of paracord for a robust braid.
In addition to the cordage, you’ll need a few other items to complete the project. Sharp scissors or a utility knife are essential for cutting the cord cleanly. A lighter or a heat source is necessary for melting and sealing the ends of the paracord to prevent fraying.
For attaching the sling to your bow, you might need a split ring, a small carabiner, or a sturdy knot. Some crafters also use a small piece of heat shrink tubing to create a neater, more secure connection point at the bow’s riser.
Cordage Selection
- Paracord (Type III 550): The go-to choice for durability and strength. Available in countless colors for customization.
- Alternatives: Specialty braided archery slings or other high-strength synthetic ropes can also be used, though paracord offers the best balance of cost, availability, and performance.
- Color Combinations: Mix and match colors for a unique look. Consider two or three distinct colors for visually appealing patterns.
Tools and Hardware
- Sharp Scissors/Knife: For precise cord cutting.
- Lighter/Heat Source: To melt and seal cord ends.
- Measuring Tape: For accurate cord length measurement.
- Optional: Split ring, small carabiner, heat shrink tubing, needle and thread for extra reinforcement.
Preparing Your Cords for Braiding
Before you can begin braiding, it’s essential to prepare your cords correctly. This step ensures that your braid is even, tight, and that the ends are securely finished, preventing unraveling. Properly prepared cords make the entire braiding process much smoother and result in a more professional-looking sling.
The first step is determining the correct length for your cords. This is a critical measurement that depends on the type of braid you plan to use and how long you want the finished sling to be. A common starting point for a four-strand round braid using paracord is to cut each strand to approximately 4 to 5 feet (1.2 to 1.5 meters) in length.
It’s always better to have a little extra length than not enough, as you can trim excess later.
Once you have your cords cut to length, you need to prepare them for the braiding process. For paracord, this usually involves separating the outer sheath from the inner strands if you intend to use only the inner strands for a thinner braid, or using the entire cord as is. For a standard 550 paracord, using all strands provides good thickness and strength.
Cutting Cords to Length
The exact length will vary based on the braid pattern and desired finished length. A good rule of thumb for a 4-strand round braid on a wrist sling is:
- Measure: Measure out 4 to 5 feet (1.2 to 1.5 meters) for each of the four strands.
- Cut: Use sharp scissors or a utility knife to make a clean cut.
- Seal: Immediately after cutting, carefully use a lighter to melt the very end of the paracord. Press the melted end flat with the side of the lighter or a metal object to create a sealed, rounded tip that won’t fray. Do this for all cut ends.
Securing the Working End
At the starting end of your braid, you need a way to keep all the cords together as you begin. This can be done in several ways:
- Overlapping and Taping: Overlap the ends of all cords by about 2-3 inches and secure them tightly with masking tape.
- Knotting: Tie a simple overhand knot with all cords together, leaving a small tail of about 2-3 inches. This tail will be integrated into the braid or trimmed and sealed later.
- Heat Shrink Tubing: Slide a piece of heat shrink tubing over the overlapped ends and use a heat gun or lighter to shrink it securely. This provides a very clean and professional finish.
Whichever method you choose, ensure that the working end is held firmly together, allowing you to begin the braiding process without the individual cords slipping apart.
The Four-Strand Round Braid: A Popular Choice
The four-strand round braid is a versatile and widely used braiding technique that creates a strong, durable, and visually appealing cordage. It’s an excellent choice for a bow wrist sling because it results in a smooth, rounded profile that is comfortable against the wrist and robust enough for regular use. This braid pattern is relatively easy to learn, making it accessible for beginners.
To begin a four-strand round braid, you’ll need four cords. These cords are arranged in pairs, and the braiding process involves consistently moving one strand over two others and under the fourth. The key to a tight and uniform braid is to maintain consistent tension on all strands throughout the process.
As you braid, the pattern will naturally twist and form a rounded shape.
The consistent tension and the interlacing pattern of the four-strand braid make it incredibly strong. This inherent strength is vital for a bow wrist sling, which needs to withstand the forces exerted during archery. The rounded form also ensures that the sling sits comfortably on your wrist without sharp edges or uncomfortable pressure points, contributing to a better shooting experience.
Setting Up for the Braid
- Arrange Cords: Lay out your four prepared cords side-by-side.
- Assign Positions: Mentally (or physically) label them as Cords 1, 2, 3, and 4 from left to right.
- The Pattern: The fundamental movement is to take the outermost left cord (Cord 1), move it over the next cord (Cord 2), and under the one after that (Cord 3), bringing it to the right side.
- Repeat on Other Side: Then, take the outermost right cord (Cord 4), move it over the adjacent cord (Cord 3), and under the next one (Cord 2), bringing it to the left side.
- Maintain Tension: As you pull each cord through, maintain even tension on all strands. This is crucial for an even braid.
- Continue: Repeat these steps, always working with the outermost strands, alternating sides. The braid will start to form a circular, twisted pattern.
Tips for Consistent Tension
- Anchor Point: Secure the starting end of your braid (the taped or knotted end) to a stable surface, like a clamp on a workbench or a heavy object.
- Even Pulling: Use both hands to pull each cord, ensuring equal force is applied.
- Watch the Form: As you braid, observe the pattern forming. If one side looks looser than the other, adjust your tension on the appropriate cords.
- Take Breaks: If your hands get tired, take a short break. Consistent tension is easier to maintain when your hands are relaxed.
With practice, the four-strand round braid becomes intuitive. The consistent rhythm of moving the outer cords over two and under one will quickly become second nature, allowing you to create a beautiful and functional sling efficiently.
How to Attach the Sling to Your Bow
The attachment point of your wrist sling to the bow’s riser is critical for both security and function. A poorly attached sling can lead to the bow falling, or it can interfere with the bow’s performance. Fortunately, most modern compound bows have dedicated attachment points, typically a small threaded hole or a sling loop on the lower part of the riser.
The most common and secure method of attachment involves using a split ring or a small, sturdy carabiner. The braided section of your sling needs to be terminated in a way that can securely loop through this ring or clip onto the carabiner. This termination usually involves a final knot or a series of sealed ends.
Beyond the standard attachment point, some archers prefer to use alternative methods for a more customized fit or to avoid potential vibration transfer. However, for a reliable and effective setup, utilizing the manufacturer-provided attachment point with a robust connection is generally the best practice.
Common Attachment Methods
| Method | Description | Pros | Cons |
|---|---|---|---|
| Split Ring | A small, strong metal ring that attaches to the bow’s riser and the sling’s loop. | Secure, common, easily replaceable. | Can sometimes rattle if not fitted properly. |
| Small Carabiner | A quick-release clip that attaches to the riser and the sling. | Easy on/off, good for quick adjustments. | Can be bulkier, potential for accidental release if not secured. |
| Direct Knot | Tying the end of the sling directly to the bow’s attachment point with a secure knot. | Minimalist, no extra hardware. | Difficult to remove or adjust without untying. |
The split ring method is widely favored for its balance of security and ease of use. Ensure the ring is of good quality and fits snugly into the bow’s attachment point.
Finishing the Sling End for Attachment
Once your braid is the desired length, you need to finish the end to create a loop or attachment point.
- Knotting: Tie a strong knot, like a figure-eight or a double overhand knot, using all the strands of your braid. Leave a sufficient tail (about 1-2 inches) to securely integrate into the braid or seal.
- Melting and Flattening: Carefully melt the tail ends with a lighter and press them flat against the knot or the braid itself. This creates a solid, integrated stopper.
- Heat Shrink Tubing: For a very clean finish, slide a piece of heat shrink tubing over the knot and the end of the braid. Heat it until it shrinks tightly. Trim any excess cord before shrinking.
- Loop Creation: Ensure the knot or tubing creates a loop that can easily pass through a split ring or carabiner, or serves as the direct attachment point.
The goal is a clean, secure, and streamlined end that won’t snag on anything and can withstand the forces of drawing and releasing the bow.
Customizing Your Bow Wrist Sling
One of the biggest advantages of braiding your own bow wrist sling is the ability to customize it completely. This goes beyond just functionality; it allows you to create a piece of gear that reflects your personal style and preferences. Color combinations, braid patterns, and added embellishments can all contribute to a unique and personalized accessory.
Color is the most straightforward way to personalize your sling. By choosing different colors of paracord, you can create striking patterns. For a four-strand braid, alternating two colors creates a classic two-tone effect.
Using three or four colors can lead to more intricate and eye-catching designs. Consider the colors of your bow, your hunting attire, or simply your favorite hues.
Beyond color, you can explore different braid patterns. While the four-strand round braid is popular, other options like a cobra weave or a hollow braid can offer different textures and appearances. Some archers even incorporate small beads or other decorative elements into the braid, though it’s important to ensure these additions don’t compromise the sling’s integrity or comfort.
Color Combination Ideas
- Two-Color Classic: Alternate two complementary or contrasting colors for a balanced look.
- Three-Color Harmony: Use three colors, perhaps a dominant color, a secondary color, and an accent color, woven together.
- Camouflage Effect: Combine earth tones like green, brown, and tan for a traditional hunting aesthetic.
- High Visibility: Use bright colors like neon green, orange, or yellow for increased visibility, especially important for safety during hunting.
- Team Spirit: Match the colors of your favorite sports team or school.
Decorative Elements and Embellishments
Adding small decorative elements can make your sling truly one-of-a-kind. When choosing embellishments, always prioritize security and functionality over pure aesthetics.
| Element | Considerations | Best For |
|---|---|---|
| Beads | Use larger beads with wide holes that can be easily incorporated into the braid without weakening it. Avoid small, sharp beads. | Adding a pop of color or a subtle visual accent. |
| Woven Charms | Small, lightweight charms can be woven into the end of the braid. Ensure they are securely attached and don’t have sharp edges. | Personalized symbols or good luck charms. |
| Contrast Stitching | Use a contrasting color thread to add decorative stitching to the end of the braid or the attachment loop. | Adding fine detail and visual interest. |
When adding any embellishments, ensure they are firmly secured and won’t create drag or interfere with your shot. The primary function of the sling must always remain paramount.
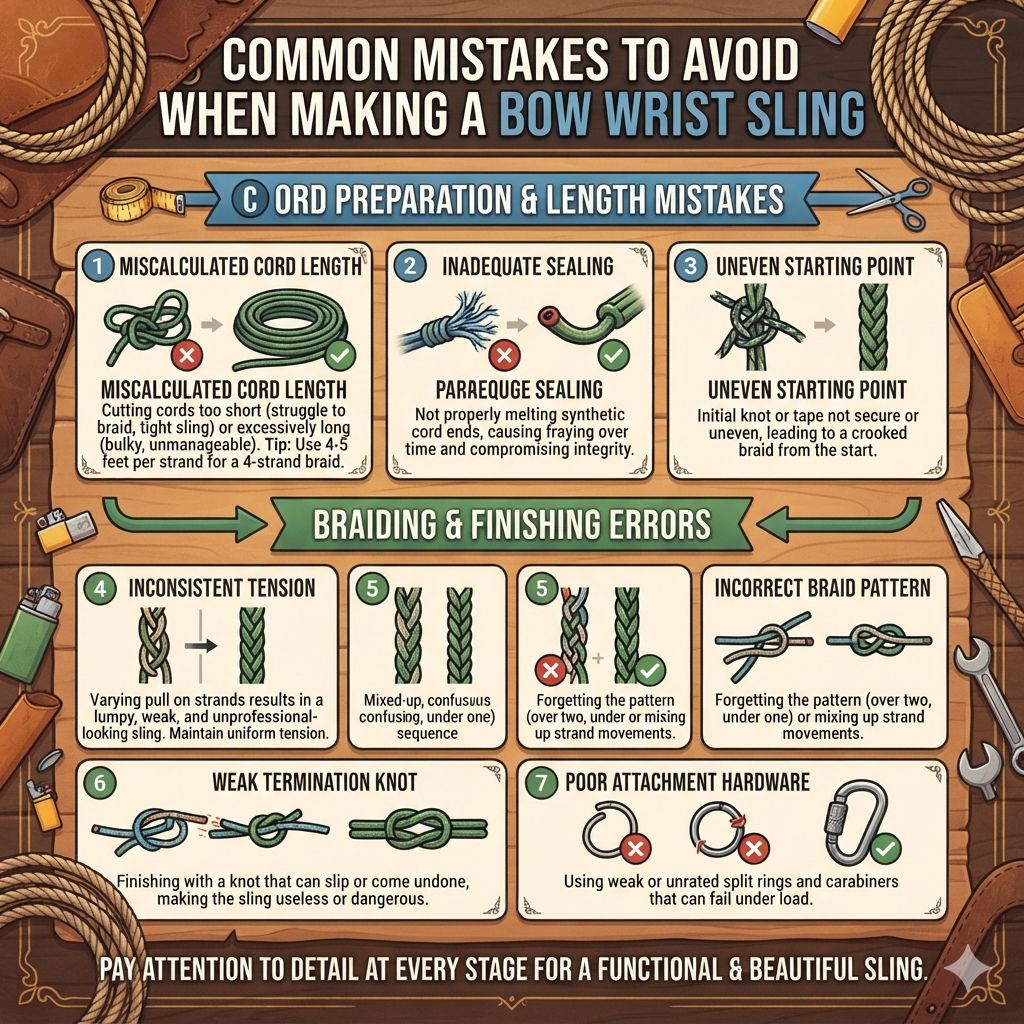
Common Mistakes to Avoid
Even with detailed instructions, beginners can sometimes encounter issues or make mistakes that affect the quality and functionality of their bow wrist sling. Being aware of these common pitfalls can help you create a superior product from the start.
One of the most frequent errors is miscalculating the cord length. If your cords are too short, you’ll find yourself struggling to complete the braid, or the finished sling will be too tight for comfortable use. Conversely, excessively long cords can lead to a bulky, unsightly sling with too much excess material to manage.
Another common mistake involves inconsistent tension during braiding. This results in an uneven, lumpy braid that is both aesthetically unpleasing and potentially weaker. Maintaining uniform tension on all strands is key to achieving a professional-looking and robust sling.
This often requires practice and attention to detail throughout the braiding process.
Mistakes in Cord Preparation and Length
- Cord Length: Cutting cords too short is a major issue. Always err on the side of having slightly too much length; excess can be trimmed and sealed. For a standard 4-strand round braid, 4-5 feet per strand is a safe bet.
- Inadequate Sealing: Not properly melting and sealing the cut ends of synthetic cords like paracord will cause them to fray and unravel over time, compromising the sling’s integrity. Ensure all ends are thoroughly sealed and rounded.
- Uneven Starting Point: If the initial knot or tape used to hold the cords together at the start is not secure or is uneven, it can lead to a crooked or uneven braid from the very beginning.
Braiding and Finishing Errors
- Inconsistent Tension: As mentioned, this is a critical factor. Loose sections and tight sections will make the braid look unprofessional and can create weak points.
- Incorrect Braid Pattern: Forgetting the pattern (over two, under one) or mixing up the strand movements will result in an incorrect braid that may not hold its shape or strength.
- Weak Termination Knot: The knot used to finish the end of the sling must be robust. A knot that can slip or come undone will render the sling useless and potentially dangerous. Use a reliable knot like a figure-eight or a double overhand.
- Poor Attachment Hardware: Using a flimsy split ring or a carabiner that isn’t rated for the load can lead to failure. Always opt for strong, durable hardware.
By paying close attention to these details during each stage of the process, you can avoid common errors and ensure your handmade bow wrist sling is both beautiful and highly functional.
Frequently Asked Questions
What is the best type of cord for a bow wrist sling?
Paracord, specifically Type III 550 paracord, is widely considered the best choice for braiding bow wrist slings. It offers an excellent balance of strength, durability, resistance to the elements, and a vast selection of colors for customization. Its inner strands can also be utilized for finer projects, though for a wrist sling, using the full cord is generally recommended for thickness and strength.
How long should the cords be for braiding a wrist sling?
The length of the cords depends on the braid pattern and the desired final length of the sling. For a common four-strand round braid used for wrist slings, cutting each of the four strands to approximately 4 to 5 feet (1.2 to 1.5 meters) is a good starting point. It’s always advisable to cut them a little longer than you think you’ll need, as excess can be trimmed and sealed.
Can I use different braid patterns for a bow wrist sling?
Yes, you can. While the four-strand round braid is popular for its strength and comfort, other braid patterns like the cobra weave, hollow braid, or even a simple three-strand braid can be used. The choice of pattern will affect the look, feel, and potentially the strength of the sling.
Ensure the chosen pattern is robust enough for archery use.
How do I make sure the sling is comfortable to wear?
Comfort is achieved through a combination of factors: the braid pattern should be smooth and rounded, avoiding sharp edges. The length should be appropriate – not too tight, not too loose. Using paracord provides a good balance of flexibility and rigidity.
Some archers also find that a wider braid or incorporating a softer material for the part that contacts the wrist can enhance comfort, though this is less common for DIY paracord slings.
What is the lifespan of a braided paracord wrist sling?
A well-made paracord wrist sling can last for several years with regular use. However, its lifespan depends on several factors, including the quality of the paracord, the amount of use, exposure to UV rays and moisture, and the specific stresses it undergoes. Regularly inspect your sling for signs of wear, fraying, or damage to the attachment points, and replace it if any issues are found.
Final Thoughts
Braid a bow wrist sling yourself and gain a reliable, personalized accessory that can significantly enhance your archery experience. By following these steps, you’ve learned how to select materials, prepare cords, execute a strong braid, and attach it securely to your bow. This DIY project not only saves money but also allows for a level of customization unmatched by off-the-shelf options.
Enjoy your custom-crafted, high-performance bow wrist sling on your next trip to the range or out in the field.