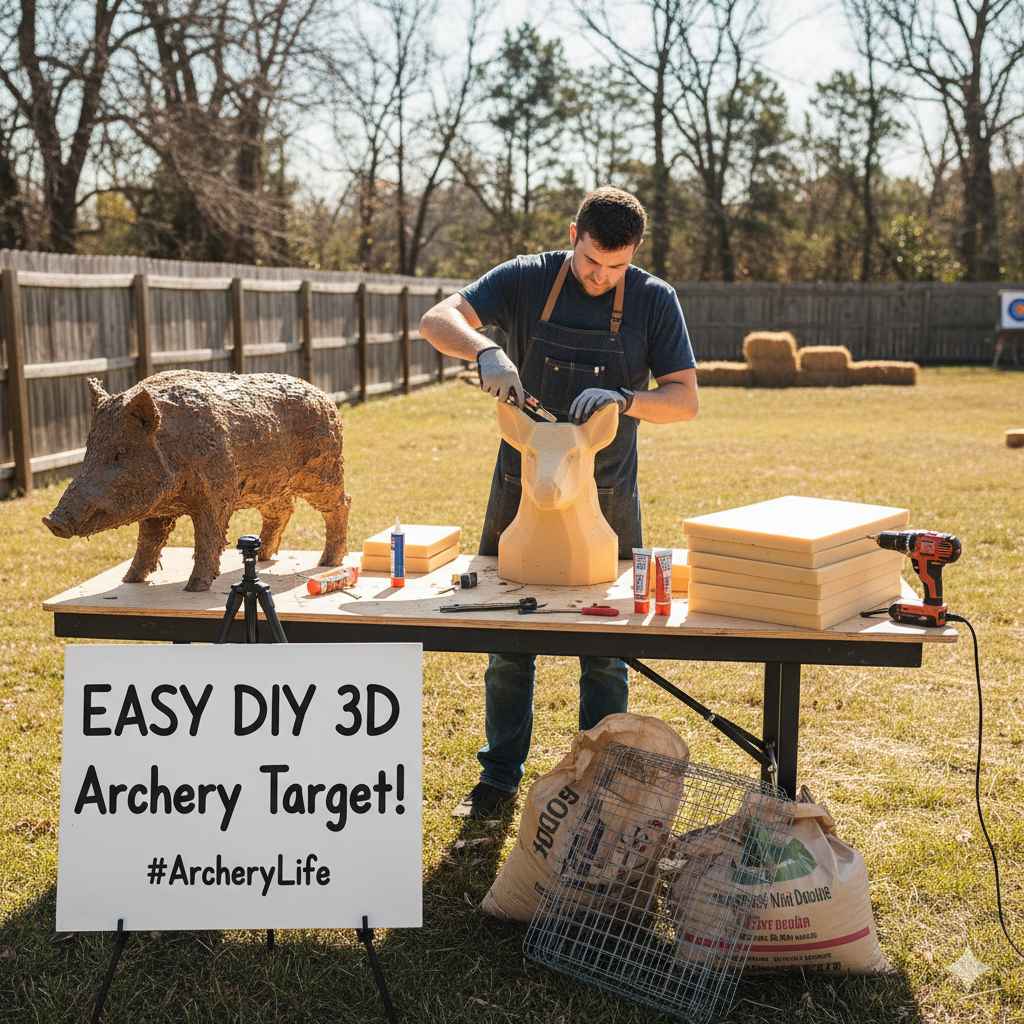
Making your own 3D archery target might seem tricky at first. Many beginners wonder where to start or if it’s even possible without special tools. This guide will show you it’s easier than you think!
We’ll walk through everything step by step. Get ready to learn How to Build a 3D Archery Target (Easy DIY Guide) and hit the range with confidence.
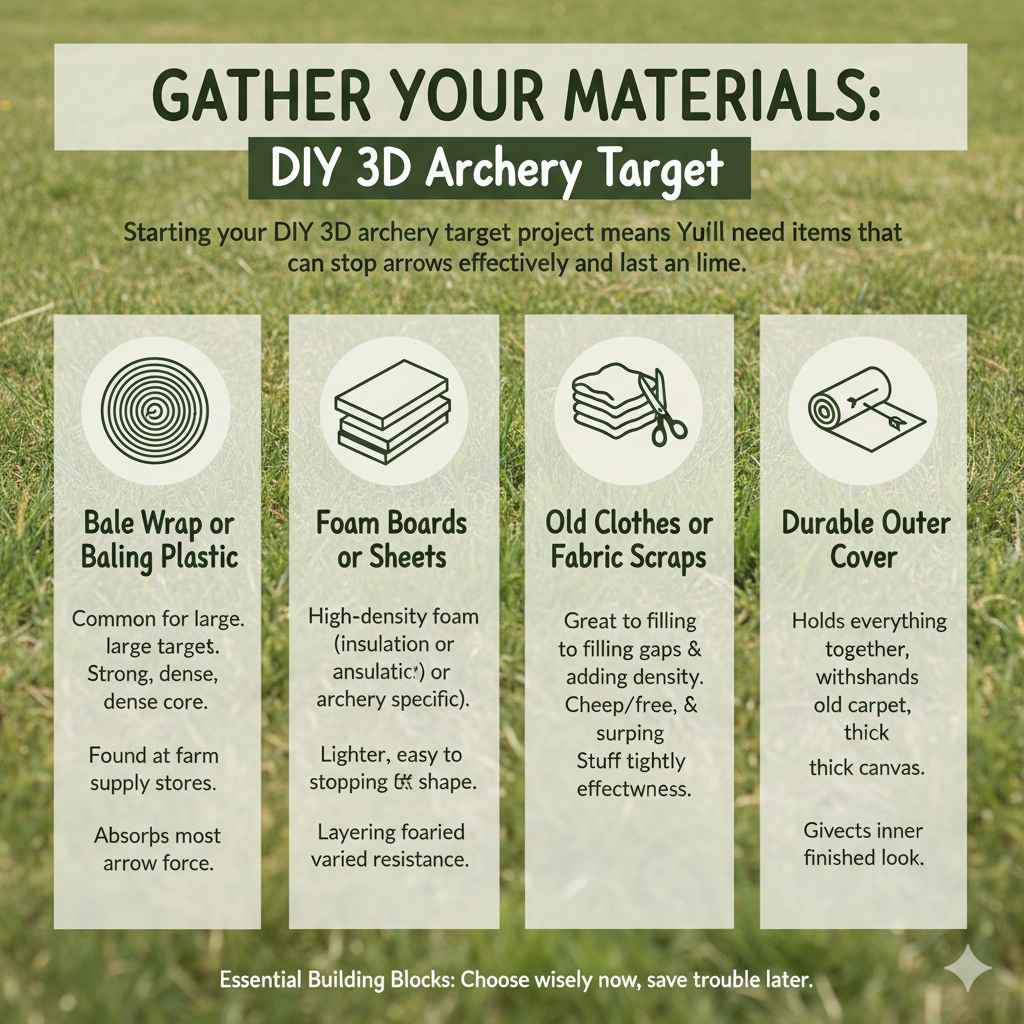
Gathering Your Materials for a 3D Archery Target
Starting your DIY 3D archery target project means getting the right stuff. You’ll need items that can stop arrows effectively and last a long time. Think about what kind of targets you’ve seen and what makes them work.
This section covers the basics of what you’ll need to get started.
Essential Building Blocks
The heart of any good archery target is its ability to absorb arrow energy. This stops your arrows from passing through and also makes them easier to pull out. Different materials offer different stopping powers and lifespans.
Choosing wisely now will save you trouble later.
Bale Wrap or Baling Plastic: This is a common material for large target butts. It’s like the plastic used to wrap hay bales. It’s strong and can be packed tightly.
You can often find it at farm supply stores or sometimes get it used for free. It forms the dense core of your target, absorbing most of the arrow’s force.
Foam Boards or Sheets: High-density foam, like insulation foam boards or specific archery target foam, is excellent. It provides a consistent stopping surface. It’s lighter than bale wrap and can be easier to cut and shape.
Layering different types of foam can offer varied resistance for your arrows.
Old Clothes or Fabric Scraps: These are great for filling gaps and adding density. They are cheap or free and can help create a softer, more forgiving stopping surface. Stuffing them tightly into your target structure is key to its effectiveness.
Durable Outer Cover: You’ll need something tough to hold everything together and withstand weather. Heavy-duty tarp, old carpet remnants, or even thick canvas can work. This layer protects the inner materials and gives your target a finished look.
Tools You Will Need
Having the right tools makes building your target much smoother. You don’t need a workshop full of power tools for most DIY targets. Simple hand tools are often all that’s required.
These are the basics to have ready.
Sharp Knife or Box Cutter: For cutting foam, fabric, or plastic sheeting. Make sure the blades are new and sharp for clean cuts. A dull blade can tear materials.
Measuring Tape: Accuracy in cutting and assembling is important. Measure twice, cut once! This will ensure your target is the right size and shape.
Heavy-Duty Staple Gun and Staples: For attaching the outer cover to itself or a frame. Industrial-grade staples are best for holding tough materials securely.
Duct Tape or Strong Packing Tape: Useful for temporary fixes or reinforcing edges. It’s a versatile tool for any DIY project.
Gloves and Safety Glasses: Protect your hands and eyes. Working with sharp objects and packing materials can be hazardous.
Designing Your DIY 3D Archery Target
Before you start cutting and packing, it’s smart to think about your target’s design. A well-planned target performs better and lasts longer. Consider where you’ll be shooting and what kind of arrows you use.
Target Size and Shape
The size of your target depends on the space you have and your archery goals. For backyard practice, a smaller, more portable target might be ideal. For a dedicated range, you might build a larger, more permanent one.
Shapes can vary too, from simple squares to more complex layered designs.
Standard Square or Rectangular Target: This is the easiest design for beginners. You build a box or a layered block. Its simple construction makes it quick to assemble.
It’s also very stable.
Layered Target: This involves stacking multiple layers of different materials. Each layer can contribute to stopping power. It helps distribute the impact force evenly across the target.
This can extend the target’s life significantly.
Freestanding vs. Mounted Target: Decide if your target will stand on its own or be mounted on a stand or frame. A freestanding target needs a stable base.
A mounted target might be easier to move and adjust height.
Stopping Power Considerations
The main job of your target is to stop arrows safely. This means packing materials very tightly. Loose packing leads to arrows going too deep or even through the target.
The type of arrows you shoot also matters. Heavier arrows need more stopping power.
Arrow Speed and Weight: Faster and heavier arrows hit harder. They require denser and more robust target materials. Using materials designed for high-impact absorption is key for these arrows.
Arrow Diameter: Wider arrows create larger holes, which can degrade the target faster. Consider how the material will seal around larger diameter shafts.
Arrow Pull: A good target makes arrows easy to pull. If arrows are too hard to remove, the materials might be too dense or packed in a way that grips the fletching too tightly.
Building the Target Core
The core is the most critical part of your DIY 3D archery target. It’s what actually stops the arrows. Packing this section correctly is vital for performance and longevity.
This is where the real work happens.
Using Bale Wrap or Baling Plastic
Bale wrap is a cost-effective way to build a dense target. You can often get rolls of it from local farms or agricultural suppliers. It’s strong and can be compressed significantly.
Form a Core Structure: You can use a sturdy wooden frame or even tightly packed cardboard boxes to define the shape of your target. For a square target, build a strong wooden box without a top or bottom.
Start Wrapping: Begin wrapping the bale wrap tightly around a central form or as you build up layers within your frame. Use a strong tape to secure the beginning of the wrap.
Pack Tightly: Continue wrapping, pulling the plastic as taut as possible with each layer. The goal is to create a very dense block. Imagine you are creating a dense, solid mass.
Compress and Secure: Once you have a good amount of wrap, you might need to compress it further. You can use straps or ratchet ties to squeeze it into a dense bale. Ensure it’s uniformly compressed.
A well-packed bale wrap core can stop arrows very effectively. It’s also quite durable and can withstand many impacts. The density is its main advantage for arrow stopping.
Layering Foam Boards
Foam boards offer a cleaner and lighter alternative. They are easy to cut and assemble. You can often find them at hardware or craft stores.
High-density options are best for archery.
Cut Foam to Size: Measure and cut your foam boards into the desired dimensions for your target. You can cut them into squares, rectangles, or even custom shapes. A sharp knife or box cutter works best here.
Stack the Layers: Stack the cut foam pieces on top of each other. You can create a solid block by gluing them together or by using straps to hold them firmly compressed.
Consider Foam Types: Mixing foam types can be beneficial. For example, a softer foam layer at the front can help catch arrows gently, while a denser foam layer behind it provides the main stopping power.
Ensure Tight Fit: Make sure the foam pieces fit together snugly with no gaps. Gaps can allow arrows to penetrate deeper than intended. Use a strong adhesive if gluing layers together.
Foam targets are generally easier to make and lighter to move. The consistent density of foam provides predictable arrow stopping. This makes them a popular choice for many archers.
Adding the Outer Cover and Finishing Touches
Once your core is built, it needs a durable outer cover. This protects the core materials and holds everything together. It also gives your target a finished, professional look.
Constructing the Outer Shell
The outer cover is the target’s protective skin. It needs to be tough enough to withstand repeated arrow impacts and outdoor elements. The method of attachment is important for durability.
Choose a Durable Material: Heavy-duty tarp, thick canvas, or old carpet are good choices. They should be waterproof or water-resistant to protect the inner core from rain and moisture.
Wrap the Core: Drape your chosen material around the core structure. Ensure it’s pulled taut and smooth. You want to avoid wrinkles or loose spots that could catch arrows incorrectly.
Secure the Cover: Use a heavy-duty staple gun to attach the edges of the cover together and to any frame you might have. Overlap seams generously for extra strength. Duct tape can be used to reinforce edges or cover staple lines.
Create a Replacement System: For easier maintenance, consider a design where the outer cover can be opened or removed. This allows you to replace worn sections or re-pack the core as needed.
A well-made cover will significantly extend the life of your target. It keeps the inner materials from being exposed to damage.
Adding a Striking Surface (Optional)
Some archers like to add a specific striking surface to the front of their target. This can improve arrow stoppage and make arrow removal even easier.
Carpet Remnants: A thick, tightly woven carpet can be a great front surface. It’s forgiving and helps stop arrows smoothly.
Specialty Archery Target Faces: You can purchase dedicated archery target faces that attach to the front of your DIY target. These are designed for optimal arrow capture and arrow pull.
Rubber Mats: Thick rubber mats can also serve as a durable and effective striking surface. They absorb impact well.
Attaching these surfaces securely with staples or strong adhesive is key. They should be flush with the outer cover for a smooth surface.
Making it Stand
Your target needs a stable base to stand on. If you’re not mounting it, consider how it will remain upright during shooting.
Wooden Frame Base: Build a simple wooden frame that the target core sits inside or on top of. This adds stability and prevents the target from tipping over.
Weighting the Base: For lighter targets, you might need to add weight to the base to keep it from moving when hit by an arrow.
Ground Stakes: If using it outdoors on soft ground, you can use stakes to secure the base to the earth.
A stable target is a safe target. Always ensure it’s firmly planted before you start shooting.
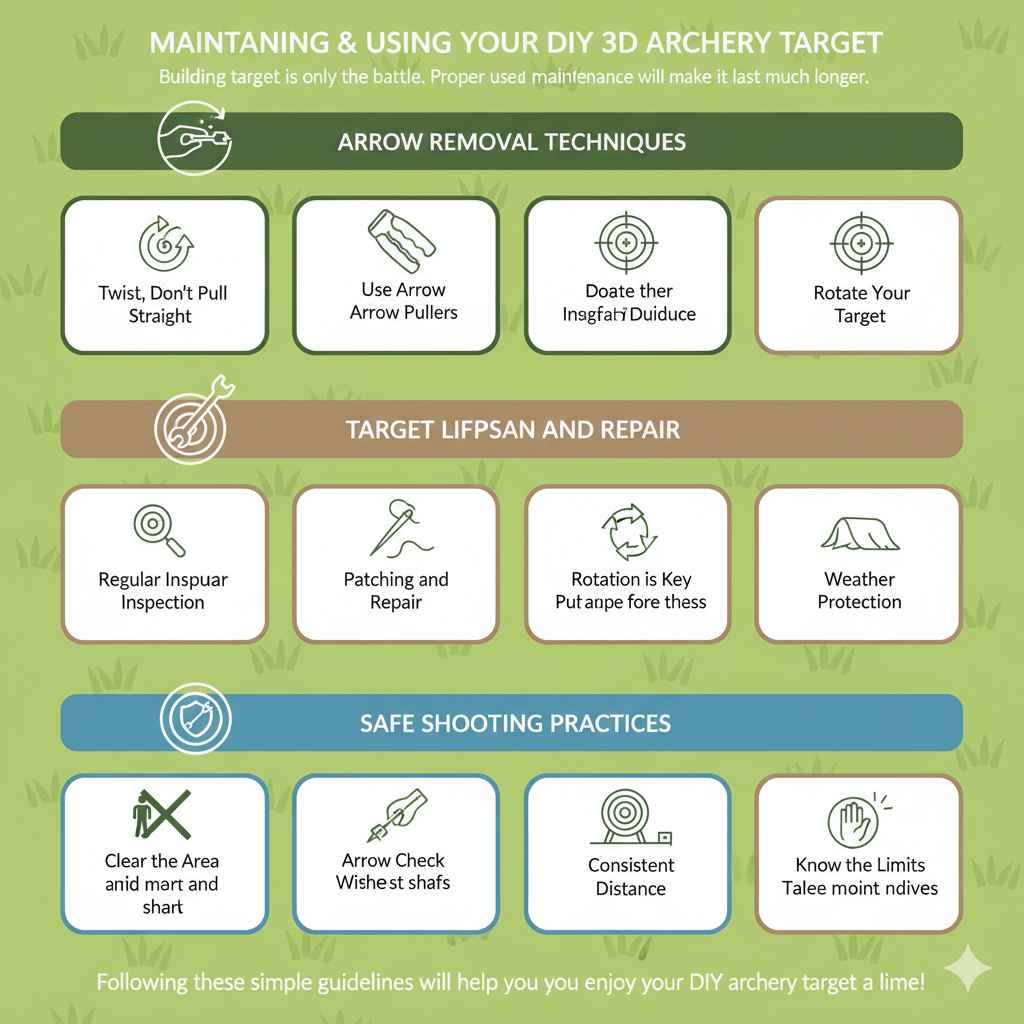
Maintaining and Using Your DIY 3D Archery Target
Building a target is only half the battle. Proper use and maintenance will make it last much longer and perform better.
Arrow Removal Techniques
Getting arrows out of a target can sometimes be tough. Here are some tips to make it easier and prevent damage to your arrows or the target.
Twist, Don’t Pull Straight: Gently twist your arrow as you pull it. This breaks the suction and reduces friction. Most target materials will release easier with a slight rotation.
Use Arrow Pullers: Invest in an arrow puller tool. These rubber grips provide extra leverage and make removing arrows much easier, especially from dense targets. They also help prevent hand strain.
Avoid Over-Penetration: Shoot at a target appropriate for your arrow’s speed and weight. Over-penetration can bury arrows too deep, making them very difficult to extract.
Rotate Your Target: Don’t shoot all your arrows into the same spot. Spread your shots around the target face. This distributes wear and tear, and prevents the formation of deep, hard-to-pull arrow holes.
Target Lifespan and Repair
Even the best DIY targets will eventually wear out. But with a little care, you can extend their life significantly.
Regular Inspection: Check your target regularly for signs of wear, such as tears in the cover or deeply damaged areas. Address minor issues before they become major problems.
Patching and Repair: Small tears in the cover can be patched with heavy-duty tape or by sewing on a patch of similar material. If certain areas of the core become too compressed or damaged, you might be able to re-pack them.
Rotation is Key: As mentioned, rotating where you shoot on the target is crucial. This means using different sides, top to bottom, and left to right. A target with multiple shooting surfaces will last much longer.
Weather Protection: When not in use, try to protect your target from prolonged exposure to sun and rain. Covering it with a tarp or storing it under a shelter can prevent material degradation.
Safe Shooting Practices
Safety is always the top priority when practicing archery.
Clear the Area: Ensure the area behind and around your target is clear of people, pets, and any obstructions. Know your backstop. Make sure there is no risk of a missed arrow hitting something unintended.
Arrow Check: Before shooting, inspect your arrows for any damage. Cracked or bent arrows can be dangerous and may break upon impact, sending fragments flying.
Consistent Distance: Try to shoot from a consistent distance. This helps you gauge your accuracy and also prevents excessive wear on one spot of the target.
Know Your Limits: Don’t attempt shots you are not comfortable with. If the target is not suitable for your equipment, practice at a different venue.
Following these simple guidelines will help you enjoy your DIY archery target for a long time. It’s rewarding to shoot at something you built yourself!
Frequently Asked Questions
Question: How much does it cost to build a DIY 3D archery target?
Answer: The cost can vary a lot. If you use mostly recycled materials like old clothes, scrap wood, and free bale wrap, you might spend very little, perhaps under $50. If you buy new foam, heavy-duty tarp, and specialized materials, it could cost $100 to $200 or more, depending on the size and complexity.
Question: Can I use a regular foam mattress for my target?
Answer: While a foam mattress might seem like a good idea, it’s usually too soft for archery arrows. Arrows may pass right through or embed themselves too deeply, making them very hard to pull out. High-density foam specifically designed for targets or construction is much better.
Question: How do I make my DIY target more durable?
Answer: Durability comes from using strong materials and packing them very tightly. A tough, waterproof outer cover is essential. Regularly rotating your shooting spots on the target also prevents it from wearing out too quickly in one area.
Question: What kind of arrows can my DIY target handle?
Answer: A well-built DIY target can handle most types of arrows, from field points to broadheads, depending on its density and construction. For very powerful bows, you’ll need a denser, more robust core. Always test your target with a few shots from a safe distance to see how it performs.
Question: Is it better to build a square target or a round one?
Answer: For DIY purposes, square or rectangular targets are usually easier to build. You can create a sturdy frame and pack materials evenly. Round targets can be more challenging to construct and maintain a consistent density throughout.
Wrap Up
You’ve learned how to build your own 3D archery target. This guide showed you how to gather materials, design your target, and put it all together. With simple steps, you can create a functional and durable target.
Enjoy practicing your archery skills with your custom-built target!