Making carbon fiber arrow shafts involves cutting raw shafts to your draw length, squaring the ends for perfect alignment, and then installing components like inserts, nocks, and fletchings. Using an arrow saw, fletching jig, and proper glue ensures you create custom, high-performance arrows perfectly matched to your bow and shooting style.
Have you ever felt like store-bought arrows just aren’t quite right for you? Maybe they are too long, too stiff, or the colors just don’t match your style. It can be frustrating. But what if I told you that making your own custom carbon fiber arrows is easier than you think? It’s a rewarding project that gives you full control over your gear.
Building your own arrows saves money and helps you understand your equipment on a deeper level. This guide will walk you through every step in a simple, clear way. We’ll cover everything you need, from tools to techniques. Soon, you’ll be shooting arrows you built with your own hands!
Why Make Your Own Carbon Fiber Arrows?
Building your own arrows might seem like a lot of work, but the benefits are huge, especially for archers who want to improve their skills. It’s about more than just saving a few dollars; it’s about taking control of your performance and understanding what makes an arrow fly true. Let’s look at why so many archers choose to build their own.
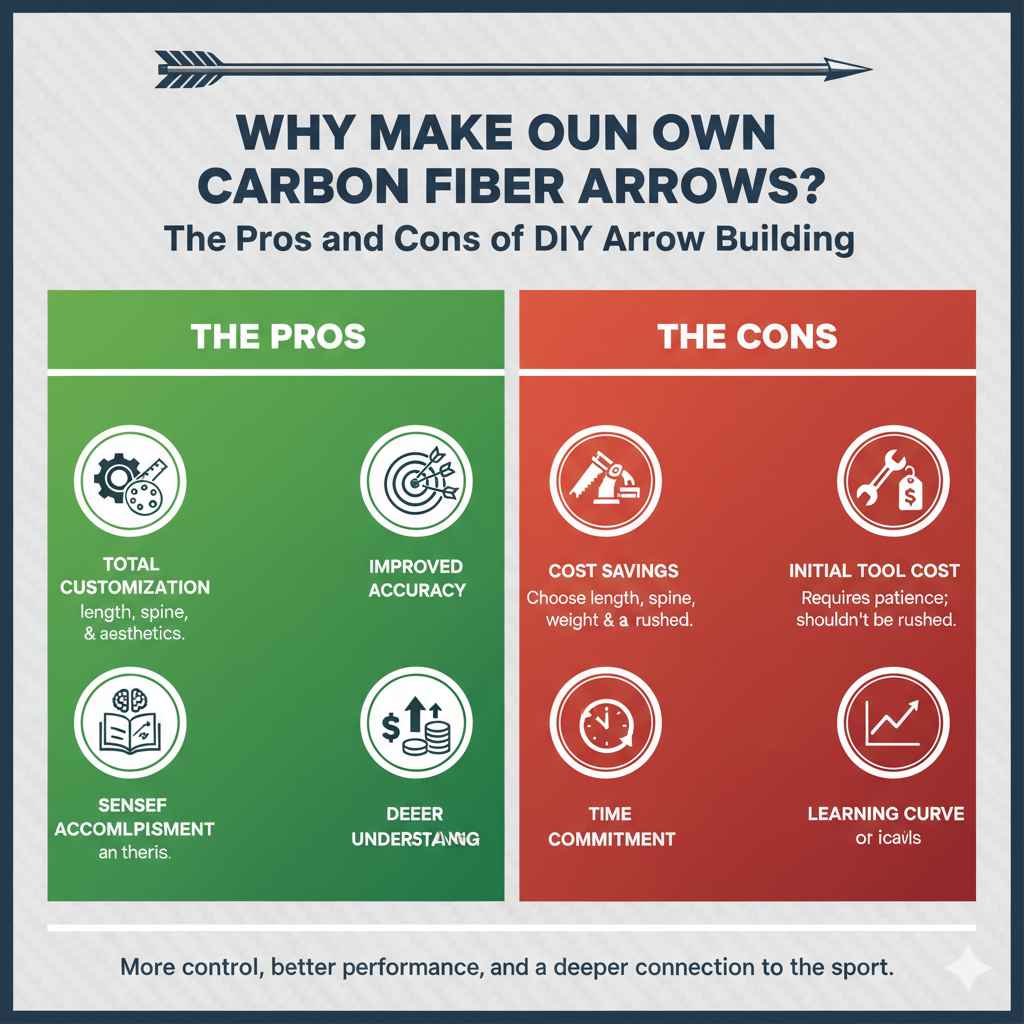
The Pros and Cons of DIY Arrow Building
- Total Customization: You get to choose everything. You can pick the perfect length, stiffness (spine), and weight for your specific bow and shooting style. You can also choose the color of your fletchings and nocks for a look that is all your own.
- Improved Accuracy: When you build your own arrows, you can make sure every single one is identical. This consistency leads to tighter groups and more predictable shots. You control the quality from start to finish.
- Cost Savings: Buying the components and building arrows yourself is often much cheaper than buying pre-made, high-end arrows. The initial investment in tools pays for itself over time.
- Deeper Understanding: The process teaches you so much about archery physics. You’ll learn how arrow spine, weight, and balance (F.O.C.) affect flight. This knowledge makes you a smarter, more adaptable archer.
- Sense of Accomplishment: There’s nothing quite like hitting the bullseye with an arrow you built yourself. It connects you to the sport on a whole new level.
Of course, there are a few things to consider before you start.
- Initial Tool Cost: You will need to buy some specific tools, like an arrow saw and a fletching jig. This is a one-time cost, but it’s something to budget for.
- Time Commitment: Building a dozen arrows takes time and patience, especially when you are first learning. It’s a process that shouldn’t be rushed.
- Learning Curve: Your first batch might not be perfect, and that’s okay! There is a small learning curve, but with practice, you will get the hang of it quickly.
Understanding the Basics: What is a Carbon Fiber Arrow?
Before we start building, let’s quickly cover the key parts of a carbon fiber arrow. Understanding these terms will help you choose the right components for your bow. Think of it like learning the ingredients before you start cooking.
Key Arrow Terms You Need to Know
- Shaft: This is the main body of the arrow. For this guide, we’re focusing on carbon fiber shafts, which are known for being strong, straight, and lightweight.
- Spine: This is the most important factor. Spine measures the stiffness of the arrow shaft. A “weaker” spine (higher number) bends more easily, while a “stiffer” spine (lower number) bends less. Your arrow’s spine must match your bow’s draw weight and your arrow length. An incorrect spine is a major cause of poor arrow flight.
- GPI (Grains Per Inch): This tells you the weight of the raw shaft per inch. A higher GPI means a heavier arrow. Heavier arrows are quieter and penetrate better, while lighter arrows fly faster and flatter.
- Straightness Tolerance: This measures how straight the shaft is. It’s usually shown as a number like ±.001″, ±.003″, or ±.006″. The smaller the number, the straighter the arrow, which generally means better potential for accuracy. For most archers, a ±.003″ or ±.006″ straightness is more than enough.
Choosing the right spine is critical. An arrow that is too weak can be dangerous, and one that is too stiff won’t fly accurately. Always check the manufacturer’s chart to match your bow’s draw weight and your arrow length to the correct spine.
| Bow Draw Weight (Pounds) | Common Arrow Spine | Best For |
|---|---|---|
| 25-40 lbs | 500 – 600 | Beginner recurve bows, low-poundage compound bows |
| 40-55 lbs | 400 | Most common for deer hunting and target archery |
| 55-70 lbs | 340 | Standard for modern compound hunting bows |
| 70-85 lbs | 300 | High-performance compound bows, heavy draw weights |
Tools and Materials You’ll Need
Having the right tools makes the job easy, safe, and fun. You don’t need a professional workshop, just a few key items. Here is a list of everything you’ll need to get started.
Essential Equipment List
- Raw Carbon Shafts: Choose shafts with the correct spine for your bow. They are sold by the dozen.
- Arrow Saw: A high-speed abrasive saw is essential for a clean, square cut on carbon. Do not use a regular pipe cutter or hacksaw, as they will splinter the carbon fibers.
- Fletching Jig: This tool holds the shaft in place and precisely guides your fletchings (the “feathers” or vanes) onto the shaft at the correct angle.
- Arrow Squaring Tool: This device ensures the ends of your cut shaft are perfectly flat and square. This is crucial for proper nock and insert alignment, which directly impacts accuracy.
- Inserts and Field Points/Broadheads: Inserts are small metal cylinders glued into the front of the arrow. They have internal threads that allow you to screw in your points.
- Nocks: These are the plastic tips at the back of the arrow that clip onto the bowstring.
- Fletchings (Vanes or Feathers): These are the stabilizers at the back of the arrow. Vanes are plastic and are great for all-weather shooting. Feathers are traditional and forgiving but can be affected by rain.
- Arrow Glue/Adhesive: You will need a fletching glue (often called fletching cement) for the vanes and a stronger, slower-setting epoxy or hot melt glue for the inserts.
- Denatured Alcohol or Acetone: Used for cleaning the shafts and nocks before gluing to ensure a strong bond.
- Safety Gear: Safety glasses and a dust mask are non-negotiable, especially when cutting carbon. Carbon dust is harmful if inhaled.
- Measuring Tape: To determine the correct arrow length.
The Proven, Easy Way: A Step-by-Step Guide
Ready to build? Let’s get to it! Follow these steps carefully, and you’ll have a set of custom arrows in no time. Take your time, focus on one step at a time, and enjoy the process.
Step 1: Measure and Cut Your Shafts
First, you need to determine your correct arrow length. The easiest way is to use a full-length arrow and draw your bow back. Have a friend mark the arrow shaft about 1 to 1.5 inches in front of the arrow rest. This extra length ensures the broadhead will be safely in front of your fingers.
Once you have your measurement, it’s time to cut. Put on your safety glasses and dust mask. Set your arrow saw to the desired length. Place the shaft in the saw and turn it on. Slowly and gently rotate the shaft as you cut. Let the saw do the work; don’t force it. This will give you a clean, splinter-free cut.
Step 2: Square the Ends
This step is often skipped by beginners, but it’s vital for accuracy. Even the best arrow saw can leave a slightly uneven edge. An arrow squaring tool will sand the end of the shaft perfectly flat (90 degrees).
Hold the tool and insert the cut end of the arrow shaft. Gently twist the shaft against the abrasive surface inside the tool. A few turns are all you need. You will see a small ring of carbon dust form, which tells you the end is now perfectly square. Do this for both the front and back ends of the shaft.
Step 3: Clean and Prep the Shafts
Glue won’t stick well to a dirty or oily surface. Take a paper towel and moisten it with denatured alcohol or acetone. Thoroughly wipe the inside of the shaft where the insert will go (about one inch deep) and the outside of the shaft where the fletchings will be placed. This removes any carbon dust or factory residue and creates a perfect surface for the adhesive.
Step 4: Install the Inserts
It’s time to glue in the inserts. For this, a two-part epoxy or hot melt glue is best. Super glue can be too brittle and may crack on impact.
If using epoxy, mix a small amount according to the package directions. Apply a thin, even layer around the shank of the insert. Gently push the insert into the front of the shaft with a slight twisting motion until it is fully seated. Wipe away any excess glue that squeezes out with a paper towel.
If using hot melt, heat the glue stick and apply a small amount to the insert. Heat the insert itself for a moment, then push it into the shaft. The advantage of hot melt is that it sets instantly and can be re-heated to remove or adjust the insert later.
Set the arrows upright on their points and let the glue cure completely. Check the instructions on your glue for curing times.
Step 5: Install the Nocks
This is the easiest step! Most nocks are designed to be a simple press-fit. Line up the nock and push it firmly into the back of the arrow shaft. You should feel a solid “snap” or “click” as it seats. If it feels too loose, you can use a tiny bit of string wax or a drop of soft glue, but most modern nocks fit very securely on their own.
Step 6: Fletch Your Arrows
This is the final and most creative step. Place a shaft into your fletching jig. Make sure the nock is properly seated in the jig’s receiver. Place one vane into the clamp of the jig.
Apply a thin, steady bead of fletching glue down the base of the vane. Don’t use too much, or it will squeeze out and make a mess. Press the clamp onto the jig, seating the vane firmly against the arrow shaft. Let it sit for the time recommended by the glue manufacturer (usually 15-30 seconds for quick-set glues).
Carefully remove the clamp. Rotate the shaft in the jig to the next position (most jigs have 3-fletch or 4-fletch settings) and repeat the process for the remaining vanes. After all vanes are on, let the arrow sit for several hours before shooting to ensure the glue is fully cured.
Safety First: Essential Precautions
Your safety is the top priority. Building arrows is a safe hobby, but there are a few things to be mindful of, especially when working with carbon fiber.
- Protect Your Lungs: Cutting carbon fiber creates very fine dust that is harmful to breathe. Always wear a NIOSH-approved dust mask or respirator. Work in a well-ventilated area, like a garage with the door open. According to the National Institute for Occupational Safety and Health (NIOSH), fine airborne particles can pose a respiratory hazard.
- Protect Your Eyes: Always wear safety glasses when cutting shafts or working with glues. Tiny pieces of carbon can fly off the saw, and you don’t want glue splashing into your eyes.
- Handle Glues Carefully: Work in a ventilated area to avoid inhaling strong fumes from adhesives. Avoid getting glue on your skin. If you do, clean it off immediately.
- Check for Damage: Before you ever shoot an arrow you’ve built (or any carbon arrow), flex it and listen for any cracking or splintering sounds. Rotate the arrow and check for any visible damage. Never shoot a damaged carbon arrow, as it can shatter upon release and cause serious injury.
Choosing the Right Components for Your Bow
The beauty of building your own arrows is that you can fine-tune every part. But with so many choices, where do you start? Here’s a simple breakdown to help you pick the right components.
Vanes vs. Feathers
The biggest choice you’ll make for fletchings is between plastic vanes and natural feathers. Neither is “better” — they just have different jobs.
| Feature | Plastic Vanes | Natural Feathers |
|---|---|---|
| Durability | Extremely durable and waterproof. | Lighter but more fragile. Can get matted when wet. |
| Guidance | Provide excellent guidance at high speeds. | Create more drag, stabilizing the arrow faster. Very forgiving. |
| Best Use | Compound bows, crossbows, and all-weather shooting. | Traditional bows (longbows, recurves) shot off the shelf. |
| Clearance | Stiff material requires perfect clearance past the arrow rest. | Can collapse and pass cleanly over the riser or rest. |
For most beginners using a compound bow or a recurve with a modern arrow rest, plastic vanes are the best choice. They are tough, reliable, and come in countless shapes, sizes, and colors.
Inserts and Nocks
Inserts are usually made of aluminum or brass. Aluminum inserts are standard and lightweight. Brass inserts are much heavier and are used to increase the arrow’s total weight and its front-of-center (F.O.C.) balance, which can improve penetration for hunting.
Nocks come in different styles to match different bowstrings. Make sure you get the right size nock to fit your shafts. They are not one-size-fits-all!
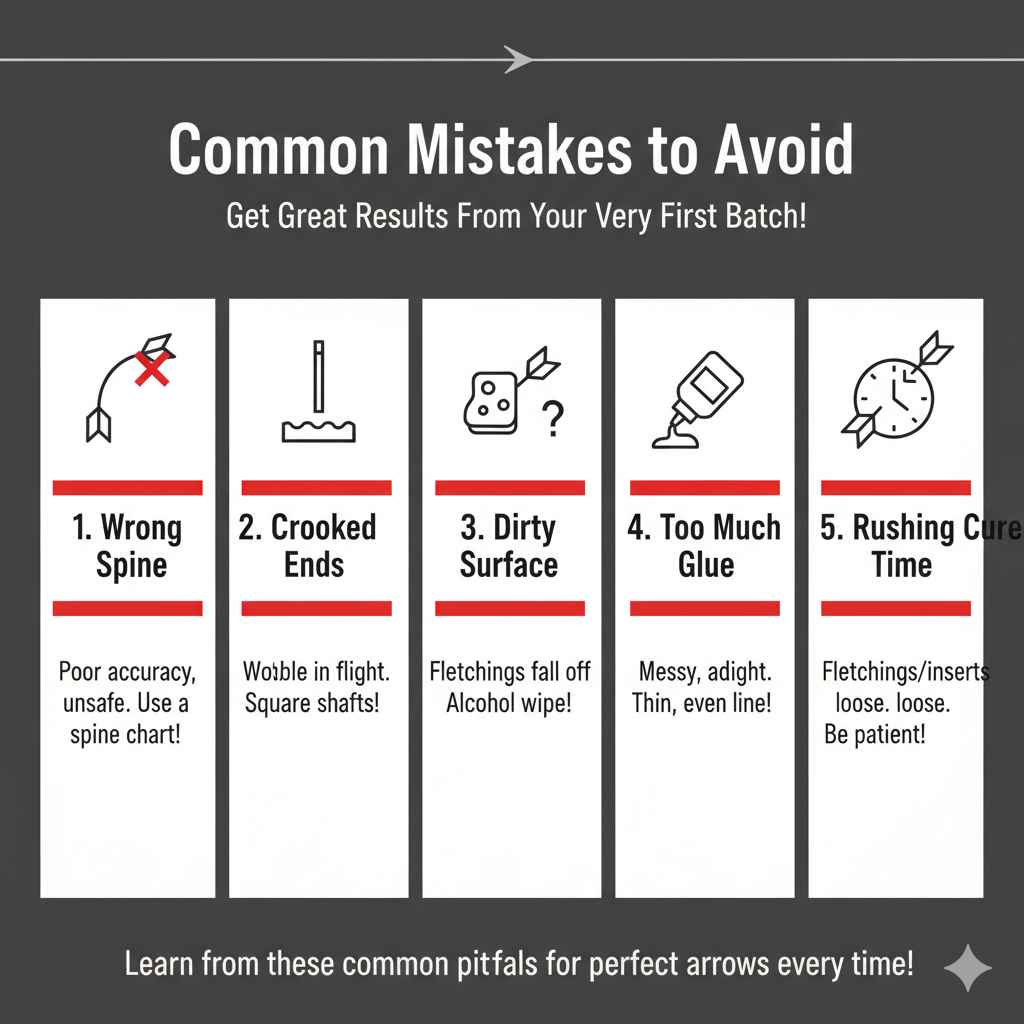
Common Mistakes to Avoid
As with any new skill, there are a few common pitfalls. Here are some mistakes to watch out for so you can get great results from your very first batch.
- Using the Wrong Spine: This is the #1 mistake. Always use a spine chart. Guessing will lead to poor accuracy and can be unsafe.
- Not Squaring the Shafts: A crooked end means the insert or nock won’t sit straight. This will cause your arrow to wobble in flight, ruining accuracy.
- Forgetting to Clean: Glue needs a clean surface. Skipping the alcohol wipe is a common reason for fletchings falling off.
- Using Too Much Glue: A little goes a long way. Too much glue adds weight, looks messy, and can run down the shaft. A thin, even line is all you need.
- Rushing the Curing Time: It’s tempting to shoot your new arrows right away, but you have to let the glue fully harden. Be patient! Firing them too early can cause the fletchings or inserts to come loose.
Frequently Asked Questions (FAQ)
What is the best arrow length for me?
The standard method is to measure your draw length and add 1 to 1.5 inches. To find your draw length, stand naturally, make a fist, and extend your arm straight out to the side. Have someone measure from the center of your chest to the tip of your middle finger. Divide that number by 2.5. For example, if the measurement is 70 inches, your draw length is about 28 inches, and your ideal arrow length would be 29-29.5 inches.
Can I use a Dremel tool to cut my arrow shafts?
While you can use a Dremel with an abrasive cut-off wheel, a dedicated arrow saw is much safer and provides a cleaner, more square cut. If you must use a Dremel, build a jig to hold the arrow steady and ensure a straight cut, and always wear your safety gear.
What’s the difference between a straight and helical fletch?
A straight fletch is applied perfectly parallel to the shaft. A helical fletch is applied with a slight spiral curve. Helical fletchings cause the arrow to spin more in flight, which improves stability and accuracy, especially at longer distances. Most fletching jigs allow you to set a straight, offset, or helical angle.
How do I know what size inserts and nocks to buy?
Carbon arrow shafts have an inside diameter (I.D.). This measurement is usually listed by the manufacturer (e.g., .246″, .204″, .166″). Inserts and nocks are sized to match this I.D. Always check the shaft’s specifications to ensure you buy matching components.
Can I use super glue for my fletchings and inserts?
You can use certain types of super glue (cyanoacrylate) for fletchings, but it needs to be a flexible, impact-resistant formula. Regular super glue is too brittle. For inserts, it is highly recommended to use a stronger, two-part epoxy or hot melt glue, as they can withstand the massive force of impact much better.
How long does it take to build a dozen arrows?
For a beginner, plan on spending about two to three hours for your first dozen, not including glue curing time. Once you get a rhythm going, you can likely complete a dozen in about 60-90 minutes. It’s a great way to spend an afternoon.
Do I need to F.O.C. balance my arrows?
F.O.C. (Front of Center) refers to the arrow’s balance point. While advanced archers and bowhunters often fine-tune it, beginners don’t need to worry about it too much. Simply using standard inserts will result in an F.O.C. that is perfectly acceptable for target practice and general hunting.
Conclusion
Congratulations! You now have all the knowledge you need to build your very own custom carbon fiber arrows. It’s a journey that takes you from being just an archer to an arrow craftsman. By taking the time to measure, cut, and assemble your arrows with care, you are investing directly in your own accuracy and success.
Remember to prioritize safety, take your time, and don’t be afraid to make a few mistakes along the way—it’s all part of the learning process. The pride you’ll feel when you nock an arrow you built yourself is unmatched. So gather your tools, pick out your components, and get ready to create the best arrows you’ve ever shot. Happy building, and shoot straight!