Learn how to cut carbon arrows safely and accurately with the best methods. Properly cut arrows improve accuracy and prevent damage. Our guide covers essential tools, step-by-step instructions, and expert tips for beginners to achieve perfect arrow length.
How to Cut Carbon Arrows: Proven Best Methods for Beginners
Welcome, fellow archers! If you’ve just started your archery journey or are looking to fine-tune your equipment, you’ve likely discovered that arrow length is a big deal. Arrows that are too long or too short can throw off your aim and even affect your bow’s performance. It might seem a bit daunting at first, especially with carbon arrows being a bit different from traditional materials. But don’t worry! I’m here to guide you through the process of cutting carbon arrows step-by-step. We’ll make sure it’s clear, safe, and lands you with perfectly fitted arrows. Let’s get your arrows ready for some great shooting!
Why Arrow Length Matters
Think of your arrow like a perfectly tailored suit for your bow. If it’s too long, it won’t fit right, and it might even snag. If it’s too short, it won’t have enough support when it leaves the bow, which can make your shots wobbly and inconsistent. Getting the right length is crucial for several big reasons:
- Accuracy: A properly spined arrow (meaning it has the right stiffness for your bow) will fly truer when it’s the correct length. This means better grouping of your shots.
- Consistency: Every shot should behave the same way. The right arrow length helps ensure this.
- Bow Performance: Your bow is designed to launch arrows of a certain length and weight. Incorrect length can affect how smoothly and powerfully your bow operates.
- Safety: While less common with carbon arrows than traditional materials, an ill-fitting arrow can sometimes lead to unexpected impacts or inefficient energy transfer.
Carbon arrows are fantastic because they are strong, light, and very consistent. However, they require a specific approach when cutting to make sure you don’t damage the shaft. We’ll cover the best ways to do this safely right here.
Essential Tools for Cutting Carbon Arrows
Before you start cutting, gathering the right tools is super important. Using the wrong tools can lead to a messy cut, a weak arrow, or even injury. Here’s what you’ll need:
The Must-Haves:
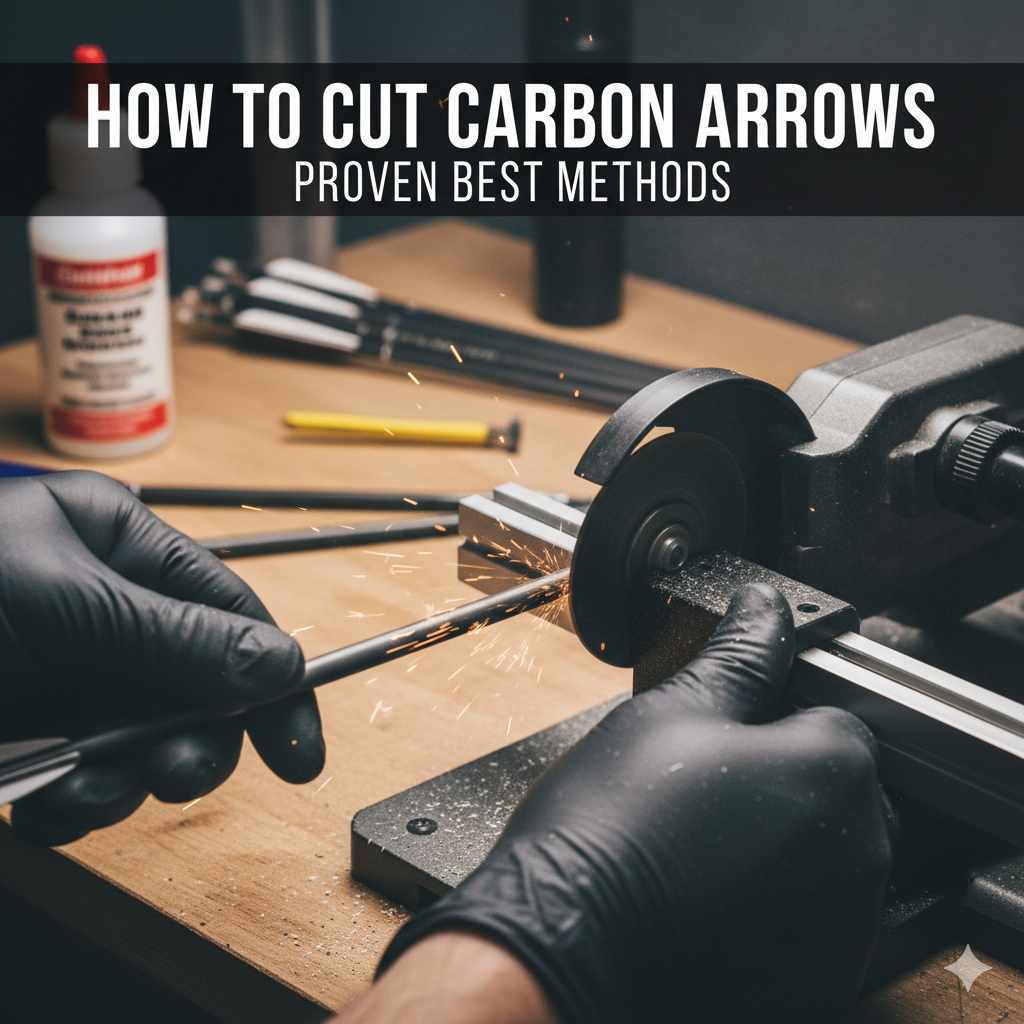
- Arrow Saw or Cutting Tool: This is the most critical tool. A specialized arrow saw is ideal as it provides a clean, straight cut. If you don’t have an arrow saw, a high-quality rotary tool (like a Dremel) with a cutting disc designed for metal or carbon is a good alternative. Some archers also use a fine-toothed hacksaw, but this requires more skill to get a straight cut.
- Measuring Tape or Ruler: A precise measuring tool is non-negotiable. Make sure it has clear markings, ideally in both inches and millimeters.
- Arrow Squaring Tool: After cutting, the end of the arrow needs to be perfectly square (flat and perpendicular). This ensures the nock inserts properly and provides a solid connection with your bowstring. A dedicated arrow squaring tool is the easiest way to achieve this.
- Fine-Grit Sandpaper: You’ll use this to gently smooth any rough edges after cutting and squaring.
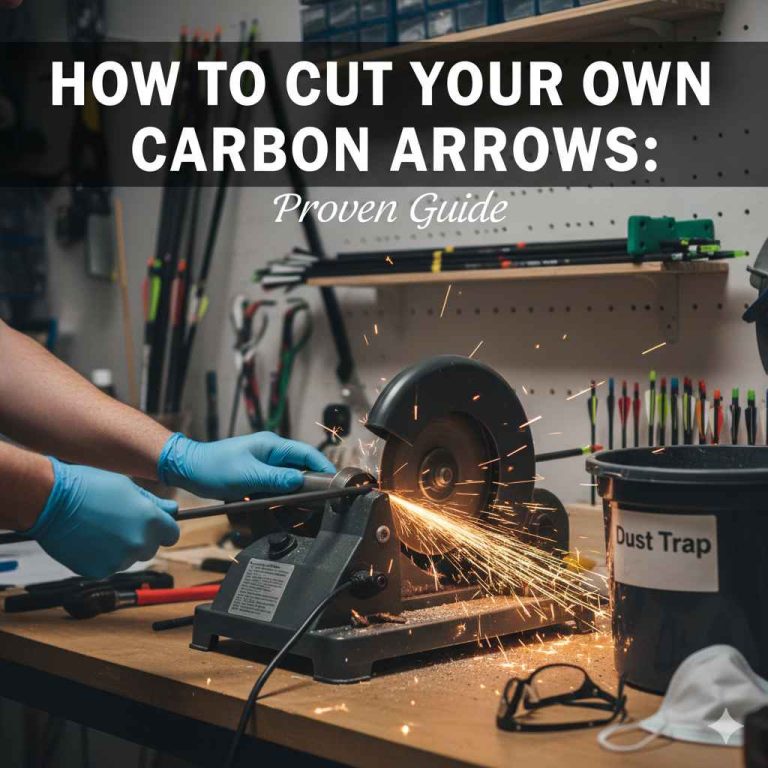
- Safety Glasses: Carbon dust can be harmful if inhaled or if it gets into your eyes. Always wear safety glasses.
- Dust Mask: To protect your lungs from carbon dust.
- Clamps or Vise: To hold the arrow securely while you cut and square it. Don’t try to hold the arrow by hand – stability is key!
Optional but Helpful:
- Arrow Measurement Jig: Some people create or buy jigs that help hold the arrow at the correct measurement point for cutting, ensuring consistency.
- Calipers: For very precise measurements.
Remember to always check the manufacturer’s recommendations for your specific arrows. Some carbon arrows have specific cutting instructions or warnings. You can often find this information on the manufacturer’s website or product packaging.
Determining Your Correct Arrow Length
This is the most crucial step before you even think about cutting. An arrow’s length is typically measured from the bottom of the nock (where the string attaches) to the point where it meets the string at full draw. However, a more common and professional way to measure is from the bottom of the nock groove to the end of the arrow shaft. We then factor in your desired overhang.
Common Measurement Methods Explained:
There are a few ways to figure out your ideal arrow length. The most reliable method involves using your bow and a specialized measuring tool.
- Bow and Measuring Tool Method: This is the most accurate way.
- Put your bow on a bow square (a T-shaped tool that hooks onto your bowstring and rests on your bow’s shelf).
- The bow square will give you a measurement from the string to the arrow rest.
- You’ll then need to measure from the string along the arrow rest’s plane to where you want your arrow to end. This point is often called the “overhang.” A common overhang is 1 to 1.5 inches past the arrow rest when the bow is at brace height (not drawn).
- When your bow is at full draw, the string will move forward, and the arrow tip will typically end up being 1-2 inches in front of the bow’s riser (the handle). This is a good general guideline, but it can vary slightly based on your draw length and bow type.
- Draw Length and Brace Height Method: This is a more general Guideline.
- Measure your actual Draw Length (from the valley of the grip to the string at full draw).
- Add 1.75 inches to your Draw Length. This gives you a starting point for your arrow length measurement from clicker to nock.
- A common measurement for arrow length is from the throat of the nock to the end of the shaft, and then add about 1 inch for your desired overhang. This overhang is how far the arrow extends past the point where it rests on the arrow rest when the bow is at rest.
Important Considerations:
- Spine: Arrow length significantly affects the spine (stiffness) of your arrow. Shorter arrows are stiffer, and longer arrows are more flexible. Cutting an arrow too short can make it too stiff for your bow, causing damage or inconsistent flight. Always ensure your arrow is still within the recommended spine range for your bow. Your local archery shop can help you find the right spine.
- Arrow Rest Type: Different arrow rests can influence the ideal overhang. Target archers often prefer a specific overhang for consistent rest contact.
- Release Aid: Using a mechanical release or shooting fingers can also subtly affect your ideal length.
- Experimentation: Beginners might find it helpful to start with a slightly longer arrow and then gradually cut it down after testing. This helps you feel the difference in flight.
If you’re unsure, consulting with an experienced archer or visiting a local pro shop is highly recommended. They can help you measure accurately for your specific setup. For example, the National Field Archery Association (NFAA) offers resources on equipment, which can be a good starting point for understanding archery measurements:
Step-by-Step Guide: How to Cut Carbon Arrows
Now that you have your tools and know your target length, let’s get cutting! Remember these are carbon arrows, so dust control and a clean cut are paramount.
Step 1: Mark Your Cut Line
With your arrow length determined, it’s time to mark where you’ll cut. Use a soft pencil or a fine-tip marker to draw a straight line around the arrow shaft at your calculated length. A good trick to ensure a perfectly straight line is to use a piece of scrap paper or tape wrapped around the shaft, then draw the line along the edge of the paper/tape. This creates a guide for your cut.
Step 2: Secure the Arrow
Place your arrow in a vise or securely clamp it. Make sure the clamp only grips the shaft where you’ll be cutting, or slightly beyond it. You don’t want to crush the carbon. It’s often best to position the arrow so the cut line is just proud of the clamped area, allowing smooth access for your cutting tool.
Step 3: The Cut
This is where your chosen cutting tool comes into play.
- Using an Arrow Saw: An arrow saw is designed for this. Ensure the blade is sharp. Turn on the saw and slowly feed the arrow into the blade, ensuring it spins freely. Keep it straight and let the saw do the work. Avoid forcing the arrow.
- Using a Rotary Tool (Dremel-like): Attach the appropriate cutting disc. Make sure it’s rated for carbon or metal. With the arrow secured and spinning slowly (if your setup allows, otherwise hold it steady), carefully bring the spinning disc to the marked line. Make several passes rather than trying to cut all the way through in one go. This helps prevent the heat from melting the carbon and keeps the cut cleaner.
- Using a Hacksaw: This requires the most care. Use a very fine-toothed blade. Hold the arrow as steady as possible and saw slowly and deliberately along your marked line, trying to keep the blade perfectly perpendicular to the shaft.
Crucial Note: Always cut slightly longer than your final desired measurement. You can always cut more off, but you can’t add carbon back! This gives you room for error and for the squaring process.
Step 4: Clean Up the Cut Edge
Once the arrow is cut, you’ll likely have a slightly rough or jagged edge. Carefully use your fine-grit sandpaper to smooth this edge. If you’re using a squaring tool, this is usually where you’d use it next.
Step 5: Square the Arrow Shaft
This is a vital step! A crooked end will cause the nock and point to be misaligned, leading to poor arrow flight.
- If you have an arrow squaring tool, follow its instructions. Typically, you insert the cut end of the arrow into a guide and then use sandpaper or a honing stone attached to the tool to sand the end perfectly flat and perpendicular to the shaft.
- If you don’t have a dedicated tool, you can try to very carefully and slowly sand the end on a flat surface with very fine sandpaper. However, a dedicated tool is highly recommended for consistency.
Step 6: Final Inspection and Cleaning
Wipe down the arrow shaft to remove any carbon dust. Inspect the cut end to ensure it is smooth, flat, and free of any cracks or frayed carbon fibers. If you notice any issues, you may need to re-square or very lightly sand again. Also, check the other end of the arrow to ensure it’s still properly aligned.
Table: Comparing Arrow Cutting Methods
To help you choose the best method for your situation, here’s a quick comparison of common cutting tools:
| Tool | Pros | Cons | Beginner Friendliness |
|---|---|---|---|
| Dedicated Arrow Saw | Cleanest, most precise cut. Repeatable results. Designed specifically for arrows. | Most expensive option. Requires dedicated setup space. | High (if used correctly) |
| Rotary Tool (e.g., Dremel) with Carbon Cutting Disc | Versatile tool, relatively affordable. Can provide good results with practice. | Requires a steady hand. Can generate heat if used incorrectly. Risk of uneven cuts. | Medium |
| Fine-Tooth Hacksaw | Very inexpensive. Portable. | Difficult to achieve a perfectly straight and clean cut. High risk of jagged edges or splintering. Very labor-intensive. | Low |
For beginners, investing in a good arrow saw or a reliable rotary tool kit with proper attachments is highly recommended for safety and accuracy. If you only plan to cut one or two arrows, you might consider asking your local pro shop to cut them for you for a small fee. They have the specialized equipment and expertise.
Post-Cutting: Nocks and Points
Once your arrows are cut, squared, and cleaned, it’s time for the final touches. Your carbon arrows will be ready to accept nock inserts and screw-in points or glue-on components. The precise length you cut ensures these components fit correctly and contribute to the arrow’s overall performance.
Installing Nocks:
Most modern carbon arrows use internal nock inserts. These are usually glued into the shaft end. Ensure the insert is the correct size for your arrow shaft diameter. Use an appropriate adhesive (often Fletching Cement or a specialized archery glue) and insert the nock firmly. If your arrows use external nocks, the process is similar but the nock fits over the end of the shaft.
You can find great resources on arrow building and tuning from organizations like USA Archery:
(USA Archery Official Website)
Adding Points:
If you are using screw-in points (field points, broadheads), they will thread directly into the insert. Make sure they are screwed in securely. If you are using glue-on points, this is a more permanent process that requires careful alignment and specialized glue. For beginners, screw-in points are usually much easier to manage.
Tips for Success and Safety
To make sure your arrow-cutting experience is smooth and safe, keep these tips in mind:
- Always Wear Protection: Safety glasses and a dust mask are not optional. Carbon dust is nasty stuff.
- Work in a Well-Ventilated Area: This helps clear away any dust produced during cutting and sanding.
- Measure Twice, Cut Once: It sounds cliché, but it’s absolutely true for arrow building. Double-check your measurements before any cutting begins.
- Practice on a Scrap Arrow: If you’re nervous, try cutting an old or damaged arrow first to get a feel for the process.
- Don’t Rush: Take your time. Precision is more important than speed when cutting arrows.
- Keep Components Clean: Ensure dust doesn’t get into your inserts, points, or nocks. Clean everything thoroughly.
- Check Spine Rating: If you cut your arrows significantly shorter than recommended, you might be changing their spine. Ensure they remain appropriate for your bow’s draw weight. A good rule of thumb is to never have an arrow that is too stiff.
- Buy from Reputable Sources: Ensure your shafts are from a trusted manufacturer. High-quality shafts are easier to cut cleanly.
FAQ: Your Carbon Arrow Cutting Questions Answered
Here are some common questions beginners have about cutting carbon arrows:
Q1: Can I really cut carbon arrows myself?
A: Yes, absolutely! With the right tools and these instructions, beginners can learn to cut carbon arrows accurately and safely. It’s a rewarding skill that helps you perfectly tune your archery gear.
Q2: What’s the biggest mistake beginners make when cutting arrows?
A: The most common mistakes are not measuring accurately enough, not squaring the arrow shaft properly, and not using the correct cutting tools, which leads to a messy or weak cut.
Q3: Is it safe to breathe in carbon arrow dust?
A: No, it’s not safe. The fine carbon particles can be harmful to your lungs and eyes. Always wear a dust mask and safety glasses when cutting or sanding carbon arrows.
Q4: How long should my arrows really be?
A: The ideal arrow length depends on your draw length, bow, and shooting style. A common method is measuring from the throat of your nock to the end of the shaft and adding about 1 to 1.5 inches for overhang. Always use a bow square for the most accurate measurement if possible.
Q5: Can cutting an arrow make it too stiff or too weak?
A: Yes. Cutting an arrow shorter makes it stiffer (increases its spine). Cutting it longer makes it weaker (decreases its spine). It’s crucial to ensure your cut arrow is still within the correct spine range for your bow’s draw weight to ensure safe and accurate flight.
Q6: What kind of glue should I use for nock inserts?
A: You should use a strong, reliable adhesive designed for archery components. Fletching cement, carbon arrow-specific glues, or even a good quality super glue (often with an activator that wicks into the joint) can work.