It’s a common dream: beautiful, dark oak cabinets that feel brand new. You look at your current cabinets, maybe a bit worn or just not your style anymore. You think, “I could totally restain those!” But then a little voice whispers, “What if I mess them up?” That fear is real.
Ruining your cabinets feels like a costly mistake. You want that warm, updated look, but not at the price of a DIY disaster.
This guide is here to help. We’ll walk through restaining oak cabinets step-by-step. You’ll learn how to get amazing results.
We’ll cover what you need to know. You’ll feel confident about tackling this project. Let’s make those cabinets look stunning.
Restaining oak cabinets involves prepping the wood thoroughly, applying a stain that enhances the grain, and sealing it for durability. Proper technique is key to avoiding blotchiness and ensuring a beautiful, long-lasting finish that respects the natural beauty of the oak.
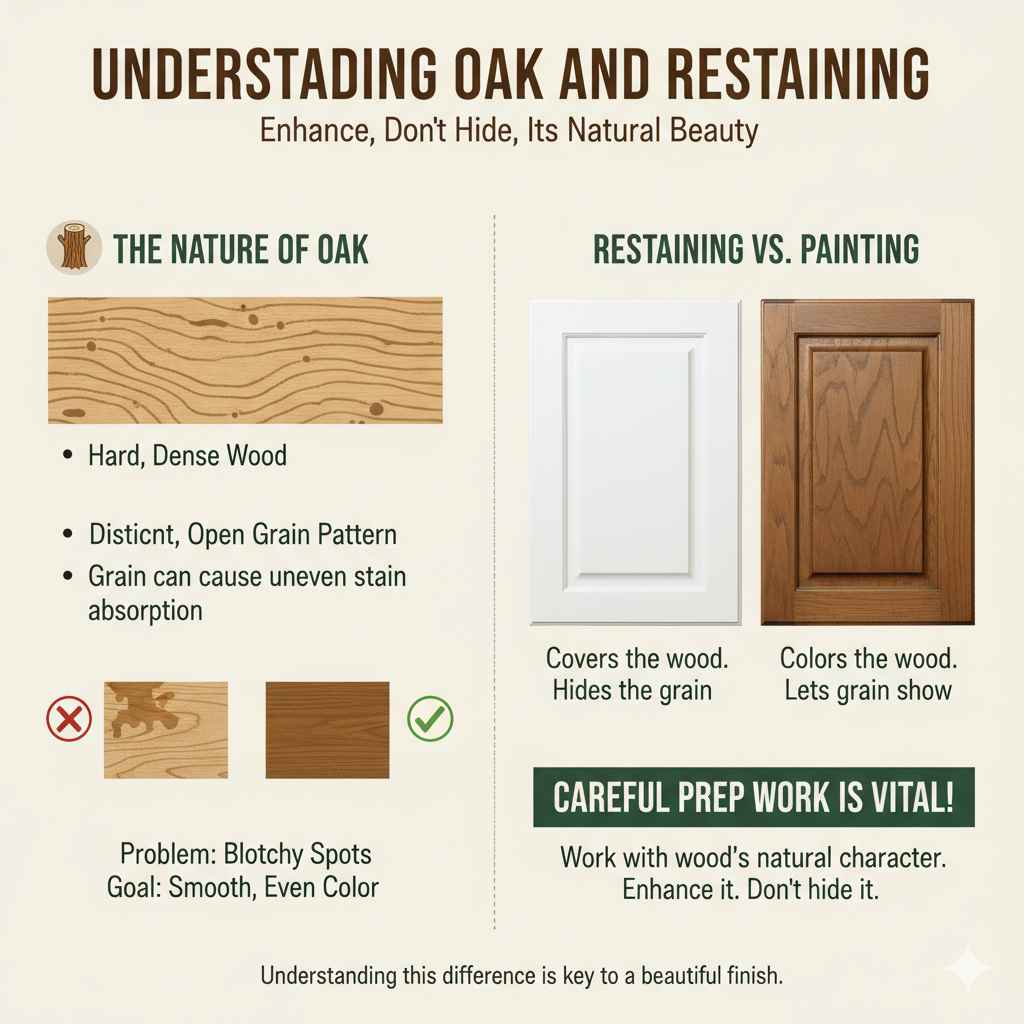
Understanding Oak and Restaining
Oak is a hard, dense wood. It has a very distinct, open grain pattern. This grain is what makes oak beautiful.
But it can also cause problems when staining. Without the right steps, the stain can soak in unevenly. This leads to blotchy spots.
It looks messy and unprofessional. You want a smooth, even color. You want the wood’s natural beauty to shine through.
Restaining is different from painting. Painting covers the wood. Restaining colors the wood.
It lets the grain show. For oak, this means careful prep work is vital. You’re not just slapping on color.
You are working with the wood’s natural character. You want to enhance it. You do not want to hide it.
Understanding this difference helps a lot.
Why Restain Instead of Refinish or Paint?
You might wonder why restaining is the best choice. Refinishing means stripping away all the old finish. This is a lot of work.
It can be messy. Painting cabinets is a big change. It hides the wood grain completely.
Restaining offers a middle ground. It changes the color. It updates the look.
But it keeps the natural wood grain visible.
For oak, restaining can bring out its deep texture. A darker stain can make the grain pop. It adds a rich, warm feel to your kitchen.
It’s often less work than a full refinish. And it keeps that classic wood look that many people love. It’s a great way to update without losing the charm of real wood.
Gathering Your Supplies
Before you start, gather everything you need. This makes the job go much smoother. You don’t want to stop halfway.
You’ll need cleaning supplies. These include a good degreaser and cloths. You’ll need sandpaper.
Get different grits, like 120 and 220. A tack cloth is also very helpful. It picks up dust.
For staining, choose your stain color. Gel stains are often recommended for oak. They tend to go on more evenly.
They don’t soak in as deeply. You’ll also need good quality brushes or foam applicators. For protection, you’ll need a clear topcoat.
Polyurethane is a popular choice. Make sure you have safety gear too. Gloves and a mask are a must.
Step 1: The Crucial Prep Work
This is the most important step. Do not skip it. First, remove your cabinet doors and drawers.
Label them clearly. This helps you put them back correctly. Clean everything really well.
Use a strong degreaser. Kitchen cabinets get greasy. You need to remove all grease.
Wipe them down with clean water afterward. Let them dry fully.
Next, light sanding. You are not trying to remove the old finish. You are just roughing it up.
This gives the new stain something to grip. Use 120-grit sandpaper. Sand all surfaces you will stain.
Pay attention to corners and edges. After sanding, wipe away all dust. Use a shop vacuum or a dry cloth.
Then, use a tack cloth. It grabs the tiny dust particles. This dust-free surface is key.
Prep Work Checklist
Cleanliness is King:
- Degrease thoroughly.
- Rinse and dry completely.
Sanding for Grip:
- Use 120-grit sandpaper.
- Lightly scuff all surfaces.
Dust Removal is Vital:
- Vacuum or dry wipe.
- Follow with a tack cloth.
Step 2: Using a Pre-Stain Wood Conditioner
For oak, this step is highly recommended. A pre-stain wood conditioner helps the stain absorb evenly. It fills in the open pores of the oak.
This prevents dark blotches. You apply it like a thin coat of finish. Let it sit for the time recommended on the can.
Then, you wipe off any excess. Don’t let it dry completely.
This conditioner is like priming a wall before painting. It creates a more uniform surface. It helps the stain penetrate consistently.
This is especially useful for woods with open grains like oak. It’s a small step but makes a huge difference. It helps achieve that professional, smooth look you want.
Step 3: Applying the Stain
Now for the fun part: adding color! Stir your stain well. Do not shake it.
Shaking creates bubbles. Apply the stain. Use a good quality brush or foam applicator.
Work in the direction of the wood grain. Apply a thin, even coat. Don’t brush too much.
You want to cover the surface.
Let the stain sit for a few minutes. The longer it sits, the darker it gets. Check your stain can for recommended times.
For oak, start with a shorter time. You can always add more color. Wipe off the excess stain.
Use a clean, lint-free cloth. Wipe with the grain. This removes the extra pigment.
It leaves the color in the wood pores. This highlights the grain.
Staining Tips for Oak
Stain Choice:
- Gel stains work well.
- They offer more control.
Application:
- Apply with the grain.
- Use thin, even coats.
Wiping Excess:
- Use a clean, lint-free cloth.
- Wipe with the grain.
Step 4: Second Coat and Adjustments
Did the first coat give you the color you wanted? If not, you can apply a second coat. Let the first coat dry completely.
Then apply another thin coat. Repeat the wiping process. Be patient.
It’s better to build color slowly. You can always add more. It’s hard to take it away.
Sometimes, you might still have a few light spots. You can lightly reapply stain to those areas. You can also try a glaze.
Glazes add depth. They can also help blend any minor imperfections. But for most DIYers, careful application of the stain is enough.
Check the color in good light. Make sure it’s what you envisioned.
Step 5: Applying the Topcoat
Once your stain is dry, it’s time to protect it. The topcoat seals the stain. It also protects the wood from wear and tear.
Polyurethane is a good choice. It’s durable and easy to find. You can use oil-based or water-based.
Water-based dries faster and is clearer. Oil-based offers a bit more amber tone and protection.
Apply the topcoat in a well-ventilated area. Use a clean brush or applicator. Apply thin, even coats.
Let each coat dry fully. Follow the manufacturer’s instructions. Lightly sand between coats with very fine sandpaper, like 220-grit.
Wipe away dust with a tack cloth. This smooths the surface. It helps the next coat adhere better.
Three coats are usually recommended for cabinets.
Topcoat Application
Product Choice:
- Polyurethane is common.
- Consider oil-based or water-based.
Application Process:
- Apply thin, even coats.
- Work in the direction of the grain.
Between Coats:
- Allow drying time.
- Lightly sand with fine grit.
- Wipe with a tack cloth.
What to Avoid: Common Mistakes
There are a few common mistakes people make. One is not prepping enough. Skipping cleaning or sanding causes problems.
Another is applying stain too thick. This can lead to pooling and streaks. Not wiping off enough excess stain is also an issue.
It makes the finish look muddy.
Using the wrong type of stain can be tricky. Some stains soak into oak too fast. This causes blotches.
Also, rushing the drying times between coats is bad. It can make the finish soft. It might peel or crack later.
Patience is a virtue when restaining cabinets. Take your time. Follow each step carefully.
Avoid These Mistakes
Prep is Key:
- Don’t skip cleaning.
- Don’t skip sanding.
Stain Application:
- Apply thin coats.
- Wipe off excess stain.
Patience Matters:
- Let coats dry fully.
- Follow manufacturer’s advice.
Real-World Scenarios and How They Play Out
I remember working with a client, Sarah. She had beautiful honey-toned oak cabinets in her kitchen. They were from the 80s.
They were well-made but looked dated. Sarah wanted a rich, dark espresso finish. We talked about the process.
She was a little nervous about the prep work.
We started by removing the doors. She was amazed at how much grease and grime came off. Even after cleaning, the wood still felt a bit sticky.
That’s when the sanding began. She could see the old finish getting roughed up. It felt important.
Then we applied the pre-stain conditioner. It made the wood look a little wet, but she trusted the process.
When she applied the gel stain, it went on so smoothly. The color was deep and even. She wiped off the excess.
The oak grain showed through beautifully. It looked like a completely different kitchen. She applied two coats of stain.
Then came the topcoat. She did three coats of a water-based poly. The final result was stunning.
The cabinets looked custom-made. Sarah was so proud. She said it was worth every bit of effort.
What This Means for Your Cabinets
When it comes to your cabinets, restaining can transform your space. It’s an affordable update. It respects the natural beauty of the wood.
It gives your kitchen a fresh, modern feel. The key is understanding that oak needs a little extra care.
It means you can achieve a high-end look without a huge price tag. You can match your cabinets to your evolving style. You don’t have to live with dated cabinets forever.
With careful steps, your oak cabinets can be a source of pride.
When to Worry and When to Relax
A little unevenness in the stain might happen. Especially on your first try. Don’t panic.
Often, a second coat or a glaze can fix it. Small imperfections are part of a hand-finished look. They show it’s not factory-made.
However, if you see large dark patches. Or if the stain looks streaky and muddy. That usually means a prep issue.
It could be grease left on the cabinets. Or maybe the stain wasn’t wiped off correctly. If the topcoat starts to bubble or peel.
That’s a sign of moisture. Or maybe applying it too thick. Always read the product instructions carefully.
Quick Tips for Success
Here are a few extra tips to help you out. Always test your stain. Use a scrap piece of oak.
Or an inconspicuous spot on the back of a door. This shows you the true color. It lets you practice your technique.
Good lighting is also important. Work in a bright area. Natural light is best.
Keep your workspace clean. Dust is your enemy. It gets into the finish.
It can ruin the smooth look. Have plenty of clean rags ready.
Fast Track to Great Results
Test First:
- Stain a scrap piece.
- Find your perfect shade.
Work Smart:
- Use bright lighting.
- Keep the area dust-free.
Safety First:
- Ensure good ventilation.
- Wear your protective gear.

Frequently Asked Questions About Restaining Oak
Can I restain oak cabinets without sanding?
It’s not recommended. Sanding creates a surface for the stain to grip. Without it, the stain might not adhere well.
You could end up with a finish that peels or looks uneven. A light scuff sanding is usually enough. It doesn’t require removing the old finish.
What is the best type of stain for oak cabinets?
Gel stains are often the top choice for oak. They are thicker. They sit on top of the wood more.
This helps prevent blotchiness. Oil-based stains can also work well. They penetrate the wood.
But they require more careful application on oak. Always use a pre-stain conditioner.
How many coats of stain do I need for oak?
This depends on the color you want. Most people use one or two coats. Build the color slowly.
Let each coat dry completely. Wipe off the excess stain thoroughly. You can always add another coat if it’s not dark enough.
It’s harder to lighten it if it gets too dark.
How long does it take to restain kitchen cabinets?
Restaining cabinets is a multi-day project. It takes time for cleaning, sanding, staining, and drying. Allow at least 2-3 days.
This includes drying time between coats. If you’re doing doors and drawers too, it might take a week. Rushing the process leads to poor results.
Can I restain over a dark stain?
Yes, you can. If you want to go darker, you can often restain. Make sure the old finish is clean and lightly sanded.
Test your new stain color in an hidden spot. If you want to go lighter, you’ll need to strip the old stain first. This is a more involved process.
What is the difference between restaining and refinishing oak?
Restaining involves adding color over the existing finish. You typically just clean and lightly sand. The old finish stays on.
Refinishing means removing the old finish completely. Then you apply a new stain and topcoat. Refinishing is more labor-intensive but allows for bigger color changes or repair.
Final Thoughts on Your Cabinet Project
Restaining oak cabinets is a rewarding project. It can totally change your kitchen’s feel. Remember that preparation is the absolute key.
Take your time with cleaning and sanding. Choose your stain wisely. Apply it evenly.
And always protect your work with a good topcoat. You can achieve beautiful results. Your kitchen will look amazing.
Happy staining!