The bullseye, or the gold, in Olympic Archery is 12.2 cm in diameter. This is crucial for understanding target size and how points are scored. This guide breaks down Olympic archery targets for beginners.
Ever wondered about the exact size of that tiny gold circle in Olympic archery? It might seem small, but it’s the heart of the sport and where every archer aims. For many beginners, picturing the target can be a bit fuzzy, leading to frustration when shots don’t land where expected. Understanding the dimensions of each scoring zone is key to improving your aim and appreciating the incredible skill of Olympic archers. Don’t worry; we’ll break down the Olympic archery target into simple, easy-to-understand pieces. Get ready to see the target like never before and sharpen your focus for your own archery adventures!
The Heart of the Target: Understanding Olympic Archery Bullseye Size
As an archery guide, I often hear beginners ask, “Just how big is that bullseye, anyway?” It’s a fair question! When you see archers hitting those tiny rings from a distance, the target can look impossibly small. Knowing the precise dimensions of each scoring zone on an Olympic archery target is fundamental for anyone learning the sport. It helps you understand the challenge, appreciate the precision required, and set realistic goals. Let’s dive into the details of the target, focusing on that coveted bullseye and its surrounding rings.
What is the Bullseye in Olympic Archery?
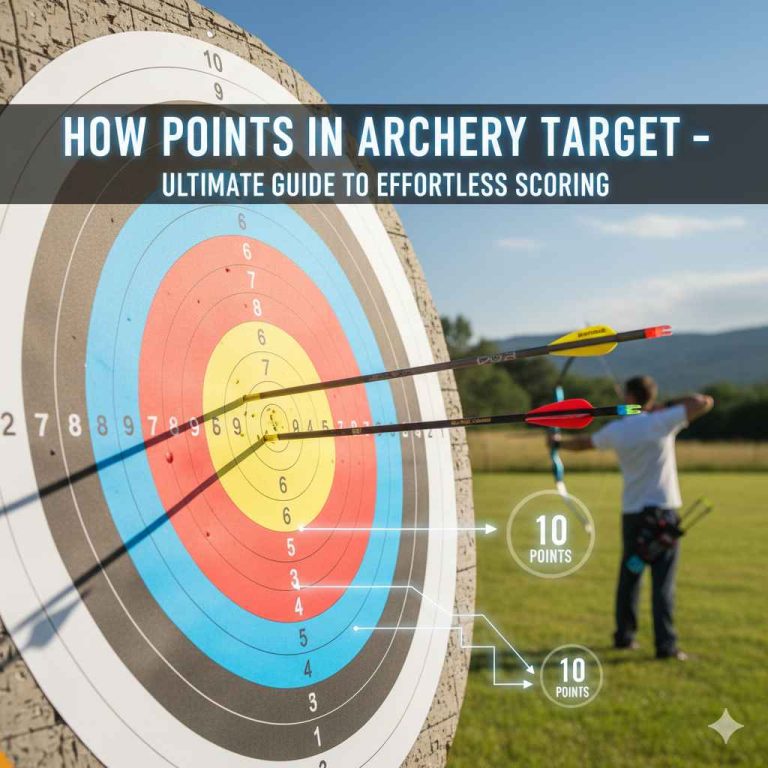
In Olympic archery, the bullseye is officially referred to as the “gold” scoring zone. It’s the innermost circle on the target face. This is where archers earn the highest possible score, which is 10 points. Alongside the gold, there are other concentric rings, each with its own color and point value. The entire target face has a diameter of 122 cm, and the gold ring itself is a specific size within that.
The Dimensions of the Target Face
The official World Archery target face is a fascinating piece of equipment designed for precision and fairness. It’s not just one giant circle; it’s a series of concentric rings, each a different color and worth a specific number of points.
Overall Target Diameter: 122 cm (approximately 48 inches)
Number of Ring Zones: 10
Colors: The colors are arranged from the center outwards: Gold, Red, Blue, Black, and White. Each color represents two scoring zones.
Focusing on the Gold: The Bullseye
The bullseye, or the gold ring, is the ultimate aim for any archer. It’s not just a single ring; it’s composed of two distinct 10-point zones for scoring purposes, though they are both visually “gold.”
Innermost Gold Ring (X-Ring): This is the very center. While it looks like the bullseye, in official scoring, there’s an even smaller “X” ring within the gold. This X-ring is used as a tie-breaker in competitions when archers have the same score. It’s the most difficult part of the target to hit.
Outer Gold Ring: This is the larger part of the gold zone.
Now, for the critical question: how big is the bullseye?
When people ask “how big is the bullseye,” they are generally referring to the entire gold scoring area.
The Gold Scoring Area (Combined): The diameter of the entire gold area, which represents the 10-point zones, is 12.2 cm (approximately 4.8 inches).
To visualize this, imagine placing a small cantaloupe or a large grapefruit in the center of the target; that’s roughly the size of the gold scoring area.
The X-Ring: Within that 12.2 cm gold area, there’s an even smaller, central “X” ring. This X-ring has a diameter of 6.1 cm (approximately 2.4 inches). While visually part of the bullseye, hitting this signifies exceptional precision and is crucial for tie-breaking.
So, when we talk about the bullseye in Olympic archery and its size, we’re primarily referring to that 12.2 cm gold zone, with the understanding that the X-ring is the absolute center.

Scoring Zones and Their Sizes
Understanding the bullseye is just part of the picture. The entire target face is divided into specific scoring zones, each with its own size and point value. Knowing these dimensions helps you grasp the skill involved and how points are awarded.
Here’s a breakdown of the Olympic archery target’s scoring zones, from the center outwards:
| Zone | Color | Point Value | Diameter (cm) | Diameter (inches) | Width of Ring (cm) | Width of Ring (inches) |
|---|---|---|---|---|---|---|
| 10 | Gold | 10 | 12.2 | 4.8 | 6.1 | 2.4 |
| X (Tie-breaker) | Gold (Center) | 10 (or X) | 6.1 | 2.4 | 6.1 | 2.4 |
| 9 | Red | 9 | 24.4 | 9.6 | 12.2 | 4.8 |
| 8 | Red | 8 | 36.6 | 14.4 | 12.2 | 4.8 |
| 7 | Blue | 7 | 48.8 | 19.2 | 12.2 | 4.8 |
| 6 | Blue | 6 | 61.0 | 24.0 | 12.2 | 4.8 |
| 5 | Black | 5 | 73.2 | 28.8 | 12.2 | 4.8 |
| 4 | Black | 4 | 85.4 | 33.6 | 12.2 | 4.8 |
| 3 | White | 3 | 97.6 | 38.4 | 12.2 | 4.8 |
| 2 | White | 2 | 109.8 | 43.2 | 12.2 | 4.8 |
| 1 | White | 1 | 122.0 | 48.0 | 12.2 | 4.8 |
As you can see, each scoring ring (except the very center gold section) has a width of 12.2 cm. This consistent width means that as you move further from the center, the area of each ring increases significantly because the outer rings encompass larger circles. This is why hitting the outer rings, especially the 1 and 2 points, becomes progressively easier than hitting the gold.
Why Target Size Matters for Beginners
For someone just starting in archery, understanding target dimensions is more than just trivia; it’s a practical tool for improvement.
Setting Realistic Expectations: Knowing that the bullseye is only 12.2 cm wide helps you understand why those initial shots might not always be dead center. It normalizes the learning curve and reduces frustration.
Focus and Aiming: When you’re learning, you might initially aim for the general “gold” area. As you get better, you can refine your aim to target specific parts of the gold, like the perceived bullseye or the X-ring, for higher scores.
Equipment Comparison: Different types of archery (like field archery or traditional archery) use different targets. Knowing the Olympic standard helps you compare and understand the specificity of the Olympic style.
Appreciating the Sport: The more you understand the technical aspects, the more you can appreciate the incredible skill and dedication of Olympic archers.
Equipment for Olympic Archery
While knowing the target size is essential, success in Olympic archery also depends heavily on the right equipment. Olympic recurve archery, the style seen in the Games, uses specialized equipment designed for accuracy and stability.
Key Components of an Olympic Recurve Bow Setup:
1. The Riser: This is the central handle of the bow. Olympic risers are typically made of machined aluminum for strength and vibration dampening.
2. Limbs: These are the two arms of the bow that store and release energy. In Olympic recurve, the limbs must be made of materials like wood and fiberglass or carbon. They are detachable from the riser.
3. String: Made from high-strength synthetic fibers, designed for durability and minimal stretch.
4. Arrow Rest: A small device that supports the arrow as it’s shot.
5. Plunger Button (or “Vibration Dampener”): This adjustable spring-loaded pin helps fine-tune arrow flight by slightly “flexing” the riser. It’s crucial for making micro-adjustments to arrow spine.
6. Stabilizers: These are rods connected to the riser that help absorb shock and vibration, improving balance and shot stability. Olympic setups often have a long central stabilizer and two shorter side stabilizers.
7. Sight: An adjustable sight mounted on the riser, allowing archers to make precise aiming point adjustments.
8. Clicker: A small device that audibly “clicks” when the archer has drawn the bowstring to the same anchor point consistently. This helps ensure a repeatable draw length.
9. Arrows: Olympic archers use precisely matched arrows, often made of carbon or aluminum, meticulously selected for their stiffness (spine) and weight to match the bow’s power.
The combination of these elements, used with proper technique, allows archers to consistently hit targets at considerable distances. For a deeper dive into Olympic archery equipment requirements, the Official Olympic Archery Website and World Archery Rules provide comprehensive details.
Training and Improving Your Aim
Understanding the target is one thing; hitting it consistently is another! For beginners, this involves building a strong foundation in technique and practicing effectively.
Steps to Improve Your Archery Aim:
1. Proper Stance: Stand with your feet shoulder-width apart, perpendicular to the target. Your weight should be evenly distributed. A stable base is crucial for consistent shots.
2. Grip: Hold the bow lightly and naturally. Avoid “gripping” the bow tightly, as this can cause torque and affect the arrow’s flight. Let the bow rest in the crook of your hand.
3. Draw Sequence: This is a smooth, controlled motion.
Nocking the Arrow: Place the arrow on the string and rest.
Bow Arm: Keep your bow arm stable and slightly bent, not locked straight. Imagine pushing the bow away from you.
Drawing the String: Use muscles in your back to pull the string back smoothly, not just your arm muscles.
Anchor Point: Find a consistent spot to touch your drawing hand to your face (e.g., corner of your mouth, under your jawbone). This is your aiming reference.
4. Aiming: Focus your eyes on the gold (bullseye). Your sight pin should be aligned with the target. For beginners, it’s often best to focus on the target itself as if you were “looking through” the sight pin.
5. Release: This is a crucial step that should be passive and surprise you. Instead of “plucking” the string, relax the muscles in your drawing hand, allowing the string to move forward out of your fingers smoothly. Think of it as letting go.
6. Follow-Through: Maintain your shot position and aim for a moment after the arrow leaves. This ensures you don’t disturb the shot with sudden movements.
7. Practice, Practice, Practice: Consistency comes with repetition. Start at closer distances (e.g., 10-20 yards) and focus on good form before moving to Olympic distances (70 meters).
Drills for Beginners:
Close-Range Accuracy: Shoot at a larger target or even just the gold at 5-10 yards. Focus solely on form and consistent grouping.
Anchor Point Practice: Draw to your anchor point and hold for a few seconds without shooting. This builds muscle strength and consistency.
Blank Bale Shooting: Shoot at a target that has no scoring rings (a blank bale or a large black target). This forces you to focus entirely on your shot process and release, without the pressure of aiming for a specific spot.
Olympic Archery Distances
The dimensions of the bullseye and target face take on a new perspective when you consider the shooting distances in Olympic archery.
Olympic Recurve Distance: In the Olympic Games, archers shoot at a distance of 70 meters (approximately 76.6 yards).
This distance is significant. At 70 meters, the 122 cm target face appears quite small, and the 12.2 cm gold bullseye becomes a true test of precision. The archers aren’t just hitting a target; they’re sending arrows through about a 3.9-inch circle from the length of an American football field twice over!
Consider the effect gravity has on an arrow. By the time an arrow travels 70 meters, it will have dropped considerably. Archers compensate for this by aiming slightly “above” the target, using their sight for precise elevation adjustments. This is an advanced skill that relies on knowing your equipment, your arrow’s trajectory, and the exact bullseye size.
Common Beginner Mistakes and How to Avoid Them
As you start your archery journey, you’ll inevitably make mistakes. Recognizing them and learning how to correct them will speed up your progress significantly.
Gripping the Bow Too Tightly: This is a classic. A death grip on the bow causes your hand to twist, imparting inconsistent torque to the riser, which sends arrows off course.
Solution: Practice a relaxed grip. Imagine holding a tiny bird in your hand; you don’t want to crush it, but you also don’t want it to fly away. Use a bow sling to help keep the bow secured without a tight grip.
“Plucking” the String: Jerking the string away from your face during the release is another common issue. This erratic movement causes the bow to jump and the arrow to fly erratically.
Solution: Focus on a “surprise” or “back tension” release. Engage your back muscles and let the string slip away smoothly, rather than actively pulling it. Imagine your fingers just opening naturally as the draw cycle completes.
Inconsistent Anchor Point: If your drawing hand doesn’t land in the exact same spot on your face every single time, your aim will vary.
Solution: Use the clicker and focus on feeling your anchor point firmly. Practice drawing to anchor and holding, ensuring your hand settles in the same position.
Target Panic: This is a mental hurdle where archers feel an urge to shoot the arrow as soon as they see the target — often before they are properly aimed.
Solution: Blank bale shooting is excellent for overcoming target panic, as it removes the visual cue of the scoring rings and forces you to focus on the process. Also, practice delayed releases where you hold at full draw for a few extra seconds before shooting.
Not Following Through: Moving your shooting hand or body immediately after the arrow is released can disturb the bow’s stability, affecting the arrow’s flight.
* Solution: Consciously hold your shot position for a second or two after the arrow has left. Imagine your bow arm and drawing hand staying in place, as if you’re frozen in the shot.

Frequently Asked Questions (FAQ)
Here are some common questions beginners have about Olympic archery targets and the sport in general.
Q1: How far away is the target in Olympic Archery?
The standard competition distance for Olympic recurve archery is 70 meters (approximately 76.6 yards).
Q2: What are the colors on an Olympic archery target, and what do they mean?
The target has five colors: Gold (center), Red, Blue, Black, and White (outermost). Each color represents two scoring zones. Gold is 10 points, Red is 9 and 8, Blue is 7 and 6, Black is 5 and 4, and White is 3 and 2. Hitting the very center of the gold zone also counts as an “X” and is used for tie-breaking.