Cutting your own carbon arrows at home is achievable with the right tools and a careful, step-by-step approach. This guide breaks down the process, ensuring accuracy and safety for beginner archers wanting to consistently tune their equipment.
Welcome, fellow archers! As you get more into the sport, you’ll find that having arrows perfectly matched to your draw length is a game-changer for accuracy. But sometimes, store-bought arrows are just a little too long, or you want that perfect custom fit. Cutting your own carbon arrows might sound daunting, but it’s something you can absolutely do yourself with a little guidance. You’ll gain confidence and save money while dialing in your archery setup. Let’s learn how to do it right!
Why Cut Your Own Carbon Arrows?
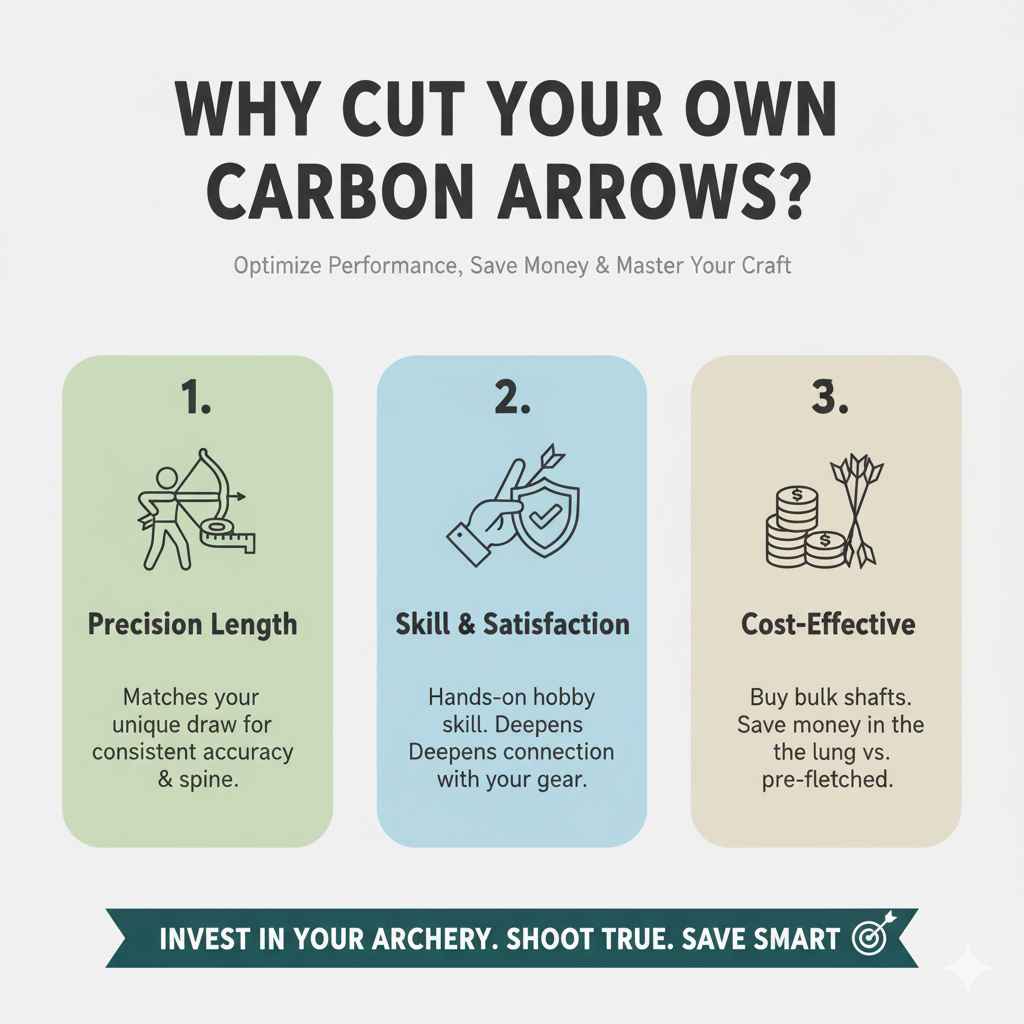
There are a few excellent reasons why cutting your own carbon arrows makes sense for any serious archer, especially those just starting out. Getting your arrows to the precise length for your draw is crucial for consistency. An arrow that’s too long can flex unpredictably, impacting where it hits the target. Too short, and it might not rest properly on your bow’s rest or arrow shelf, which is a safety concern.
Beyond just performance, cutting your own arrows offers a sense of accomplishment. It’s a hands-on skill that connects you more deeply with your archery gear. Plus, when you start buying arrows in bulk or bare shafts to build yourself, cutting them to your exact specifications can be more economical in the long run. You’re investing in a skill that pays dividends in both accuracy and savings.
Tools You’ll Need for Cutting Carbon Arrows
Before we grab any tools, let’s make sure we have everything we need. Having the right equipment is key to a clean, accurate cut and, most importantly, to your safety. Rummaging around for the right tools mid-project can be frustrating, so let’s get prepared!
- Arrow Squaring Tool: This is vital for ensuring the end of the arrow is perfectly flat and perpendicular to the shaft. A crooked cut can lead to arrow inconsistencies.
- Carbon Arrow Saw or Cutting Tool: You need a tool designed specifically for cutting carbon arrows. A basic hacksaw is generally not suitable as it can splinter carbon and create a rough edge. Specialized arrow saws (often called arrow polishers or cut-off saws) are ideal for a clean, straight cut.
- Measuring Tape or Caliper: Precision is key! Use a reliable measuring tool to get the exact length you need.
- Marker: To mark your cut line clearly on the arrow shaft.
- Safety Glasses: Absolutely non-negotiable. Carbon dust can be harmful if inhaled or gets into your eyes.
- Dust Mask: Wear a mask to avoid inhaling carbon dust.
- Optional: Sandpaper (fine grit): For very light deburring if needed after cutting.
- Optional: Work Surface/Vice: A stable surface to hold the arrow securely while you cut, or a specialized arrow clamp.
Choosing the Right Saw
When it comes to cutting, the tool makes a huge difference. The goal is a cut so clean that it looks like it came from the factory. This is where a good arrow saw comes in. These saws are designed to spin the arrow at a controlled speed while a very thin abrasive or diamond wheel slices through the carbon fiber with minimal vibration or splintering.
You can find dedicated arrow cutting saws online or at larger archery pro shops. They range in price, but even a more basic benchtop model will significantly outperform a manual saw or dremel with a cutting wheel. For consistent, repeatable results perfect for beginners, investing in a proper arrow saw is highly recommended. Check out resources like Merrick Science for insights into arrow construction and tools that can help you understand the precision involved.
Determining Your Arrow Length
Figuring out the perfect arrow length is the first crucial step before you even think about cutting. It’s not rocket science, but it requires a bit of understanding about your bow and how you shoot. The general idea is to determine your bow’s “draw length” and then measure the arrow accordingly.
Here’s a common and reliable method:
- Draw Your Bow: With an arrow nocked and your bow drawn to your normal, comfortable anchor point, have a friend (wearing safety glasses!) look at where the shaft of the arrow is in relation to the riser or body of your bow.
- Using a Bow Square: A bow square is a handy tool. You place the long edge against the string at the arrow rest level. The short, perpendicular edge will touch the riser. You then measure from this point along the arrow shaft.
- Measure to the Notch: The standard measurement is from the bottom of the nock groove to the front of the bowstring when drawn. The typical “rule of thumb” is to add 1 to 1.5 inches to this measurement.
- Alternative “Finger Test”: Some archers use a simpler measurement. Draw your bow and place your index finger’s knuckle against the bow’s riser, right where the arrow passes over. Then, extend your finger out so it’s straight. The point where the arrow shaft ends at your fingertip is roughly your arrow length. You’ll then add about an inch to this for spine and fletching clearance.
The Importance of Spine and Length
When you cut an arrow, you change its stiffness, or “spine.” Shorter arrows are stiffer. So, if you cut your arrows too short, they might become too stiff for your bow, which can lead to erratic flight and poor accuracy. This is why it’s better to err on the side of slightly longer and cut down a little at a time, rather than cutting too much off at once. Always consult your bow manufacturer’s recommendations for recommended arrow spine for your draw weight and length. You can often find useful charts and guides from reputable archery manufacturers like Hoyt Archery that explain spine dynamics.
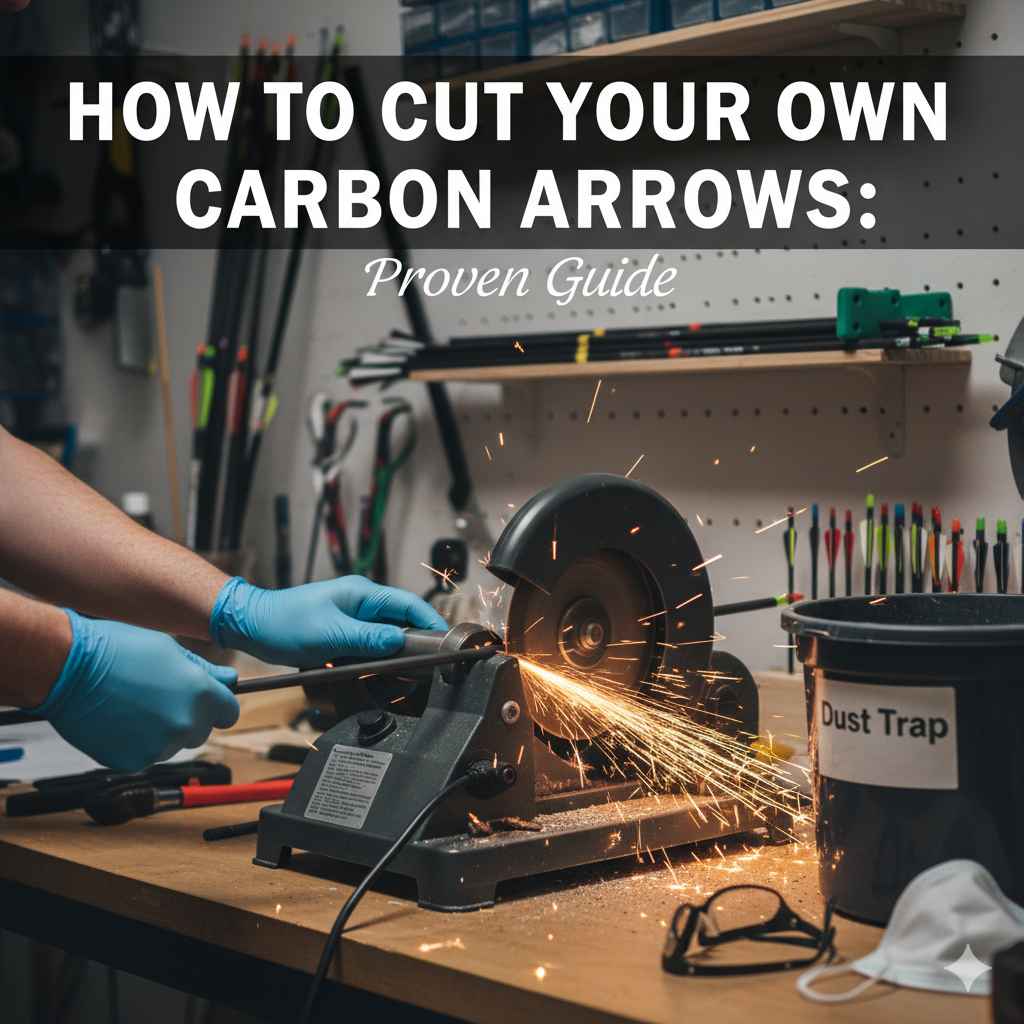
Step-by-Step Guide: Cutting Your Carbon Arrows
Alright, you’ve got your tools, you’ve determined your length, and you’re ready to make the cut. Remember, patience and precision are your best friends here. This isn’t a race; it’s about making it right.
Step 1: Mark Your Cut Line
Take one of your arrows and the measuring tape. Measure from the back of the shaft (the end where the nock goes) to the exact length you determined. Use your marker to draw a clear, thin line all the way around the arrow shaft. Make sure this line is as straight and perpendicular as possible. You can even use a piece of tape carefully wrapped around the arrow to act as a guide for your marker, ensuring a perfect circle.
Step 2: Secure the Arrow
This is where a vice or an arrow cutting jig is incredibly helpful. You want the arrow to be held firmly in place so it doesn’t move AT ALL during the cutting process. If the arrow shifts, your cut will be crooked. Some arrow saws have integrated clamps, which is ideal. If you’re using a manual method, ensure the arrow is supported for its entire length and clamped securely at the point where you will be cutting.
Step 3: Set Up Your Saw and Safety Gear
Put on your safety glasses and your dust mask. If you’re using a powered arrow saw, ensure it’s set up on a stable surface and plugged in. If you’re using a manual method with a miter box and very fine-toothed saw, set that up securely. Make sure the cutting wheel or blade is positioned squarely across your marked line.
Step 4: Make the Cut
This is the moment of truth! Using your arrow saw, turn it on and let it reach full speed. Gently feed the arrow into the cutting wheel, keeping the marked line aligned with the blade. Let the saw do the work; don’t force it. If you’re using a manual saw, use slow, steady strokes. The goal is a smooth, clean cut with minimal vibration. If you’re using a specialized arrow cutting jig with a blade, you’ll often pull the blade through the shaft while the arrow is held stationary.
Crucial Note: Many modern arrow saws are designed as “cut-off saws” where the wheel remains stationary, and you feed the arrow into it. The arrow might be held by a roller system or a clamp. Always refer to your specific tool’s instructions.
Step 5: Check the Cut and Deburr (If Necessary)
Once the cut is complete, remove the arrow. Inspect the end. It should be perfectly flat and clean. If there are any tiny little burrs or rough edges, you can very gently use a fine-grit sandpaper to smooth them down. Be careful not to sand too much, as this could slightly alter the length. The goal is to remove any sharp or uneven bits, not to reshape the end.
Step 6: Repeat for All Arrows
Once you’ve successfully cut one arrow, it’s time to repeat the process for all the arrows you intend to cut. Ensure you measure and mark each one carefully. Consistency is key!
Understanding Arrow Length Measurement Standards
It’s important to know how arrow length is typically measured to avoid confusion when talking to other archers or looking up specs. While we’ve discussed measuring from various points, the most common standardized measurement is often referred to as “shaft length” or “component length.”
Here’s a breakdown of why that matters:
| Measurement Type | Description | Relevance |
|---|---|---|
| Overall Arrow Length | From the tip of the broadhead/field point to the end of the nock’s protruding tail. | Less common for manufacturing, useful for quick visual checks. |
| Shaft Length (Component Size) | From the end of the shaft back to where the nock will insert, OR from the front of the shaft to the back of the shaft. The most common is to measure the bare shaft from back to front, before inserting any components. | This is the length you are primarily concerned with when cutting. It’s the actual length of the carbon tube. |
| Measured Length (for Tuning) | Often measured from the string groove of the nock (when installed) to the front of the arrow’s shaft (where the point inserts). | This is frequently used in tuning guides and bow tuning charts. |
When you buy arrows, they are usually listed by their “component size” or “shaft length.” This is the length of the bare shaft before any points or nocks are attached. When we cut our arrows, we are cutting this bare shaft length. After cutting, you will add nocks, inserts, points, and fletching, which add to the final overall length. Always remember that an arrow that is too short can be a safety hazard if it doesn’t sit properly on your arrow rest or shelf and support the bolt/arrow properly.
Common Mistakes to Avoid
Even with the best intentions, it’s easy to make a mistake when you’re new to something. Here are some common pitfalls when cutting carbon arrows. Knowing these upfront can save you from frustration and wasted arrows.
- Using the Wrong Cutting Tool: A hacksaw or a standard cutting disc on a rotary tool can splinter the carbon, creating dangerous micro-fractures or a ragged edge. This weakens the arrow and can lead to catastrophic failure.
- Not Squaring the Cut: An angled cut means the arrow won’t fly straight. The nock might not be aligned perfectly with the shaft, and the point will be off, affecting accuracy.
- Cutting Too Many Arrows at Once: It’s tempting to mass-produce, but especially for your first few, cut one at a time. This lets you double-check your measurements and technique.
- Cutting Too Short: This is a critical error. As mentioned, an arrow too short for your draw length is unsafe. It’s better to have an arrow that’s slightly too long and can be trimmed further than one that’s too short.
- Ignoring Carbon Dust: Carbon dust is not good for you. Always use a mask and eye protection. Proper ventilation is also a good idea.
- Not Securing the Arrow Properly: Any movement during the cut will result in a crooked arrow. Use a vice, jig, or arrow saw clamp to keep it perfectly still.
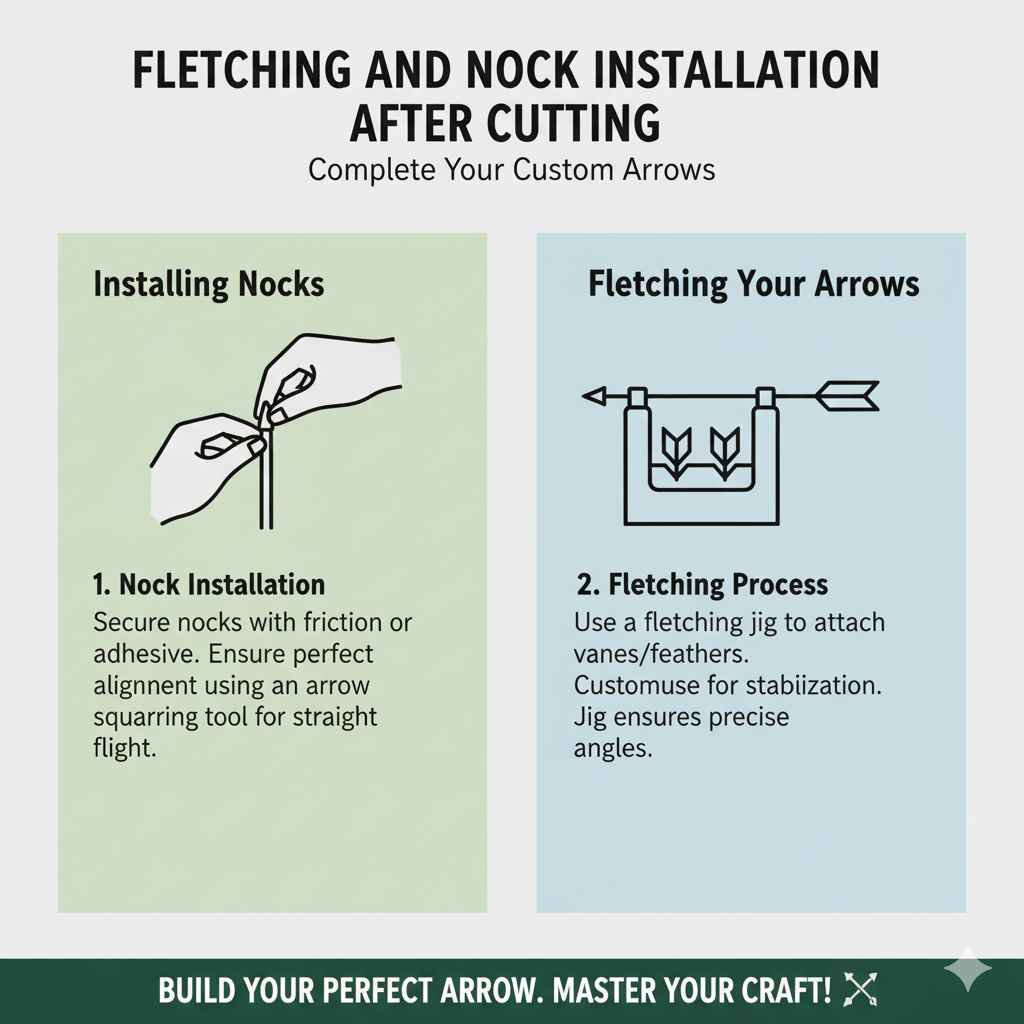
Fletching and Nock Installation After Cutting
Once you have your perfectly cut shafts, the next step is to get them ready for shooting. This involves installing the nocks and then fletching them. Many archers find it easier to fletch their arrows using a specialized jig after the cutting and squaring process is complete.
Installing Nocks
Nocks are typically held in place either by friction fit or by using a small amount of specialized arrow adhesive. Some nocks are designed to be inserted into a pre-grooved end, while others might be glued onto the shaft’s end. Always follow the instructions provided by the nock manufacturer. Ensure the nock aligns perfectly straight with the shaft to avoid any inconsistencies in flight. An arrow squaring tool is also essential here, as it ensures the pocket for the nock is indeed square with the shaft.
Fletching Your Arrows
Fletching (the vanes or feathers on an arrow) is crucial for stabilizing its flight. You can buy pre-fletched arrows, but fletching your own allows for customization and is a good skill to learn. An electric jig can even do some of the work for you. For beginners, a simple Bohning Fletching Jig or similar is a great investment. They allow you to attach vanes or feathers at precise angles, ensuring your arrow flies true. For a deep dive into fletching techniques, resources from experienced arrow builders can be invaluable, like those found on sites dedicated to bowhunting techniques and equipment, such as Bowhunting.com, which often feature detailed build-along guides.
Frequently Asked Questions (FAQs)
Q1: Can I use a regular saw to cut carbon arrows?
It’s strongly discouraged. Regular saws can splinter the carbon fiber, creating weak spots and a rough edge. This can lead to arrow failure and is dangerous. A specialized carbon arrow saw or cutting tool is essential for a clean, safe cut.
Q2: How do I know if my arrow is too short?
An arrow that is too short can be unsafe because it might not rest properly on your arrow rest or bow shelf. It might “fall off” the rest before release or not be supported by the bow’s riser through the shot. A general rule is to never have the arrow shaft extend so far forward that it doesn’t protrude at least an inch past the riser when drawn.
Q3: Will cutting my arrows affect their spine rating?
Yes, cutting an arrow makes it stiffer, meaning its spine rating increases. Shorter arrows are stiffer than longer arrows of the same model. This is why choosing the correct initial length is important, so you don’t end up with an arrow that is too stiff for your bow’s draw weight.
Q4: What is the best way to measure for arrow length?
A common method is to draw your bow to your anchor point, have a friend use a bow square to find the point on the arrow shaft perpendicular to the string, and then measure from there to the desired front of the arrow (usually adding 1 to 1.5 inches to the string-to-riser measurement for clearance and spine). Alternatively, you can measure from the bottom of your nock groove to the front of your riser when drawn, and add about an inch.
Q5: Does it matter if the cut end isn’t perfectly square?
Absolutely. A perfectly square cut ensures the nock, and subsequently the point, are aligned perfectly straight with the arrow shaft. An angled cut will throw off your arrow’s flight and significantly impact your accuracy. An arrow squaring tool is a must-have for this reason.
Q6: How much carbon dust is produced, and why is it dangerous?
Cutting carbon fiber can produce very fine dust particles. Inhaling this dust can be irritating to the respiratory system. More importantly, carbon fiber dust can be abrasive and irritating to the eyes and skin. Always wear a dust mask and safety glasses, and work in a well-ventilated area.
Conclusion
There you have it! Cutting your own carbon arrows is a rewarding skill that enhances your archery experience. By using the right tools, carefully measuring your desired length, prioritizing safety with protective gear, and following these step-by-step instructions, you can achieve professional-looking results right at home. Remember, precision and patience are key. Taking the time to get it right the first time will pay off in improved accuracy and consistency downrange.