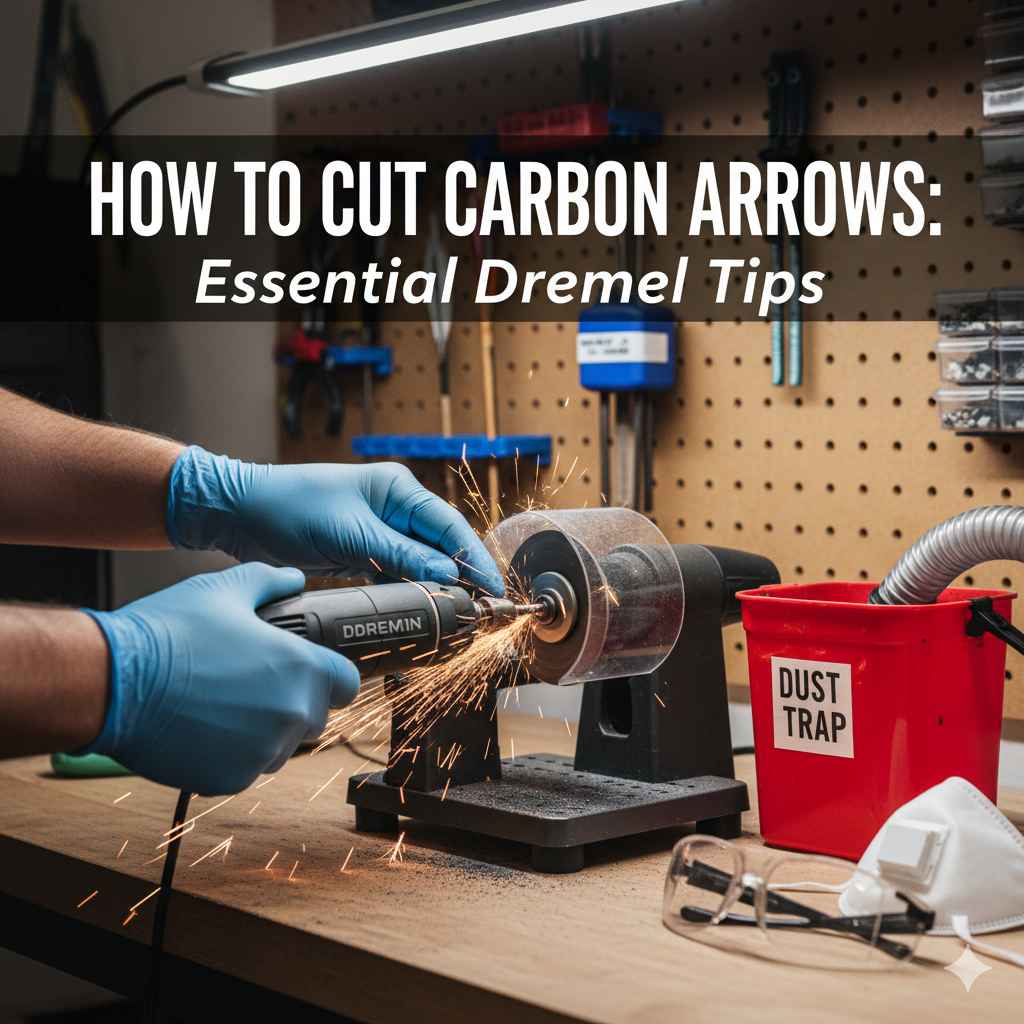
Cut carbon arrows accurately and safely with your Dremel by using the right attachments, securing your arrow firmly, making clean passes, and always prioritizing eye protection and ventilation. This guide provides essential tips for a perfect arrow shaft length, ensuring better shooting.
Hitting your target in archery often comes down to the right equipment, and that includes your arrows. Sometimes, the arrows you buy are a little too long for your draw length, or perhaps you’re building your own custom arrows. Cutting carbon arrows to the perfect length can seem a bit daunting, especially if you’re new to this. You might worry about messing up a good arrow or even causing damage to yourself. But don’t worry! With the right tools and a little guidance, cutting carbon arrows is a straightforward process that can significantly improve your shooting. We’ll walk you through exactly how to do it safely and effectively using a Dremel tool, so you can get perfectly fletched shafts ready for the range.
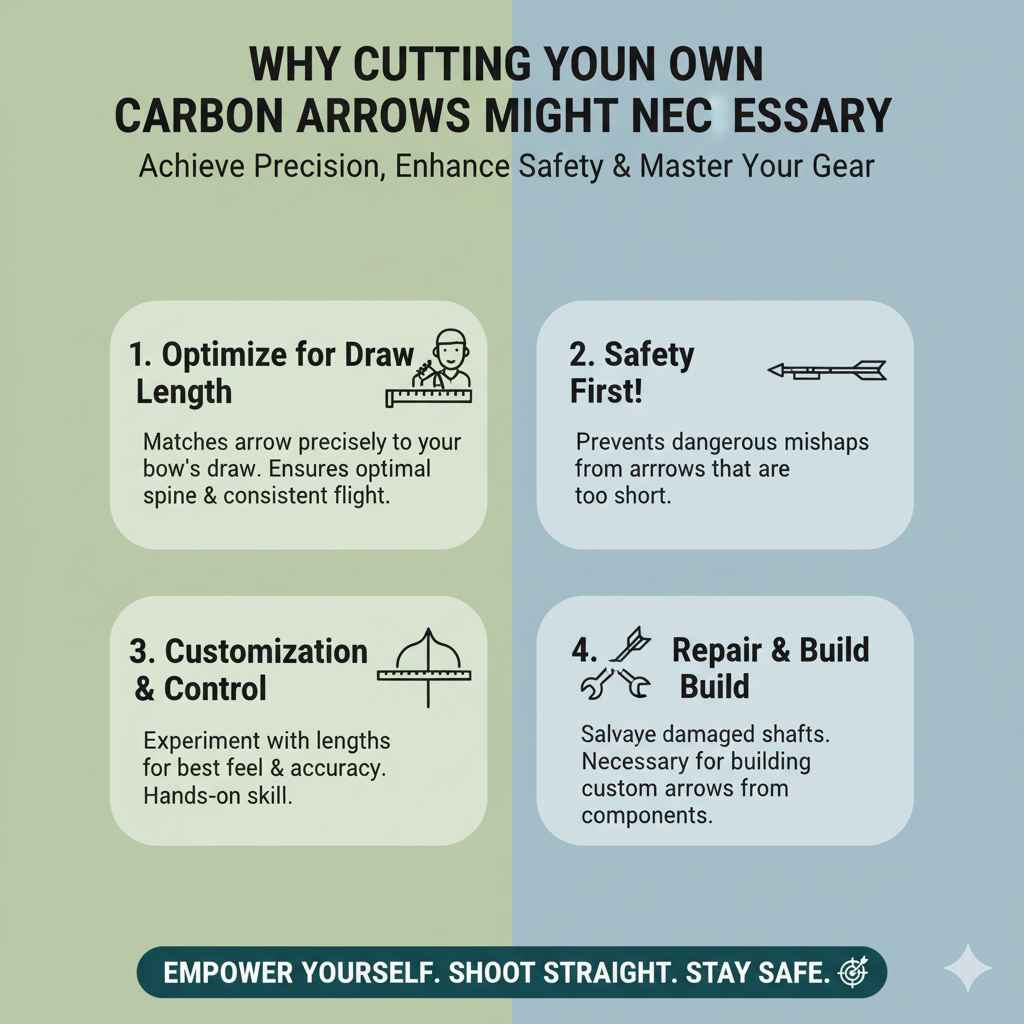
Why Cutting Your Own Carbon Arrows Might Be Necessary
As a beginner in archery, you’re likely focused on getting the feel of the bow, learning proper form, and hitting those first targets. Choosing the right arrow length is incredibly important for accuracy and arrow flight. An arrow that’s too long can flex too much before it leaves the bow, leading to erratic shots. Conversely, an arrow that’s too short might be unsafe to shoot, as it could fall off the rest before it’s fully propelled by the string.
Several common situations might lead you to cut your own arrows:
Optimizing for Draw Length: The most common reason is to match the arrow precisely to your bow’s draw length. This ensures the best possible arrow spine and flight.
Customization: You might want to experiment with slightly different arrow lengths to see what feels and shoots best for you.
Building Your Own Arrows: If you’re assembling arrows from components (shafts, inserts, nocks), cutting them to the desired length is a necessary step.
Repairing Damaged Shafts: In some rare cases, if the very end of an arrow is damaged, you might trim it down to salvageable material.
Don’t feel intimidated by this process. Think of it as a valuable skill that gives you more control over your archery gear. It’s all about precision and safety, and we’ll cover both today. Let’s get your arrows ready for optimal performance!
Essential Tools for Cutting Carbon Arrows with a Dremel
Using a Dremel tool for cutting carbon arrows is popular because of its precision and the variety of bits available. However, before you even grab your Dremel, ensure you have everything you need for a clean cut and a safe experience.
Here’s a checklist of what you’ll need:
Dremel Rotary Tool: A standard Dremel tool (or similar rotary tool) will work. Make sure it’s in good working order.
Cutting Wheel Attachment: The most crucial part is the right cutting wheel. For carbon shafts, a thin, reinforced cutting wheel designed for metal or fiberglass is best. Look for something like the Dremel EZ Speed-Clic metal cut-off wheels or a similar high-quality, reinforced grit wheel. Avoid standard abrasive cutting discs, as they can be too brittle or shatter easily.
Arrow Squaring Device/Jig: This is essential for ensuring your cut is perfectly perpendicular (90 degrees) to the arrow shaft. A perfectly square cut is vital for proper nock fit and consistent arrow flight. You can purchase specialized arrow squaring jigs designed for this purpose.
Measuring Tape or Caliper: For precise measurement of your desired arrow length.
Marker: A fine-tip permanent marker for marking the cut line.
Safety Glasses/Goggles: Absolutely non-negotiable. Always protect your eyes from carbon dust and potential debris.
Dust Mask/Respirator: Cutting carbon fiber produces fine dust. Inhaling this dust can be harmful. A good dust mask or respirator is highly recommended.
Work Surface/Vice: A stable surface and a way to hold the arrow securely without crushing it. An arrow clamp or a vice with soft jaws is ideal.
Optional: Vacuum Cleaner: To help manage dust as you cut.
It’s worth investing in a good arrow squaring jig. While you might try to freehand it, the consistency you’ll achieve with a jig is invaluable. A good jig ensures that the nock will sit perfectly straight on the back of the arrow, which is critical for accurate shooting.
Step-by-Step Guide: How to Cut Carbon Arrows with Your Dremel
Now that you have your tools ready, let’s walk through the process. Remember, patience and precision are key.
Step 1: Determine Your Correct Arrow Length
This is the most critical first step. An arrow’s length is typically measured from the bottom of the nock groove to the back of the shaft where the insert will be glued.
Measure Your Draw Length Accurately: The best way to do this is usually to have an experienced archer or pro shop help you. They can measure your actual draw length using a draw board or by observing your bow at full draw.
Measure Nock to Valley and Add Spine: A common method is to measure from the pivot point of your grip (the “pivot point”) to your bowstring at full draw, then add about 1 to 1.5 inches. Another method is measuring from your string and adding the distance to the front of your arrow rest. Always confirm with a knowledgeable source or archery shop.
Consider Arrow Spine: Longer arrows generally have a weaker spine, while shorter arrows have a stiffer spine. You need to ensure your arrow spine is correctly matched to your bow’s draw weight and your intended draw length. Arrows that are too short for your draw and bow can be dangerously overspined, leading to poor arrow flight or even damage to your bow. For more information on arrow spine, consult resources like Mercury Bowstrings’ guide on arrow spine.
Step 2: Mark the Cut Line
Once you know your desired finished length, you need to mark the shaft.
Measure from the Nock: Place your arrow on a flat surface. Measure from the back of the nock groove (where the string clicks in) to your desired cut point.
Mark Clearly: Use your permanent marker to make a clear, fine line around the circumference of the arrow shaft. This line will be your guide for the cut. Ensure the line is as straight as possible.
Step 3: Secure the Arrow and Set Up Your Dremel
A stable setup is crucial for a clean cut and safety.
Mount the Cutting Wheel: Attach the reinforced cutting wheel to your Dremel tool. Ensure it’s securely fastened according to the tool’s instructions.
Secure the Arrow in the Squaring Jig: Place the arrow into your arrow squaring jig or your vice with soft jaws. Position it so that the marked line is precisely where the cutting wheel will make contact. The arrow must be held firmly but not so tight that it deforms or cracks the carbon.
Position the Dremel: Rest the Dremel tool on a stable surface or in a stand if you have one. You want to be able to guide the Dremel smoothly along the marked line. Ensure the cutting wheel is aligned with your marked line.
Step 4: Make the Cut
This is where the Dremel comes into play.
Wear Your Safety Gear: Put on your safety glasses and dust mask!
Start the Dremel: Turn on the Dremel at a moderate speed. High speeds can generate excessive heat and potentially damage the carbon. A speed around 15,000-20,000 RPM is often a good starting point, but check your Dremel’s manual for recommendations on cutting wheels.
Gentle Pressure: Hold the Dremel firmly but with minimal pressure against the arrow shaft. Let the cutting wheel do the work. Do not force it.
Steady Pass: Slowly and steadily guide the Dremel around the circumference of the arrow. If you are using a squaring jig, the jig will ensure the cut is perpendicular. If not freehanding, you’ll need to rotate the arrow slightly and make multiple shallow passes, ensuring the cut remains square to the shaft.
Be Patient: Carbon dust will be generated. It’s a good idea to have a vacuum nearby to suck up dust as you go, or at least be prepared to clean up thoroughly afterward.
One Clean Pass is Best: Ideally, you want to make one clean pass to cut through the shaft. If you need to make multiple passes, ensure you are constantly checking that the cut remains square to the shaft.
A table can help visualize the process and recommended settings.
| Tool/Action | Recommendation | Why it’s Important |
|---|---|---|
| Dremel Speed | Moderate (15,000 – 20,000 RPM) | Prevents overheating and damage to carbon; allows for a cleaner cut. |
| Cutting Wheel | Thin, reinforced metal or fiberglass cutting wheel | Designed for precise cuts without shattering; durable. |
| Arrow Securing | Arrow squaring jig or vice with soft jaws | Ensures a perpendicular (square) cut for proper nock fit and arrow flight. |
| Pressure | Light and steady | Allows the tool to cut effectively without stressing the material or creating excessive dust. |
| Safety Gear | Eye protection, dust mask/respirator | Essential protection against carbon dust and debris. |
Step 5: Clean and Inspect the Cut End
Once the arrow is cut, you need to finish the job.
Remove Burrs: After cutting, there might be small burrs or rough edges on the freshly cut end of the carbon shaft. Gently sand these away with a fine-grit sandpaper or a small sanding drum attachment on your Dremel. The goal is a smooth, clean edge.
Check Squareness: Visually inspect the cut end. It should be perfectly flat and square. If you have a caliper or a specialized arrow inspection tool, use it to double-check that the diameter is consistent all the way around.
Clean the Shaft: Wipe down the entire arrow shaft to remove any residual carbon dust.
Step 6: Install the Insert (If Applicable)
If you are making arrows from component shafts, the next step is installing the insert.
Apply Adhesive: Use a good quality epoxy or carbon-specific arrow insert adhesive. Follow the manufacturer’s instructions for the adhesive.
Insert and Align: Apply a small amount of adhesive to the tip of the insert. Carefully insert it into the back of the arrow shaft.
Ensure Alignment: This is where that perfectly square cut is crucial. The insert should slide in cleanly and sit flush. For some adhesives, you might need to ensure the insert is perfectly straight. Some archers use alignment jigs for this. Rotate the arrow so the insert is perfectly aligned with the shaft, and let the adhesive cure completely according to the product’s instructions. Check reputable archery suppliers like Lancaster Archery Supply for specific arrow building components and adhesives.
Your carbon arrow is now cut and ready for your nock and fletching! By following these steps carefully, you’ll achieve professional-quality results.
Safely Handling Carbon Dust
Carbon fiber dust is a significant concern when cutting or sanding carbon arrows. It’s incredibly fine and can be harmful if inhaled or if it gets into your eyes. Taking proper precautions is not just recommended; it’s essential for your health.
Here’s how to manage carbon dust safely:
Use a Respirator: A simple dust mask might not be enough. A respirator with P100 filters offers the best protection against fine particulate matter. Ensure it fits snugly to your face.
Work in a Ventilated Area: Always perform these tasks outdoors or in a well-ventilated garage or workshop. Avoid doing this in enclosed living spaces.
Contain the Dust: Use a shop vacuum with a HEPA filter to collect dust as you cut. You can also use a dust collection attachment on your Dremel if available.
Clean Up Thoroughly: After you’re finished, clean your workspace meticulously. Wipe down surfaces with a damp cloth (to trap dust) and vacuum the area thoroughly.
Dispose of Waste Properly: Place all carbon dust and scrap pieces in a sealed plastic bag before disposing of them in your trash.
Wash Your Hands and Face: After cutting, always wash your hands and face thoroughly with soap and water to remove any residual dust.
Many experienced archers and bow technicians will tell you that treating carbon dust with respect is paramount. It’s part of the job, but not a part you want to take lightly.Alternatives to Dremel Cutting
While a Dremel is a common and effective tool for cutting carbon arrows, it’s not the only option. Understanding these alternatives can be helpful if you don’t have a Dremel or prefer another method.
Arrow Saw/Arrow Slitter: These are purpose-built machines designed specifically for cutting arrows. They often have a built-in mechanism to ensure a perfectly square cut and a steady speed. They are generally more expensive than a Dremel.
Hobby Bandsaw with Fine Blade: A bandsaw with a fine-toothed blade designed for miter cuts can also be used. However, it requires very careful setup to ensure squareness and can be more challenging for beginners to control.
Manual Arrow Cutters: Some specialized manual tools exist that grip the arrow and use a small, sharp blade to make the cut after rotating. These can be slow but effective for a single arrow.
The choice often comes down to budget and frequency of use. For the hobbyist or beginner, a Dremel with the right attachments is often the most accessible and versatile option. However, for those who build many arrows or want the absolute highest level of guaranteed precision, a dedicated arrow saw is the gold standard.
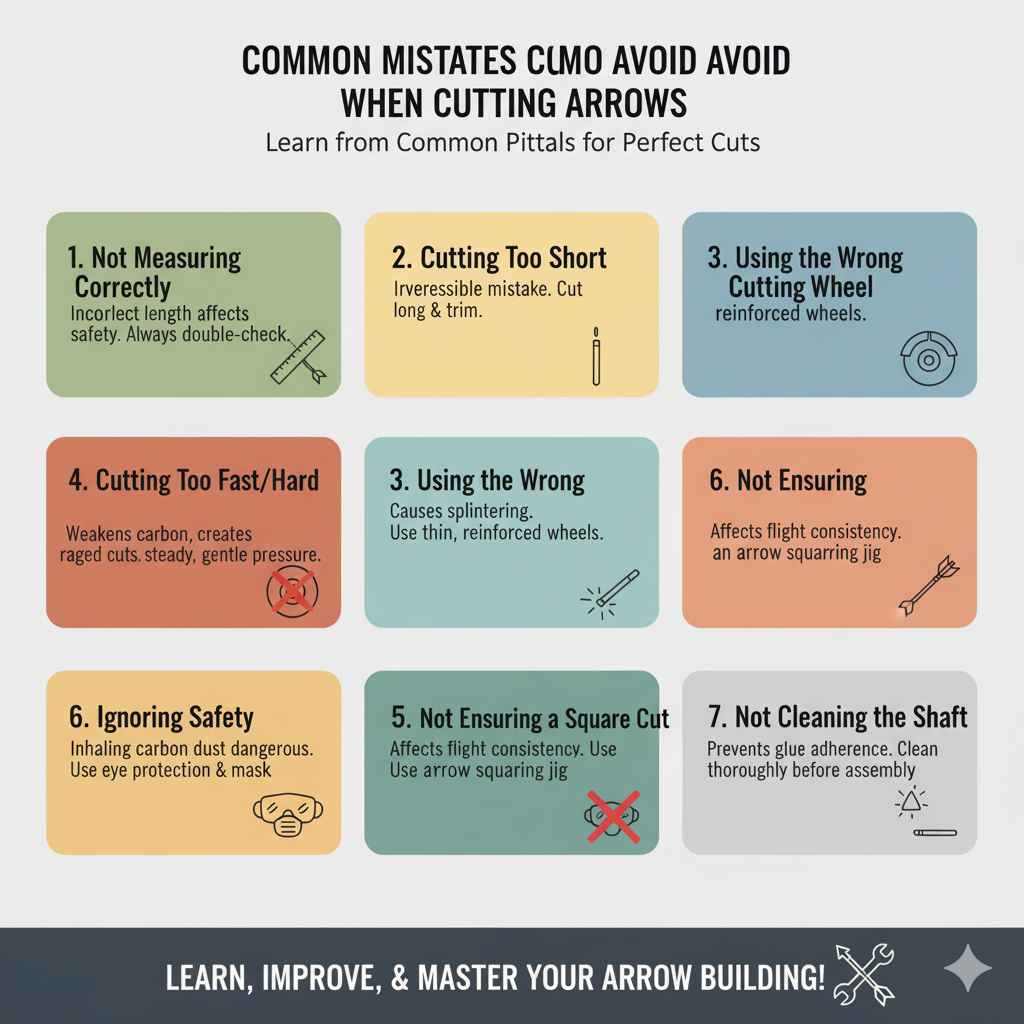
Common Mistakes to Avoid When Cutting Arrows
Even with the best intentions, beginners can make a few common errors. Being aware of these can help you sidestep them.
Not Measuring Correctly: This is the number one mistake. Incorrect measurements lead to arrows that are too long or too short, impacting accuracy and safety. Always double-check your measurements.
Cutting Too Short: It’s better to cut a little long and take off more material than to realize you’ve cut an arrow too short. You can always trim more, but you can’t add length back.
Using the Wrong Cutting Wheel: A standard grinding wheel is too aggressive and can splinter the carbon. Always use thin, reinforced wheels designed for cutting harder materials.
Cutting Too Fast or with Too Much Pressure: This can cause the carbon to heat up, potentially weakening it, or lead to a ragged, uneven cut and excessive dust.
Not Ensuring a Square Cut: A crooked cut will prevent your nock from seating correctly, which severely affects arrow flight and consistency. An arrow squaring jig is highly recommended.
Ignoring Safety: Cutting carbon without eye protection and a dust mask is dangerous. Never skip this vital step.
* Not Cleaning the Shaft: Leaving carbon dust on the shaft can interfere with glue adherence when installing an insert, potentially leading to the insert coming loose.
Learning from these common pitfalls means you’re more likely to succeed on your first try. Remember, every arrow maker has made a mistake or two along the way!
Frequently Asked Questions (FAQ)
Here are some common questions beginners have about cutting carbon arrows.
Q1: How do I know the correct length for my arrows?
A1: The safest and most accurate way is to have a qualified archery professional measure your draw length and consult your bow’s specifications. A general rule of thumb is to measure from the pivot point of your bow’s grip to the string at full draw and add about 1 to 1.5 inches. However, this varies, so professional advice is best.
Q2: Can I really cut carbon arrows with just a Dremel?
A2: Yes, you can! Using a Dremel with a thin, reinforced cutting wheel and an arrow squaring jig is a common and effective method for cutting carbon arrows. The key is to use the right attachments and proceed slowly and carefully.
Q3: What happens if I cut my arrow too short?
A3: If an arrow is significantly too short for your draw length and bow poundage, it can be dangerous. The arrow might be too stiff (overspined) for your setup, leading to poor arrow flight and potential damage to your bow. A slightly too-short arrow can also be unsafe if it comes off the rest before being fully propelled by the string. If you cut an arrow too short, it’s generally recommended to discard it and start again.
Q4: How much carbon dust does cutting create, and is it harmful?
A4: Cutting carbon arrows produces very fine carbon dust that can irritate the skin, eyes, and respiratory system. It is considered harmful if inhaled. Always wear appropriate safety gear, including a respirator, and work in a well-ventilated area while cleaning up diligently afterward.