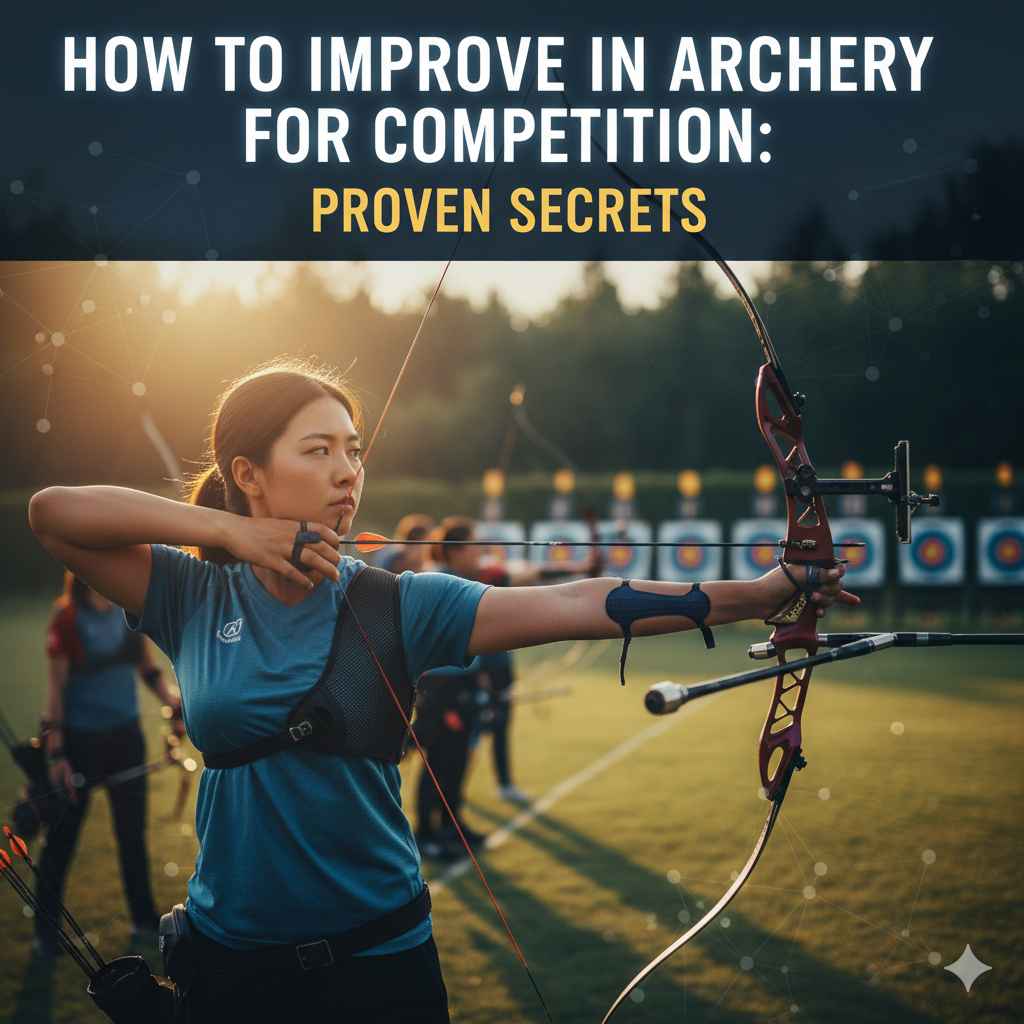
To improve in archery for competition, focus on mastering fundamental form, building a consistent practice routine, and developing mental toughness. Consistently drilling your shot process, fine-tuning your equipment, and learning to manage pressure are the keys to transforming from a hobbyist to a confident competitor. This approach builds a strong, repeatable foundation for success.
Thinking about taking your archery skills to the next level? The idea of shooting in a competition can be both exciting and a little scary. You see other archers hitting the bullseye with ease, and you wonder, “How do they do that?” It’s a common feeling, but I’m here to tell you that every great archer started exactly where you are now.
The gap between shooting for fun in your backyard and shooting for points on the line isn’t as wide as you might think. It’s not about some magical secret; it’s about refining what you already know and building smart, consistent habits. You don’t need superhuman talent, just the right guidance.
In this guide, I’ll walk you through the proven steps to prepare for competition. We’ll cover everything from perfecting your form to calming your nerves, all in a simple, easy-to-follow way. Let’s get you ready to step up to that shooting line with confidence!
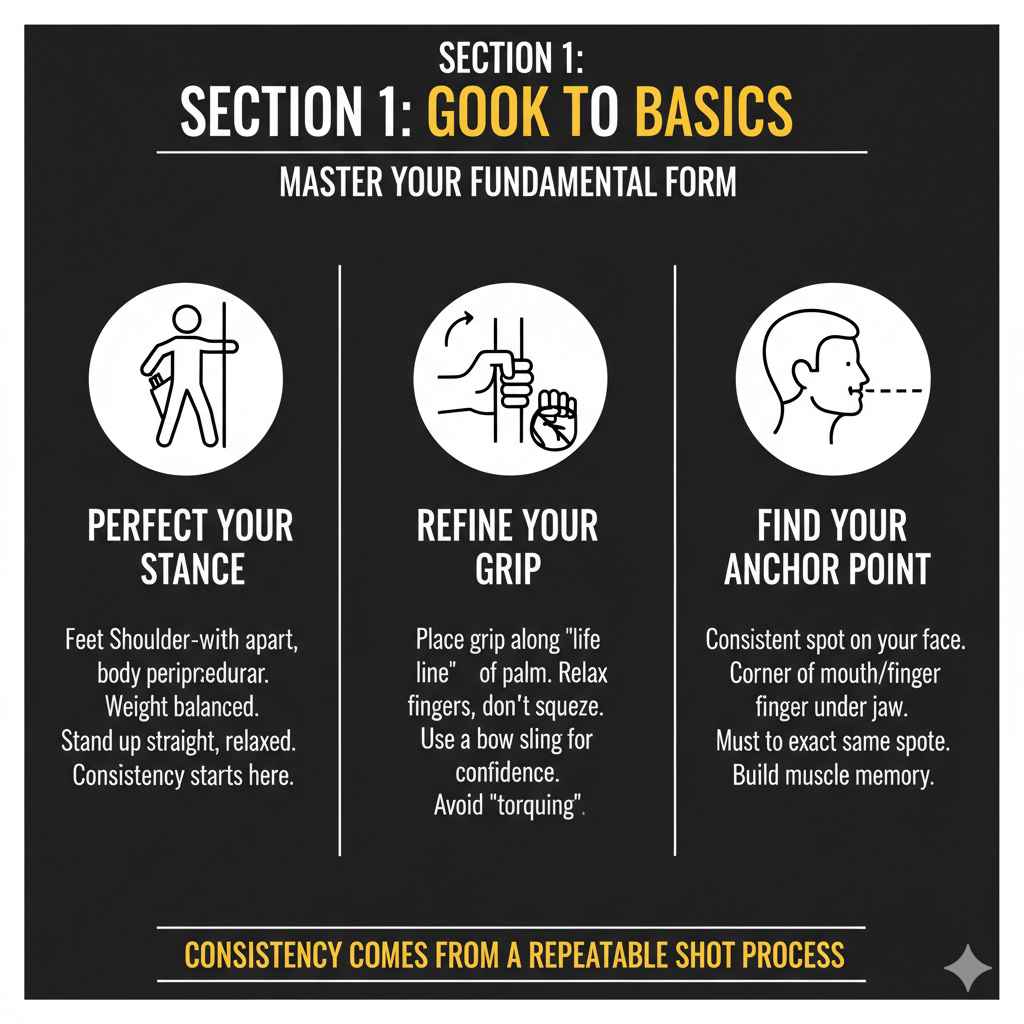
Section 1: Go Back to Basics: Master Your Fundamental Form
Before you can win, you need a solid foundation. In archery, that foundation is your form. Even the world’s best archers constantly drill the basics because consistency comes from a repeatable shot process. If you want to improve for competition, you must make your form second nature.
Perfect Your Stance
Your stance is where every great shot begins. It connects you to the ground and provides the stability needed for a clean release. Without a solid stance, everything else will be inconsistent.
- Feet Placement: Stand with your feet shoulder-width apart. Your body should be perpendicular to the target, like you’re standing on a line pointing directly at it.
- Weight Distribution: Keep your weight balanced evenly between both feet. Avoid leaning forward or backward. You should feel grounded and stable.
- Body Alignment: Stand up straight, but stay relaxed. Keep your shoulders down and your chest open. Avoid hunching over or tensing up.
A good stance feels natural and strong. Once you find it, use it every single time you shoot. Consistency starts here.
Refine Your Grip
How you hold the bow is critical. A common mistake for beginners is gripping the bow too tightly, which is often called “torquing.” This can twist the bow upon release and send your arrow off course.
- The “Life Line” Grip: Place the bow’s grip along the “life line” of your palm, between your thumb and index finger.
- Relax Your Fingers: Your fingers should be relaxed and lightly curled. Don’t squeeze the grip! Let the bow rest in your hand.
- Use a Bow Sling: A finger or wrist sling is a great tool. It allows you to keep a relaxed grip without fear of dropping the bow. This simple piece of gear builds confidence and good habits.
Find Your Anchor Point
Your anchor point is the specific spot on your face where you draw the bowstring back to every single time. This is one of the most important elements for accuracy. If your anchor point changes, your arrow’s flight path will change too.
For beginners, a common and effective anchor point is bringing the string to the corner of your mouth. Your index finger can rest just under your jawline. Whatever you choose, it must be the exact same spot for every shot. Close your eyes, draw your bow, and see if you can hit your anchor point by feel alone. That’s when you know you have it.
Focus on a Clean Release
The release is the final, crucial moment. All the work you’ve done setting up the shot can be undone by a jerky or rushed release. The goal is to let the string go as smoothly as possible.
Instead of “letting go,” think of relaxing your fingers and letting the string slip away. Your hand should move straight back along your jawline, as if you’re following through. This follow-through motion is a natural result of the back tension you’re holding. A clean release is quiet, smooth, and feels effortless.
Section 2: Build a Winning Practice Routine
Just showing up to the range and flinging arrows won’t make you a competitive archer. You need a plan. Purposeful practice is about quality, not just quantity. A structured routine helps you build muscle memory, track progress, and stay motivated.
Set Clear, Achievable Goals
What do you want to achieve? Instead of a vague goal like “get better,” set specific targets.
- Short-Term Goals: “This week, I will focus on my anchor point and hit a 6-inch group at 20 yards.”
- Medium-Term Goals: “This month, I will shoot my first local club competition and focus on completing my shot process every time, regardless of the score.”
- Long-Term Goals: “In six months, I want to consistently score in the top half of my division at local competitions.”
Goals give your practice direction and make it easier to see how much you’re improving.
Structure Your Practice Sessions
Don’t just shoot at the bullseye for an hour. Break your sessions into different phases to get the most out of your time. A well-rounded practice session includes a warm-up, skill drills, and a cool-down.
| Practice Phase | Activity | Purpose |
|---|---|---|
| Warm-Up (10 minutes) | Stretching, light draw exercises with a stretch band, blank bale shooting (shooting at a close target with no face). | Activates muscles, prevents injury, and allows you to focus purely on form without worrying about aiming. |
| Drill Work (25 minutes) | Focus on one specific element of your form (e.g., release, anchor point, stance). Use drills like the one-arrow-at-a-time drill. | Isolates and improves weak spots in your shot process. Builds deep muscle memory. |
| Scoring/Simulation (20 minutes) | Shoot a “mock competition.” Score your ends, follow a timer, and try to replicate the pressure of a real event. | Builds mental endurance and helps you practice your pre-shot routine under pressure. |
| Cool-Down (5 minutes) | Light stretching, review your session notes, and identify one thing you did well and one thing to work on next time. | Helps with muscle recovery and reinforces learning. Ends the session on a positive, constructive note. |
Practice Drills for Competitive Edge
Here are a few simple but powerful drills to add to your routine:
- Blank Bale Shooting: Stand about 5 feet from a target butt with no target face. Close your eyes and go through your shot process. This drill removes the distraction of aiming and forces you to focus 100% on how your form feels.
- Hold at Full Draw: Come to full draw, anchor, and aim. Hold for 10-15 seconds before letting down without shooting. This builds stamina and helps you get comfortable with the feeling of back tension.
- The Follow-Through Drill: After you release the arrow, freeze in your follow-through position. Hold it until the arrow hits the target. This ensures you are not dropping your bow arm or collapsing after the shot.
Section 3: Fine-Tune Your Equipment for Peak Performance
Your bow is your partner in competition. If it’s not set up correctly for you, you’ll be fighting it with every shot. While you don’t need the most expensive gear, you do need well-tuned gear that fits you properly.
Ensure Proper Draw Length and Weight
This is the most important part of bow fit. An incorrect draw length will ruin your form and alignment. A draw weight that is too heavy will cause you to shake, develop bad habits (like punching the trigger), and risk injury.
If you’re not sure about your draw length or weight, visit a local pro shop. They have the tools and expertise to measure you correctly. It’s better to shoot a lighter weight with perfect form than a heavy weight with poor form.
Basic Bow Tuning for Beginners
Bow tuning can seem complex, but here are a few basics every competitive archer should understand.
- Nocking Point: This is the small metal or thread ring on your bowstring where the arrow nocks. If it’s too high or too low, your arrow will fly erratically. A pro shop can set this perfectly for you.
- Center Shot: This aligns your arrow rest so the arrow points directly in line with the bowstring. A good center shot prevents the arrow from kicking out to the side on release.
- Sight Alignment: Make sure your sight is perfectly vertical. If it’s tilted, your left-and-right misses will get worse at longer distances.
For more advanced tuning, like paper tuning or walk-back tuning, it’s a great idea to work with a coach or an experienced archer at your local club.
Section 4: Develop the Mental Game of a Champion
Archery is often said to be 90% mental. In a competition, everyone on the line knows how to shoot. The winner is often the person who can handle the pressure and stay focused. Building mental toughness is just as important as practicing your form.
Create a Pre-Shot Routine
A pre-shot routine is a sequence of simple, repeatable steps you do before every single shot. It acts as a mental checklist that helps you focus and block out distractions. It can be as simple as this:
- Step up to the line.
- Take a deep breath.
- Set your feet and grip.
- Look at the target and visualize the arrow hitting the center.
- Begin your shot process.
Practice your routine until it’s automatic. In a high-pressure situation, your routine will be your anchor, keeping you calm and focused.
Learn to Manage Competition Nerves
Nerves are normal! Even Olympic archers get nervous. The trick is not to eliminate them, but to manage them.
- Breathing Exercises: When you feel nervous, your heart rate increases and your breathing becomes shallow. Take a slow, deep breath in for four seconds, hold for four seconds, and exhale for four seconds. This simple technique can calm your entire nervous system.
- Focus on the Process, Not the Outcome: Don’t think about winning or losing. Don’t think about your score. Focus only on executing your next shot as perfectly as you can. Your pre-shot routine is your best tool for this.
- Positive Self-Talk: Replace negative thoughts (“Don’t miss!”) with positive ones (“Focus on a smooth release.”). Be your own best coach.
Visualization: See Your Success
Before a competition, take a few minutes to close your eyes and visualize yourself shooting. Imagine walking up to the line, feeling calm and confident. Picture your perfect shot process, from your stance to your follow-through. See the arrow flying perfectly and landing in the center of the target. This mental rehearsal prepares your mind for success.
Section 5: Physical Conditioning for a Stronger Shot
Archery is a sport of strength, stability, and endurance. Being physically fit will help you hold your bow steadier, control your shot for longer, and avoid fatigue during a long competition day. You don’t need to be a bodybuilder, but some targeted exercises will make a huge difference.
Key Muscle Groups for Archery
The primary muscles used in archery are in your back, shoulders, and core. A strong core provides stability, while strong back muscles are essential for a proper draw and release using back tension.
| Exercise | How it Helps Archery | Simple How-To |
|---|---|---|
| Planks | Builds core strength and stability, helping you stay steady while aiming. | Hold a push-up position on your forearms, keeping your body in a straight line. Start with 30 seconds and work your way up. |
| Rows | Strengthens the back muscles (rhomboids and lats) used to draw the bow with back tension. | Use a resistance band or light dumbbells. Sit or stand straight, and pull the weight or band toward your chest, squeezing your shoulder blades together. |
| Shoulder Blade Squeezes | Activates and strengthens the back muscles for a better release. | Stand with your arms at your sides. Squeeze your shoulder blades together as if you’re trying to hold a pencil between them. Hold for 5 seconds and release. |
| Bow Raises | Builds shoulder endurance for holding the bow steady. | Hold your bow (or a light weight) with your bow arm straight out in front of you. Hold for 30 seconds, rest, and repeat. |
Incorporate these simple exercises into your weekly routine, 2-3 times a week. You’ll be surprised at how much steadier and more controlled your shooting becomes.
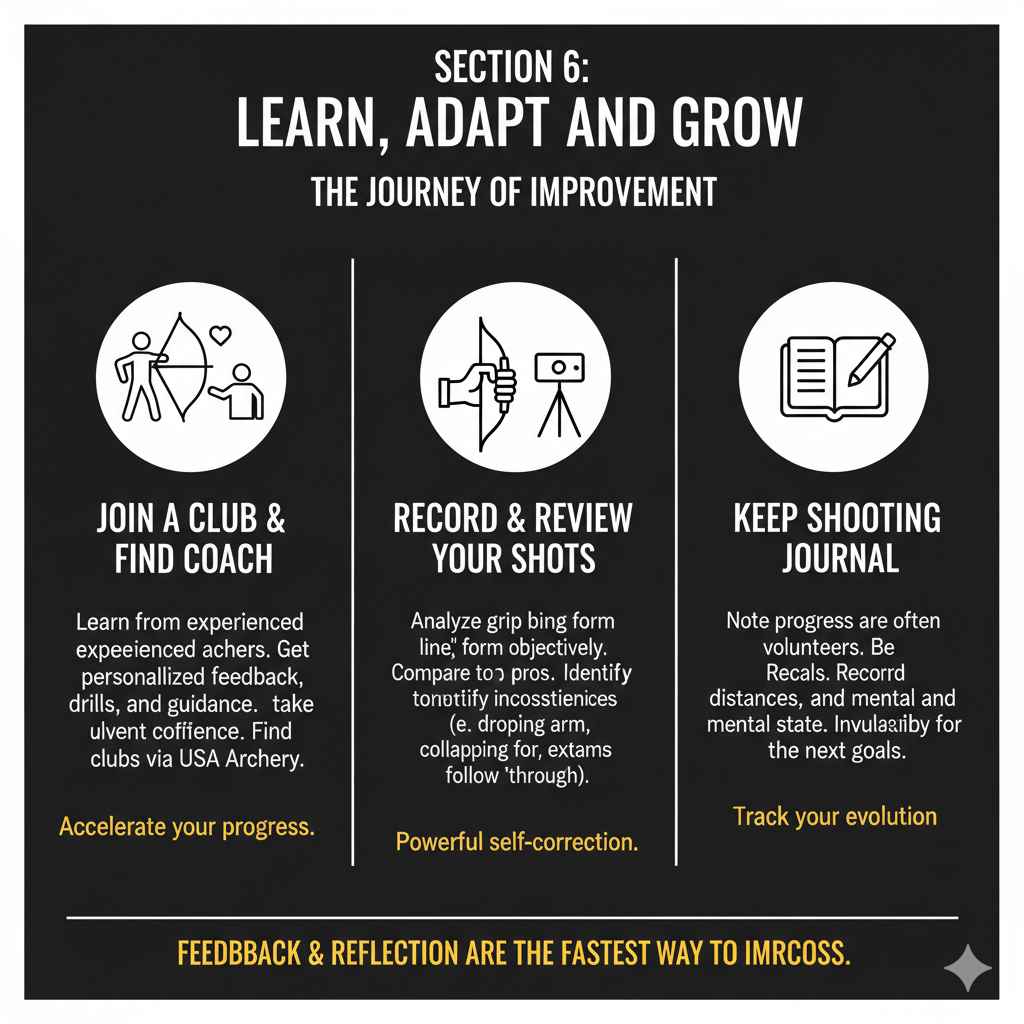
Section 6: Learn, Adapt, and Grow
The journey to becoming a better competitive archer doesn’t happen in isolation. The fastest way to improve is to learn from others and be open to feedback.
Join a Club and Find a Coach
Joining a local archery club is one of the best things you can do. You’ll be surrounded by experienced archers who are happy to share their knowledge. Many clubs also have certified coaches who can provide personalized feedback on your form and technique. To find a club near you, check out the USA Archery Club Locator.
A good coach can spot issues you can’t see yourself and provide drills and guidance to fix them. The investment in a few coaching sessions can accelerate your progress immensely.
Record and Review Your Shots
Set up your smartphone to record yourself shooting from the side. Later, watch the video and compare your form to that of professional archers. Do you see any inconsistencies? Is your bow arm dropping? Are you collapsing on your follow-through? This is a powerful, objective way to analyze your own technique.
Keep a Shooting Journal
After each practice session or competition, take a few minutes to write in a journal. Note what went well, what challenges you faced, and what you want to work on next time. Did your new pre-shot routine help you stay calm? Did you struggle with a particular distance? This journal will become an invaluable record of your progress and a tool for setting future goals.
Frequently Asked Questions (FAQ)
How much should I practice for a competition?
For a beginner entering their first competition, practicing 2 to 3 times per week is a great goal. Focus on quality over quantity. A focused 1-hour session is better than 3 hours of casual shooting. Consistency is the most important factor.
What is the most important skill for competition?
While good form is crucial, the most important skill for competition is having a repeatable shot process. This means doing the exact same thing—mentally and physically—for every single arrow. This consistency is what leads to accuracy under pressure.
How do I handle my nerves during my first competition?
It’s normal to be nervous! The best way to handle it is to focus on your pre-shot routine and deep breathing. Don’t worry about your score or what others are doing. Just focus on executing one good shot at a time. Remember, your first competition is about learning and having fun.
Do I need expensive equipment to compete?
Absolutely not. You do not need the most expensive gear to be competitive, especially at the local level. A well-tuned, entry-level or mid-range bow that fits you properly is far more effective than a top-of-the-line bow that is poorly tuned or too heavy for you.
What is a good first competition to enter?
A local club shoot or a 3D archery tournament are excellent choices for a first competition. The atmosphere is usually friendly and supportive, and it’s a great way to learn the rules and etiquette of competitive archery without intense pressure.
How do I know when I’m ready to compete?
You’re ready when you can consistently execute your shot process and group your arrows reasonably well at the distance you’ll be competing at. More importantly, you’re ready when you feel excited about the challenge and want to test your skills in a fun, new environment.
What should I bring to my first competition?
Besides your bow and arrows, bring essential gear like an armguard, finger tab or release aid, and a quiver. Also pack extras like a spare nock, arrow rest, and any tools you need for adjustments. Don’t forget water, snacks, a folding chair, and sunscreen!
Conclusion: Your Journey to Competitive Success
Improving in archery for competition is a journey, not a race. It’s built on the simple but powerful secrets we’ve covered: a solid foundation in the fundamentals, a purposeful practice routine, well-tuned equipment, a strong mental game, and a willingness to learn.
Don’t be intimidated by the idea of competition. Every archer on that line was once a beginner. By focusing on these key areas, you are building the skills and confidence to not only participate but to truly enjoy the challenge. The goal of your first competition isn’t to win, but to put your training into practice, learn from the experience, and have fun.
So, take these tips to the range, practice with purpose, and trust in your process. You have what it takes to step up to that line and shoot with confidence. Happy shooting!