To train for Olympic archery, focus on mastering the fundamentals with a recurve bow. Develop a consistent shot cycle, including proper stance, anchor point, and release. Build a structured training plan that includes form drills, scoring practice, and physical conditioning. Working with a certified coach is essential for personalized feedback and progress.
Have you ever watched the Olympics and felt amazed by the archers? They stand so still, aim with incredible focus, and hit a tiny target from far away. It looks like a superpower. You might think, “I could never do that.” But what if I told you that every single one of those archers started just like you? They started with their first bow, their first arrow, and a simple desire to learn.
Training for Olympic archery is a journey, not a race. It’s about building good habits one step at a time. It can feel confusing at first. What bow do you need? How do you stand? How do you even begin to aim? Don’t worry. This guide will walk you through everything. We will break it all down into simple, easy steps. You will learn the basics, build a solid foundation, and find out how to start your own archery adventure.
First, What Is Olympic Archery?
When people talk about “Olympic archery,” they are talking about a very specific style. It’s important to know the rules of the game before you start training. This helps you focus on the right skills and equipment from day one.
The Bow: The Olympic Recurve
The only type of bow allowed in the Olympics is the recurve bow. Unlike a simple longbow, a recurve bow has tips that curve away from the archer. This design gives the arrow more speed and power. Olympic recurve bows are also highly technical. They have sights for aiming, stabilizers to reduce vibration, and other tools to help with consistency. You will not see compound bows with their wheels and pulleys in the Olympics.
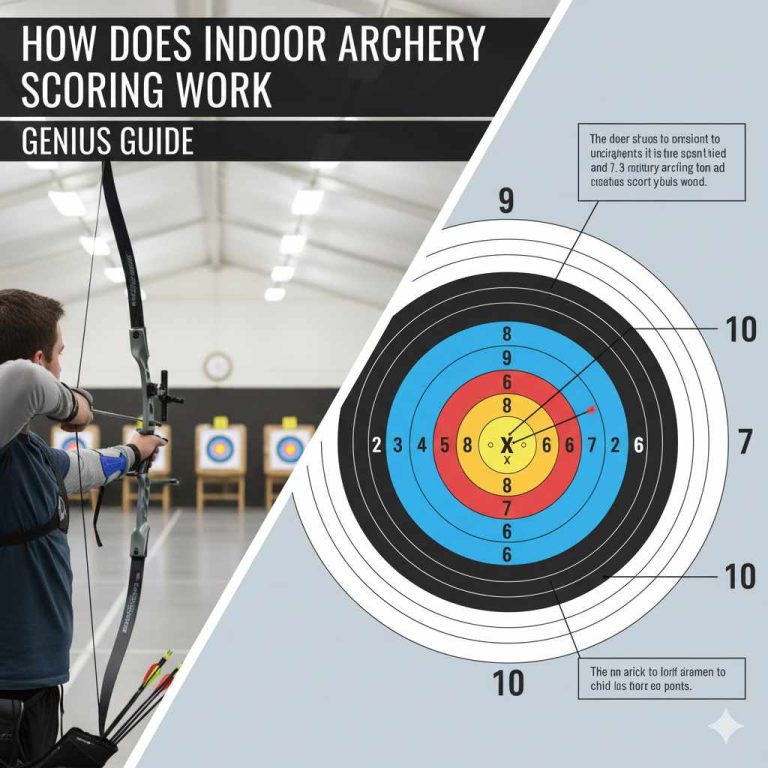
The Distance and Target
Olympic archers shoot at a target that is 70 meters away. That’s about 76 yards, or most of the length of a football field! The target itself is 122 centimeters (about 48 inches) wide. The very center, the yellow gold ring worth 10 points, is only 12.2 centimeters wide—about the size of a CD. Hitting that tiny circle from so far away is the ultimate goal, and it requires incredible precision.

Step 1: Getting the Right Equipment
Your bow is your most important partner in archery. Starting with the right gear makes learning much easier and more enjoyable. You don’t need the most expensive equipment to begin, but you do need gear that fits you correctly.
Choosing Your First Recurve Bow
A beginner’s bow is often a “takedown” bow. This means the riser (the handle) and the limbs (the bending parts) come apart. This is great for a few reasons:
- Portability: It’s easy to pack up and take to the range.
- Upgradability: As you get stronger, you can buy stronger limbs without needing a whole new bow.
- Adjustability: It allows you to learn the basics of bow tuning.
The two most important factors for your first bow are draw weight and draw length.
Draw Weight: This is the amount of force you need to pull the string back. Beginners should start with a low draw weight, typically between 15 and 25 pounds. Starting too heavy will make you tired, shaky, and lead to bad habits. Your goal is to learn good form, not to pull a heavy weight.
Draw Length: This is how far you pull the string back. It is unique to your body size. An archery pro shop can measure this for you perfectly. Getting the right draw length ensures you can shoot comfortably and consistently.
Essential Gear for Olympic Recurve
Here is a breakdown of the key parts of an Olympic-style recurve bow. You won’t need all of these on day one, but it’s good to know what they are.
| Component | Purpose | Beginner’s Tip |
|---|---|---|
| Riser | The handle and central part of the bow where everything else attaches. | Choose a comfortable grip. You can start with a basic cast aluminum or forged riser. |
| Limbs | The top and bottom parts that bend to store energy. | Start with a low draw weight (15-25 lbs). You can always get stronger limbs later. |
| Sight | A device mounted on the riser used for aiming. | A simple, adjustable sight is perfect for learning the basics of aiming. |
| Arrow Rest | A small shelf that holds the arrow as you draw. | A simple plastic or magnetic rest is reliable and easy to use. |
| Plunger Button | A spring-loaded button that helps the arrow fly straight. | This helps “tune” the bow. Your coach or a pro shop can help set it. |
| Stabilizers | Rods and weights that help balance the bow and absorb vibration. | You can start without these and add them as your form improves. |
Personal Safety Gear
Never shoot without these items. Safety always comes first!
- Armguard: Protects your forearm from the bowstring.
- Finger Tab or Glove: Protects your fingers from the pressure of the string. A tab is standard for Olympic style.
- Arrows: Get arrows that are the correct length and stiffness (spine) for your bow. A pro shop is the best place to get this right.
Step 2: Master the Fundamental Shot Cycle
Good archery is all about consistency. You want to perform every single shot the exact same way. This process is called the “shot cycle.” By breaking it down into small, repeatable steps, you can build a strong and reliable form. The national governing body, USA Archery, outlines these steps in detail, but here is a simple guide to get you started.
- Stance: Stand with your feet shoulder-width apart. Your body should be perpendicular to the target, like you’re standing on a “T.” Distribute your weight evenly.
- Nock the Arrow: Place the back of the arrow (the nock) onto the bowstring. You’ll hear a little “click.” Make sure the odd-colored feather or vane (the “index fletching”) points away from the bow.
- Set Your Grip: Hold the bow with a relaxed hand. Your knuckles should be at a 45-degree angle. Don’t squeeze the grip! Let the bow rest gently in the pocket of your thumb and index finger.
- Set Up: Raise your bow arm toward the target. Your arm should be straight but not locked. Keep your shoulder down and relaxed.
- Draw: Pull the string back smoothly using your back muscles, not your arm muscles. Imagine squeezing a tennis ball between your shoulder blades.
- Anchor: Bring your drawing hand to a consistent spot on your face. This is your “anchor point.” For Olympic style, this is usually with your index finger touching the corner of your mouth or under your chin. Find a spot that is solid and repeatable.
- Transfer and Aim: Once anchored, transfer the holding weight from your arm muscles to your back muscles. Line up your sight with the target. Try to keep the sight pin floating in the middle of the gold.
- Release and Follow Through: The release should be a surprise. Simply relax the fingers of your drawing hand and let the string go. Your hand should move straight back along your jawline. Keep your bow arm pointed at the target until the arrow hits. This is the “follow-through,” and it’s very important!
Practice these steps without an arrow first (this is called a “blind bale” practice when done at close range to a target butt). Focus on how each step feels. The goal is muscle memory, so your body knows what to do without you having to think about it.
Step 3: Build a Consistent Training Plan
You don’t become an Olympian by shooting a few arrows on the weekend. Progress comes from regular, focused practice. A structured training plan will help you improve much faster than just shooting randomly.
Start Close, Really Close
When you start, don’t even think about the 70-meter distance. Your first goal is to build good form. Stand just 5 or 10 meters away from a large target butt. At this distance, you don’t need to worry about aiming. You can focus 100% on your shot cycle. Once your arrows are grouping tightly together, you know your form is becoming consistent. Then, you can start moving back.
Frequency Over Duration
It’s better to practice for 1 hour three times a week than for 3 hours once a week. Shorter, more frequent sessions help build muscle memory more effectively and prevent fatigue. When you get tired, your form gets sloppy, and you start practicing bad habits.
A Sample Beginner Training Schedule
Here is a simple plan to get you started. The number of arrows is just a suggestion. Listen to your body and stop if you feel tired or your form is breaking down.
| Day | Focus of the Session | Suggested Duration / Arrow Count |
|---|---|---|
| Session 1 (e.g., Tuesday) | Form and Shot Cycle Practice (Close Range) | 1 hour / 60-90 arrows |
| Session 2 (e.g., Thursday) | Form Drills and Aiming Practice (Slightly Farther) | 1 hour / 60-90 arrows |
| Session 3 (e.g., Saturday) | Scoring and Endurance (Your Current Distance) | 1.5 hours / 90-120 arrows |
| Rest Days | Allow your muscles to recover. You can stretch or do light cardio. | Active recovery is key. |
Keep a Journal
Track your progress! After each session, write down a few notes. What went well? What was challenging? How many arrows did you shoot? What was your score? A journal helps you see your improvement over time and identify areas that need more work. It’s a great way to stay motivated.
Step 4: Physical and Mental Conditioning
Olympic archery is as much a mental game as it is a physical one. Top archers are athletes in every sense of the word. They train their bodies and their minds to perform under pressure.
Strength and Stability Training
Archery uses muscles that you might not work in your everyday life. A good conditioning program will prevent injury and give you the stamina to shoot for long periods.
- Core Strength: Planks, bridges, and bird-dogs build a stable base for your shot. A strong core connects your upper and lower body.
- Back Strength: Rows, lat pulldowns, and band pull-aparts strengthen the key muscles used to draw the bow. This helps you use your back, not your arms.
- Shoulder Stability: Exercises with light weights or resistance bands help strengthen the small muscles around your shoulder joint, which is crucial for holding the bow steady.
You don’t need to be a bodybuilder, but a foundation of fitness will make a huge difference.
The Mental Game
At the highest levels, what separates the good from the great is mental strength. Here’s how you can start training your mind:
- Focus: When you shoot, think only about your shot process. Let go of distractions. Let go of the last arrow, whether it was good or bad. Focus on the current shot.
- Visualization: Before you shoot, close your eyes and imagine yourself executing a perfect shot. See the arrow flying perfectly into the center of the target. This builds confidence and programs your mind for success.
- Breathing: Use deep, calming breaths to manage nerves and keep your heart rate steady. A simple technique is to breathe in for four counts, hold for four, and breathe out for six.
The mental game takes practice, just like physical form. Start practicing it from your very first day on the range.
Step 5: Find a Coach and a Community
You can learn a lot from books and videos, but nothing can replace the guidance of a qualified coach. A coach can see things about your form that you can’t. They can provide instant feedback, create a personalized training plan, and help you break through plateaus.
Look for a coach certified by a recognized organization, such as World Archery or your national governing body. They have been trained to teach proper technique and safety.
Joining a local archery club is also a fantastic idea. A club gives you a safe place to shoot, access to equipment, and a community of fellow archers. You can learn from more experienced shooters, make friends, and find people to motivate you. Archery is an individual sport, but it’s much more fun when you’re part of a team.

Frequently Asked Questions (FAQ)
1. How long does it take to become good at Olympic archery?
Progress varies for everyone. It can take several months to develop consistent form and a year or more of dedicated practice to become proficient at longer distances. Reaching an elite level often takes 5-10 years of consistent, high-level training with a coach.
2. Is Olympic archery an expensive sport to start?
It can be, but there are budget-friendly ways to begin. A good quality beginner takedown recurve bow set (including bow, arrows, and safety gear) can cost between $200 and $400. Many archery clubs offer rental equipment, which is a great way to try the sport before buying.
3. Can I start archery at any age?
Absolutely! Archery is a lifelong sport. Kids can start as young as 8 or 9 with light bows, and adults can pick it up at any age. It’s more about proper technique and conditioning than raw strength, making it accessible to a wide range of people.
4. Do I need a coach right away?
It is highly recommended. A certified coach will ensure you learn proper form and safety from the very beginning. This helps prevent developing bad habits that can be difficult to unlearn later. Even a few introductory lessons can set you on the right path.
5. What muscles are most important for archery?
The primary muscles used are in your back (rhomboids, trapezius), shoulders (deltoids), and core. While some arm strength is needed, the real power comes from your back. A good training program focuses on building a strong and stable “back tension” for a powerful and consistent shot.
6. How do I find a place to practice?
The best way is to search for local archery clubs or ranges. The USA Archery Club Finder is an excellent resource for finding certified clubs and coaches in your area. These places provide a safe, structured environment for practice.
7. What’s the biggest mistake beginners make?
The most common mistake is starting with a draw weight that is too heavy. This leads to poor form, fatigue, and potential injury. Always start with a light bow and focus 100% on learning the correct shot cycle before you worry about power or distance.
Conclusion: Your Journey Starts Now
Training for Olympic archery is a long but incredibly rewarding path. It’s a sport of discipline, focus, and continuous self-improvement. It teaches you patience and mental fortitude. Remember that every shot is a new beginning and a new opportunity to be your best.
Don’t be intimidated by the 70-meter distance or the pressure of competition. Focus on the first step: getting the right gear. Then the next: learning the shot cycle. Build a solid foundation, practice with purpose, and don’t be afraid to ask for help. The journey of a thousand arrows begins with a single, well-executed shot. So grab a bow, find a range, and let your adventure begin. You are capable of more than you think.