Making a traditional wooden bow takes 8 steps: pick a stave, rough-shape it, tiller the bend, cut string nocks, then string and finish it. Rush the tillering step and the bow will not bend evenly, or it snaps under draw weight. This guide covers wood selection, all 8 build steps, and the safety checks to run before you shoot it.
Why Make Your Own Traditional Bow?
There’s a unique sense of accomplishment that comes with creating something with your own hands, especially when it’s a tool with such a long and storied history as the traditional bow. Imagine shooting an arrow from a bow that you personally shaped from a piece of wood! It’s a tangible connection to ancient skills and a fantastic way to understand the physics and craftsmanship behind this ancient weapon. Beyond the pride, making your own bow offers a deeper appreciation for archery, its origins, and the materials involved. It’s a rewarding hobby that combines nature, woodworking, and a bit of athletic skill.
Choosing the Right Wood: The Heart of Your Bow
The wood you select is the most crucial element in building a successful traditional bow. It needs to be strong, flexible, and able to store energy efficiently when drawn. For beginners, it’s best to start with woods that are more forgiving and readily available. We’re looking for a wood that can bend significantly without breaking and then spring back to its original shape.
Ideal Woods for Beginner Bowyers
- Hickory: A classic choice for a reason. Hickory is strong, readily available, and quite forgiving. It has good elasticity, making it suitable for self-bows (bows made from a single piece of wood).
- Ash: Similar to hickory in many ways, ash also offers good strength and flexibility. It’s a reliable wood for first-time bow makers.
- Osage Orange: Often considered the “king” of bow woods. It’s incredibly strong, elastic, and makes powerful, durable bows. However, it can be harder to work with and find than hickory or ash.
- Maple: Certain types of maple, like hard maple, can also be used. It’s generally a bit stiffer than hickory, which might require a slightly different approach to tillering.
- Oak: While some species of oak can be used, many archers find them less ideal due to brittleness. If using oak, white oak is generally preferred over red oak.
What to Look for in a Stave (Raw Bow Wood)
- Straight Grain: The wood should have as straight and consistent grain as possible. Avoid knots, twists, or significant irregularities in the grain pattern, especially on the back (outer) and belly (inner) surfaces of the bow.
- Seasoned Wood: Wood must be properly seasoned (dried) to prevent warping, cracking, and loss of energy. Ideally, your wood should be dried for at least one to two years. If you’re buying, ensure it’s from a reputable supplier who deals in bow staves.
- No Defects: Inspect the stave carefully for any signs of insect damage, rot, or cracks. Even small flaws can become major problems during the bow-making process.
You can often find good staves from dedicated bow-making suppliers online. They usually offer wood that has been seasoned and milled to suitable dimensions. For your first bow, a simple, straight piece of hickory or ash will serve you well.

Essential Tools and Materials
You don’t need a full workshop to make a traditional bow, but some basic tools are essential. Having the right gear makes the process much smoother and safer.
Tools You’ll Need
- Drawknife: This is your primary tool for rough shaping the bow stave.
- Scrapers: Various scrapers (like cabinet scrapers) are crucial for fine-tuning the shape and smoothing the wood.
- Spokeshave: Useful for shaping curves and smoothing surfaces.
- Rasps and Files: For more precise material removal and shaping.
- Sandpaper: A range of grits, from coarse to fine, for smoothing.
- Measuring Tape/Ruler: For accurate measurements.
- Pencils: For marking your lines.
- Vice or Clamps: To hold the stave securely while you work.
- Bow Square: A specialized tool to help ensure even limb thickness and width.
- Tillering Stick or Tree: A crucial piece to safely bend the bow limb by limb to check its flex.
- String Material: Dacron B-50 or similar modern bowstring material is recommended for beginners.
- Nocks Material: Horn, antler, or even tough wood can be used for string nocks.
- Safety Glasses: Absolutely essential to protect your eyes from flying wood dust or debris.
- Dust Mask: Wood dust can be harmful, so a mask is important for your respiratory health.
Optional but Helpful Tools
- Band Saw or Jigsaw: If you want to cut the initial bow shape more quickly.
- Belt Sander: Speeds up the rough shaping process.
- Planes: For smoothing larger surfaces.
Always prioritize safety. Wear your safety glasses and dust mask, especially when doing aggressive shaping or sanding. A clean workspace also reduces risks.
Best Bow-Making Tool Pick
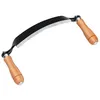
10-Inch Curved Draw Knife – $26.99
The exact rough-shaping tool Step 2 of this guide calls for — the curved blade follows the stave’s natural curve instead of gouging flat chunks out like a straight blade.
- Best for: rough-shaping a raw stave down to the bow’s working profile
- Why we picked it: the curved edge matches the stave shaping described in Step 2 better than a flat drawknife
- Main drawback: arrives needing a sharpening pass before first use
Compare more bow-making tool options
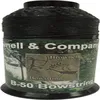 Option 1 Dacron B-50 Bowstring Spool – $17.99
| 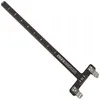 Option 2 Easton T-Bow Square – $14.99
|  Option 3 6-Piece Cabinet Scraper Set – $19.99
|
As an Amazon Associate we earn from qualifying purchases.
Step-by-Step Guide to Making Your Traditional Bow
This guide focuses on making a simple “self-bow” from a single piece of wood. We’ll aim for a straight-limbed design, which is often easier for beginners.
Step 1: Preparing the Stave
Once you have your seasoned stave, examine it closely. Identify the back (the side that will face away from you when shooting) and the belly (the side that will face you). The back of the bow should ideally follow the natural grain of the wood, with minimal run-off (where the grain slants off the side). Never cut into the back of the bow with your tools; this weakens it significantly. The belly will be where you remove most of the wood to create the bending limbs.
Using your pencil and ruler, draw the basic shape of your bow onto the stave. A common approach is to leave the handle section thicker and taper the limbs towards the tips. The width of your bow will typically be wider at the handle and gradually taper to about 1-2 cm (0.4-0.8 inches) at the tips. Ensure the taper is symmetrical on both limbs.
Step 2: Rough Shaping
Secure your stave in a vice or with clamps. Using your drawknife, begin to remove wood from the belly side. Your goal is to create the general outline of the bow, tapering the limbs from the handle. Work slowly and remove only small amounts of wood at a time. Constantly check your progress against your marked lines. Remember, you can always remove more wood, but you can’t put it back!
Pay attention to the center of the bow, which will be the handle. This section should remain thicker and wider than the limbs. As you shape the limbs, aim for a gradual tapering in width and thickness. For a simple straight-limbed bow, you can aim for limbs that are rectangular in cross-section, tapering evenly from handle to tip.
Step 3: Initial Tillering (The Art of Bending)
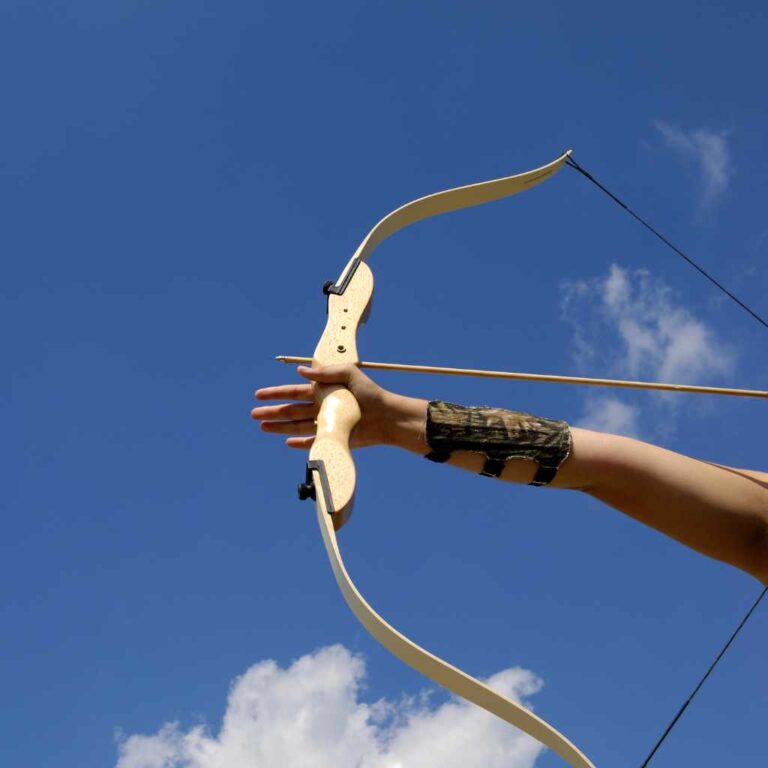
Tillering is the process of carefully bending the bow limbs to ensure they flex evenly. This is the most critical part of bow making and requires patience. Uneven bending will cause the bow to break. Understanding the principle behind a self-bow’s flex is key here; the belly compresses and the back stretches. The back must not be compressed or damaged at all.
Instead of trying to string the bow, you’ll use a tillering stick or tree. This is essentially a notched piece of wood or a sturdy tree branch that allows you to pull the bow string a small, incremental amount at different stages of the tillering process.
Start by bracing the handle against the tillering stick and pulling the string just a few inches. Observe where the limb bends. If one part bends much more than another, that’s where you need to remove wood. Use your scraper or files to carefully remove wood from the belly side of the stiffer areas. The goal is to make both limbs bend in a smooth, semi-circular arc. Take your time and remove wood only from the belly, never the back. Repeat this process, gradually increasing the draw length on the stick, removing wood from stiff spots, and checking for even flex over and over.
A common mistake is to rush tillering. This is where most bows break. A properly tillered bow will have a smooth, even curve on both limbs when drawn.
Step 4: Refining the Shape and Smoothing
As the bow starts to take its proper curve, switch to your spokeshave and scrapers for finer work. Ensure the limbs are symmetrical in width and thickness. Continue tillering regularly during this stage. Once the bow is tillered to your desired draw weight and length (don’t exceed your target draw length often until the very end!), you can begin to smooth the entire surface. Start with coarser sandpaper and work your way up to finer grits. The smoother the surface, the less prone it is to moisture absorption and potential cracking.
A common goal for a beginner bow might be a draw weight of 25-40 pounds at a 28-inch draw length. You can measure your draw weight roughly by using a bathroom scale attached to the string at full draw, though a proper archery scale is more accurate.
Step 5: Cutting String Nocks
The string nocks are the grooves at the tips of the bow where the string will attach. These need to be cut carefully so they don’t weaken the tips.
You can cut shallow V-shaped grooves about 1-2 cm (0.4-0.8 inches) from the very tips. A small saw or a file can be used for this. Be careful not to cut too deep, especially into the back of the bow. Many beginners opt to reinforce the tips with durable material like horn or antler, but for a first bow, carefully filed wood nocks can work. Ensure the nocks are smooth to prevent cutting the bowstring.
Step 6: Stringing and Final Tillering
Once the bow is shaped and smooth, and the nocks are cut, you can make and attach your bowstring. A simple Flemish twist string is traditional, but for beginners, a Dacron string purchased from an archery supplier is easiest and most reliable. The string should be slightly shorter than the bow so that when strung, it braces the bow at a natural angle, creating a “brace height” of about 5-7 inches (13-18 cm) from the handle to the string. (This is the distance before you begin drawing the bow).
With the bow strung, perform final tillering. You’ll be drawing the bow fully (or to your target draw length) repeatedly. Watch the limbs closely. If you notice any hinges (areas that bend too much) or stiff spots, unstring the bow and carefully remove a tiny amount of wood from the belly of the stiff areas. This is an iterative process. You might go back and forth between stringing, drawing, and scraping many times. This is where patience truly pays off.
Step 7: Finishing and Sealing
Once you are happy with the tiller, you need to protect the wood. Traditional bows are susceptible to moisture, which can cause them to warp or lose their cast (how well they propel an arrow).
Apply several thin coats of a protective finish to the entire bow. Options include:
- Boiled Linseed Oil: A classic choice that penetrates the wood.
- Tung Oil: Similar to linseed oil, offering good protection.
- Polyurethane Varnish: Provides a durable, water-resistant layer.
- Beeswax/Resin Finish: For a more natural, traditional feel.
For beginners, a simple wipe-on polyurethane or a good quality tung oil offers excellent protection and is easy to apply. Let each coat dry completely and lightly sand with very fine grit sandpaper (e.g., 400 grit) between coats for a smoother finish.
Step 8: Adding a Handle Grip (Optional)
While many traditional bows have no grip, you can add one for comfort. This could be as simple as wrapping the handle area with leather cord, cloth, or even using a wood-burning tool to create a textured surface.
Understanding Bow Terminology
To get the most out of this guide and future bow-making adventures, it’s helpful to know a few key terms:
| Term | Definition |
|---|---|
| Stave | A long piece of wood intended for bow construction. |
| Self-bow | A bow made from a single piece of wood. |
| Back | The outer side of the bow, which is under tension when the bow is drawn. This side should not be cut into. |
| Belly | The inner side of the bow, which is compressed when drawn. Wood is removed from here to shape the limbs. |
| Limbs | The upper and lower sections of the bow that bend. |
| Handle | The middle section of the bow that you hold. |
| Nocks | Grooves at the tips of the bow where the string is attached. |
| Tillering | The process of shaping the bow limbs so they bend evenly. |
| Draw Weight | The force (in pounds) required to pull the bowstring back to a specific draw length (usually 28 inches). |
| Brace Height | The distance from the deepest part of the handle to the bowstring when the bow is strung. |
Safety First: Bow Making and Shooting
Safety is paramount in bow making and archery. Always remember these points:
- In the Workshop: Wear safety glasses and a dust mask when working the wood. Be mindful of sharp tools and secure your workpiece properly. Never place your hands or fingers in the path of a cutting tool.
- Tillering Danger: When tillering, always keep your body and face away from the path of the limbs. If a limb breaks, it can snap back with significant force.
- Arrow Safety: Never point a drawn bow at anything you don’t intend to shoot. Always use appropriate safety gear when shooting.
- Range Safety: Maintain a safe shooting range clear of people and obstructions. Know your target and what is beyond it.
- Arrow Spine: Ensure your arrows are spined correctly for your bow’s draw weight. Incorrectly spined arrows can break upon impact, posing a serious danger. For traditional bows, unspined or poorly spined arrows can be particularly hazardous. Information on arrow spine can be found here.

Frequently Asked Questions About Making a Traditional Bow
Q1: How long does it take to make a traditional bow?
For a beginner, making a simple traditional bow can take anywhere from 20 to 60 hours of work, spread over several days or weeks. Patience is key, and rushing the process, especially tillering, is the most common cause of failure.
Q2: Can I use any type of wood I find in my backyard?
While theoretically possible, it’s highly unadvisable for beginners. You need seasoned wood with straight grain and no defects. Most backyard trees are not suitable, and wood needs to be dried for a long time (1-2 years) to be stable. It’s best to start with a prepared stave from a reputable supplier.
Q3: My bow broke during tillering. What did I do wrong?
This is common! The most likely causes are removing too much wood too quickly, not tillering evenly between the limbs, cutting into the back of the bow, or working with a flawed stave. Re-examine your work, especially the tillering process, and learn from the mistake. Every broken bow is a lesson.