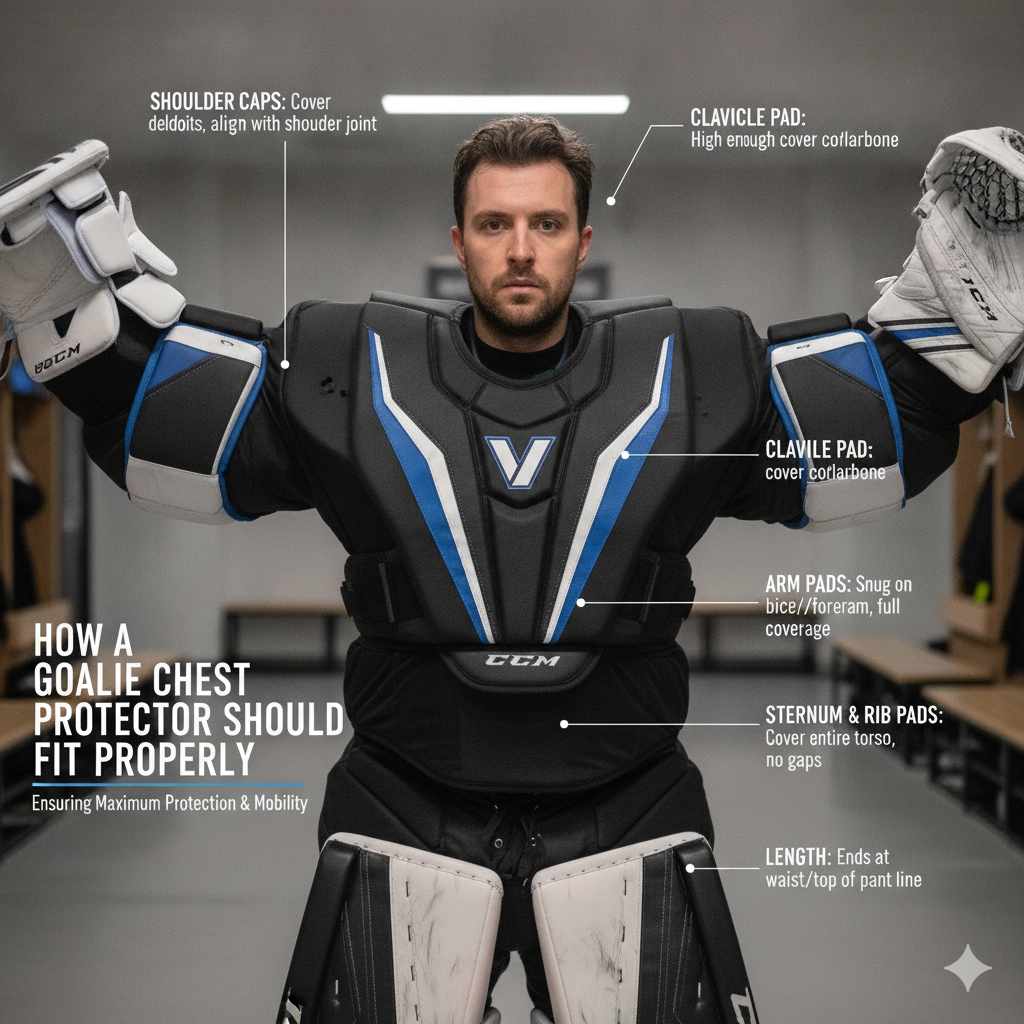
A properly fitting goalie chest protector offers maximum impact protection, unrestricted movement, and overall comfort. It should feel snug but not tight, allowing for full range of motion without pinching or rubbing. Key fit points include shoulder, arm, and chest coverage, with no gaps or excessive looseness.
For a closely related bow or archery topic, How A Hockey Chest Protector Should Fit gives readers a useful next step.
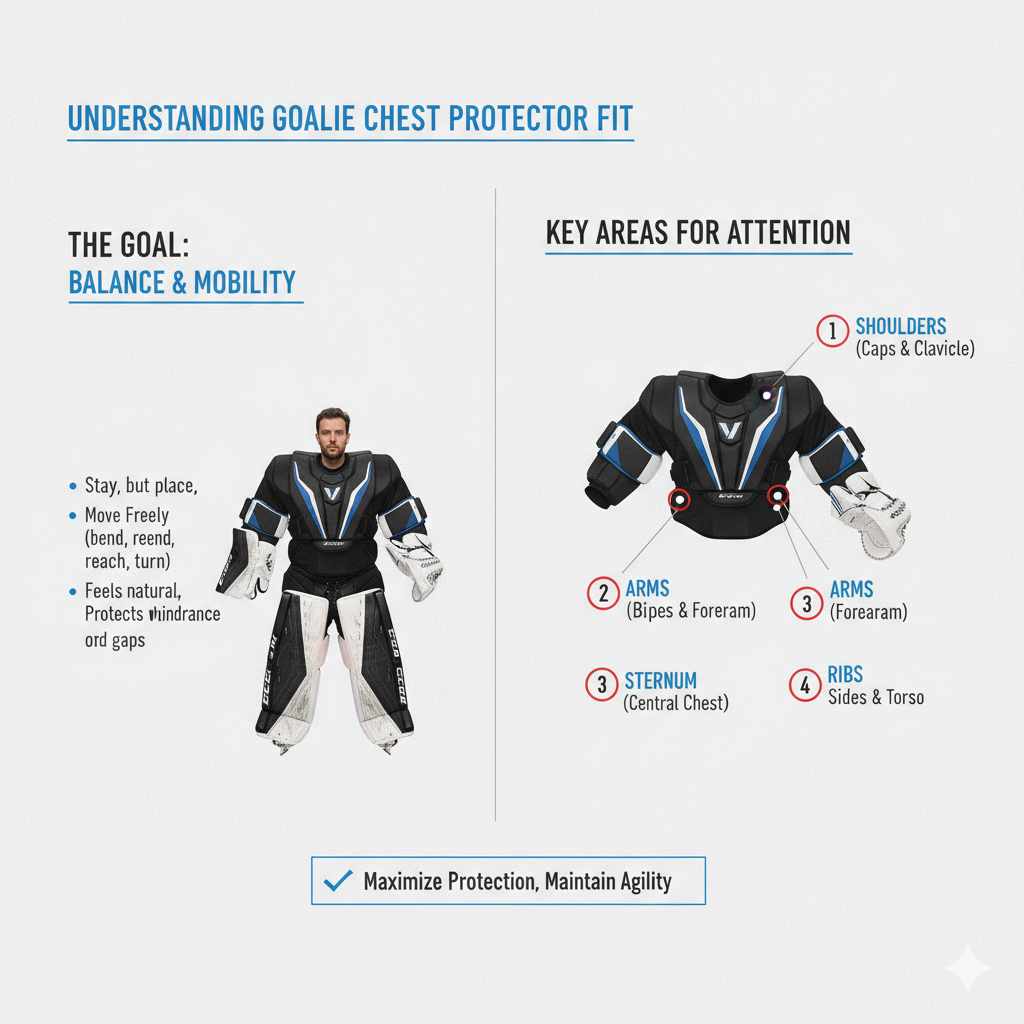
Understanding Goalie Chest Protector Fit
Think of your goalie chest protector as your second skin when you’re in the crease. It’s designed to stop pucks and sticks. But if it doesn’t fit right, it can actually get in your way.
Or worse, it might not give you the full protection you expect.
The main goal is balance. You want it to be snug enough to stay in place. But it also needs to be loose enough so you can move freely.
This means bending, reaching, and turning without feeling held back. A good fit feels natural. You almost forget you’re wearing it, until you need its protection.
Several parts of the chest protector need special attention. These are the shoulders, the arms, the sternum, and the ribs. Each area plays a role in how well it protects you and how comfortable it is.
We’ll look at each of these areas closely.
My Own Chest Protector Story
I remember one game, early in my hockey days. I was maybe 14. My chest protector felt a bit big.
I thought, “More padding is good, right?” Wrong. During a scramble in front of the net, a puck came hard and fast. It hit me right on the bicep.
Normally, the padding would have absorbed it. But because the arm piece was sitting too low and loose, the puck found a tiny gap.
I felt a sharp sting, and my arm went numb for a few minutes. It wasn’t a serious injury, thankfully. But it was a wake-up call.
That experience taught me that fit is not just a suggestion. It’s a safety feature. I learned I had to adjust the straps and make sure everything was snug and in the right place.
Since then, I’ve always been extra careful about how my gear fits.
Chest Protector Fit: Key Areas
Shoulders: Padding should sit right on top of your shoulder joint. No gaps. No slipping off.
Arms: Bicep and forearm pads should cover your arms fully. They must move with your arms.
Chest & Sternum: This area needs solid protection. The sternum guard should be centered and not dig in.
Ribs: Rib padding should wrap around your sides. It should protect without restricting your breathing.
Checking the Shoulder Fit
The shoulders are where your chest protector starts. They need to sit just right. If they are too wide, they can slide around.
This leaves your shoulder joints exposed. If they are too narrow, they might dig into your neck. That’s uncomfortable and can restrict your head movement.
When you put on the chest protector, the top of the shoulder caps should rest directly on your shoulder bones. Imagine a line drawn across the top of your shoulder. The padding should cover that line perfectly.
It shouldn’t hang over the edge. It shouldn’t be far from the edge either.
Many chest protectors have adjustable shoulder straps. These are often velcro or buckle systems. You use these to pull the shoulder padding down snugly.
They help keep the entire unit in place. You want to feel a secure fit here. But again, not so tight that it pulls your arms down unnaturally.
Shoulder Fit Check: A Quick Guide
- Stand tall.
- Put on the chest protector.
- Let the shoulder caps settle naturally.
- Do they cover your shoulder joints?
- Are they too wide or too narrow?
- Adjust the shoulder straps for a snug feel.
- Move your arms. Do they stay in place?
Arm Protection and Mobility
Your arms are constantly moving when you play goalie. They block shots, cover angles, and play the puck. So, the arm protection needs to be spot on.
This includes the bicep guards and the forearm pads.
The bicep guards should cover the entire length of your upper arm. They should align with the shoulder padding. When you lower your arms to your sides, there should be no gap between the shoulder piece and the bicep piece.
The bicep pad itself should be wide enough to protect the sides of your arm.
Forearm protection is equally vital. The pads should extend down your forearms. They should cover you from your elbow to your wrist.
The goal is to protect against slashes and shots. But they must also allow you to bend your elbows easily. They shouldn’t feel like rigid braces.
When you bring your arms up, like to make a save, the arm pieces should follow your movement. They shouldn’t bunch up. They shouldn’t get stuck.
If the arm pieces are too long, they can interfere with your gloves. If they are too short, they leave a gap near your elbow. This is a common spot for injuries.
Arm Fit: What to Look For
- Bicep Coverage: Full upper arm protection. No gaps when arms are down.
- Forearm Coverage: Extends from elbow to wrist.
- Mobility: Easy bending of elbows. Pads don’t bunch up.
- Alignment: Arm pieces connect well with shoulder pieces.
- No Interference: Doesn’t hinder your glove or stick handling.
Sternum and Rib Protection
The core of your body needs strong protection. The sternum guard is a hard plate designed to stop direct shots to the chest. It should be centered over your breastbone.
It shouldn’t poke you in the throat or dig into your stomach when you bend.
Rib padding is often made of layered foam or plastic. It’s designed to absorb impact. This padding should wrap around your sides.
It should provide coverage without making it hard to breathe. Some goalies find that rib pads are too stiff. This can limit their ability to rotate their torso.
When you lean forward, the sternum guard should stay in place. It shouldn’t lift up too much. When you twist, the rib padding should flex with you.
It shouldn’t feel like a rigid shell. It should provide a cushion.
Some chest protectors have adjustable sternum guards. This allows you to fine-tune the position. You might also find that the overall length of the chest protector matters.
A protector that is too long can hit your pants or restrict your hip movement. One that is too short leaves your lower ribs exposed.
Sternum & Ribs: Comfort vs. Protection
- Sternum Guard: Centered, no digging, stays put.
- Rib Padding: Covers sides well. Allows easy breathing and torso rotation.
- Length: Protector shouldn’t be too long or too short.
- Flexibility: Padding should move with your body.
How to Properly Size a Chest Protector
Sizing is the first step. Most brands have sizing charts. These charts are usually based on your height and chest measurement.
It’s a good starting point. But remember, these are guidelines. Every goalie is built differently.
When you’re looking at a chart, find your height first. Then, measure your chest. You do this by wrapping a soft tape measure around the fullest part of your chest.
Keep the tape measure level. Don’t pull it too tight.
Compare your measurements to the chart. It will suggest a size like Small, Medium, Large, or Extra Large. It might also give you a numerical size.
For example, a Senior Medium might be for someone 5’7″ to 5’10”.
The key is to not just pick a size and assume it’s perfect. You must try it on. How it feels and moves is more important than the label inside.
Sizing Chart Basics
Height: Your total height from feet to head.
Chest Measurement: Around the fullest part of your chest.
Brand Charts: Always use the specific brand’s sizing guide.
Try On: Essential for checking real fit and feel.
The Try-On Process: What to Do
When you go to a store or receive your chest protector, the real test begins. Put it on. Wear your goalie jersey over it.
This is important because the jersey will affect how the pads sit.
First, adjust the shoulder straps. Make them snug. Then, adjust the bicep straps and any waist straps.
You want the protector to hug your body without being restrictive.
Next, move. Bend at the waist. Reach out to the sides.
Lift your arms overhead. Mimic saves you might make. Do butterfly slides.
Do recovery movements. Does anything feel tight? Does anything feel loose?
Does it restrict your breathing?
Check for gaps. Look in a mirror. Are there any areas where your skin or base layer is visible between padded sections?
These are weak spots.
A good test is to have someone watch you. They can point out if pads are shifting or looking out of place. They can also check your coverage from different angles.
Your Essential Try-On Checklist
- Wear your goalie jersey.
- Adjust all straps: shoulders, arms, waist.
- Move freely: reach, bend, twist, squat.
- Check for gaps in coverage.
- Ensure no pinching or rubbing.
- Verify you can breathe easily.
- Test range of motion for saves.
Common Fitting Mistakes Goalies Make
It’s easy to make mistakes when fitting gear. One common error is thinking bigger is always better. A chest protector that is too large will shift.
It can expose vital areas. It can also make you feel clumsy.
Another mistake is not adjusting all the straps. People often just adjust the shoulders. They forget about the arms or the waist.
These straps are there for a reason. They customize the fit to your body.
Some goalies wear their chest protector too loose. They want maximum movement. But this sacrifices protection.
A loose protector can slide around during play. A puck or stick could hit an unprotected spot.
Conversely, some make it too tight. This restricts breathing and movement. It can lead to fatigue.
It can also cause chafing and discomfort. This can distract you during a game.
Finally, not accounting for your jersey matters. A jersey can change how pads sit. Always try on your gear with your playing jersey.
Avoid These Fit Pitfalls
Too Big: Leads to shifting and gaps.
Straps Ignored: Missed customization for a secure fit.
Too Loose: Sacrifices protection for perceived freedom.
Too Tight: Restricts breathing and movement.
Forgetting the Jersey: Fit will be different during a game.
Adjusting for Maximum Protection and Comfort
Once you have a chest protector that’s the right size, it’s about the fine-tuning. This is where the real comfort and protection come from. You need to use all the adjustment points.
The shoulder straps should pull the protector up so the shoulder caps are perfectly placed. They should feel secure. The bicep straps connect the arm guards to the main body.
Make sure they are snug enough so the arm guards don’t flap. But not so tight they pull your arms down.
Some protectors have adjustable elbow caps. You might be able to move them up or down slightly. This helps ensure your elbow is always in the center of the padding.
Waist straps can help keep the protector snug against your body. This prevents it from riding up.
A good fit means the protection is where it should be. It stays there through every movement. You should feel covered.
You should feel like you can move. It’s a delicate balance.
Fine-Tuning Your Fit
Shoulder Straps: Position shoulder caps correctly.
Bicep Straps: Secure arm guards, allow free arm movement.
Waist Straps: Keep protector close to body, prevent riding up.
Elbow Caps: Adjust for ideal elbow placement within padding.
Goal: Snug, secure, and completely mobile.
The Difference Between Youth and Adult Fit
Youth chest protectors are designed for growing bodies. They often have more adjustability. This is to accommodate growth spurts.
They might use simpler strap systems.
Adult chest protectors are built for more defined adult frames. They come in a wider range of sizes. The padding might be more dense.
The materials might be more durable.
For younger goalies, it’s crucial to get a protector that fits them now. Don’t buy one “to grow into” if it’s too big. That compromises safety.
Youth sizes are usually based on age ranges or shorter heights.
Adult sizes are more about precise measurements. Even within adult sizes, there can be variations. Some brands might have a “taller” or “shorter” cut for a given size.
Youth vs. Adult Sizing
Youth: More adjustability, designed for growth, age/height based.
Adult: Precise measurements, wider size range, potentially denser padding.
Key: Fit for today, not for tomorrow, especially for youth.
When to Seek Professional Help
If you’re struggling to get a good fit, don’t hesitate to ask for help. Hockey shops that specialize in goalie gear often have experienced staff. They can measure you and help you try on different models.
Coaches or experienced goalies can also offer advice. They’ve seen many different fits. They can spot problems you might miss.
They might know specific tricks for adjusting certain brands.
Sometimes, a specific chest protector model just doesn’t work for your body type. That’s okay. There are many brands and models available.
The goal is to find the one that fits you best.
Getting Expert Advice
- Specialty Hockey Shops: Staff know gear inside and out.
- Goalie Coaches: They understand specific goalie needs.
- Experienced Goalies: Can offer peer advice.
- Manufacturer Websites: Often have detailed fitting guides and videos.
What Does a “Good” Fit Feel Like?
A good fit feels almost invisible. You put it on, adjust it, and then you forget about it. Your movements are natural.
You don’t feel any pinching or binding. You don’t feel any sharp edges.
You should feel protected. When you move, the padding moves with you. There are no sudden shifts.
You can breathe deeply. You can twist your torso. Your arms have full mobility.
It feels secure. You don’t worry about it sliding out of place. You trust that it’s there to do its job if a puck comes your way.
It’s a feeling of confidence.
If you’re constantly adjusting it during a game, it’s not fitting right. If you feel aches or pains after a practice, the fit might be off. A good fit contributes to better performance and fewer injuries.
Signs of a Great Fit
- Comfort: You forget you’re wearing it.
- Mobility: Full range of motion for all actions.
- Security: Stays in place during dynamic movements.
- Protection: Feels like a solid layer of defense.
- Breathability: Easy to take full breaths.
- No Distractions: You focus on the game, not your gear.
Caring for Your Chest Protector
Proper fit also extends to how you care for your gear. After each use, you should let your chest protector air out. Moisture can lead to smells and damage materials.
Follow the manufacturer’s instructions for cleaning. Some can be wiped down. Others might need special cleaners.
Avoid using harsh chemicals.
Store it properly. Don’t just stuff it into a bag. Hang it up if possible.
This helps it keep its shape. This also allows air to circulate.
Regularly check the straps and stitching. Make sure everything is in good condition. If something is torn or loose, it needs to be repaired or replaced.
This ensures your fit remains consistent and safe.
Keeping Your Protector in Shape
Air Out: Always let it dry after use.
Clean Gently: Use recommended cleaning methods.
Store Properly: Hang it up to maintain shape and airflow.
Inspect Regularly: Check straps, stitching, and padding integrity.
When Is a Chest Protector Too Small?
A chest protector is too small if it feels constricting. You might find it hard to lift your arms fully. Your elbows might feel jammed into the padding.
The shoulder caps might sit too far in on your shoulders.
You might see gaps at the top of your shoulders or along your sides. The sternum guard might feel like it’s digging into your collarbone. Your breathing might feel shallow.
When you move, the padding might bunch up. It might pull on your skin. It won’t feel like a natural extension of your body.
It will feel like something you’re fighting against.
Signs of a Chest Protector Being Too Small
- Tightness: Restricts movement, feels constricting.
- Shoulder Issues: Caps too narrow, digging in.
- Elbow Problems: Padding jammed, limited bend.
- Gaps: Visible skin between padding and body.
- Breathing Difficulty: Shallow breaths, feeling restricted.
When Is a Chest Protector Too Big?
A chest protector that is too big is a more common issue. You’ll notice it shifting a lot. The shoulder pads might slide down your arms.
The arm guards can flop around. There will be visible gaps where pucks could get through.
The sternum guard might hang too low. It could interfere with your pants or your mask. The overall length might be too long, hitting your hips or restricting your butterfly.
It will feel baggy.
When you move, the protector might move independently of you. It won’t feel connected. You might feel like you have to adjust it constantly.
This is a distraction. It also means you are not getting full protection.
Signs of a Chest Protector Being Too Big
- Shifting: Pads slide around, especially shoulders and arms.
- Gaps: Large open areas where protection should be.
- Loose Fit: Feels baggy, not snug to the body.
- Length Issues: Too long, interfering with pants or hips.
- Constant Adjustment: You’re always fiddling with it.
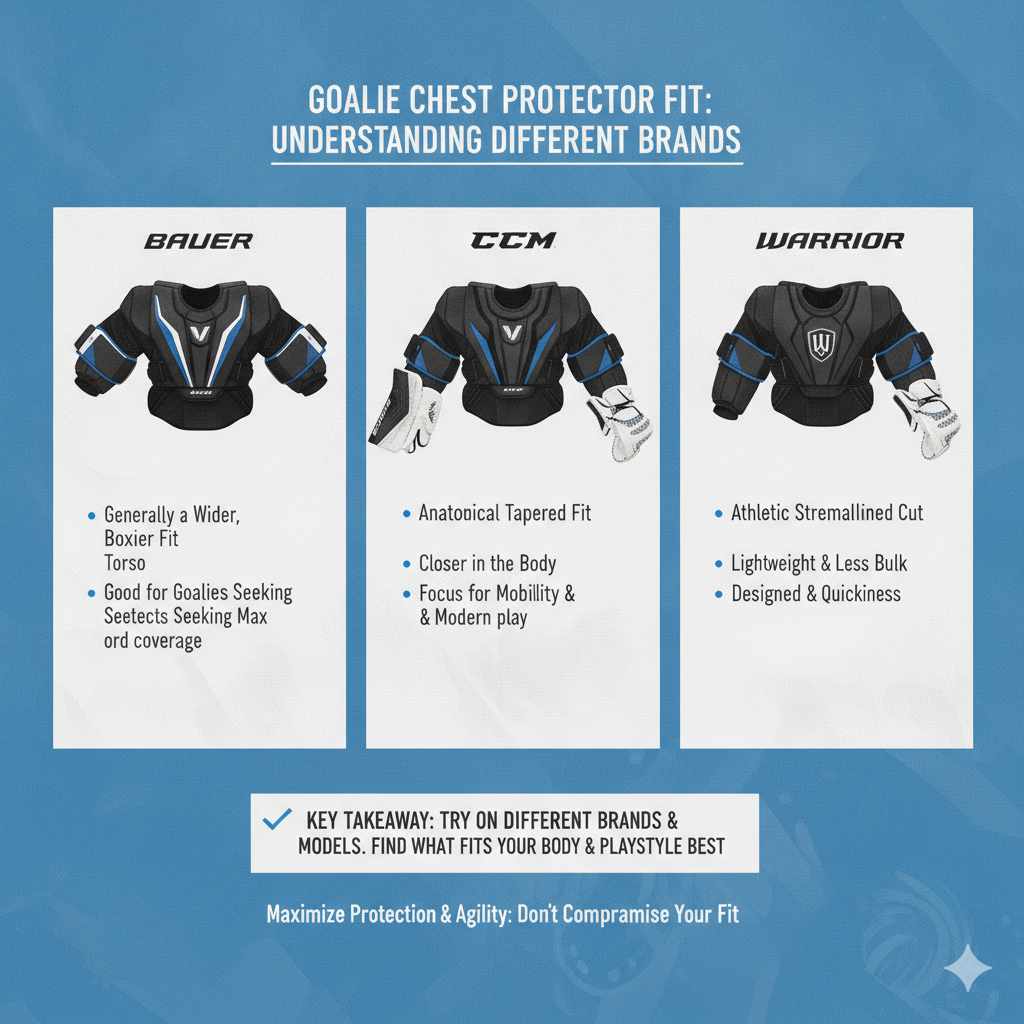
The Role of Different Brands
Different brands have different fits. Bauer often offers a slightly wider fit. CCM tends to have a more anatomical, contoured fit.
Warrior might have a more athletic, streamlined cut.
These are generalizations, of course. Within each brand, different models will fit differently. A high-end model might have more advanced adjustments.
A more basic model might have fewer.
This is why trying on is so important. Don’t stick to one brand just because you always have. Explore.
See what feels best on your body. What works for one goalie might not work for another.
Brand Fit Considerations
Bauer: Often slightly wider, more traditional feel.
CCM: Tends to be more contoured, closer fit.
Warrior: Usually athletic, streamlined, performance-focused.
Other Brands: Each has unique sizing and shaping characteristics.
Model Variations: Fit can change even within the same brand’s lines.
Frequently Asked Questions About Goalie Chest Protector Fit
How do I know if my goalie chest protector is the right size?
A properly sized chest protector feels snug but not tight. It should cover your shoulders, arms, and chest completely with no gaps. You should be able to move freely without the pads shifting or restricting you.
Always try it on with your goalie jersey.
Should my goalie chest protector be tight or loose?
It should be snug, not tight. Think of it as a secure hug for your torso. Too loose, and it won’t offer full protection and will shift.
Too tight, and it will restrict your breathing and movement. Adjust all the straps for a customized, secure feel.
How should the shoulder pads of a goalie chest protector fit?
The shoulder caps should sit directly on top of your shoulder joints. They should cover the top of your shoulder bone completely. They should not extend too far over the edge or leave a gap.
Adjust the shoulder straps to keep them securely in place.
What if my goalie chest protector arm guards feel restrictive?
If the arm guards feel restrictive, check the bicep and forearm strap adjustments. Make sure they are not too tight. Also, ensure the protector is the correct size.
If it’s too small, the arm protection might be too short or stiff. Try moving in different ways to see where the restriction occurs.
How much gap is too much between chest protector pads?
Any visible gap between padded sections, especially on the arms, shoulders, or ribs, is too much. These gaps are weak points where a puck or stick could get through and cause injury. Ensure all padded sections overlap or meet without openings.
Can a chest protector that’s too big be dangerous?
Yes, a chest protector that is too big can be dangerous. It can shift during play, leaving vital areas exposed. It can also be a distraction, forcing you to constantly adjust it, taking your focus off the game.
Always prioritize a proper, secure fit over size.
Conclusion: Your Best Fit Means Better Play
Getting your goalie chest protector to fit just right is a big deal. It affects your safety, your comfort, and your ability to move. It’s worth the time and effort to get it perfect.
Focus on the shoulders, arms, and core. Make sure there are no gaps. And always test it with your jersey on.
A well-fitting chest protector is a critical piece of your equipment. It lets you focus on making saves, not on adjusting your gear. It’s about feeling confident and secure in the crease.
So take the time, check the fit, and enjoy playing your best game.