How Do You Make Arrows
Making your own arrows is an ancient craft that continues to fascinate outdoor enthusiasts, archers, and history buffs alike. Whether you’re an aspiring bowhunter, a competitive archer, or simply drawn to traditional skills, understanding how to make arrows blends artistry, engineering, and a deep appreciation for materials.
Each step, from selecting the right shaft wood to fletching and nocking, affects arrow flight, accuracy, and durability. The process also offers insight into the ingenuity and resourcefulness of cultures that relied on archery for survival and warfare.
Today’s arrow making combines time-tested traditions with modern materials and precision tools. Learning how to craft arrows not only improves your archery performance but also enhances your knowledge of physics, woodworking, and design. This comprehensive guide explores every aspect of arrow making, from material selection and crafting techniques to tuning finished arrows for optimal flight.
Whether you’re starting with raw wood or high-tech carbon shafts, you’ll find actionable advice, real-world examples, and expert tips to create arrows tailored to your needs.
Key Takeaways
- Arrow making requires careful material selection, precise crafting, and attention to detail at every stage.
- Understanding the impact of shaft, fletching, nock, and point choices is critical for flight accuracy and safety.
- Both traditional and modern materials, from wood to carbon fiber, offer unique benefits and challenges.
- Proper tools, measurements, and tuning ensure consistency, reliability, and improved shooting performance.
- Real-world examples and data-driven comparisons help you choose the best approach for your archery goals.

Credit: ridgelightranch.com
Understanding Arrow Components
Making high-quality arrows starts with a thorough understanding of their essential parts. Each component has a specific function, and the materials and methods used for each play a pivotal role in the arrow’s overall performance.
The Shaft
The shaft is the backbone of the arrow, dictating weight, spine (flexibility), and durability. Historically, archers used woods such as Port Orford cedar or ash for their straight grain and resilience. Modern arrows often use aluminum, carbon fiber, or hybrids for greater uniformity and strength.
Key Factors:
- Spine: The degree to which the shaft bends under pressure, critical for matching arrow flight to bow draw weight.
- Weight: Affects speed and penetration; lighter shafts fly faster, heavier shafts offer more stability.
- Diameter: Thinner shafts reduce wind drift; thicker shafts add durability.
Fletching
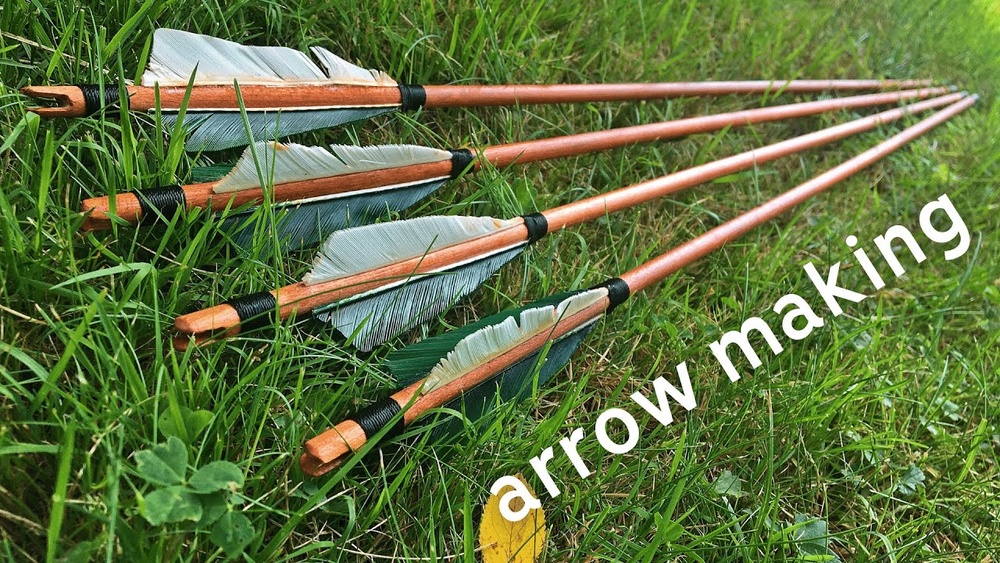
Fletching, the feathers or vanes near the nock, stabilizes the arrow in flight. Traditional arrows use turkey or goose feathers, while contemporary designs may use plastic vanes for weather resistance.
Fletching Configurations:
- Three-fletch: Most common, with feathers spaced evenly around the shaft.
- Four-fletch: Adds stability, often used for broadhead arrows.
Nock
The nock is the slotted tip at the arrow’s rear that attaches to the bowstring. Nocks can be carved directly into wooden shafts or made from durable plastic for modern arrows. The fit must be snug but not tight, ensuring a clean release.
Arrowhead (point)
The arrowhead determines the arrow’s purpose, whether for target shooting or hunting. Options include:
- Field points: For practice and target shooting.
- Broadheads: For hunting, offering greater cutting power.
- Blunt points: For small game or stump shooting.
Comparison Table: Traditional Vs. Modern Arrow Materials
| Component | Traditional Material | Modern Material | Key Advantages |
|---|---|---|---|
| Shaft | Wood (cedar, ash) | Carbon, Aluminum | Consistency, durability (modern); authenticity, feel (traditional) |
| Fletching | Feathers | Plastic vanes | Stability, tradition (feathers); weather resistance (vanes) |
| Nock | Self-nock (carved) | Plastic nock | Precision, ease of replacement (modern) |
| Point | Stone, bone, metal | Steel, alloy | Penetration, sharpness, specialization |

Credit: www.youtube.com
Selecting Materials For Arrow Making
Choosing the right materials is foundational to arrow making. Material quality and compatibility with your bow and intended use dictate much of the arrow’s effectiveness and safety.
Wooden Shafts
Wooden shafts remain popular among traditionalists and historical reenactors. Port Orford cedar is prized for straight grain and lightness, while ash and hickory offer greater strength at the cost of additional weight.
Selection Tips:
- Look for straight, knot-free grain.
- Test spine by gently flexing the shaft, too much or too little bend can cause erratic flight.
- Season or dry wood to avoid warping.
Aluminum And Carbon Shafts
Aluminum shafts are valued for straightness and consistent spine ratings. Carbon fiber shafts are lighter, more durable, and less prone to bending, but can splinter if damaged. Many competitive archers prefer carbon for its speed and uniformity.
Considerations:
- Match spine rating to bow draw weight (manufacturers provide spine charts).
- Inspect carbon shafts for cracks, splintered arrows are dangerous.
Fletching Materials
Feather fletching is traditional and imparts excellent stabilization, especially from the bow’s shelf. However, feathers can be affected by moisture. Plastic vanes are more durable and weather-resistant, making them suitable for compound bows and outdoor shooting.
Nock And Point Materials
Modern plastic nocks provide consistency and are easy to replace. For points, hardened steel or alloy field points are standard for target practice, while broadheads come in fixed or mechanical designs for hunting.
Example: Material Selection For Target Arrows
A beginner might choose cedar shafts with three 4-inch turkey feathers, a plastic snap-on nock, and a 100-grain field point. This combination offers a balance of tradition, ease of assembly, and reliable flight for target practice.

Credit: scoutlife.org
Tools And Equipment For Arrow Crafting
A successful arrow-making project requires specific tools to ensure precision and safety. While some tools are specialized, many are common woodworking implements.
Essential Tools
- Shaft straightener: For correcting minor bends in wooden shafts.
- Fletching jig: Ensures fletchings are spaced and angled correctly for consistent flight.
- Arrow saw or fine-tooth saw: Used to cut shafts to length.
- Taper tool or pencil sharpener: Shapes the ends of the shaft for nock and point installation.
- Glue and adhesives: Epoxy for points; fletching glue for feathers or vanes.
Measuring And Safety Equipment
- Calipers or spine tester: Measures shaft diameter and spine.
- Scale: Checks arrow weight for consistency.
- Safety glasses and gloves: Protect against splinters and adhesive fumes.
Optional Advanced Tools
- Arrow spinner: Tests finished arrows for straightness and balanced rotation.
- Digital grain scale: For precision tuning of arrow weight.
Example: Setting Up A Home Arrow-making Workshop
In my experience, a basic arrow-making setup can fit on a sturdy workbench. A fletching jig, saw, and a simple spine tester allow you to create a dozen arrows in an afternoon. Investing in quality adhesives and a reliable straightener pays off in arrow consistency.
Step-by-step Arrow Making Process
Crafting arrows involves multiple stages, each requiring attention to detail for optimal results. Below is a detailed step-by-step guide.
Shaft Preparation
- Select and Inspect: Choose shafts that are straight and free from defects. Discard any with visible cracks or warping.
- Cut to Length: Measure from the nock point to about 1-2 inches beyond the bow’s rest, then cut to size.
- Spine Test and Match: Flex each shaft and group by spine rating to ensure consistency within your arrow set.
- Straighten: Use a shaft straightener or gentle hand pressure to correct any bends.
Tapering And Sanding
- Taper Ends: Use a taper tool to shape one end for the point and the other for the nock.
- Sand Smooth: Lightly sand the entire shaft to remove splinters and prep for finishing.
- Seal and Finish: Apply a thin coat of lacquer, polyurethane, or traditional oils to protect against moisture.
Installing Nocks
- Attach Nock: For wooden arrows, carve or glue a plastic nock onto the tapered end.
- Align Nock: Ensure the groove aligns with the grain of the shaft for strength.
Fletching Arrows
- Set Up Fletching Jig: Place shaft in the jig and align for even spacing.
- Apply Adhesive: Use fletching glue on the base of each feather or vane.
- Attach Fletchings: Press onto the shaft, following the desired helical or straight orientation.
- Allow to Cure: Let adhesive dry thoroughly, typically 30 minutes to several hours, depending on glue type.
Installing Arrowheads
- Insert Point: Slide or glue the point onto the tapered front end.
- Check Fit: Ensure a snug fit; any looseness can affect flight and safety.
- Secure with Epoxy: For hunting arrows, use strong epoxy to anchor the point.
Arrow Tuning And Finishing
- Weigh Each Arrow: Use a grain scale to ensure all arrows in a set are within 10 grains of each other.
- Spin Test: Place each arrow on an arrow spinner to check for wobble.
- Final Inspection: Examine for straightness, secure fletching, and proper nock alignment.
Example: Building A Set Of Traditional Wooden Arrows
A hobbyist aiming to replicate medieval English longbow arrows would use ash shafts, self-nocks, goose feathers, and hand-forged steel bodkin points. The process would involve careful hand-shaping and binding the feathers with silk thread, then sealing with shellac for authenticity.
Customizing Arrows For Performance
No two archers, or bows, are exactly alike. Customizing your arrows allows you to optimize flight characteristics for your specific needs, whether that’s target accuracy, hunting penetration, or historical accuracy.
Adjusting Spine And Weight
- Spine tuning: Use arrows with a spine rating matched to your bow’s draw weight. Too stiff or too flexible arrows will not group well.
- Weight: Heavier arrows (more grains per inch) offer better penetration and quieter flight, while lighter arrows provide higher speed.
Fletching Shape And Orientation
- Parabolic vs. shield cut: Parabolic feathers reduce drag, while shield cut offers more stabilization.
- Helical fletching: Adds spin to the arrow, increasing stability, especially for broadheads.
Arrow Length And Balance
- Length: Longer arrows are more forgiving but may lose speed; shorter arrows are faster but require precise form.
- FOC (Front of Center): Proper balance (about 10-15% FOC) is critical for stable flight and penetration.
Point Selection For Purpose
- Field points: Ideal for target archery; minimize target damage.
- Broadheads: Necessary for legal and ethical hunting of game animals.
- Blunts and judo points: Used for small game and field practice.
Comparison Table: Arrow Customization Options
| Customization | Effect on Performance | Recommended Use |
|---|---|---|
| Higher Spine | Resists bending, suitable for heavy bows | Hunting, high-draw bows |
| Helical Fletching | Improves spin and stability | Broadhead arrows, hunting |
| Lighter Arrow | Increases speed, reduces drop | Target shooting, 3D archery |
| Heavier Arrow | Better penetration, quieter | Bowhunting, long-range |
| Parabolic Fletching | Reduces drag, slightly less stable | Recurve, target arrows |
Example: Tuning Arrows For A 50 Lb Recurve Bow
For a 50 lb recurve bow, optimal arrows might feature a spine of 500, 30-inch carbon shafts, three 4-inch helical vanes, and a 125-grain field point. This combination provides a balance of speed, accuracy, and penetration for both target and field use.
Safety Considerations And Best Practices
Arrow making is a rewarding craft, but it demands strict attention to safety at every stage to prevent accidents and ensure equipment reliability.
Material Inspection
- Check for Defects: Inspect shafts for splits, knots, or cracks before and after crafting.
- Carbon Arrow Safety: Never shoot a carbon arrow with visible cracks, it can shatter on release, causing injury.
- Nock Security: Loose or misaligned nocks can lead to misfires.
Safe Tool Use
- Wear Protective Gear: Safety glasses and gloves are essential when cutting, sanding, or using adhesives.
- Ventilate Workspace: Many adhesives emit fumes; work in a well-ventilated area.
Shooting Safety
- Test Arrows: Always test new arrows with a low-draw practice shot before full-power use.
- Retire Damaged Arrows: Immediately discard any arrow that shows signs of damage after shooting.
Pro Tip:
Mark your arrows with identifying colors or initials. This not only helps recover arrows in the field but also ensures you track performance and identify any recurring issues with specific batches.
Real-world Examples And Case Studies
Practical experiences from archers and historical references offer valuable lessons in arrow making.
Example: Olympic Archer’s Approach
Olympic archers rely on carbon shafts with extremely tight tolerances. According to World Archery, top competitors use arrow sets matched within 1 grain of weight and 0.002-inch straightness. This meticulous attention to detail translates into maximum consistency and reliability at elite levels.
Example: Indigenous Arrow Crafting
Indigenous cultures around the world have developed unique arrow-making traditions suited to their environments. The San people of southern Africa use reed shafts and poison-tipped points for hunting small game, showcasing adaptive ingenuity and deep ecological knowledge (San People – Wikipedia).
Example: Diy Bowhunter’s Field-tested Arrows
A seasoned bowhunter may customize arrows with weight tubes inside carbon shafts for increased mass, using four-fletch vanes for stability in strong crosswinds. Field testing shows these modifications improve penetration and grouping at distances beyond 40 yards.
Troubleshooting Common Arrow Making Issues
Even experienced arrow makers encounter challenges. Quick troubleshooting guides can help identify and solve frequent problems.
Arrows Flying Erratically
- Check for inconsistent spine or mismatched arrow weights.
- Inspect for warped shafts or misaligned fletching.
- Verify nock alignment.
Fletching Not Sticking
- Ensure shaft surface is clean and free of oils.
- Use glue compatible with both shaft and fletching material.
- Allow adequate drying time in a dust-free environment.
Points Or Nocks Coming Loose
- Roughen shaft surface before gluing.
- Use appropriate adhesives; epoxy for points, flexible glue for nocks.
- Avoid overheating when installing hot-melt points.
Example: Diagnosing Arrow Grouping Issues
If arrows group inconsistently on the target, use a spine tester and digital scale to check for deviations in spine and weight. Often, replacing outlier arrows solves the problem.
Arrow Making For Specific Archery Disciplines
Different archery styles require unique arrow characteristics. Understanding these needs helps tailor your arrow-making process.
Traditional Archery
- Materials: Wood shafts, feather fletching, self-nocks.
- Emphasis: Historical accuracy, craftsmanship, and a tactile shooting experience.
Target Archery
- Materials: Carbon or aluminum shafts, plastic vanes.
- Emphasis: Consistency, speed, and precision.
Bowhunting
- Materials: Heavy carbon shafts, durable vanes, broadheads.
- Emphasis: Penetration, reliability, and ethical harvesting.
3d And Field Archery
- Materials: Lightweight, durable shafts; parabolic fletching.
- Emphasis: Flat trajectory, quick recovery from deflection.
Comparison Table: Arrows For Different Disciplines
| Discipline | Preferred Shaft | Fletching | Point Type | Key Attribute |
|---|---|---|---|---|
| Traditional | Wood | Feather | Field, broadhead | Authenticity |
| Target | Carbon, Aluminum | Plastic vane | Field | Consistency |
| Bowhunting | Carbon | Durable vane | Broadhead | Penetration |
| 3D/Field | Aluminum/Carbon | Parabolic vane | Field | Trajectory |
Advanced Arrow Making Techniques
For those looking to refine their craft, advanced techniques can further enhance arrow performance and aesthetics.
Cresting And Personalization
Cresting involves painting or applying colored bands to arrows for identification and decorative appeal. Use waterproof paints and allow ample drying time between colors.
Footed Arrows
Footing reinforces the shaft’s front by splicing in a denser wood, increasing durability against impact. This technique is common in traditional English war arrows.
Weight Adjustment
Adding weight tubes or adjusting point mass allows fine-tuning of FOC and total arrow weight. Competitive archers often experiment to find the optimal configuration for their shooting style.
Micro-diameter Shafts
Micro-diameter carbon shafts reduce wind drift and increase penetration. These require specialized components but offer significant benefits for long-range target and field archery (Archery 360).
Example: Custom Cresting For Club Arrows
A local archery club crests its arrows with unique color bands and initials. This prevents mix-ups during tournaments and adds a sense of pride among members, while also making lost arrows easier to return.
Frequently Asked Questions
How Long Does It Take To Make An Arrow By Hand?
The time required depends on your experience and the materials used. A beginner may need several hours to make a single arrow, factoring in drying times for adhesives and finishes. With practice and efficient workflow, a skilled maker can produce a dozen arrows in 4-6 hours.
What Is The Ideal Arrow Length For My Bow?
The ideal length varies based on your draw length and intended use. Generally, arrows should be 1-2 inches longer than your full draw length for safety. For most adult archers, this equates to arrows between 28 and 32 inches, but always measure your own draw length before cutting shafts.
Can I Reuse Old Arrows Or Components?
Yes, components like points and nocks can often be reused if undamaged. Shafts may be reused if they are not warped or cracked. Always inspect reused materials for safety and performance before shooting.
What Is The Difference Between Straight And Helical Fletching?
Straight fletching aligns the feathers or vanes parallel to the shaft, resulting in faster speed but less spin. Helical fletching attaches them at a slight angle, causing the arrow to spin during flight, which stabilizes the arrow, particularly useful for broadhead-tipped arrows.
Are Handmade Arrows As Accurate As Store-bought Arrows?
Handmade arrows can be just as accurate as commercial arrows if made with precision and consistency. In fact, many traditional and competitive archers prefer handmade arrows for their customizability. However, mass-produced arrows may offer tighter tolerances for spine and weight in high-volume target settings.
Crafting your own arrows is a deeply rewarding pursuit that bridges history, craftsmanship, and sport. With the right materials, tools, and techniques, you can produce arrows perfectly suited to your needs, whether