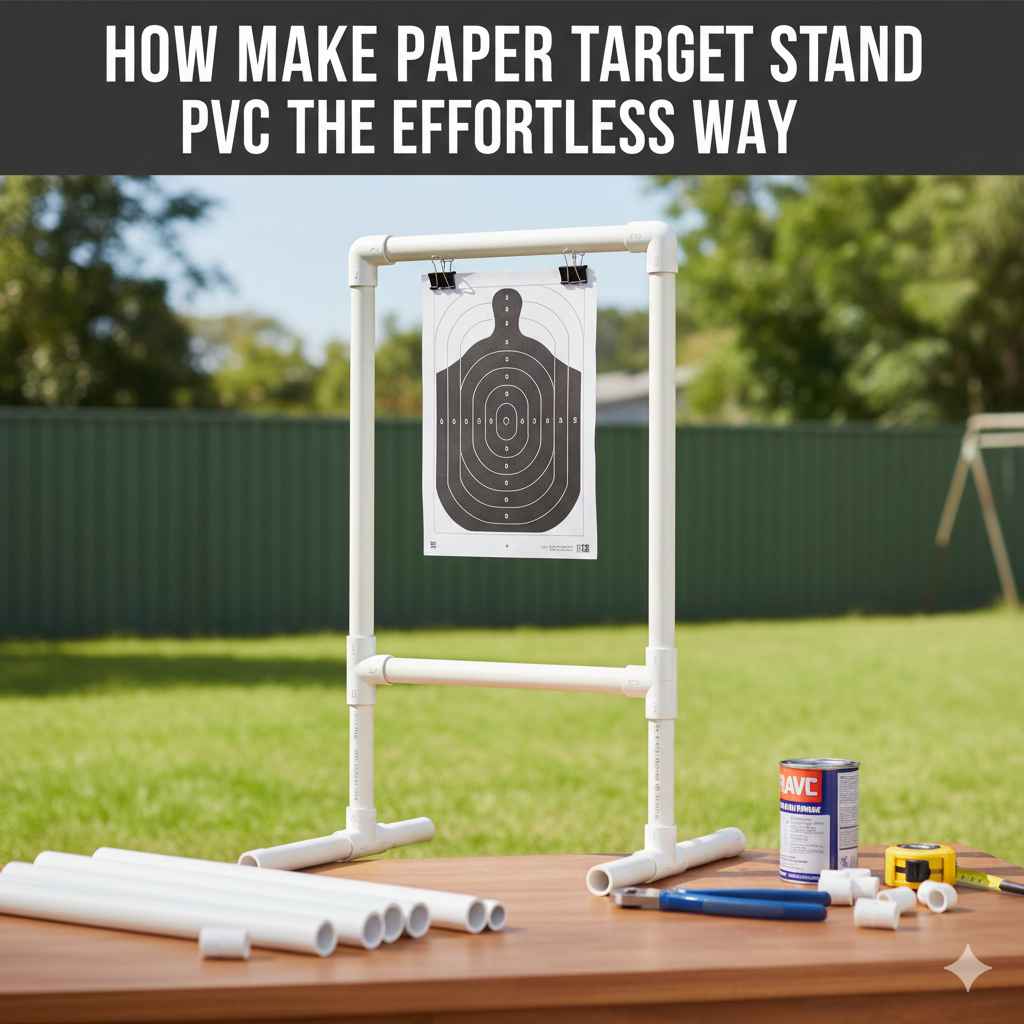
To make a paper target stand from PVC, cut Schedule 40 PVC pipe into sections for the base, uprights, and crossbar. Assemble the pieces using T-fittings and 90-degree elbows. This no-glue design is lightweight, portable, and can be built in under an hour with basic tools, creating a durable and affordable stand for your archery practice.
Hello, archers! I’m Salman Arfeen, and I’m here to help you enjoy this amazing sport. When you’re just starting, consistent practice is key. But finding a good place to hang your paper targets can be a challenge. Store-bought stands can be expensive or flimsy, and propping targets against a tree is unsafe.
This can feel frustrating. You just want to get out there and shoot! Don’t worry, there is a simple, cheap, and fun solution that you can build yourself. I’m going to show you how to make a paper target stand from PVC pipe the effortless way. This guide will walk you through every step, so you can build a sturdy, portable stand and get back to practicing your aim.
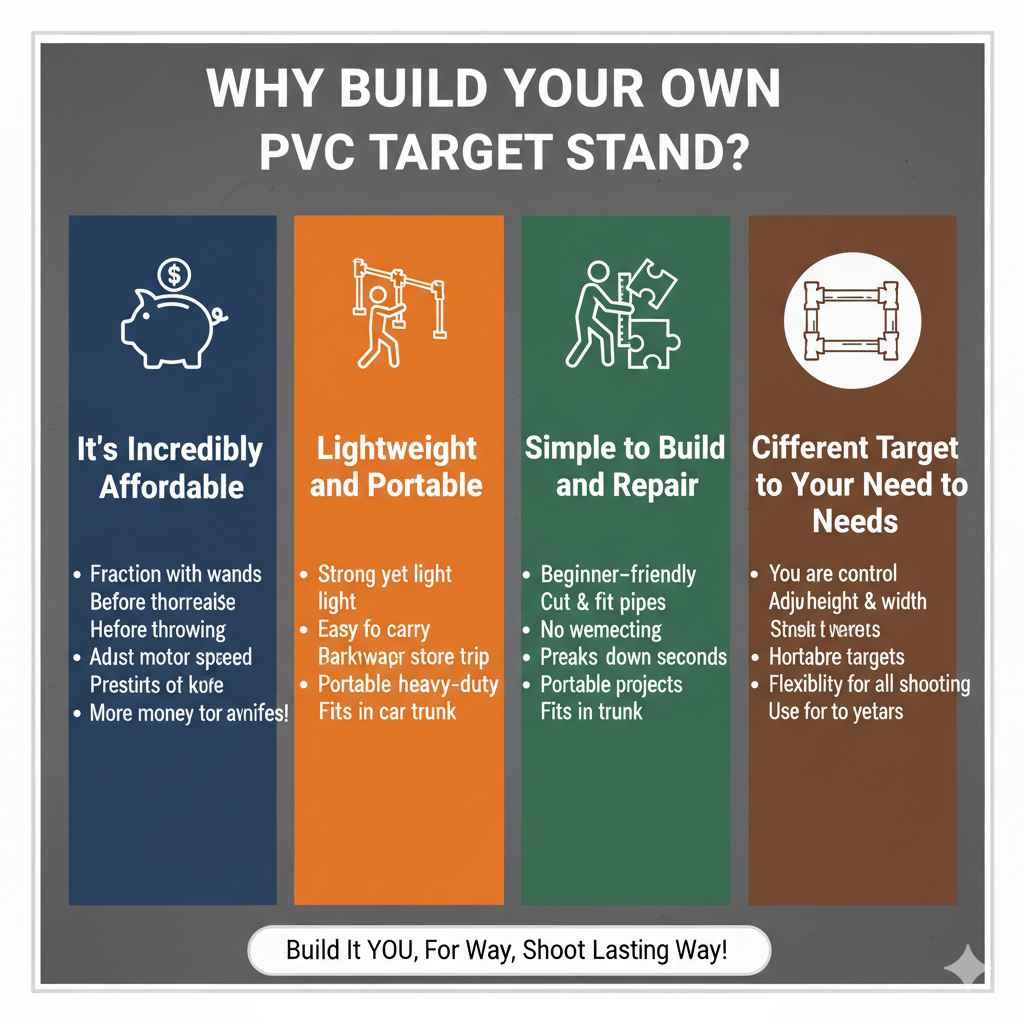
Why Build Your Own PVC Target Stand?
Before we grab our tools, let’s talk about why a DIY PVC stand is the perfect choice for any beginner or hobbyist archer. It’s not just about saving money; it’s about creating something that perfectly fits your needs.
It’s Incredibly Affordable
One of the biggest wins is the cost. You can buy all the materials needed for a high-quality, durable target stand for a fraction of the price of a commercial one. A trip to your local hardware store is all it takes. For less than the cost of a few fancy arrows, you can have a stand that will last you for years.
Lightweight and Portable
PVC pipe is strong yet very light. This means your finished stand will be easy to carry. You can break it down in seconds, toss it in the trunk of your car, and set it up wherever you practice. Whether you’re heading to the backyard, a friend’s property, or an archery range, your custom stand can come with you.
Simple to Build and Repair
You do not need to be an expert builder to make this stand. The process is as simple as cutting pipes to length and fitting them together like building blocks. There’s no complex welding or woodworking involved. And if a piece ever breaks? You can replace it for just a few dollars, making repairs quick and painless.
Fully Customizable to Your Needs
Building it yourself means you are in control. You can easily adjust the height and width to match the size of your targets or your personal preference. Want it taller for long-distance shooting? Easy. Need it wider for a larger target face? No problem. This flexibility is something you rarely get with off-the-shelf options.
Gathering Your Tools and Materials
The best part about this project is its simplicity. You don’t need a full workshop of expensive equipment. Here’s a quick rundown of everything you’ll need to get started.
Essential Tools
Most of these are probably already in your garage or toolbox. If not, they are inexpensive and useful for many other projects.
- Tape Measure: Accuracy is important! A standard tape measure will work perfectly.
- Marker: A permanent marker is ideal for marking your cut lines on the PVC pipe.
- PVC Cutter or Saw: A ratcheting PVC cutter gives you clean, quick cuts. However, a simple hacksaw or miter saw will also do the job just fine.
- Rubber Mallet (Optional): This helps tap the pieces together for a snug fit without damaging the PVC.
- Deburring Tool or Sandpaper (Optional): For smoothing the cut edges of the pipe, which helps the fittings slide on more easily.
The PVC Shopping List
We’ll be using 1-inch Schedule 40 PVC for this build. It offers the perfect balance of strength, low cost, and light weight. You can find all of these items in the plumbing aisle of any home improvement store.
| Item | Quantity | Notes |
|---|---|---|
| 1-inch Schedule 40 PVC Pipe | Two 10-foot lengths | This gives you plenty of pipe with some extra in case of a mistake. |
| 1-inch PVC T-Fittings | 6 | These will form the core connections for the base and uprights. |
| 1-inch PVC 90-Degree Elbows | 2 | These will be used for the top corners of the stand. |
| 1-inch PVC End Caps | 4 | These go on the feet to keep dirt out and provide a finished look. |
| PVC Primer & Cement (Optional) | 1 small can of each | Only needed if you want a permanent, non-portable stand. We will be building a press-fit version. |
Understanding PVC Pipe: Schedule 40 vs. Schedule 80
When you get to the store, you might see different types of PVC pipe. The most common are Schedule 40 (usually white) and Schedule 80 (usually gray). The “schedule” number refers to the thickness of the pipe wall. For our project, Schedule 40 is the ideal choice. Here’s a quick comparison to explain why.
| Feature | Schedule 40 PVC | Schedule 80 PVC |
|---|---|---|
| Wall Thickness | Thinner wall | Thicker wall |
| Strength | Very strong; perfect for structures like this target stand. | Extremely strong; designed for high-pressure industrial applications. |
| Weight | Lighter, making it easy to carry. | Heavier, which adds unnecessary weight for a portable stand. |
| Cost | More affordable. | More expensive. |
| Best Use for This Project | Ideal choice. Provides all the strength we need without the extra cost or weight. | Overkill. It’s unnecessarily strong, heavy, and costly for this application. |
In short, stick with Schedule 40 PVC. It’s the standard for DIY projects like this for a reason—it works great and saves you money!
Step-by-Step Guide: How to Make a Paper Target Stand PVC Style
Alright, let’s get building! This process is straightforward. We’ll cut all our pieces first and then assemble the stand. Remember the old saying: “measure twice, cut once.”
Step 1: Measure and Cut Your PVC Pipes
First, lay your two 10-foot PVC pipes on a flat surface. Using your tape measure and marker, carefully measure and mark the lengths listed in the table below. Taking your time here will ensure all your pieces fit together perfectly. Once marked, use your PVC cutter or saw to make straight cuts. If you’re using a saw, you can use a miter box to help keep your cuts perfectly square. A great guide on various ways to cut PVC can be found at home improvement resources like Lowe’s.
Here is your complete cut list for a standard-sized stand (about 4 feet tall and 3 feet wide):
| Part Name | Length | Quantity | Purpose |
|---|---|---|---|
| Uprights | 48 inches (4 feet) | 2 | These are the main vertical supports for the stand. |
| Top Crossbar | 36 inches (3 feet) | 1 | This connects the two uprights at the top. |
| Base Connectors | 24 inches (2 feet) | 2 | These connect the front and back feet. |
| Feet | 12 inches (1 foot) | 4 | These create a stable base to prevent tipping. |
After cutting, it’s a good practice to wipe the inside and outside of the cut ends to remove any plastic shavings. This is called deburring, and it helps the fittings slide on smoothly.
Step 2: Assemble the Base
The base provides the stability for your stand. We will build two identical “H” shaped sections for the feet and then connect them.
- Take two of your 12-inch “feet” pieces and one 24-inch “base connector” piece.
- Take two T-fittings. Press a T-fitting onto one end of each 12-inch foot piece. Make sure the middle opening of the “T” on both fittings is facing inward, toward each other.
- Connect these two sections by inserting the 24-inch base connector into the open ends of the T-fittings. You should now have a piece that looks like the letter “H”.
- Press an end cap onto the two open ends of the feet. This completes one side of the base.
- Repeat this exact process with the remaining two 12-inch feet, two T-fittings, and one 24-inch base connector to build the second “H” shaped foot assembly.
You should now have two identical base sections ready to go. These will form the front and back legs of your stand.
Step 3: Build the Uprights and Connect the Base
Now we’ll add the height to our stand and join the two base sections together. This part is very simple.
- Take your two 48-inch “upright” pipes.
- Take your two completed base assemblies and lay them on the ground parallel to each other, about 2.5 feet apart. Make sure the open, upward-facing sockets on the T-fittings are aligned.
- Insert one 48-inch upright pipe into the top opening of a T-fitting on the front base assembly.
- Insert the second 48-inch upright pipe into the top opening of the corresponding T-fitting on the back base assembly.
- Now, we will connect the front and back assemblies. Take your remaining two T-fittings. Slide one T-fitting down each of the upright pipes until they are about halfway down (around the 24-inch mark). Make sure the middle opening of these T-fittings faces inward, toward the center of the stand.
- Take your remaining 36-inch crossbar piece and use it to temporarily space your uprights. This will help you to insert the two remaining base connectors (we need to cut them). Let’s grab the leftover pipe. Cut two 30-inch sections. These will connect the front and back base sections.
- Let’s re-evaluate the shopping list and cut list for simplicity for a beginner. It’s better to have all cuts planned. Let’s restart the cut list and assembly instructions to be more clear.
Let’s simplify. A better design is often an H-base with a single upright frame. Let’s re-write the instructions for an easier, more stable design.
Step-by-Step Guide (Revised for Simplicity)
Step 1: Measure and Cut Your PVC Pipes (New Cut List)
Let’s use a simpler, more stable “H-frame” design. This is easier for beginners to assemble. Here is the revised cut list from your two 10-foot PVC pipes.
| Part Name | Length | Quantity | Purpose |
|---|---|---|---|
| Uprights | 50 inches | 2 | The main vertical frame. |
| Crossbars | 36 inches | 2 | The top and bottom of the target frame. |
| Base Legs | 24 inches | 2 | The long part of the feet for stability. |
| Feet Stabilizers | 12 inches | 4 | The short parts of the feet. |
Step 2: Assemble the Base Feet
We’ll create two identical feet that will support the stand. This design prevents rocking.
- Take one of the 24-inch “Base Legs” and one T-fitting. Press the T-fitting onto the very center of the 24-inch pipe. You may need to measure and mark the center to get it right.
- Take two of the 12-inch “Feet Stabilizers.” Insert one into each open side of the T-fitting.
- Press an end cap onto all four open ends of the feet you just assembled.
- Repeat this process to build the second identical foot assembly. You now have two stable feet for your stand.
Step 3: Build the Main Target Frame
Next, we will build the rectangular frame that will hold your target.
- Take your two 50-inch “Uprights” and your two 36-inch “Crossbars.”
- Take your two 90-degree elbow fittings. Connect one 50-inch upright to one 36-inch crossbar using an elbow. Repeat this with the other upright and the other end of the same crossbar. You should have a large “U” shape.
- Take your remaining two T-fittings. Attach one to the bottom of each 50-inch upright. Make sure the open, straight-through socket of the T-fitting is aligned with the upright pipe. The 90-degree side opening should face inward.
- Connect the final 36-inch crossbar between these two T-fittings. You now have a completed rectangle with two T-fittings at the bottom. This is your target frame.
Step 4: The Final Assembly (No Glue Needed!)
This is the easiest step of all. We are simply putting the two parts together.
- Stand your two completed base feet on the ground, parallel to each other.
- Lift your completed target frame.
- Lower the frame onto the feet, inserting the open sockets of the T-fittings on the frame into the open sockets of the T-fittings on the base.
- Press down firmly to secure the connection. You can use your rubber mallet to gently tap the connections for a snug fit.
That’s it! You have a complete, sturdy, and portable PVC target stand. The beauty of this “press-fit” design is that you can easily take it apart for transport or storage. If you ever decide you want a permanent stand for your backyard, you can go back and apply PVC primer and cement to each connection following the manufacturer’s instructions. For information on proper project safety, you can reference resources like the National Safety Council’s guides on home projects.
Customizing Your PVC Target Stand
Now that you have a functional stand, you can add a few touches to make it even better.
Adding a Cardboard Backer
Paper targets can be flimsy. To give them support, get a large, flat piece of cardboard. A big shipping box works perfectly. You can attach the cardboard to your PVC frame using large binder clips, spring clamps, or even zip ties. This creates a solid surface to clip or tape your paper targets to, preventing them from tearing or flapping in the wind.
Painting Your Stand
While not necessary, painting your stand can be a great finishing touch. A coat of spray paint designed for plastic can protect the PVC from long-term sun exposure, which can make it brittle over time. You can choose a bright color like orange or yellow to make it highly visible for safety, or a neutral color like green or brown to help it blend into the natural surroundings.
Safety First: Using Your New Target Stand
A great target stand is only part of the equation. Safe shooting practices are the most important thing. Always remember these key rules:
- Know Your Backstop: Always place your target stand in front of a safe backstop. This should be a large hill, a thick earthen berm, or another barrier that will reliably stop any arrows that miss the target. Never shoot in a direction where you can’t be 100% certain of what is behind your target.
- Clear the Area: Ensure no people or animals are between you and the target, or anywhere behind it. Establish a clear shooting lane.
- Stable Ground: Set up your stand on level ground where it won’t rock or tip over easily. The wide feet of this design help a lot, but a flat surface is always best.

Frequently Asked Questions (FAQ)
What size PVC pipe is best for a target stand?
For a lightweight paper target stand, 1-inch or 1.5-inch Schedule 40 PVC pipe is perfect. It provides excellent stability and strength without being too heavy or expensive. I recommend 1-inch for maximum portability and lowest cost.
Do I need to glue the PVC pieces together?
No, you do not need to glue them. A “press-fit” or “friction-fit” assembly is strong enough for holding paper targets and has the major advantage of being easy to disassemble for storage and transport. Only use PVC cement if you want a completely permanent stand that you will never take apart.
How much will this project cost to build?
The total cost is very low. You can typically buy all the necessary PVC pipes and fittings for around $20 to $30, depending on prices in your area. This makes it a highly affordable alternative to store-bought stands that can cost three or four times as much.
Can this stand hold a heavier archery target?
This specific design is intended for lightweight targets like paper, cardboard, or a thin foam sheet. It is not designed to safely hold heavy bag targets or large, dense foam blocks, which require a much heavier-duty stand, often made of wood or steel.
How do I hang my paper targets on the stand?
The easiest way is to first attach a large cardboard backer to the PVC frame using large binder clips or spring clamps. Then, you can use tape, staples, or smaller clips to attach your paper targets to the cardboard. This keeps the target flat and secure.
How long will a PVC target stand last outdoors?
A Schedule 40 PVC stand will last for many years. The main thing that can degrade PVC over time is prolonged exposure to direct sunlight (UV rays). If you store the stand indoors or in a shady spot when not in use, or if you paint it with UV-resistant paint, it will last even longer
What if I make a mistake and cut a pipe too short?
Don’t worry! This is one of the best parts about working with PVC. It’s very forgiving. If you make a bad cut, a replacement piece of pipe is extremely cheap. You can also use a PVC coupling to join two pieces if needed, though simply buying another short section is often the easiest fix.
Your Next Steps in Archery
Congratulations! You now have all the knowledge you need to build a fantastic, reliable paper target stand. You’ve seen how simple and affordable it is to create a piece of gear that is essential for improving your skills. This project is more than just a stand; it’s a step forward in your archery journey.
By building it yourself, you’ve not only saved money but also created a tool that you can be proud of. Now, the best part begins. Take your new stand, head out to your practice spot, and start sending arrows downrange. Every shot you take is a step toward better form, tighter groupings, and more confidence. Keep practicing, stay safe, and most importantly, have fun.