Safely disinfecting the inside of kitchen cabinets involves choosing the right cleaners for your cabinet material and following a simple, step-by-step process to remove dirt, grime, and potential germs. Regular light cleaning prevents the need for harsh disinfectants, but a deeper clean ensures a hygienic food storage area.
What Disinfecting Cabinet Interiors Means
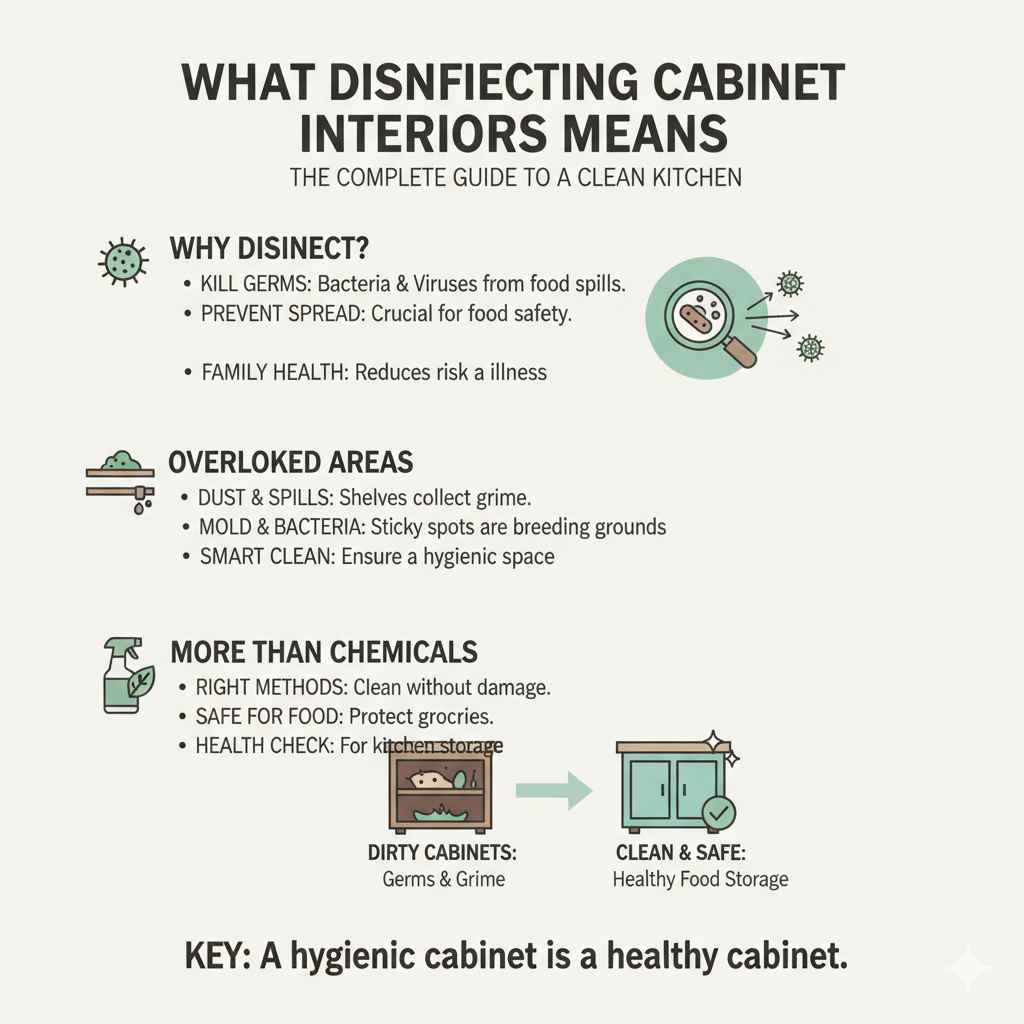
When we talk about disinfecting the inside of kitchen cabinets, it means killing germs. These germs could be bacteria or viruses. They might come from food spills or dirty packaging.
You want to make sure these tiny organisms don’t spread. This is extra important for food storage areas. It helps keep your family safe from getting sick.
The inside of cabinets often gets overlooked. We wipe down counters. We clean the sink.
But the shelves and walls inside our cabinets can collect dust. They can also get sticky spots from leaks. These areas become a breeding ground for mold or bacteria if left alone for too long.
So, giving them a good clean is a smart idea.
Disinfecting doesn’t just mean using strong chemicals. It means using the right methods for the job. This keeps your cabinets clean without damaging them.
It also ensures the area is safe for your food. Think of it as a health check for your kitchen storage. It’s about creating a clean space for your groceries.
My Kitchen Cabinet Cleaning Scare
I remember a time a few years ago. I was unpacking groceries after a big shop. I put a bag of apples on the top shelf of my pantry cabinet.
A few days later, I noticed a small, brown stain on the shelf. It looked like apple juice had leaked. I thought, “Oh, I’ll wipe that up later.” Well, “later” turned into a week.
The stain had dried and gotten a bit sticky. When I finally got around to cleaning it, I saw a tiny fuzzy patch starting to grow. My heart sank.
I immediately thought about all the other food items that had been near that spot. Were germs spreading? Was mold growing?
It was a wake-up call. I realized how easy it is for these hidden spots to become a problem if you don’t pay attention. That little stain made me rethink how often I should really be cleaning inside my cabinets.
Cabinet Surface Types
Not all cabinets are made the same. The inside surfaces can be wood, laminate, or even painted. You need to know your cabinet type before you clean.
Harsh cleaners can damage wood. Too much water can warp laminate. Always check the material first.
This helps you pick the safest and best cleaner. It’s like choosing the right tool for a job. Using the wrong one can cause more harm than good.
Knowing your surfaces is step one.
Different Cabinet Materials and Their Needs
Kitchen cabinets come in many styles. The inside of your cabinets might be raw wood, sealed wood, or laminate. Some might have a painted finish.
Each type needs a little different care. For example, raw wood can absorb liquids easily. This makes it prone to stains and damage from too much moisture.
Sealed wood or wood with a varnish is more protected. Laminate surfaces are often very smooth and non-porous. Painted surfaces can be tough, but sometimes the paint can chip or fade with strong cleaners.
Knowing this helps you avoid mistakes. A cleaner that works great on laminate might be too harsh for bare wood. Using the wrong cleaner can leave rings.
It can make wood swell. It might even strip paint. So, taking a moment to figure out what your cabinets are made of is very important.
It’s the first step to a successful cleaning job.
Think about it like this: you wouldn’t use the same soap for your face as you do for your dishes, right? Your cabinets need that same thoughtful approach. A little detective work on the material will save you trouble later.
Safe Cleaning Solutions
What can you use to clean safely? Mild dish soap is a great start. It cuts through grease.
It lifts dirt. Water mixed with a little vinegar can also work well. Vinegar is a natural disinfectant.
For tougher spots, a baking soda paste can help. Always test any cleaner in a hidden spot first. This is a good practice.
You don’t want to find out later it caused damage. Safe solutions keep your cabinets looking good.
Choosing the Right Cleaning Agents
When it comes to cleaning the inside of your kitchen cabinets, the choice of cleaning agent is key. You want something that cleans well but is also safe. You don’t want to use harsh chemicals near where you store food.
Let’s break down some safe and effective options.
Mild Dish Soap: This is often your best friend. A few drops of dish soap in warm water create a gentle cleaning solution. It’s excellent at cutting through grease and grime.
It also helps lift sticky residues. After cleaning with soap and water, you always want to rinse the surface. Then, dry it thoroughly.
This prevents water spots and keeps the material from getting too wet.
Vinegar Solution: White vinegar is a natural wonder. Mixed with equal parts water, it makes a great all-purpose cleaner. Vinegar has mild disinfectant properties.
It can help kill some bacteria. It’s also good at tackling odors. However, it has a strong smell.
This smell fades as it dries. Be cautious with unsealed wood. Vinegar can sometimes affect the finish.
Always test it first.
Baking Soda Paste: For stubborn stains or sticky spots, baking soda is your go-to. Mix baking soda with a little water to form a paste. Apply this paste to the stained area.
Let it sit for a few minutes. Then, gently scrub it away with a soft cloth or sponge. Rinse the area well and dry it completely.
Baking soda is mildly abrasive, so gentle scrubbing is important.
Rubbing Alcohol (Isopropyl Alcohol): For true disinfection, rubbing alcohol is a good choice. It evaporates quickly. It kills many types of bacteria and viruses.
You can use it on many surfaces. Dampen a cloth with rubbing alcohol and wipe down the surfaces. Let it air dry.
It’s effective for areas that need a deeper clean. Ensure good ventilation when using it.
Commercial Cabinet Cleaners: There are many commercial cleaners made specifically for cabinets. Read the labels carefully. Make sure they are safe for the interior surfaces.
Some are for finished wood, others for painted surfaces. Always follow the manufacturer’s instructions. Test in an inconspicuous area first.
What to Avoid: Generally, you want to avoid strong abrasive cleaners. Harsh scrubbing pads can scratch surfaces. Bleach can be too strong for many cabinet materials.
It can also leave behind fumes. Always prioritize safety and gentleness.
Easy Cleaning Steps
Start by taking everything out. This is key. You can’t clean well with shelves full.
Group similar items. Wipe down each shelf. Use your chosen cleaner.
Make sure to get corners. Rinse if needed. Dry everything well.
Put items back. This makes it simple and effective. It gives you a clean space for your food.
The Step-by-Step Process for Disinfecting
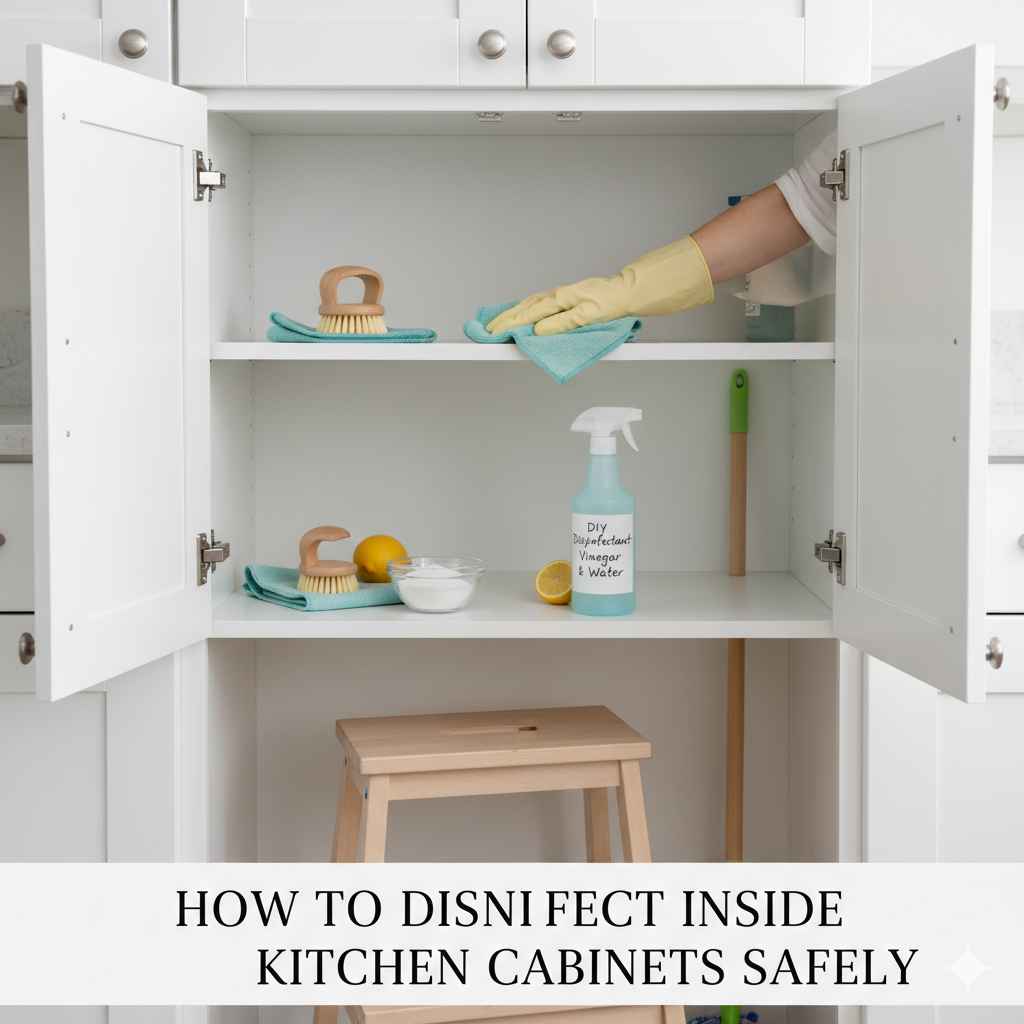
Getting your cabinet interiors clean and disinfected doesn’t have to be hard. Follow these simple steps for a thorough job. It makes a big difference.
Step 1: Empty Everything Out
This is the most crucial first step. You need a clear view of the entire cabinet interior. Take out all food items, dishes, jars, and anything else stored inside.
It’s a good time to check expiration dates. You can also group similar items together. This makes putting them back easier.
Step 2: Remove Loose Debris
Before you start wiping, grab a dry cloth or a soft brush. Use it to sweep away any crumbs, dust, or loose particles. Pay attention to corners and edges.
This prevents you from just pushing dirt around when you start cleaning with liquids.
Step 3: Choose Your Cleaner and Test
Based on your cabinet material, select your cleaning agent. A mild dish soap and water solution is usually a safe bet for most surfaces. If you’re unsure, test your cleaner on a small, hidden area first.
Wait a few minutes to see if there’s any discoloration or damage.
Step 4: Wipe Down Surfaces
Dampen a clean cloth or sponge with your chosen cleaning solution. Wring it out well so it’s not dripping. Start wiping down the shelves, walls, and ceiling of the cabinet.
Work from top to bottom. This ensures any drips fall onto uncleaned areas. Gently scrub any sticky spots or visible grime.
Step 5: Rinse (If Necessary)
If you used soap or a cleaner that leaves residue, you’ll want to rinse. Use a clean cloth dampened with plain water. Wipe down the surfaces again to remove any soap or cleaner.
Again, wring the cloth out well.
Step 6: Dry Thoroughly
This step is vital, especially for wood cabinets. Use a dry, clean towel to thoroughly dry all interior surfaces. Moisture left behind can lead to mold, mildew, or damage to the cabinet material.
Make sure the cabinets are completely dry before putting anything back.
Step 7: Disinfect (Optional but Recommended)
If you want to disinfect, now is the time. After cleaning and drying, you can use a disinfecting spray or a cloth dampened with rubbing alcohol (70% isopropyl alcohol is common). Spray lightly or wipe surfaces.
Let it sit for the contact time recommended on the product label (usually a few minutes). Rubbing alcohol evaporates quickly, so you might not need to rinse or dry after this step.
Step 8: Put Items Back
Once everything is clean, dry, and disinfected, you can start putting your items back. Arrange them neatly. Consider using shelf liners if you like.
This can make future cleanups even easier. You should feel good about your clean and safe storage space!
Real-World Cabinet Scenarios
Scenario 1: Sticky Jam Jar Leak. A jar of jam tipped over. Now there’s a sticky mess. A paste of baking soda and water works best.
Let it sit, then gently scrub. Rinse and dry. Scenario 2: Dusty Pantry Shelf. Just a bit of dust builds up over time.
Mild dish soap and water are perfect. A quick wipe down does the job. Dry well.
Scenario 3: Spilled Flour. Flour can get everywhere. First, vacuum or brush out as much as you can. Then, use a damp cloth.
A little soap helps. Dry completely.
Dealing with Different Types of Messes
Kitchen cabinets encounter all sorts of things. Sometimes it’s just dust. Other times, it’s a sticky spill or a dried-up drip.
Knowing how to handle each type of mess makes cleaning much simpler and more effective.
Sticky Residues: These are often from spilled jams, honey, syrups, or sauces. Your best bet here is a solution of warm water and mild dish soap. For really stubborn spots, a baking soda paste is excellent.
Apply the paste, let it sit for a few minutes to soften the residue, and then gently scrub with a soft cloth or sponge. Always rinse well to remove all baking soda and then dry.
Grease Splatters: Grease can find its way into cabinets, especially those near the stove. Dish soap is great for cutting through grease. You can also use a solution of equal parts water and white vinegar.
The vinegar helps break down the grease. Wipe down the area and then rinse with plain water and dry.
Dried-Up Spills: These can be tough. The key is to soften them first. Dampen a cloth with warm water and lay it over the dried spill for a few minutes.
This will rehydrate the residue, making it easier to wipe away. You might then follow up with your chosen cleaner and dry the area.
Food Stains: For general food stains from things like tomato sauce or berries, a mild soap solution or a vinegar solution often works. For tougher stains, especially on porous surfaces like unfinished wood, you might need to be more patient. A paste of baking soda might help lift these.
Always test first.
Mold or Mildew: If you spot any signs of mold or mildew, it’s important to act quickly. For small spots, a solution of equal parts water and white vinegar can help. Wipe the area with the vinegar solution and let it sit for an hour.
Then, wipe it clean with a damp cloth and dry thoroughly. For larger or persistent mold issues, you might need a stronger disinfectant or professional advice. Ensure good ventilation when dealing with mold.
Remember to always work from top to bottom when cleaning cabinets. This way, any dirt or cleaner you wipe off will fall onto an area you haven’t cleaned yet. And always, always dry the cabinets completely after cleaning to prevent moisture damage.
What This Means For Your Home
When is it Normal? A little dust is normal. Some minor smudges from jars are common. These happen in busy kitchens.
When to Worry? See mold or mildew. Notice strange smells. Find signs of pests.
These need attention. Simple Checks: Look inside cabinets monthly. Wipe up spills right away.
Check expiration dates often. These habits help.
When to Be Concerned About Cabinet Interiors
Most of the time, a little dirt or a minor spill inside your kitchen cabinets is no big deal. A good cleaning will sort it out. However, there are times when you should pay closer attention.
These signs suggest a bigger problem that needs addressing.
Persistent Odors: If you notice a musty, stale, or sour smell coming from your cabinets, even after cleaning, it could indicate hidden mold or mildew. Sometimes, it could be a sign of a leak behind the cabinets. Don’t ignore persistent bad smells.
Visible Mold or Mildew: Any fuzzy growth, whether black, green, or white, is a clear sign of mold. This is a health concern. It needs to be treated promptly.
Small spots can often be cleaned with vinegar, but if it’s widespread, you might need professional help.
Signs of Pests: Look for tiny droppings, gnaw marks, or actual insects. Pests like ants, roaches, or pantry moths can infest cabinets. This requires immediate action to clean thoroughly and prevent their return.
Water Damage: Warped wood, peeling veneer, or discoloration that looks like water stains can mean there’s a leak. This could be from a leaky pipe behind the wall or a spill that wasn’t properly dried. Water damage can weaken cabinet structures over time.
Sticky or Oily Film That Won’t Go Away: While some stickiness can be cleaned, a persistent oily film that returns quickly might indicate an ongoing issue, like grease build-up or even something less obvious. Ensure you are using the right degreaser if this is the case.
If you notice any of these issues, it’s important to investigate further. For mold or potential water damage, ensure the area is thoroughly dried and properly treated to prevent further issues. For pests, a thorough cleaning and sealing of potential entry points are usually necessary.
Quick Tips for a Cleaner Kitchen
Wipe Spills Immediately: Don’t let them dry. Use Shelf Liners: They catch drips and make cleaning easy. Choose washable ones.
Organize Items: Use bins and containers. This keeps things tidy. It also prevents spills from spreading.
Regular Check-ins: Look inside cabinets once a month. Catch problems early. Store Food Properly: Use airtight containers.
This stops pests and leaks.
Preventing Future Messes and Stains
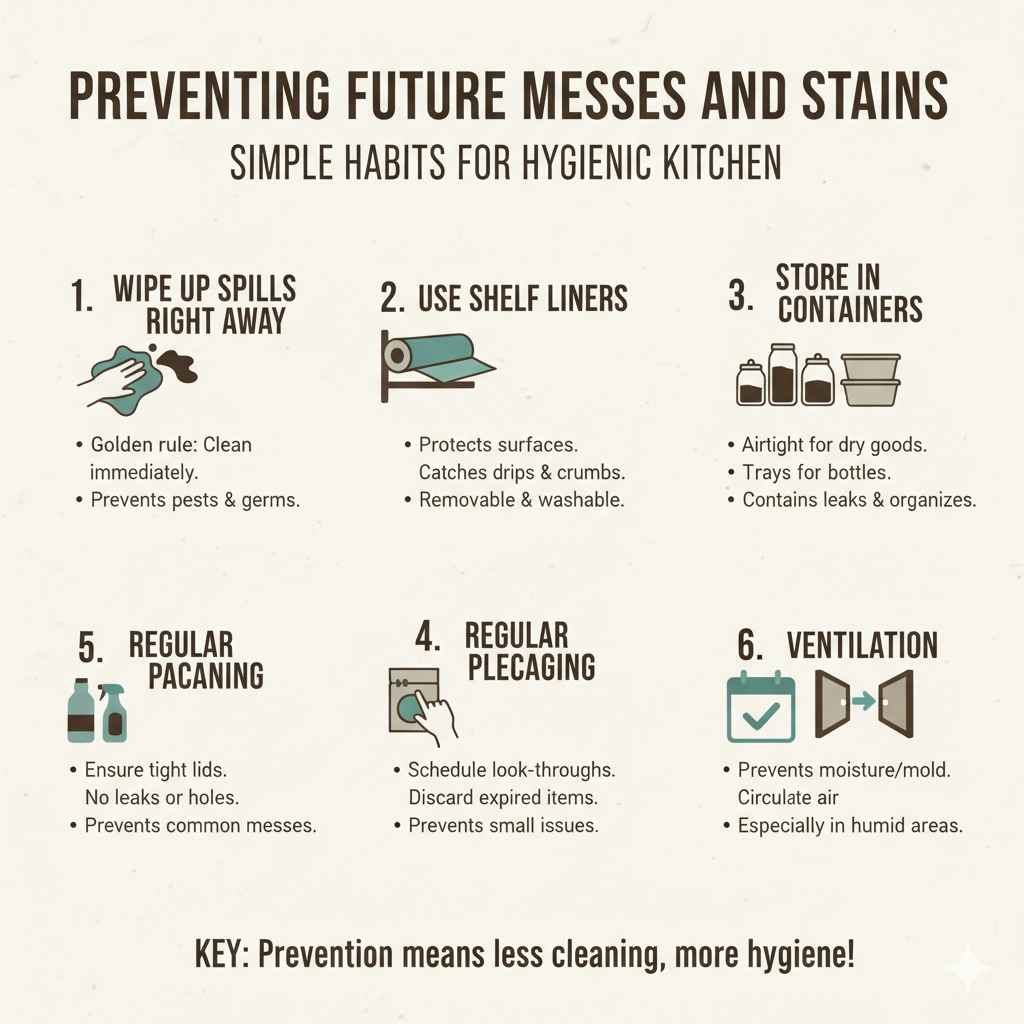
The best way to deal with cabinet messes is to prevent them from happening in the first place. A few simple habits can go a long way in keeping the inside of your cabinets clean and hygienic with less effort.
Wipe Up Spills Right Away: This is the golden rule. Whenever something spills inside a cabinet, grab a cloth and clean it up immediately. Don’t wait.
Dried-on spills are much harder to remove and can attract pests or become a breeding ground for germs.
Use Shelf Liners: Shelf liners are fantastic for protecting the cabinet surface. They catch drips from bottles, spills from jars, and crumbs from packages. When the liner gets dirty, you can simply lift it out, wash it, and put it back.
Many liners are washable or wipeable.
Store Items in Containers: Use airtight containers for dry goods like flour, sugar, cereal, and pasta. This prevents spills and also keeps pests out. Jars and bottles can also be placed in trays or bins.
This contains any potential leaks and makes it easier to keep things organized.
Check Packaging: Before putting items into cabinets, quickly check their packaging. Make sure lids are on tight. Ensure there are no leaks or holes in bags.
This small step can prevent many common messes.
Regular Decluttering and Cleaning: Schedule a quick look-through of your cabinets every few months. Discard expired items. Wipe down any sticky spots you might have missed.
This prevents small issues from becoming big problems.
Ventilation: In humid areas, good ventilation can help prevent moisture build-up inside cabinets, which can lead to mold. Leaving cabinet doors open occasionally can help air circulate.
By adopting these simple preventative measures, you’ll find that cleaning the inside of your kitchen cabinets becomes a much less daunting task. Your cabinets will stay cleaner for longer, and your food storage areas will be more hygienic.
Frequently Asked Questions About Disinfecting Cabinets
What’s the best way to clean wooden cabinet interiors?
For wooden cabinet interiors, start with a damp cloth and mild dish soap. Wring the cloth out very well so it’s not dripping. Wipe down the surfaces.
Then, use a dry cloth to ensure everything is completely dry. For tougher spots, a paste of baking soda and water can work, but always test first and rinse well. Avoid excess water, which can warp wood.
Can I use bleach to disinfect my kitchen cabinets?
It’s generally best to avoid using bleach on the inside of kitchen cabinets. Bleach is a very strong chemical. It can damage finishes, discolor wood, and leave behind fumes that aren’t ideal for food storage areas.
Milder disinfectants like rubbing alcohol or vinegar solutions are usually safer and just as effective for typical household needs.
How often should I disinfect my kitchen cabinets?
You don’t need to disinfect the inside of your cabinets every single time you clean them. A good practice is to do a thorough clean with soap and water every 3-6 months. Disinfection can be done as needed, perhaps when you notice a spill that might have harbored germs, or if someone in the house has been sick.
Regular wiping of spills is more important than frequent deep disinfection.
What about cleaning the inside of pantry cabinets?
Pantry cabinets are especially important to keep clean. The steps are similar: empty everything out, remove crumbs, wipe with a mild cleaner, rinse if needed, and dry completely. You can use a vinegar solution for a light disinfection.
Check for signs of pests like pantry moths or weevils. Using airtight containers for dry goods helps a lot.
Are commercial cabinet cleaners safe for the inside of cabinets?
Some commercial cabinet cleaners are safe for interiors, but you must read the label carefully. Many are designed for the exterior finish. Look for products that specify they can be used on interior surfaces.
When in doubt, it’s safer to stick to mild dish soap, water, or a vinegar solution. Always test any new cleaner in an inconspicuous spot.
My cabinets smell a bit musty. What can I do?
A musty smell often points to moisture. First, empty the cabinets completely and let them air out with the doors open for a day if possible. Wipe down all surfaces with a solution of equal parts white vinegar and water.
Let this sit for about an hour before wiping clean with a damp cloth and drying very thoroughly. Ensure good ventilation in your kitchen. If the smell persists, there might be a leak behind the cabinets that needs professional attention.
Final Thoughts on Cabinet Care
Keeping the inside of your kitchen cabinets clean is an essential part of a healthy home. It’s about more than just looks. It’s about ensuring the safety of your food.
By understanding your cabinet materials and using simple, safe cleaning methods, you can easily maintain a spotless and hygienic kitchen. Small, regular efforts prevent big problems. Your kitchen will be a cleaner, safer place for you and your family.