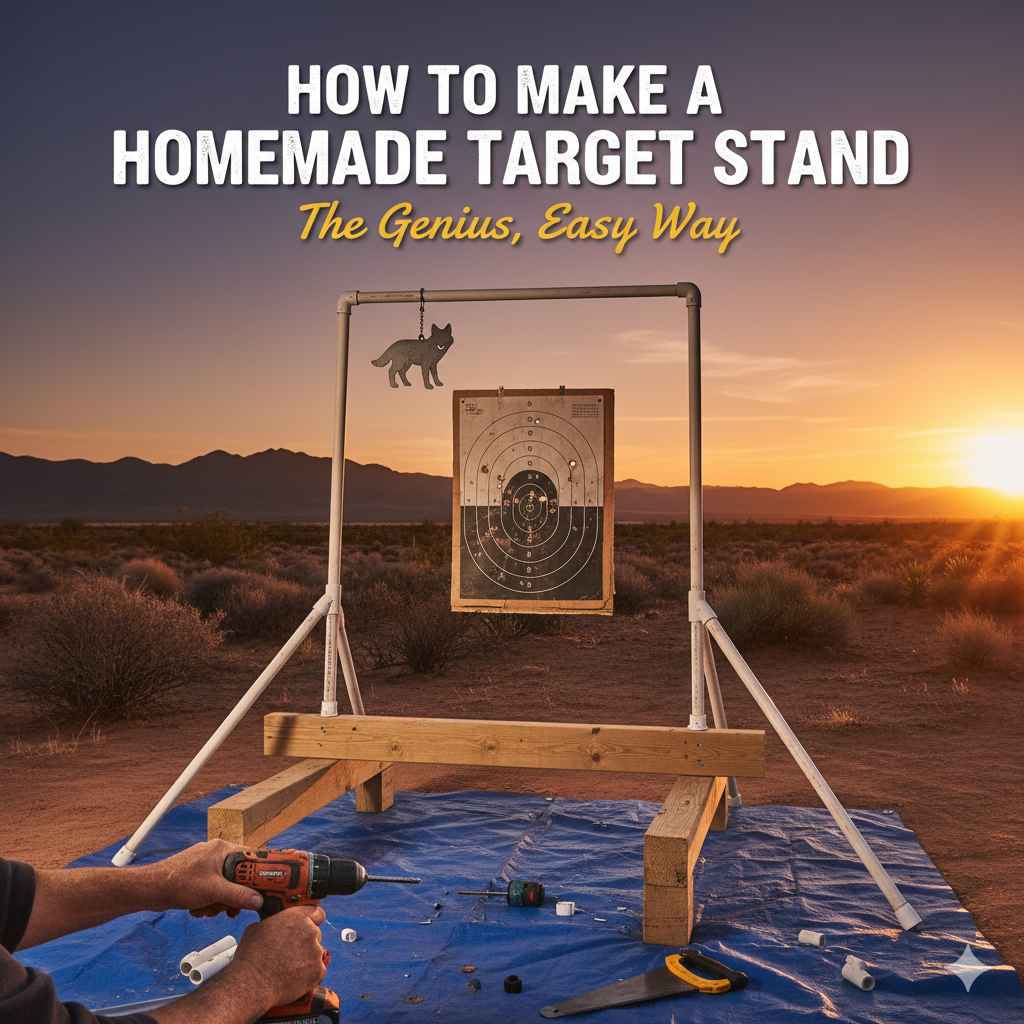
To make a genius, easy homemade target stand, cut a 10-foot PVC pipe into specific lengths for the base, legs, and uprights. Assemble the pieces using T-fittings and elbows without glue for easy disassembly. This simple, lightweight design is stable, portable, and perfect for holding archery targets securely for practice.
Hello, archers! Salman here. One of the best feelings in archery is having a great place to practice. But finding the perfect spot can be tricky, and commercial target stands can be expensive or bulky. It’s a common hurdle that stops many people from practicing as much as they’d like. What if you could build your own stand, one that’s sturdy, portable, and costs very little?
You absolutely can. I’m going to show you how to build a fantastic homemade target stand using simple materials. Forget complicated plans and confusing instructions. This guide is designed for everyone, with clear steps that make the process easy and fun. Let’s build something that will help you hit your mark, every time.
Why Build Your Own Target Stand?
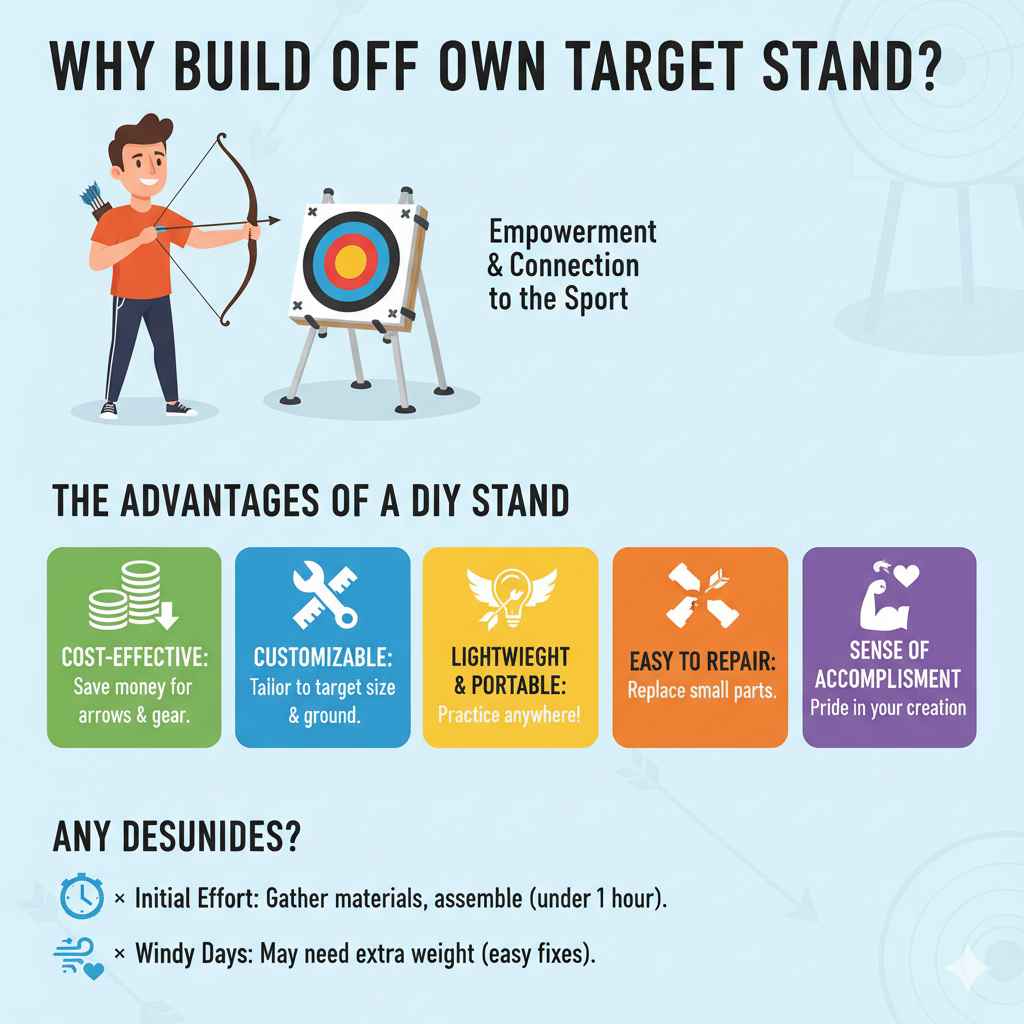
Before we grab our tools, let’s talk about why a DIY target stand is such a great idea. For a beginner, having control over your equipment is empowering. It connects you more deeply to the sport. Plus, there are some very practical benefits.
The Advantages of a DIY Stand
- Cost-Effective: This is the biggest win. You can build a high-quality stand for a fraction of the price of a store-bought one. You’ll save money that you can put toward better arrows or other gear.
- Customizable: Is your target an unusual size? Do you practice on uneven ground? When you build your own stand, you can tailor it to your exact needs. You can adjust the height, width, and even add features for extra stability.
- Lightweight and Portable: The design we’re building is incredibly light. You can easily take it apart, toss it in your car, and set it up at the park, in a field, or at a friend’s backyard. Practice anywhere!
- Easy to Repair: If a piece breaks (which is unlikely with durable PVC), you don’t have to buy a whole new stand. You can just replace the one small part for a couple of dollars.
- Sense of Accomplishment: There’s a special pride that comes from using something you built with your own hands. It makes every practice session a little more satisfying.
Are There Any Downsides?
It’s fair to consider the other side. The main challenge is the initial effort. You’ll need to gather materials and set aside a little time to cut and assemble the parts. However, the project we’re about to tackle can be completed in under an hour. For the windy days, a super lightweight stand might need some extra weight to keep it steady, but we have some easy fixes for that later on.
The Genius PVC Target Stand: Your Shopping List
The magic of this design is its simplicity. We will use PVC pipe, which is cheap, strong, and incredibly easy to work with. You can find everything you need at any major hardware or home improvement store. No special orders required!
I recommend using Schedule 40 PVC pipe with a 1.5-inch diameter. This size offers the perfect balance of strength and low weight. It’s strong enough to hold up heavy foam targets without bending but light enough to carry with one hand.
Here’s your complete shopping list:
| Item | Quantity | Notes |
|---|---|---|
| 1.5″ Schedule 40 PVC Pipe | 2 x 10-foot lengths | This gives you plenty of pipe with a little extra in case of a miscut. |
| 1.5″ PVC “T” Fittings | 4 | These will connect the legs to the base and uprights. |
| 1.5″ PVC 90-Degree Elbow Fittings | 2 | These will form the top corners of the stand. |
| 1.5″ PVC End Caps | 4 | These are for the feet, giving the stand a finished look and preventing dirt from getting in. |
Choosing Your Tools
You don’t need a fancy workshop for this. The tools are basic, and you might already have them at home.
- Measuring Tape: Essential for accurate cuts.
- Marker or Pencil: For marking your cut lines on the pipe.
- PVC Pipe Cutter or a Hacksaw: A PVC cutter is the best tool for clean, quick cuts. If you don’t have one, a simple hacksaw will work just fine.
- Sandpaper or a Deburring Tool (Optional): Useful for smoothing the edges of the pipe after you cut it. This ensures the fittings slide on easily.
Step-by-Step Guide to Building Your Target Stand
Alright, let’s get building! This process is as simple as measure, cut, and connect. We’ll create all the pieces first and then assemble them like building blocks. There’s no glue involved, which is the secret to making it so portable.
Step 1: Measure and Cut Your PVC Pipe
Accuracy here will make assembly a breeze. Lay your two 10-foot PVC pipes on a flat surface. Using your measuring tape and marker, mark all your cuts before you start cutting. This helps prevent mistakes. Here is your official cut list for a standard stand that can hold most large archery targets (around 36 to 48 inches wide).
The Ultimate PVC Cut List
| Part Name | Length | Quantity to Cut | Purpose |
|---|---|---|---|
| Uprights | 48 inches (4 feet) | 2 | These are the vertical poles that hold the target up. |
| Crossbar | 40 inches | 1 | This is the top horizontal bar connecting the uprights. |
| Legs | 24 inches (2 feet) | 2 | These form the front and back of the stand’s base. |
| Feet | 12 inches (1 foot) | 4 | These provide stability and form the wide base. |
Pro Tip: When you mark your cuts, draw a line all the way around the pipe. This will help you make a straight cut, especially if you’re using a hacksaw. For more tips on cutting PVC, this guide from The Home Depot offers excellent, easy-to-follow advice.
Once everything is marked, carefully cut each piece. If you’re using a hacksaw, try to make smooth, steady strokes. After cutting, you can use a piece of sandpaper to quickly smooth any rough edges on the inside and outside of the pipe opening. This little step makes a big difference for a snug, professional fit.
Step 2: Assemble the Base
Now for the fun part! Let’s put this puzzle together. We’ll start with the base, which is the foundation of your stand. It should look like a wide “H” when you’re done.
- Take one of your 24-inch Leg pieces.
- Push a T-fitting onto each end of the pipe. Make sure the middle opening of each T-fitting is pointing up, perpendicular to the leg piece.
- Now take two of your 12-inch Feet pieces. Push one into the open side of each T-fitting.
- Repeat this process with the other 24-inch Leg, the remaining two T-fittings, and the remaining two 12-inch Feet.
You should now have two identical assemblies that look like this: a 24-inch pipe with a T-fitting on each end, and a 12-inch foot sticking out from each T. Finally, place the four End Caps on the open ends of the four feet. This protects your pipes and gives the stand a clean, finished look.
Step 3: Build the Upright Frame
This is the part that will actually hold your target. It’s a simple rectangular frame.
- Take your 40-inch Crossbar piece.
- Push a 90-degree Elbow fitting onto each end. Make sure the open ends of the elbows are pointing in the same direction (downward).
- Now, take your two 48-inch Upright pieces.
- Insert one upright into the open end of each elbow fitting.
You should now have a large, U-shaped frame. This is the top section of your target stand.
Step 4: Put It All Together!
You’re just one step away. Now we connect the base to the upright frame.
- Take your U-shaped upright frame and stand it up.
- Take one of the base assemblies you made in Step 2.
- Line up the bottom of one of the 48-inch uprights with the upward-facing opening of a T-fitting on the base.
- Push the upright firmly into the T-fitting.
- Now, connect the second base assembly to the other upright in the same way.
That’s it! Your homemade target stand is now fully assembled. Give it a gentle shake to make sure all the pieces are seated firmly. It should be surprisingly stable and ready for action.
Customizing Your Stand and Making It Even Better
Your stand is great as is, but here are a few simple ways to upgrade it for your specific needs.
Hanging Your Target
How you hang your target depends on what kind of target you have.
- For Bag Targets: These usually have built-in straps. You can simply loop them over the top 40-inch crossbar. Easy!
- For Foam Block Targets: You can use long bolts with large washers (often called “fender washers”). Drill two holes through the top crossbar. Push the bolts through your foam target and then through the holes in the pipe. Secure them on top with another washer and a nut.
- For Cardboard or Paper Targets: The easiest way is to hang a large piece of cardboard from the crossbar using clamps or string. Then, you can pin or tape your paper targets to the cardboard backing. This protects your arrows if you miss the paper.
Adding Stability for Windy Days
Because the stand is so light, a strong gust of wind might knock it over. Here are two genius-level tricks to prevent that:
- Add Weight: Bring a couple of small sandbags or empty bags you can fill with dirt or rocks on-site. Place one over each of the 24-inch leg pieces on the base. This low center of gravity makes the stand incredibly stable.
- Stake It Down: Drill a hole through the PVC End Caps on the feet before you put them on. You can then drive a tent stake or a landscaping spike through the hole and into the ground.
Adjusting the Size
What if you get a smaller or larger target later? The beauty of this no-glue design is that you can change its size anytime. Want a wider stand? Just cut a longer crossbar. Need it to be shorter for a youth archer? Cut shorter uprights. You can have multiple sets of interchangeable pieces for different situations.
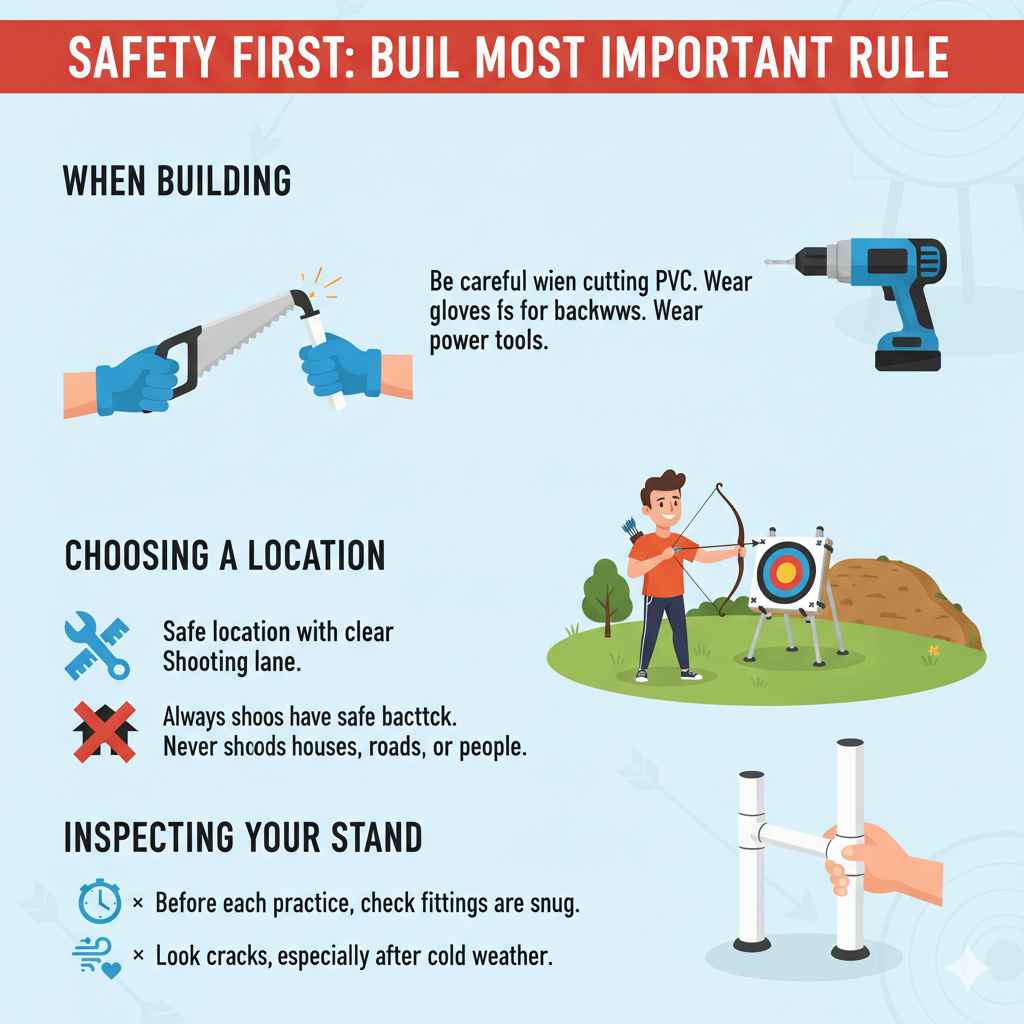
Safety First: Building and Using Your Stand
Safety is the most important rule in archery, and that applies to our equipment too. Here are a few things to keep in mind.
- When Building: Be careful when cutting the PVC. If using a hacksaw, wear gloves to protect your hands. If you are using power tools, always wear safety glasses.
- Choosing a Location: Always set up your target stand in a safe location. You need a clear shooting lane with a safe backstop behind the target. Never shoot in the direction of houses, roads, or areas where people might walk.
- Inspecting Your Stand: Before each practice session, give your stand a quick check. Make sure all the fittings are snug. PVC is very durable, but it’s good practice to look for any cracks, especially after a cold winter.
Frequently Asked Questions (FAQ)
1. What type of PVC glue should I use?
That’s the best part—you don’t need any! The genius of this design is that it’s a pressure-fit system. Not using glue makes it easy to disassemble for transport and storage. If you ever decide you want it to be permanent, you can use PVC primer and cement, but I recommend trying it without glue first.
2. Can this stand hold a heavy bag target?
Yes, absolutely. A 1.5-inch Schedule 40 PVC pipe is very strong and rigid. It can easily support the weight of most standard archery bag targets without bowing or bending. The wide base also provides excellent stability for heavier targets.
3. How do I make the stand more stable on a hill or uneven ground?
The four-footed base is already quite stable. However, on a slope, you can dig a small trench for the “uphill” feet to sit in, leveling the stand. Alternatively, you can place a flat rock or piece of wood under the “downhill” feet to prop them up. The sandbag trick also works wonders here.
4. Can I paint my PVC target stand?
You sure can! If you want to give it a custom look, you can paint it. Make sure to use a spray paint that is specifically designed for plastic. You’ll want to lightly sand the PVC surface first and wipe it clean to help the paint adhere properly. A camouflage or black matte finish looks great.
5. How much will all the materials cost?
Prices can vary slightly by location, but you can generally buy all the PVC pipes and fittings for this project for around $20 to $30. It’s an incredibly affordable solution compared to store-bought stands that can cost three or four times as much.
6. What if my target is wider than the stand?
No problem. The design is completely scalable. If your target is 48 inches wide, simply make your “Crossbar” piece about 48 inches long instead of 40 inches. You might also want to make the “Leg” pieces a little longer (e.g., 30 inches instead of 24) to maintain a stable footprint. You can adjust any dimension to fit your needs.
7. How do I store the stand when I’m not using it?
Just pull the pieces apart! The entire stand breaks down into a small bundle of pipes and fittings. You can tie them together with a bungee cord or a strap and store them easily in a garage, shed, or closet. It takes up very little space.
Your Next Step to Better Practice
Congratulations! You now have everything you need to know to build a simple, effective, and affordable homemade target stand. This project is more than just a way to save money; it’s a way to take control of your practice sessions. You’re no longer limited by what’s available at the store or whether you have a perfect tree to hang a target on.
Building this stand is a quick, rewarding project that will serve you for years to come. It’s the kind of practical tool that removes barriers and makes it easier to get out there and shoot. And every archer knows that more practice leads to better accuracy, more confidence, and a lot more fun.
So, head to the hardware store, grab your materials, and put aside an hour this weekend. You’ll be proud of what you built and excited for all the great shooting sessions ahead. Happy building, and shoot straight!