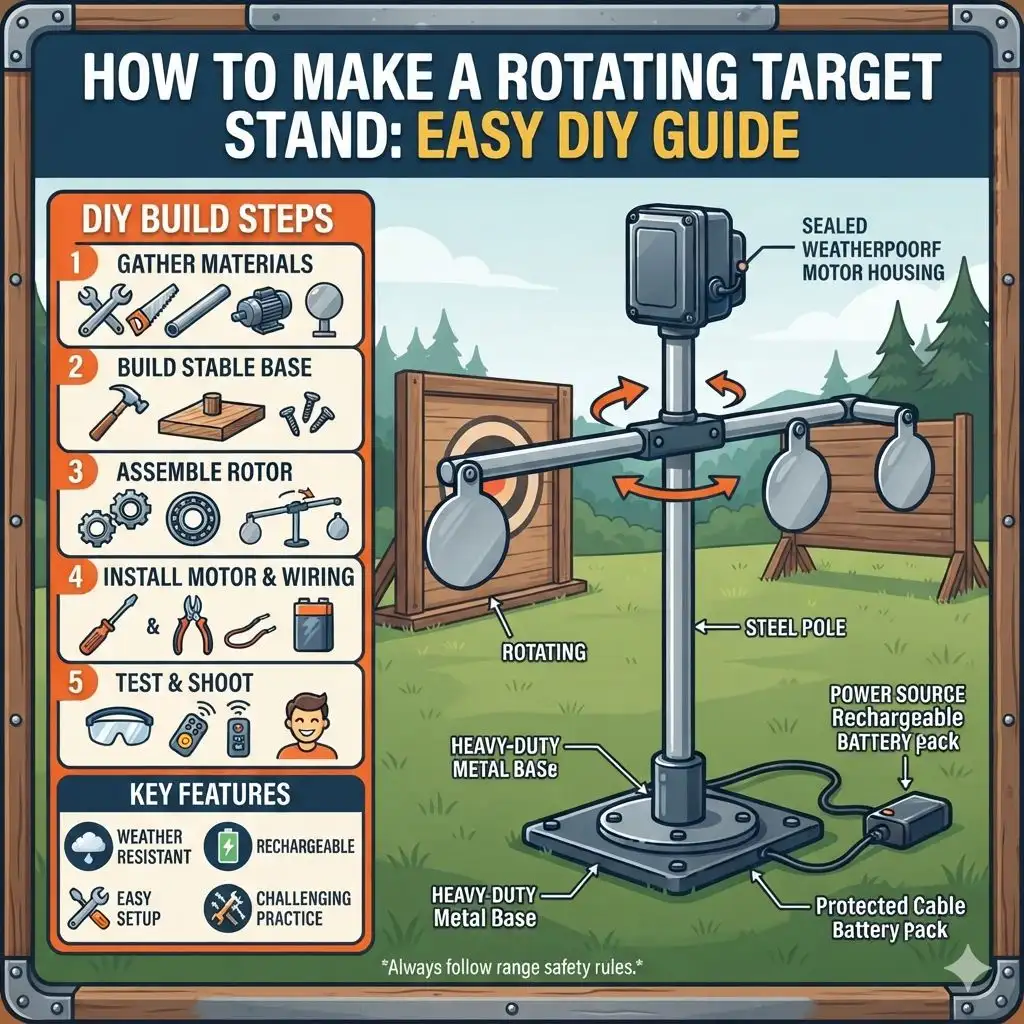
How To Make A Rotating Target Stand: Easy Diy Guide
Have you ever dreamed of having a target that spins on its own? It sounds like fun, right? Maybe you’re tired of manually resetting your targets.
Or perhaps you just want to add a new challenge to your shooting practice. Whatever the reason, building a rotating target stand can be a rewarding project. It’s not as hard as you might think.
This guide will walk you through it. We’ll make it simple and clear.
A rotating target stand is a shooting accessory that allows targets to spin or turn. This provides a dynamic and engaging shooting experience. It’s useful for improving accuracy and reaction time.
Building one yourself is a manageable DIY project.
What is a Rotating Target Stand?
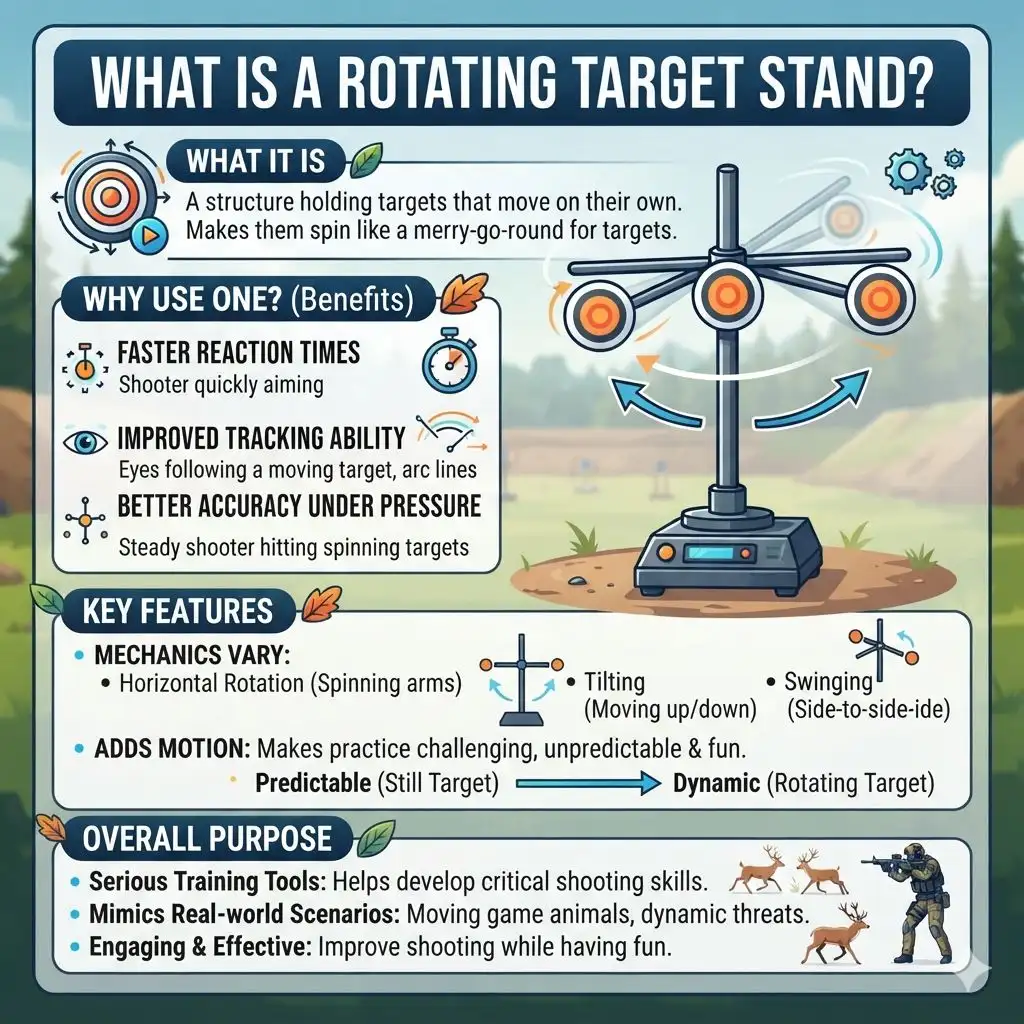
A rotating target stand is a structure. It holds targets that can move on their own. Instead of a plain, still target, this stand makes it spin.
Think of it like a merry-go-round for your targets. This adds a fun element to shooting. It also makes practice more challenging.
It’s a great way to step up your game.
Why would someone want one? Well, it changes how you shoot. You have to track a moving object.
This is very different from a still one. It mimics real-world situations better. For example, a game animal might move.
Or a threat might appear and then shift.
These stands are not just for fun. They are serious training tools. They help shooters develop crucial skills.
These include:
- Faster reaction times
- Improved tracking ability
- Better accuracy under pressure
- Enhanced focus
The mechanics can vary. Some rotate horizontally. Others might tilt or swing.
The core idea is to add motion. This motion makes the shooting task harder. It forces you to adapt.
It also makes practice less predictable.
Most DIY versions use simple motors or manual cranks. They are designed to be safe and effective. The goal is always to improve your shooting.
But to do it in a way that is also engaging.
My Own Target Stand Adventure
I remember the first time I saw one. It was at a local gun club. A fellow shooter had this amazing setup.
His targets were spinning and popping up. It looked like something out of a spy movie. I was immediately intrigued.
I’d been shooting for years. I thought I was pretty good. But seeing that made me realize there was more.
My own practice had become a bit stale. I’d hit the same paper targets. I knew exactly where they would be.
My scores were consistent, but my excitement was fading. I wanted a new challenge. I wanted to feel that thrill again.
I watched his setup for a while. It seemed complicated. I thought it would cost a fortune.
But he told me he built it himself. He said it was surprisingly easy. He gave me a few pointers.
He suggested I start simple. He said not to aim for a Hollywood-level contraption right away. Just something that spins would be great.
That night, I couldn’t stop thinking about it. I went to my garage. I looked at all my tools.
I rummaged through my scrap wood pile. Ideas started clicking. What if I used a small electric motor?
What if I mounted it on a simple frame? I got a piece of plywood. I found some old plumbing pipes.
I sketched out a basic design. It wasn’t fancy. But it had the core idea: a spinning target.
The first attempt was, well, a learning experience. The motor was too weak. The plywood wobbled.
The target spun erratically. It was almost comical. But even with its flaws, it was exciting.
Seeing that target move was a game-changer. It pushed me to refine the design. I learned a lot that weekend.
I learned about balance. I learned about motor torque. Most importantly, I learned that DIY projects don’t need to be perfect to be useful and fun.
Key Components for a Simple Rotating Stand
Base: Needs to be sturdy and heavy. Think wood or metal. It stops the stand from tipping over.
Motor: A low-speed, high-torque DC motor works well. You can find these online or at electronics stores. Battery-powered is often easiest.
Target Holder: This is what the actual target attaches to. It needs to connect to the motor shaft.
Power Source: Batteries are common. Make sure they can power the motor for a good amount of time.
Frame: Connects the base, motor, and target holder. Wood or PVC pipes work well.
Choosing Your Materials
When you decide to build something like this, the first step is gathering your supplies. This is where you can get creative. You don’t need a specialized store.
Many items can be found around your home or at a hardware store. Think about what you already have. This can save you money.
For the base, stability is key. You don’t want your stand wobbling. A sturdy piece of plywood is a great choice.
You can also use metal plating if you have access to it. The heavier the base, the better. It will absorb vibrations from the motor and the target.
A good size might be around 12×12 inches or larger. You can also attach legs to the base. This lifts it off the ground.
It makes it easier to transport.
The motor is the heart of the operation. You need a motor that turns slowly but has enough power. This is called torque.
A low RPM (revolutions per minute) motor is best. Think 5 to 30 RPM. Too fast, and the target will be a blur.
Too slow, and it won’t be much of a challenge. You can find these electric motors online. They often run on batteries, which is convenient.
Look for ones that come with a geared down output shaft.
The target holder is what the actual target will attach to. It needs to be strong. It also needs to connect securely to the motor shaft.
You could use a metal plate. You could use a sturdy piece of plastic. Even a thick piece of wood can work if the target is not too heavy.
Make sure it’s easy to swap out targets.
For the frame that connects everything, think about simple materials. PVC pipes are lightweight and easy to cut. They are also quite strong.
You can use standard fittings to create a robust structure. Wood is another good option. You can build a simple wooden frame with screws.
Consider how high you want the target to spin. This will determine the length of your frame pieces.
Don’t forget fasteners! You’ll need screws, nuts, bolts, and washers. These hold everything together.
Electrical tape or zip ties might be useful for wiring. Safety is also important. Consider adding a cover for the motor and gears.
This protects them and prevents accidental contact.
Quick-Scan Material List
| Component | Suggested Material | Why |
|---|---|---|
| Base | Plywood, Metal Plate | Stability, Weight |
| Motor | Low-RPM Geared DC Motor | Slow, steady rotation |
| Target Holder | Metal Plate, Thick Plastic | Secure attachment, durability |
| Frame | PVC Pipes, Wood | Structure, height adjustment |
| Fasteners | Screws, Nuts, Bolts | Assembly |
Essential Tools for Building
You don’t need a professional workshop. Most common household tools will do. Having the right tools makes the job much easier.
It also helps ensure a cleaner, safer build. Always remember to wear safety glasses. This is especially important when cutting or drilling.
First, you’ll need tools for cutting. A saw is essential. This could be a handsaw for wood or PVC.
If you’re working with thicker materials, a power saw like a jigsaw or circular saw might be helpful. A good utility knife can also be useful for smaller cuts.
Drilling is another key step. You’ll need a drill. A cordless drill is very handy.
You’ll also need drill bits of various sizes. These are for making holes for screws and bolts. A step drill bit can be useful for making larger holes cleanly.
Measuring and marking tools are critical. A tape measure is a must. A carpenter’s square helps ensure straight lines and right angles.
A pencil or marker will be used to mark your cutting and drilling points.
For assembly, you’ll need screwdrivers that match your screws. Pliers are always useful for holding small parts or bending wire. A wrench or socket set will be needed if you are using bolts and nuts.
If you are working with electrical components (the motor and battery), you might need wire strippers. Small gauge wire cutters are also handy. Soldering iron and solder are optional but can create more secure electrical connections.
Safety gear is non-negotiable. Always wear safety glasses. Work gloves can protect your hands.
If you’re doing a lot of sawing or drilling, hearing protection might be a good idea.
DIY Tool Checklist
Cutting: Handsaw, Jigsaw (optional)
Drilling: Cordless Drill, Drill Bits
Measuring: Tape Measure, Carpenter’s Square
Assembly: Screwdrivers, Pliers, Wrenches
Electrical (if needed): Wire Strippers, Wire Cutters
Safety: Safety Glasses, Gloves
Step-by-Step: Building Your Rotating Target Stand
Let’s get down to building. This process assumes a basic design. You can adapt it to your specific needs.
The goal is a functional, spinning target. We’ll keep it simple and clear. Remember to measure twice and cut once.
Step 1: Prepare the Base
Take your piece of plywood. Cut it to your desired size. A 12×12 inch square is a good start.
You can also add four legs to the bottom. Cut four equal lengths of wood or PVC. Attach them to the corners of the base.
This makes it more stable and easier to lift.
Drill a hole in the center of the base. This hole should be big enough for the motor shaft to pass through. You might need a larger hole if you’re mounting the motor on top of the base.
Ensure the hole is precisely in the center.
Step 2: Mount the Motor
You have a few options here. You can mount the motor directly onto the top of the base. Use sturdy screws and possibly metal brackets.
The motor shaft should point upwards. The hole you drilled in the base should align with this shaft.
Alternatively, you can mount the motor underneath the base. The shaft will then come up through the hole. This hides the motor.
It can make the setup look cleaner. Ensure the motor is securely fastened. It should not move or vibrate excessively on its own.
If your motor has gears, make sure they are protected. You might want to build a small housing around the motor. This protects it from dust and minor impacts.
Step 3: Create the Target Holder
Take your metal plate or thick plastic piece. This is where your target will attach. Drill a hole in the center of this piece.
This hole must fit snugly onto your motor shaft. You want a tight fit. This ensures the target spins smoothly.
You might need to use a set screw or a strong adhesive to secure the holder to the shaft.
Consider how you’ll attach targets. You could drill holes in the holder. You can then use bolts or clips to attach paper targets or reactive targets.
Make sure the holder is balanced. An unbalanced holder will cause unwanted shaking.
Step 4: Build the Frame (Optional but Recommended)
A frame can add height and stability. You can use PVC pipes and fittings for this. Cut two pieces of PVC for the vertical supports.
The length depends on how high you want your target. Cut a piece for the horizontal top piece. Use T-fittings and elbow fittings to connect them.
This frame can attach to the base. You might use screws or brackets. The motor might then be mounted onto this frame instead of the base.
This allows for easier height adjustment.
Step 5: Connect the Motor and Power
If you haven’t already, connect your motor to its power source. This is usually a battery pack. Follow the motor’s wiring diagram.
Most DC motors have two terminals. Connect the positive and negative wires from the battery pack to these terminals. You might want to add a switch.
This lets you turn the rotation on and off easily.
Test the motor. Does it spin? Is it too fast or too slow?
You might need to adjust the gearing or the power source. Ensure all connections are secure. Use electrical tape to insulate any exposed wires.
Step 6: Attach the Target Holder and Test
Slide your target holder onto the motor shaft. Secure it tightly. If it’s a loose fit, the target might slip or spin unevenly.
Make sure it’s centered. Turn on the motor. The target holder should spin smoothly.
Now, attach a practice target. A simple paper target works well for testing. Turn on the motor again.
Watch how it spins. Does it wobble? Is the speed consistent?
Make any necessary adjustments to balance the holder or tighten connections.
Building Tips
Tip: Start with a simple design. You can always add more features later.
Tip: Use a spirit level to ensure your base is flat.
Tip: Test the motor speed before committing to a permanent setup.
Tip: Consider a removable target holder for easy target changes.
Tip: Ensure all moving parts are covered for safety.
Real-World Context and Scenarios
Where do you use a rotating target stand? Most people use them outdoors. This is for shooting practice.
Think of a backyard range. Or a designated shooting area on private land. It’s important to have a safe backstop.
This stops bullets from going where they shouldn’t.
The environment matters. You need enough space. You also need to consider wind.
Strong winds can make the target sway unpredictably. This can add an unintended challenge. For basic practice, a calm day is best.
You want to control the variables.
Habits also play a role. If you shoot regularly, this stand can make practice more engaging. It breaks the monotony.
It keeps you sharp. Many competitive shooters use these. They use them to simulate dynamic target acquisition.
This is crucial for certain shooting disciplines.
The design of your stand influences its use. A lightweight, portable stand is good for moving between spots. A heavier, more permanent setup might be better for a dedicated range.
Consider the types of targets you use. Some targets are lighter. Others are heavier and might require a stronger motor or a more robust holder.
User behavior is important too. Always follow firearm safety rules. Never point a firearm at anything you do not intend to shoot.
Be aware of your surroundings. Ensure no one is in the line of fire. When using a rotating target, be mindful of the direction it might spin.
You might also use this for training other skills. Like decision-making under pressure. Imagine targets appearing and disappearing.
You have to decide when to engage. This builds mental discipline. It’s more than just marksmanship.
What This Means for Your Practice
So, what’s the big deal about a rotating target? It fundamentally changes your shooting practice. Instead of static targets, you’re dealing with motion.
This forces you to think differently. It makes you more adaptable.
When is it normal to use one? Any time you want to improve your skills beyond basic accuracy. When you feel your practice is getting boring.
When you want to simulate more realistic scenarios. It’s great for developing speed and reaction. It’s also excellent for improving your ability to track moving objects with your sights.
When should you worry? You don’t need to worry about the stand itself if built correctly. The worry comes with safe shooting practices.
Always ensure your setup is stable. Make sure the motor isn’t overheating. And always, always check your backstop.
A spinning target might present an unpredictable ricochet risk if you miss. This is why a good backstop is crucial.
Simple checks for your stand: Does it spin smoothly? Is the motor running well? Are all the connections tight?
Is the base stable? Does it feel solid when it’s running?
For your shooting: Are you able to track the target? Are you hitting it consistently? Are you improving your reaction time?
Are you feeling more engaged during practice?
This tool can elevate your skills. It adds a new dimension to shooting. It makes practice fun again.
It pushes you to be a better shooter.
Quick Fixes and Tips for Better Performance
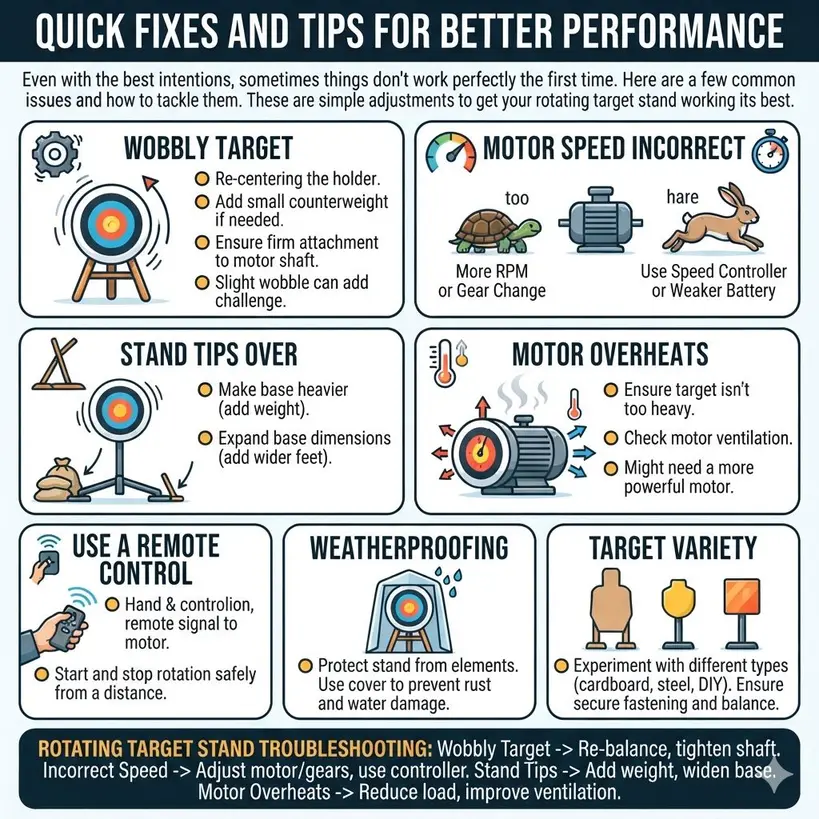
Even with the best intentions, sometimes things don’t work perfectly the first time. Here are a few common issues and how to tackle them. These are simple adjustments to get your rotating target stand working its best.
Issue: Wobbly Target. This usually means the target holder isn’t balanced or isn’t securely attached. Try re-centering the holder. Add a small counterweight if needed.
Ensure it’s firmly attached to the motor shaft. Sometimes, a slight wobble is okay. It adds an extra challenge.
Issue: Motor is Too Slow or Too Fast. If too slow, you might need a motor with more RPM. Or you could change the gear ratio if your motor allows. If too fast, you can often find speed controllers for DC motors.
These let you dial in the perfect speed. Sometimes, using a slightly weaker battery can also reduce speed.
Issue: Stand Tips Over. Your base is likely too light or too small. Make it heavier. Add more weight to the base.
Or expand the base dimensions. Adding wider feet can also increase stability.
Issue: Motor Overheats. This could mean the motor is struggling. It might be under too much load. Or it could be a faulty motor.
Ensure the target isn’t too heavy for the motor. Check that the motor is getting enough ventilation. If it keeps overheating, you might need a more powerful motor.
Tip: Use a Remote Control. For added convenience and safety, consider using a wireless remote control for your motor. This lets you start and stop the rotation from a distance.
Tip: Weatherproofing. If you plan to leave your stand outside, consider ways to protect it from the elements. A simple cover can prevent rust and water damage.
Tip: Target Variety. Don’t be afraid to experiment with different types of targets. Cardboard, steel, or even DIY reactive targets can be attached. Just ensure they are securely fastened and balanced.
Rotating Target Stand Troubleshooting
Problem: Wobbly Target.
Fix: Re-balance holder, tighten shaft connection.
Problem: Incorrect Speed.
Fix: Adjust motor/gears, use speed controller, try different battery.
Problem: Stand Tips.
Fix: Add weight to base, widen base footprint.
Problem: Motor Overheats.
Fix: Reduce target weight, improve motor ventilation, get stronger motor.
Frequently Asked Questions
What kind of motor is best for a rotating target stand?
A low-speed, high-torque DC gear motor is usually best. Look for one that spins between 5 and 30 RPM. These provide a steady, manageable rotation for targets.
How can I make my target stand more stable?
The best way is to use a heavier base. A wider base also helps prevent tipping. You can add legs to the base for extra stability, especially on uneven ground.
Can I use any type of target with a rotating stand?
You can use most paper targets. For heavier targets, like steel plates, ensure your motor has enough power and torque. Always attach them securely to prevent them from flying off.
How fast should the target rotate?
This depends on your skill level and the type of practice. A speed of 10-20 RPM is a good starting point for many shooters. You want it to be challenging but not impossible to hit.
Is it safe to build and use a rotating target stand?
Yes, if built and used correctly. Always follow firearm safety rules. Ensure your stand is stable and the motor is safely enclosed.
Always use a proper backstop for your shooting area.
What are the main benefits of using a rotating target stand?
It makes practice more engaging and challenging. It helps improve reaction time, tracking skills, and accuracy under dynamic conditions. It simulates moving targets found in hunting or tactical scenarios.
Conclusion
Building a rotating target stand is a fantastic project. It combines practical skills with a fun outcome. You’ve learned about materials, tools, and steps.
You now have the knowledge to create your own. This stand will make your shooting practice more dynamic. It’s a great way to challenge yourself.
Enjoy the process, and happy shooting!